Rx Systems AutoSealer 1002 User manual

User Guide
AutoSealer
1002
Operation & Service
121 Point West Boulevard
St. Charles, MO 63301
1-800-922-9142
fax:1-636-925-0041
RxSystems.com

1. Introduction page 1
2. Specifications and Features page 2
2.1 Specifications page 2
2.2 Features page 2
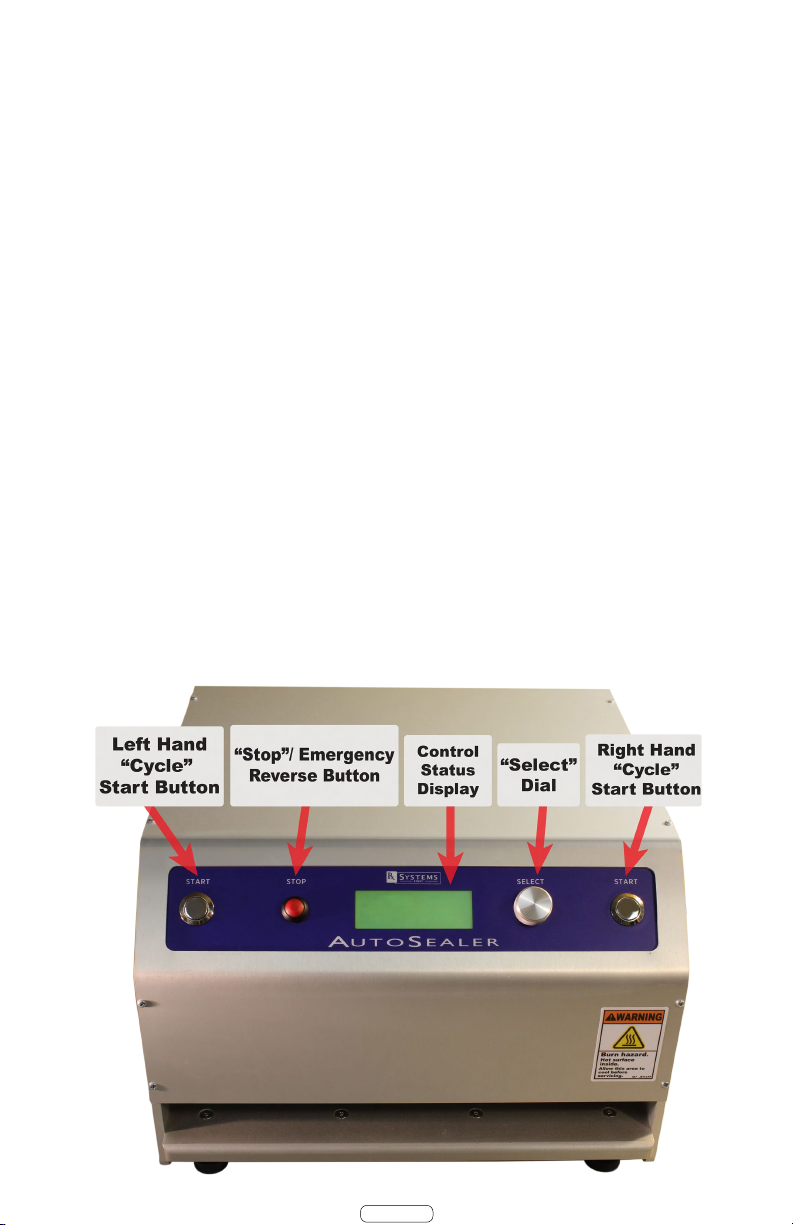
3. Identification of Controls page 3
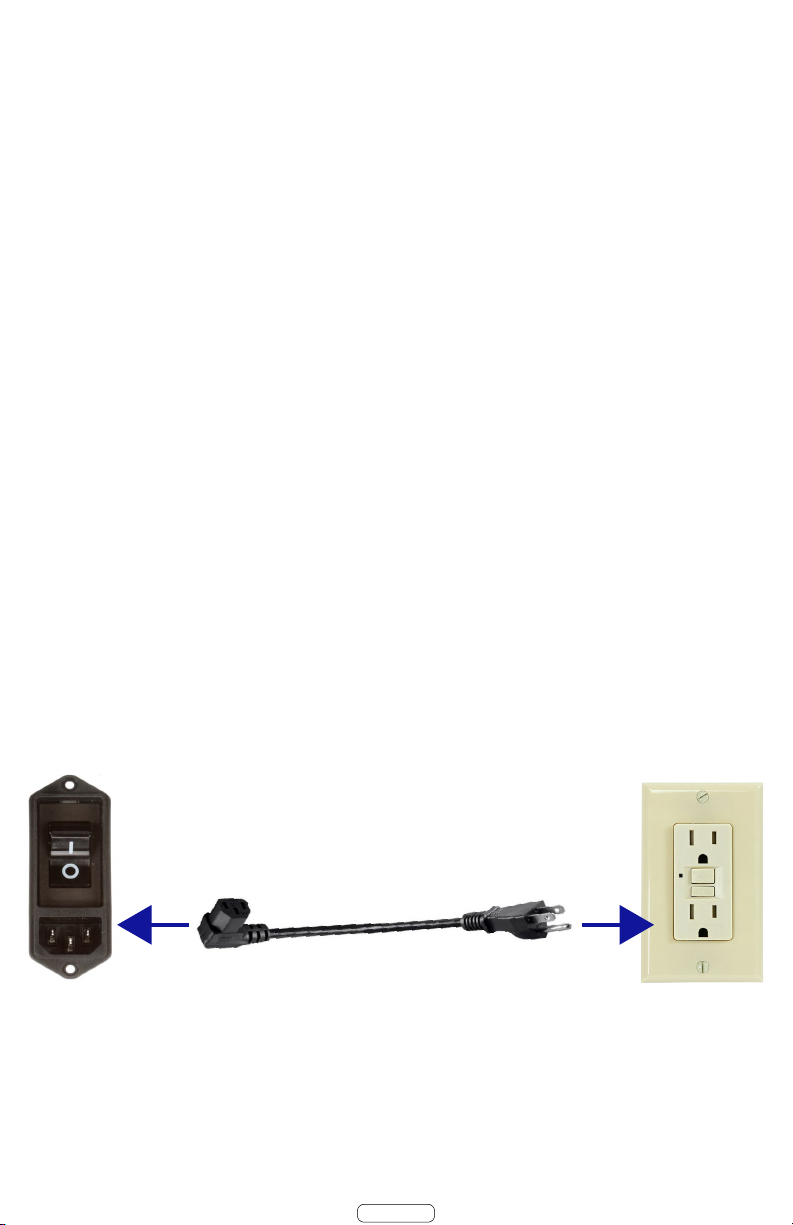
3.1 Power Inlet Module page 3
3.2 Cooling Fan And Air Intakes page 3
3.3 Select Dial page 4
3.4 Control Status Displaypage 4
3.5 Red Stop / Emergency Button page 4
3.6 Cycle / Start Buttons page 4
4. Initial Setup page 5
4.1 Remove from Packaging page 5
4.2 Place in New Homepage 5
4.3 Plug In page 5
5. Daily Power Up Routine page 6
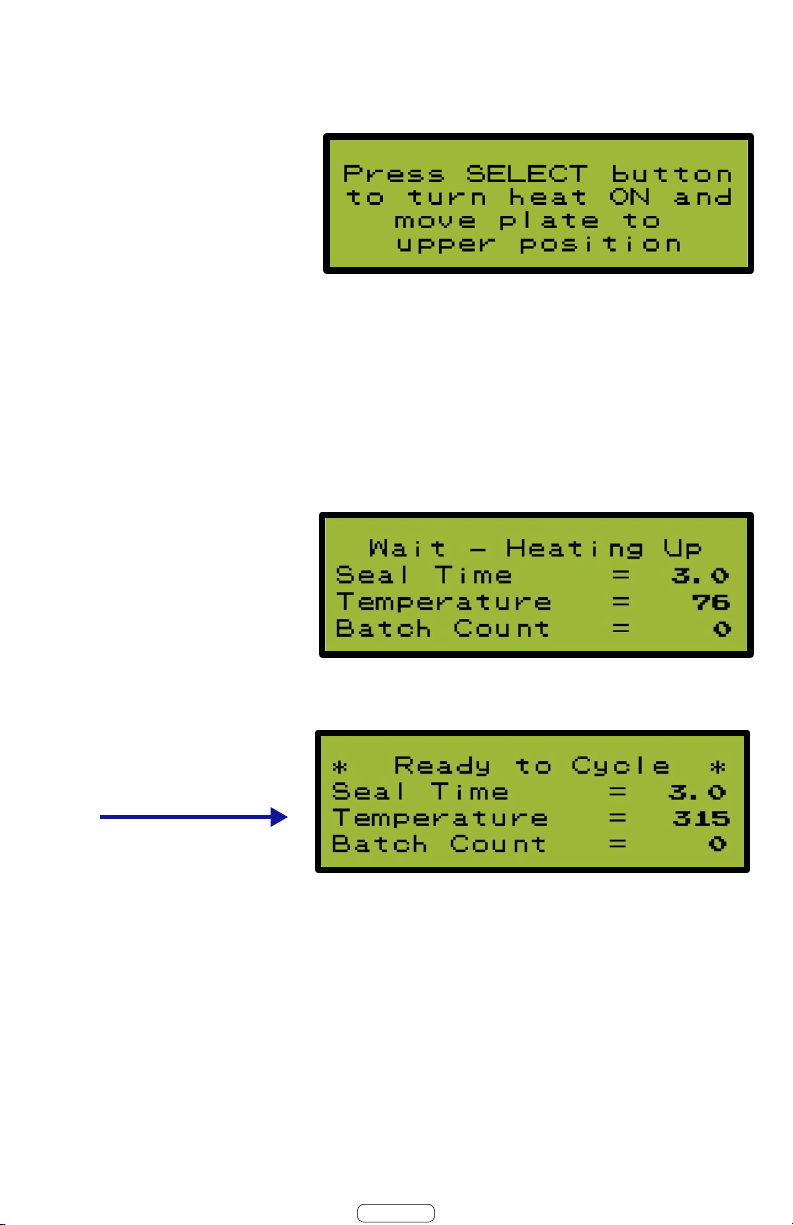
5.1 Turn On page 6
5.2 Press Select Dialpage 6
5.3 Allow to Heat Up page 6
5.4 Ready to Use page 6
6. Daily Operation page 7
6.1 Prepare Pill Cards page 7
6.2 Insert Pill Cards page 7
6.3 Press Cycle Buttons page 7
6.4 Allow Seal Time to Completepage 7
6.5 Remove Pill Cards page 7
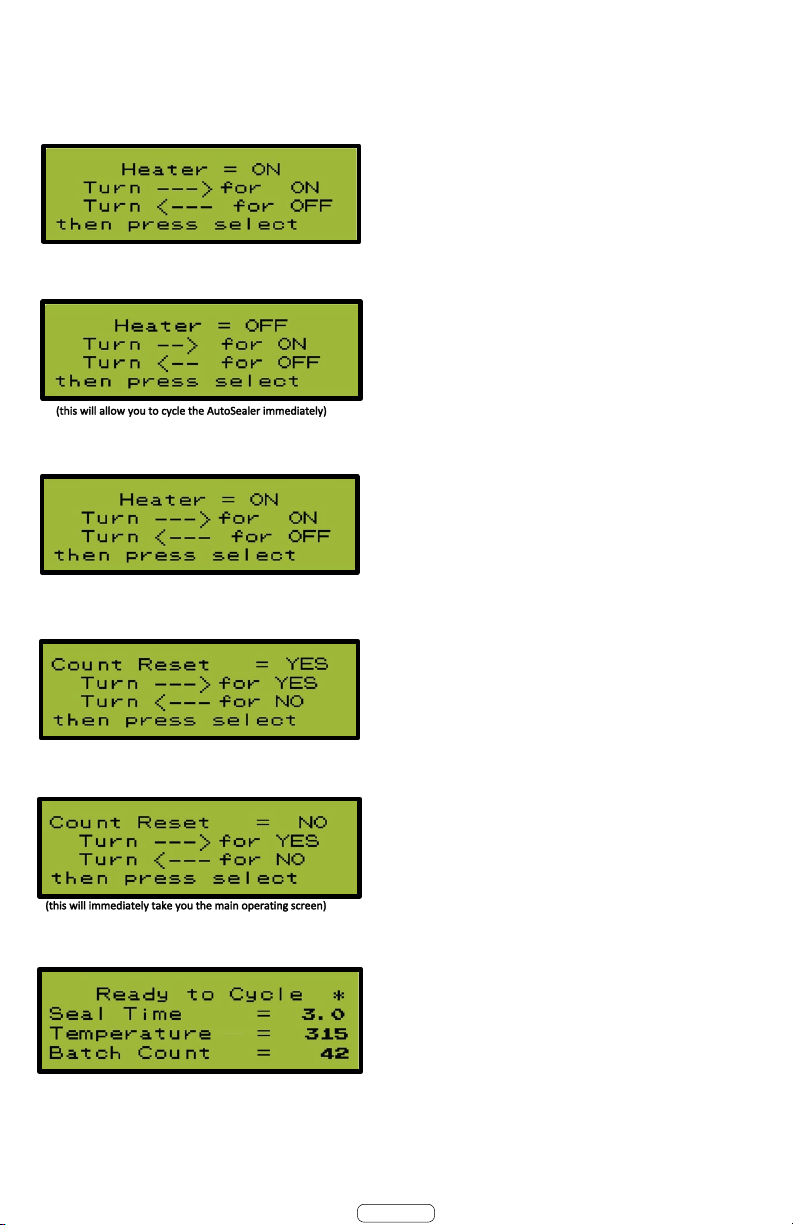
7. Understanding the Menu (User Controls) page 8
7.1 Heat O and On page 8
7.2 Reset Batch Countpage 8
7.3 Return to Main Operating Screenpage 8
8. Understanding the Menu (Admin Controls) page 9
8.1 Set Temperature page 9
8.2 Set Seal Time page 9
8.3 System Maintenance page 9
8.4 Return to Main Operating Screenpage 9
9. Parts List page 10
10. Troubleshooting page 11
11. Schematic page 12
12. Accessories page 13,14,15
13. Warranty page
14. Maintenance Log page 20
16,17,18,19
Table of Contents

Rx Systems, Inc is very pleased you
decided to join the growing number of AutoSealer owners.
This User Guide will make you familiar with the features, operating
principles, procedures, necessary maintenance and
troubleshooting of the Rx Systems AutoSealer.
With proper care and maintenance you can expect years of
trouble free service.
1. Introduction
Page 1

2.1 Specifications
• Length: 14.5"
• Width: 17"
• Height: 9.75"
• Weight: 47 lbs
• Electrical: 115 VAC, 12 Amp, 1380 Watts, 60 Hz
2.2 Features
• Controlled Temperature, Time and Pressure for a worry-free
Seal.
• Adjustable Sealing Time and Temperature
• Automatic Pressure Adjustment: consistent seal for most card
sizes and blister depths.
• Safe two hand operation.
• Emergency Shuto.
• All electric, no compressor required.
• Energy ecient.
• Air cooled outer shell, insulated heat plate.
• Minimal moving parts provide reliable operation.
• Easy access and quick change parts for routine maintenance,
when required.
• Presents Live Batch / Cycle Count.
• Flattop design provides additional work space.
• Unique Paddles reduce moisture during seal.
2. Specifications and Features
Page 2

2.1 Specifications
• Length: 14.5"
• Width: 17"
• Height: 9.75"
• Weight: 47 lbs
• Electrical: 115 VAC, 12 Amp, 1380 Watts, 60 Hz
2.2 Features
• Controlled Temperature, Time and Pressure for a worry-free
Seal.
• Adjustable Sealing Time and Temperature
• Automatic Pressure Adjustment: consistent seal for most card
sizes and blister depths.
• Safe two hand operation.
• Emergency Shuto.
• All electric, no compressor required.
• Energy ecient.
• Air cooled outer shell, insulated heat plate.
• Minimal moving parts provide reliable operation.
• Easy access and quick change parts for routine maintenance,
when required.
• Presents Live Batch / Cycle Count.
• Flattop design provides additional work space.
• Unique Paddles reduce moisture during seal.
3.1 Power Inlet Module
• All in One; Power Plug, Power Switch and Breaker
• Use Approved Power Cord Only (provided).
3.2 Cooling Fan & Air Intake Vent
• Cool air from Air Intake Vent flows through the
AutoSealer and exhausts from Cooling Fan; keeping the
internal components and cover cool.
• Do not impede or block the Cooling Fan or Air Intake
Vent.
3. Identification of Controls
Page 3

3. Identification of Controls (continued)
Page 4
3.3 Select Dial
Used to Interact with AutoSealer Menu.
When instructed, do one of the following;
• Press & Release
• Press & Hold
• Twist Left or Twist Right
3.4 Control Status Display
• Shows Live; Status, Operation, Temperature, Seal Time and
Batch Count.
3.5 Red Stop / Emergency Button
• Stops or Reverses Cycle
3.6 Cycle/ Start Buttons
• Start the Cycle, by pressing Both buttons at the
same time.
Two Handed Operation for Safety.

4. Initial Setup
4.1 Remove the AutoSelaer from it's packaging.
• If ordered, a Sealing Paddle will be (packaged) on top.
• For future shipping purposes, save all of the packaging
materials.
• This approved packaging is required for shipping.
• Remove the Cardboard Insert from inside the mouth of the
AutoSealer before operating machine.
4.2 Place AutoSealer in it's new home.
• Leave a sucient amount of space around the
AutoSealer area.
• Do not impede or block the Cooling Fan or Air Intake
Vents.
4.2 Plug the AutoSealer into a standard grounded outlet.
• Use Approved Power Cord Only (provided).
-It is recommended to use a dedicated 15 amp outlet.
Page 5

5.1 Turn the Power Switch ON.
5.2 Press & Release the Select Dial to Turn Heat ON &
Raise Heat Plate.
5.3 Allow the AutoSealer to heat up 10 to 15 minutes.
AutoSealer will not operate until it is up to set temperature.
When the AutoSealer is
ready the screen will show
5.4 Your AutoSealer is now ready for operation.
Note:
Your New AutoSealer is preprogrammed to seal all Rx
Systems heat seal pill cards. This User Guide will cover settings
& adjustments on a seperate page.
5. Daily Power Up Routine
Page 6

6.1 Prepare pill cards in sealing paddle and close the pill card.
6.2 Insert sealing paddle into AutoSealer.
6.3 Press both Cycle Buttons at the same time.
The AutoSealer will now apply heat & pressure to the pill cards.
This two handed action is for safety
6.4 The heat plate will return when it is complete. The default
seal time is 3 seconds.
6.5 Remove paddle as the pill cards are now sealed.
During this operation
the screen will show
When complete the
screen will return to
6. Daily Operation
The AutoSealer will automatically seal pill cards at a constant
temperature and pressure over a set time - you only need to
push both cycle buttons to start the sealing cycle. However,
before you do there are some preperations you need to
make.
Page 7

7.1 Heat O & On
7.2 Batch Count
7.3 Return to Main Operating Screen
7. Understanding the Menu (User Controls)
Press and Hold the Select
Dial for 1 Second
To turn the Heat ON
Twist Select Dial Right
To turn the Heat OFF
Twist Select Dial Left
Press and Release the Select Dial
To NOT Reset the Batch Count
Twist Dial Left
7.3 Press and Release the Select
Dial to return to the main
operating screen
To Reset the Batch Count
Twist Select Dial Right
Page 8

8.1 Temperature adjustment
8.3 System Maintenance
8. Understanding the Menu (Admin Controls)
Press and Hold the Stop Button
AND the Select Dial for 1 Second
To Decrease the Temperature
Set Point Twist Select Dial Left
Press and Release the Select Dial
8.2 Seal Time Adjustment
Press and Release the Select Dial to
show the System Maintenance Screen
To Increase the Temperature
Set Point Twist Select Dial Right
To Decrease the Seal Time
Twist Select Dial Left
To Increase the Seal Time
Twist Select Dial Right
<---Shows TotalTimes Machine has been Cycled (ie: Odometer)
<---Shows Inputs / Controls as Binary;1 = ON,0 = O
<---Shows Internal Temperature of the MainControl Board
This screen is for Troubleshooting Purposes
8.4 Press and Release the Select Dial
to return to the main operating screen
Default is 315°F
Default is 3.0 Seconds
Page 9

Part Number Description
AS100201 Servo Power Supply
AS100202 Heat Plate - Complete Assembly
AS100203 Spindle - Complete Assembly
AS100204 Servo Motor w/ Cables
AS100205 Pulleys - Complete Assembly
AS100206 Belt only
AS100207 Circuit Board
AS100208 Control Panel - Complete Assembly
AS100209 RH Button only
AS100210 LH Button only
AS100211 Stop Button only
AS100212 Select Switch only
AS100213 Thermocouple
AS100214SS Cover with screws
AS100215 Feet with Screws
AS100216Power Inlet
AS100217Power Cord 8'
4534 Solid State Relay
4503A Fan
AS100218 Box
9. AS1002 Parts
Page 10

Problem
-- Check Power Switch (in ON Position)
-- Check Power Cord (securely plugged in to Wall and AutoSealer)
-- Check Main (House Breaker)
-- Check AutoSealer Fuses (if applicable)
-- Check Temperature (AutoSealer will not Cycle if not up to Temperature)
-- Insure Both Cycle Buttons are being activated at the same time
-- Check Inputs on "System Maintenance" Screen (Found in Admin Controls)
-- Faulty Timing Belt - See Parts List - Contact Rx Systems
--
-- Press Stop Button
-- Check Inputs on "System Maintenance" Screen (Found in Admin Controls)
--
--
-- Heat Turned O - See Heater Controls (Found in User Controls)
-- Faulty Heat Element - See Parts List - Contact Rx Systems
Erratic Temperature readings -- Faulty Thermocouple - See Parts List - Contact Rx Systems
--
-- Faulty Cooling Fan - See Parts List - Contact Rx Systems
--
-- Contact Rx Systems
If you any questions or concerns, please contact Rx Systems.
We will be happy to assist you.
1-800-922-9142 - TSR@RxSystems.com - (Please have the AutoSealer Serial Number handy)
Solution
Stuck Paddle, No Motion, Heat
Plate will not return (go Up)
Bound Heat Plate - Contact Rx Systems - Remove Power Cord and Cover,
Carefully Rotate Pulley by hand to insure free movement
Broken Timing Belt - See Parts List - Contact Rx Systems - Remove Power Cord
and Cover, Carefully Rotate Pulley by hand to insure free movement
Heat Plate not up to Temperature - Cooling Fan will only come on after the
heat plate is up to temperature for 10 minutes.
Cooling Fan will not come on
No Heat, will not Heat Up
Blank Screen, No Power
Bound Heat Plate - Contact Rx Systems - Remove Power Cord and Cover,
Carefully Rotate Pulley by hand to insure free movement
No Motion, Heat Plate will not
go Down
Heat Plate Dirty
Remove bottom support plate (3 allen screws along both sides of machine) and
remove debris
Before Servicing; Make sure to Disconnect Power Cord and Heat Plate is Cool
10. Trouble Shooting
Page 11

11. Schematic
Page 12

Paddles
12. Options and Related Products
Page 13
Uni-Series Sealing Paddles
Uni-90 1-up
Item #1403
Uni-30/31/32 2-up
Item #1410
Uni-60/62 1-up
Item #1405
Uni-60/62 2-up
Item #1412
Uni-90 1-up
Item #1403
Uni-90 2-up
Item #1413
M-Series Sealing Paddles
M-30/31/32 1-up
Item #M400
M-30/31/32 2-up
Item #M410
M-60/62 1-up
Item #M401
M-60/62 2-up
Item #M411
M-90 1-up
Item #M403
M-90 2-up
Item #M413
Specialty Paddles
UD-32 2-up
Item #UD410
OP-Series 1-up
Item #OP404
Uni-32/62 2-up
Item #1411
UNI Control Card 4-up
Item #1414
Rx-31 Calendar Card 2-up
Item #1419
M-32/62 2-up
Item #M412
UD-32 1-up
Item #UD400
OP-Series 4-up
Item #OP410

12. Accessories and Related Products (continued)
Page 14
Sealing Tray, Control 30
M-Series Heat Sealing Accessories
Uni 30/31/32
Item #1332
Uni 60/62
Item #1362
Uni 90
Item #1390
Control 30
Item #1315
M-30/31/32
Item #M332
M-60/62
Item #M362
M-90
Item #M390
M-90 2-up
Item #M413
Control 30
Item #M335

12. Accessories and Related Products (continued)
Page 15
Pressure Board
Rails
Deblisterer
AutoFiller

13. Warranty
1
With the purchase of your AutoSealer 1002 from Rx Systems it included a two-year warranty that covers the unit from
defects in materials, and workmanship in relaon to the specicaons in the product manual.
The initial coverage is about to expire, and we oer two extended warranty opons – Silver and Gold. Check the box on
the next page for the opon that suits your needs. Both opons are available in a one or two-year agreement.
Silver Level – Includes parts & ground shipping for covered parts, plus labor if the AutoSealer is requested by our st to
be returned. Parts that are covered - On/OSwitch, Thermostat, Thermocouple, Fan, Heat Plate, Start Buon, Stop
Buon, Relays, Circuit Board, Control Panel and Servo Motor. New packaging, if needed, including delivery of empty
box/packaging, is included. Silver opon does not cover shipping costs of your unit to and from Rx Systems. Esmang
shipping cost each way is ~$80.00 (58 lbs). If needed, Loaner price = (contact RxS for current pricing) /mo, plus shipping
(~$80.00) each way.
Gold Level– Includes everything from Silver Opon plus, Loaner Equipment and ground shipping costs each way, and
ground pick-up & delivery for your unit to be repaired. This is a $470.00 value. Warranty pricing is subject to change
every 3 years to reect updated shipping costs. Maximum increase will be $10 per year.
Tech Support can determine what parts can be replaced by your st or if the unit needs to be picked up by Rx Systems.
Phone support is provided to assist your stawith part replacement.
Note: All units must be shipped in the original packaging, or a new box from Rx Systems using only approved packing
material. If you do not have the original box and packaging, it is included with both Silver and Gold Opons.
Let us know if you have any quesons. You can nd the original specs on your equipment and all of the addional
products Rx Systems’ manufactures on our website at www.RxSystems.com.Assistance and claims can be sent to
Best Regards,
Tech Support Department
800-922-9142 phone
636-925-0041 fax
Page 16

13. Warranty (Connued)
2
Extended Warranty Agreement – AutoSealer 1002
Product Locaon: Period of Coverage:
Acct #:
Contact Name:
1 Yr.
From:
To:
Phcy Name:
2 Yr.
From:
To:
Address:
Serial #
City State Zip:
Item #
Descripon
1 Year
2 Years
BEST
VALUE
SAVE
10%
1002EWS
1002 Extended Warranty - Silver
Contact Rx Systems
for current pricing
1002EWG
1002 Extended Warranty - Gold
Please sign this page (or if mulple purchases, each one should be signed), then fax or mail to Rx Systems, Inc. AN INVOICE
WILL BE MAILED IN A FEW DAYS. The terms and condions on the next pages are part of this Agreement. Any addional or
dierent terms proposed by the customer are rejected unless expressly agreed to in wring by Rx Systems, Inc.
CUSTOMER EXTENDED WARRANTY AUTHORIZATION
Signature:
Print Name:
Date: P.O. # (oponal)
1 Year Silver 1 YearGold
2 Years Silver 2 Years Gold
Check the opon above you wish to purchase. Ini*below to conrm you have read Secon 9 of
.the agreement. This is required.
Return by mail or fax: _______
Fax: 636-925-0041 *Ini
Rx Systems, Inc.
ATTN: Mary Terry Provide e-mail below for future communicaon:
121 Point West Blvd
St. Charles, MO 63301Email Address: _________________________________
Sign
Here
Page 17

13. Warranty (Connued)
of
3
LIMITED EXTENDED WARRANTY AGREEMENT
1. Extended warranty: Rx Systems warrants the Equipment listed on previous page and will repair or replace
defecve parts with the choice of repair or replacement at Rx Systems’ opon. This warranty is limited to no more
than two such repairs or replacements per year.
2. Exclusions: (a) Rx Systems shall not be liable to repair or replace parts that became damaged or defecve due to
misuse or negligence on the part of the customer, its employees or agents, or third pares, such as use of the
Equipment with non-Rx Systems pill cards. (b) Maintenance service and parts replacement shall not include
cosmec damage, electrical work external to the equipment or maintenance of accessories, aachments,
equipment or devices, unless speccally noted in this agreement. (c) Labor, parts, and other expenses incurred
by Rx Systems, Inc. to service or repair product damaged by accident, neglect, abuse, misuse, re, water or act of
nature, power or telephone facilies, the failure to maintain parts in accordance with Rx Systems, Inc.
specificaons, the failure to perform prescribed customer maintenance rounes, or causes other than ordinary
use, and services or repairs requested by customer to alter or rebuild the Product, are not covered by or included
under this agreement and shall be paid by customer.
3. Cancellaon and Renewal: Customer’s payment is non-refundable during the period of coverage speced in this
agreement, including if the pharmacy is sold. This agreement may be renewed upon mutually agreeable terms
and condions, provided a wrin renewal request is received by Rx Systems within the previously dened terms.
If you elect to purchase addional coverage, the Extended Warranty Agreement is billed at me of renewal. All
agreements returned within 60 days ar the beginning coverage date noted on the agreement will be charged a
late fee of $25.00 per 30 days. A separate invoice will be sent for each late month. Agreements not returned within
60 days will be considered disconnued.
4. Noce and Service: Service shall be provided by Rx Systems, Inc. during normal business hours (8:00 AM – 5:00
p.m. Central Time, Monday through Friday, except on naonal and Rx Systems, Inc. holidays.) Customer shall
noy Rx Systems, Inc. of a claim under this Agreement by calling 800-922-9142 or faxing a noce to 636-925-
0041. Rx Systems, Inc. will use its best eorts to respond to inquiries within 24 hours of customer call, provided
that responses will only be made during normal business hours on Monday through Friday and not on holidays.
5. Liability: RX SYSTEMS, INC.’S TOTAL LIABILITY AND CUSTOMER’S EXCLUSIVE REMEDY FOR ANY AND ALL LOSSES
AND DAMAGES ARISING OUT OF ANY CAUSE WHATSOEVER UNDER ANY THEORY OR CONTRACT, TORT, STRICT
LIABILITY OR OTHER LEGAL OR EQUITABLE THEORY, SHALL BE LIMITED TO CUSTOMERS ACTUAL DIRECT DAMAGES
NOT TO EXCEED THE TOTAL FEES SET FORTH IN THIS AGREEMENT, OR AT RX SYSTEMS, INC.’S OPTION, THE REPAIR
OR REPLACEMENT OF ITS PRODUCTS REPAIRED OR REPLACED PURSUANT TO THIS AGREEMENT. IN NO EVENT
WILL RX SYSTEMS, INC. BE LIABLE FOR LOST PROFITS OR ANY INCIDENTAL, SPECIAL, PUNITIVE OR CONSEQUENTIAL
DAMAGES SUSTAINED IN CONNECTION WITH THE DELIVERY, USE OR PERFORMANCE OF ANY PRODUCT REPAIRED
OR REPLACED PURSUANT TO THIS AGREEMENT. RX SYSTEMS, INC. SHALL NOT BE LIABLE FOR, AND CUSTOMER
ASSUMES LIABILITY FOR, ALL PERSONAL INJURY AND PROPERTY DAMAGE CONNECTED WITH THE HANDLING,
TRANSPORTATION, POSSESSION, PROCESSING, FURTHER MANUFACTURE, DISTRIBUTION, OTHER USE OR RESALE
OF ANY OF ITS PRODUCTS REPAIRED OR REPLACED PURSUANT TO THIS AGREEMENT REGARDLESS OF WHETHER
THE PRODUCT IS USED ALONE OR IN COMBINATION WITH ANY OTHER MATERIAL.
Page 18
Table of contents
Other Rx Systems Food Saver manuals