Ryobi R18XLMW54 User manual

R18XLMW54
R18XLMW50

2
Original Instructions
IMPORTANT!
It is essential that you read the instructions in this manual
before assembling, operating, and maintaining the
product.
Subject to technical modication.
Safety, performance, and dependability have been given top
priority in the design of your cordless lawnmower.
INTENDED USE
The cordless lawnmower is intended for outdoor use only.
The product is designed for domestic lawn mowing. It is a
pedestrian-controlled walk-behind lawnmower designed to
be pushed by hand.
The product should never be operated with the wheels o
the ground. It should not be pulled or ridden on.
Do not use the product for any other purpose.
GENERAL PRODUCT SAFETY WARNINGS
WARNING! Read all safety warnings, instructions,
illustrations and specifications provided with this
power tool. Failure to follow all instructions listed below
may result in electric shock, re and/or serious injury.
Save all warnings and instructions for future reference.
The term “power tool” in the warnings refers to your mains-
operated (corded) product or battery-operated (cordless)
product.
WORK AREA SAFETY
■Keep work area clean and well lit. Cluttered or dark
areas invite accidents.
■Do not operate power tools in explosive
atmospheres, such as in the presence of flammable
liquids, gases or dust. Power tools create sparks
which may ignite the dust or fumes.
■Keep children and bystanders away while operating
a power tool. Distractions can cause you to lose control.
ELECTRICAL SAFETY
■Power tool plugs must match the outlet. Never
modify the plug in any way. Do not use any adapter
plugs with earthed (grounded) power tools.
Unmodified plugs and matching outlets will reduce risk
of electric shock.
■Avoid body contact with earthed or grounded
surfaces, such as pipes, radiators, ranges and
refrigerators. There is an increased risk of electric
shock if your body is earthed or grounded.
■Do not expose power tools to rain or wet conditions.
Water entering a power tool will increase the risk of
electric shock.
■Do not abuse the cord. Never use the cord for
carrying, pulling or unplugging the power tool. Keep
cord away from heat, oil, sharp edges or moving parts.
Damaged or entangled cords increase the risk of electric
shock.
■When operating a power tool outdoors, use an
extension cord suitable for outdoor use. Use of a
cord suitable for outdoor use reduces the risk of electric
shock.
■If operating a power tool in a damp location is
unavoidable, use a residual current device (RCD)
protected supply. Use of an RCD reduces the risk of
electric shock.
PERSONAL SAFETY
■Stay alert, watch what you are doing and use
common sense when operating a power tool. Do not
use a power tool while you are tired or under the
influence of drugs, alcohol or medication. A moment
of inattention while operating power tools may result in
serious personal injury.
■Use personal protective equipment. Always wear
eye protection. Protective equipment such as a dust
mask, non-skid safety shoes, hard hat or hearing
protection used for appropriate conditions will reduce
personal injuries.
■Prevent unintentional starting. Ensure the switch
is in the off-position before connecting to power
source and/or battery pack, picking up or carrying
the tool. Carrying power tools with your finger on the
switch or energising power tools that have the switch on
invites accidents.
■Remove any adjusting key or wrench before turning
the power tool on. A wrench or a key left attached to
a rotating part of the power tool may result in personal
injury.
■Do not overreach. Keep proper footing and balance
at all times. This enables better control of the power tool
in unexpected situations.
■Dress properly. Do not wear loose clothing or
jewellery. Keep your hair and clothing away from
moving parts. Loose clothes, jewellery or long hair can
be caught in moving parts.
■If devices are provided for the connection of dust
extraction and collection facilities, ensure these are
connected and properly used. Use of dust collection
can reduce dust-related hazards.
■Do not let familiarity gained from frequent use of
tools allow you to become complacent and ignore
tool safety principles. A careless action can cause
severe injury within a fraction of a second.
POWER TOOL USE AND CARE
■Do not force the power tool. Use the correct power
tool for your application. The correct power tool will
do the job better and safer at the rate for which it was
designed.
■Do not use the power tool if the switch does not turn
it on and off. Any power tool that cannot be controlled
with switch is dangerous and must be repaired.
■Disconnect the plug from the power source and/
or remove the battery pack, if detachable, from
the power tool before making any adjustments,
changing accessories, or storing power tools. Such
preventive safety measures reduce the risk of starting
the power tool accidentally.
■Store idle power tools out of the reach of children
and do not allow persons unfamiliar with the power
tool or these instructions to operate the power tool.
Power tools are dangerous in the hands of untrained
users.
■Maintain power tools and accessories. Check for
misalignment or binding of moving parts, breakage

3
Original Instructions
of parts and any other condition that may affect the
power tool’s operation. If damaged, have the power
tool repaired before use. Many accidents are caused
by poorly maintained power tools.
■Keep cutting tools sharp and clean. Properly
maintained cutting tools with sharp cutting edges are
less likely to bind and are easier to control.
■Use the power tool, accessories and tool bits etc.
in accordance with these instructions, taking into
account the working conditions and the work to
be performed. Use of the power tool for operations
different from those intended could result in a hazardous
situation.
■Keep handles and grasping surfaces dry, clean
and free from oil and grease. Slippery handles and
grasping surfaces do not allow for safe handling and
control of the tool in unexpected situations.
BATTERY TOOL USE AND CARE
■Recharge only with the charger specified by the
manufacturer. A charger that is suitable for one type
of battery pack may create a risk of fire when used with
another battery pack.
■Use power tools only with specifically designated
battery packs. Use of any other battery packs may
create a risk of injury and fire.
■When battery pack is not in use, keep it away from
other metal objects, like paper clips, coins, keys,
nails, screws or other small metal objects, that can
make a connection from one terminal to another.
Shorting the battery terminals together may cause burns
or a fire.
■Under abusive conditions, liquid may be ejected from
the battery; avoid contact. If contact accidentally
occurs, flush with water. If liquid contacts eyes,
additionally seek medical help. Liquid ejected from
the battery may cause irritation or burns.
■Do not use a battery pack or tool that is damaged or
modified. Damaged or modified batteries may exhibit
unpredictable behaviour resulting in fire, explosion or
risk of injury.
■Do not expose a battery pack or tool to fire or
excessive temperature. Exposure to fire or temperature
above 130°C may cause explosion.
■Follow all charging instructions and do not charge
the battery pack or tool outside the temperature
range specified in the instructions. Charging
improperly or at temperatures outside the specified
range may damage the battery and increase the risk of
fire.
SERVICE
■Have your power tool serviced by a qualified repair
person using only identical replacement parts. This
will ensure that the safety of the power tool is maintained.
■Never service damaged battery packs. Service
of battery packs should only be performed by the
manufacturer or authorized service providers.
LAWNMOWER SAFETY WARNINGS
■Do not use the lawnmower in bad weather conditions,
especially when there is a risk of lightning. This
decreases the risk of being struck by lightning.
■Thoroughly inspect the area for wildlife where the
lawnmower is to be used. Wildlife may be injured by
the lawnmower during operation.
■Thoroughly inspect the area where the lawnmower
is to be used and remove all stones, sticks, wires,
bones, and other foreign objects. Thrown objects can
cause personal injury.
■Before using the lawnmower, always visually
inspect to see that the blade and the blade assembly
are not worn or damaged. Worn or damaged parts
increase the risk of injury.
■Check the grass catcher frequently for wear or
deterioration. A worn or damaged grass catcher may
increase the risk of personal injury.
■Keep guards in place. Guards must be in working
order and be properly mounted. A guard that is loose,
damaged, or is not functioning correctly may result in
personal injury.
■Keep all cooling air inlets clear of debris. Blocked air
inlets and debris may result in overheating or risk of fire.
■While operating the lawnmower, always wear non-
slip and protective footwear. Do not operate the
lawnmower when barefoot or wearing open sandals.
This reduces the chance of injury to the feet from contact
with the moving blade.
■While operating the lawnmower, always wear long
trousers. Exposed skin increases the likelihood of injury
from thrown objects.
■Do not operate the lawnmower in wet grass. Walk,
never run. This reduces the risk of slipping and falling
which may result in personal injury.
■Do not operate the lawnmower on excessively steep
slopes. This reduces the risk of loss of control, slipping
and falling which may result in personal injury.
■When working on slopes, always be sure of your
footing, always work across the face of slopes,
never up or down and exercise extreme caution
when changing direction. This reduces the risk of
loss of control, slipping and falling which may result in
personal injury.
■Use extreme caution when reversing or pulling the
lawnmower towards you. Always be aware of your
surroundings. This reduces the risk of tripping during
operation.
■Do not touch blades and other hazardous moving
parts while they are still in motion. This reduces the
risk of injury from moving parts.
■When clearing jammed material or cleaning the
lawnmower, make sure all power switches are off
and the battery pack is disconnected. Unexpected
operation of the lawnmower may result in serious
personal injury.
■When clearing jammed material or cleaning the
lawnmower, make sure all power switches are off
and remove the isolator key. Unexpected operation
of the lawnmower may result in serious personal injury.

4
Original Instructions
ADDITIONAL SAFETY WARNINGS
■The product must be started with the user behind the
handlebars in the operator safety zone. Never start the
product if:
●The grass discharge opening is exposed and is
not protected by the grass catcher or the grass
discharge cover.
●Hands and feet of all persons are not clear of the
cutting enclosure.
■Avoid holes, ruts, bumps, rocks, property stakes, or
other hidden objects. Uneven terrain could cause a slip-
and-fall accident.
■Turn off the product, remove the safety key and the
battery pack, and allow the blade to stop if the product
has to be tilted for transportation, when crossing
surfaces other than grass, and when transporting the
product to and from the work area.
■Do not tilt the product when turning on the motor or
while the motor is running. If absolutely necessary, raise
the front of the lawnmower by no more than 5 cm to
enable easy starting. Press down on the handlebar to
achieve this. Always return the lawnmower to its normal
position with all wheels on the ground before cutting.
Tilting the lawnmower exposes the blade and increases
the probability of objects being thrown and accidentally
making contact with the blade.
■Turn off the product, and remove the safety key and the
battery pack. Make sure that all moving parts have come
to a complete stop:
●whenever leaving the product unattended (including
disposal of grass clippings)
●before clearing blockages or unclogging the
discharge chute
●before checking, cleaning, or working on the product
●before removing the grass catcher or opening the
grass discharge chute cover
●after striking a foreign object; inspect the product
for damage and make repairs as necessary before
restarting and operating the product
●if the product starts to vibrate abnormally (check
immediately)
–inspect for damage, particularly the blades
–replace or repair any damaged parts
–check for and tighten any loose parts
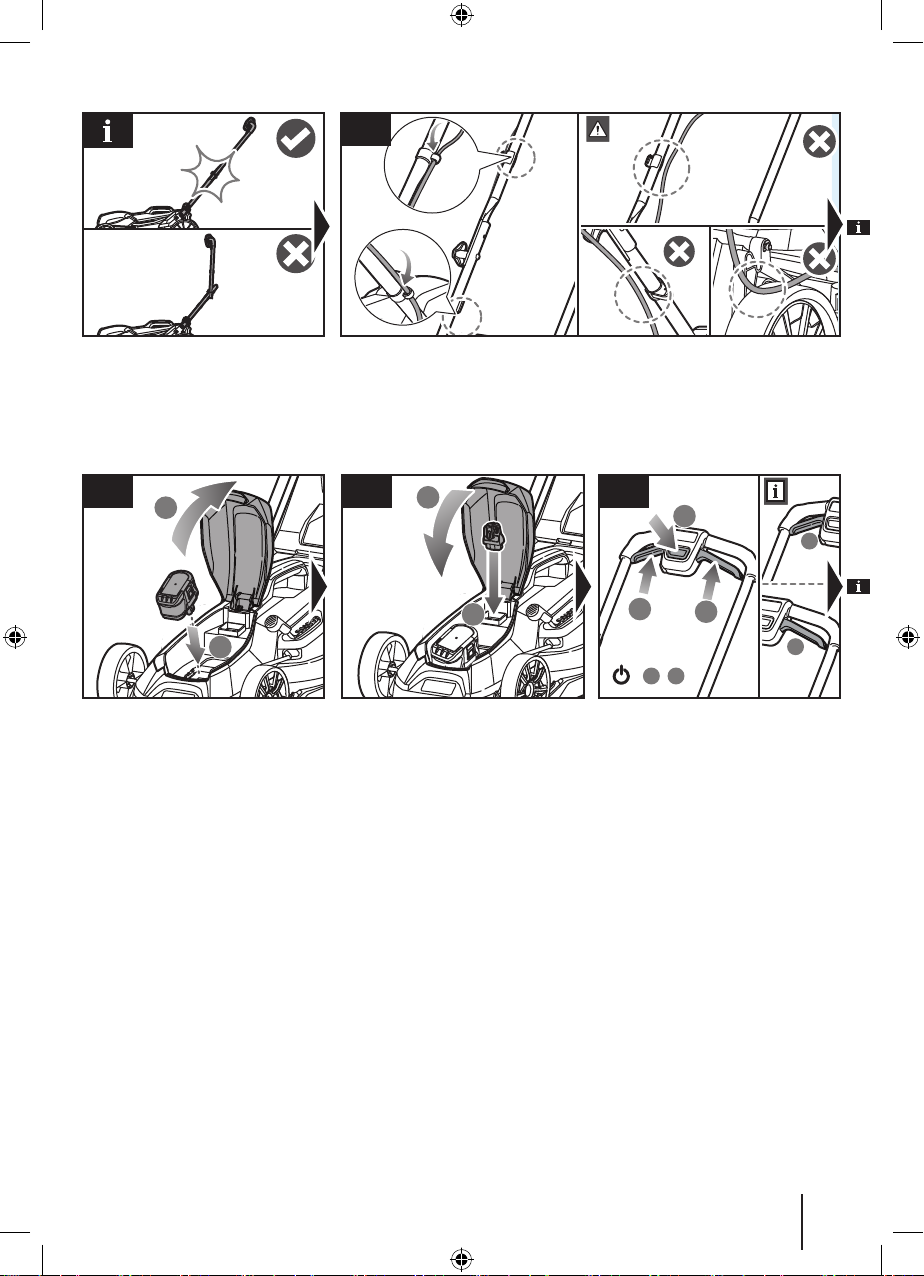
■Always ensure that the motor control cable is never
trapped, pinched, or otherwise damaged during
assembly or when folding the handle. Never apply power
to the product if this cable is damaged. Have the product
serviced by an authorised service centre only.
■Injuries may be caused, or aggravated, by prolonged use
of the product. When using the product for prolonged
periods, ensure to take regular breaks.
■Operate the product only in temperatures between 0°C
and 40°C.
ADDITIONAL BATTERY SAFETY WARNINGS
■To reduce the risk of fire, personal injury, and product
damage due to a short circuit, never immerse the
product, battery pack, or charger in fluid or allow fluid
to flow inside them. Corrosive or conductive fluids, such
as seawater, certain industrial chemicals, and bleach
or bleach-containing products, etc., can cause a short
circuit.
■Charge the battery pack in a location where the ambient
temperature is between 10°C and 38°C.
■Store the battery pack in a location where the ambient
temperature is between 0°C and 20°C.
■Use the battery pack in a location where the ambient
temperature is between 0°C and 40°C.
PRODUCT FEATURES
OVERLOAD AND OVERHEAT PROTECTION
The product has an overload protection device. When
overloading is detected, the product automatically turns o.
If the overload protector is actuated, the on/o lever must
be released. Press the start button, and squeeze the on/o
lever to restart the product. If the product still does not start,
reinstall the battery pack.
The battery pack has overheat protection. Excessive
temperatures will cause the battery to stop powering the
product. If the battery pack is too warm, allow it to cool down
before resuming operation. If the product still does not work,
recharge the battery.
NOTE: The battery pack LED indicator will not work if the
battery protection feature has caused the battery pack to
stop powering the product. Turn o the product or remove
the battery pack from the product, and the battery pack LED
indicator will resume normal function.
GENERAL MOWING TIPS
The run time of the battery depends on the condition, length,
and density of the grass.
Adjust the cutting height of the lawnmower to suit the current
condition of the lawn.
■For best performance, always cut off one-third or less of
the total height of the grass.
■When cutting long grass, reduce walking speed to allow
for more effective cutting and a proper discharge of the
clippings.
■A higher cutting height extends the run time of the
battery pack.
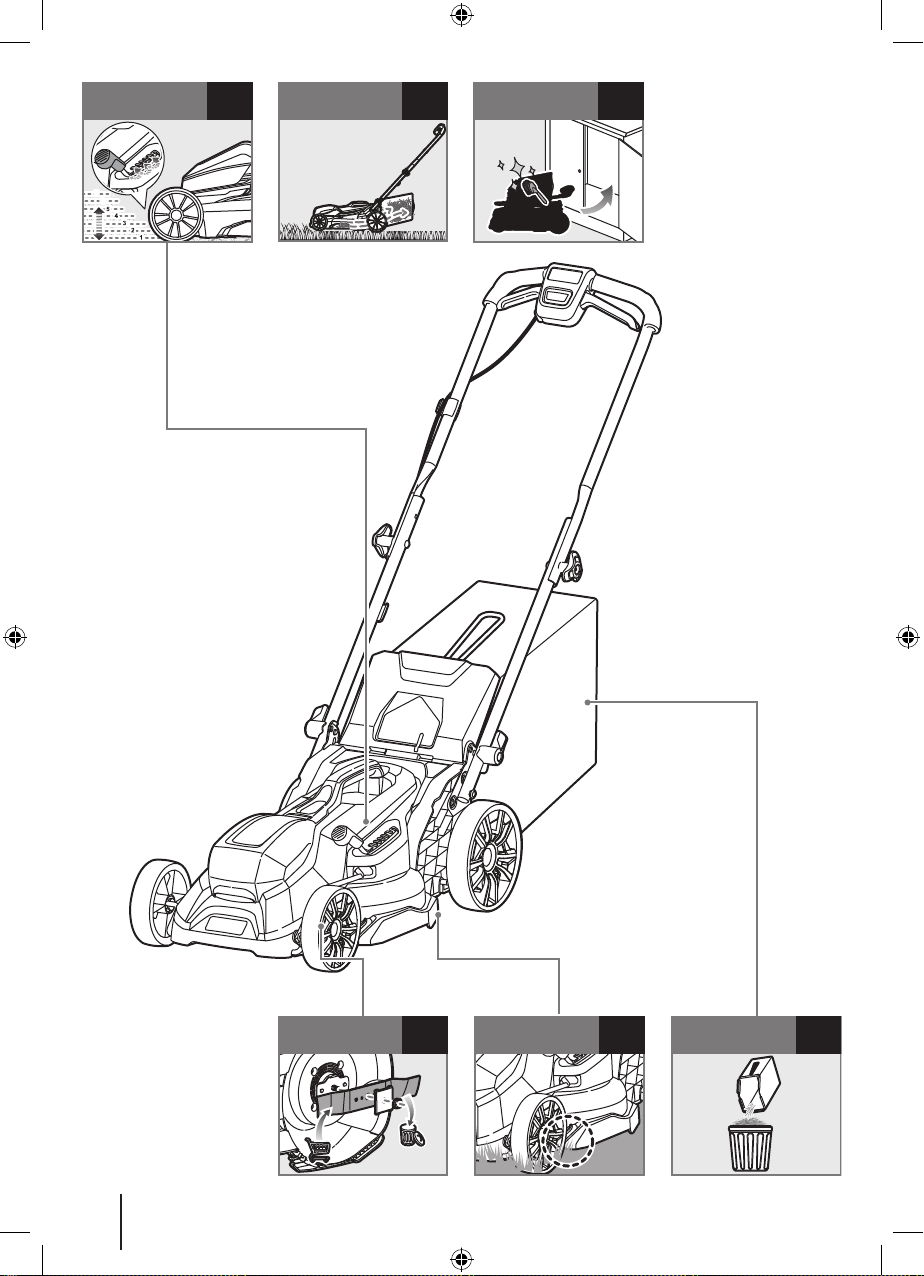
TRANSPORTATION AND STORAGE
■Turn off the product, and remove the safety key and
the battery pack. Make sure that all moving parts have
come to a complete stop. Allow the product to cool down
before storing or transporting.
■Remove all foreign materials from the product. Store the
product in a cool, dry, and well-ventilated place that is
inaccessible to children. Keep the product away from
corrosive agents, such as garden chemicals and de-
icing salts. Do not store the product outdoors.
■Store the product in a location where the ambient
temperature is between 0°C and 40°C.
■Use extreme caution when lifting or tilting the product for
maintenance, cleaning, storage, or transportation. The
blade is sharp; keep all body parts away from the blade
while it is exposed.
■For transportation in vehicles, remove the safety key
and the battery pack, and secure the product against

5
Original Instructions
movement or falling to prevent injury to persons or
damage to the product.
TRANSPORTING LITHIUM BATTERIES
Transport the battery in accordance with local and national
provisions and regulations.
Follow all special requirements on packaging and labelling
when transporting batteries by a third party. Ensure that
no batteries can come in contact with other batteries
or conductive materials while in transport by protecting
exposed connectors with insulating, non-conductive caps or
tape. Do not transport batteries that are cracked or leaking.
Check with the forwarding company for further advice.
MAINTENANCE
■Use only original manufacturer’s replacement parts,
accessories, and attachments. Failure to do so can cause
possible injury, can contribute to poor performance, and
may void your warranty.
■Servicing requires extreme care and knowledge
and should be performed only by a qualified service
technician. Have the product serviced by an authorised
service centre only.
■You may make adjustments and repairs described in this
manual. For other repairs, have the product serviced by
an authorised service centre only.
■Turn off the product, and remove the safety key and the
battery pack. Make sure that all moving parts have come
to a complete stop before any cleaning or maintenance
task.
■Check all nuts, bolts, and screws at frequent intervals
for proper tightness to ensure that the product is in safe
working condition.
■After each use, clean the plastic parts with a soft, dry
cloth. Any part that is damaged should be properly
repaired or replaced by an authorised service centre.
■Replace damaged blades and bolts in sets to preserve
balance.
■Be careful during adjustment of the product to prevent
entrapment of the fingers between moving blades and
fixed parts of the product.
■The blade on the product is sharp. Use extreme caution,
and wear heavy-duty gloves when fitting, replacing,
cleaning, or checking bolt security.
■The blade bolts must be adequately tightened. See the
manufacturer’s recommendations for blade bolt torque,
which can be found in the product specification table in
this manual.
■Be aware that even though the power source is turned
off, the blades can still be moved.
CLEARING BLOCKAGES
■Turn off the product, and remove the safety key and the
battery pack. Make sure that all moving parts have come
to a complete stop.
■Always wear heavy-duty gloves when checking or
clearing a blockage. The blades are sharp, and the
blockage itself could be a sharp object.
■Remove the grass catcher. Check and carefully clear the
grass catcher for obstructions.
■Check the grass discharge chute, and carefully clear
blockages.
■Turn the product on its side. Check its underside and the
area around the blade. Carefully remove any blockages.
Remember that the blade may move during cleaning.
SYMBOLS ON THE PRODUCT
Safety alert
Read and understand all instructions
before operating the product. Follow all
warnings and safety instructions.
Beware of thrown or ying objects.
Keep all bystanders, especially
children and pets, at least 15 m away
from the operating area.
Keep hands and feet away from
the blades. Remove the battery pack
before maintenance.
Wear eye protection.
Wear ear protection.
Do not operate the product on inclines
greater than 15°. Mow across the face
of slopes, never up and down.
Do not expose the product to rain or
damp conditions.
96
Guaranteed sound power level
Regulatory Compliance Mark (RCM).
This product meets applicable
regulatory requirements.
Press the start button, then squeeze
and hold either side of the on/off lever
to turn on the product.

6
Original Instructions
Waste electrical products should not
be disposed of with household waste.
Please recycle where facilities exist.
Check with your local authority or
retailer for recycling advice.
SYMBOLS IN THIS MANUAL
Note
Warning

7
Know your product
R18XLMW50
R18XLMW54
On/o lever
Start button
Motor control
cable
Top handle
Bottom handle
Handle knobs
Safety key
Spring pins
Grass catcher
Battery door
Rear wheel
Front wheel
Operator's
manual
Charger
Battery pack
Height adjustment
handle
Carry handle

8
Getting started
1
2
1
3
5
2
11
3
2
3
3
NOTE: Insert the grass catcher frame
into the bag. Ensure that the carry
handle sits on top of the grass catcher
bag.
For bagging operation, install the grass catcher. Raise the rear door, and hook
the grass catcher to the mower. Ensure that the catcher is secured, then lower
the rear door.
NOTE: The grass catcher collects grass clippings, preventing them from being
discharged across the lawn while mowing.
NOTE: The on/off lever must be
continuously held during use. To turn
the product off, release the on/off lever.
Wear full eye protection, ear protection,
non-slip heavy-duty gloves, substantial
footwear, and long trousers at all times
while operating the product. Do not
operate the product when barefoot or
wearing open sandals.
Attach the top handle to the bottom
handle. Install and tighten the handle
knobs to secure and lock the handles.
Set the bottom handle to the operating
position.
NOTE: Make sure that the quick-
release fasteners click to lock the
handle in place.

9
Getting started
1
2
7
1
2
6
A
1
A
+ /
B
B
22
8
Open the battery door. Insert the battery
pack into the battery port. Make sure
that the latch on the battery pack clicks
in place, and that the battery pack is
secured before operating the product.
Insert the safety key, and close the
battery door.
Press the start button, then squeeze
and hold either side of the on/off lever
to turn on the product.
NOTE: Wait for 3seconds for the blade
to reach full speed before mowing.
4
Insert the motor control cable into the motor control cable retainers. Clip the
retainers to the right-hand handle, securing the motor control cable. Ensure that
the motor control cable is properly routed along the handle.
WARNING: Always make sure that the cable is never trapped, pinched, or
damaged during assembly or when folding the handles. Do not turn on the product
if the control cable is damaged.
NOTE: Make sure that the handle locks
are tight and secure.

10
6
7
p.16
p.13 p.11 p.17
p.13p.14
Cleaning and
storing the product
Using the grass
catcher
Adusting the
cutting height
Replacing the blade Cutting with EASY
EDGE
Emptying the grass
catcher

11
Operation
15˚Max.15˚
1
2
3
1
USING THE GRASS CATCHER
WARNING: Avoid holes, ruts, bumps, rocks,
property stakes, or other hidden objects.
WARNING: Do not operate the product on
inclines greater than 15°. Mow across the
face of slopes, never up and down.
1. Raise the rear door, and install the grass
catcher, hooking it to the mower. Ensure
that the catcher is secured, then lower the
rear door.
NOTE: The grass catcher collects grass
clippings, preventing them from being
discharged across the lawn while mowing.
2. Open the battery door. Insert the battery
pack into the product. Make sure that the
latch on the battery pack clicks in place,
and that the battery pack is secured
before operating the product. Insert the
safety key. Close the battery door.
NOTE: The product does not start without
the safety key. Ensure that the safety key
is installed in the product.
1
23
4
2

12
Operation
3. Press the start button, then squeeze and
hold either side of the on/off lever to turn
on the product. Release the start button
and keep holding the on/off lever to keep
using the product.
4. Release the on/off lever to stop the
product.
B
A
+or
B
A
22
1
3
4

13
Operation
7
76
7
76
CUTTING WITH EASY EDGE
EASY EDGE allows the product to easily cut
the grass along walls or the edge of the lawn.
NOTE: EASY EDGE pulls grass towards the
blade when the product is running along a
wall or the edge of the lawn.
ADJUSTING THE CUTTING HEIGHT
To adjust the deck height, pull the cutting
height adjustment lever towards the wheel,
then raise or lower the deck to the preferred
height. Make sure that the handle is always
secured into one of the seven height slots.
NOTE: The cutting height can be adjusted
to seven positions. Cutting heights may vary
in particular products. Start the mower at the
highest position, before cutting the grass.

14
Maintenance
1
2
3
4
1
2
1
3
2
3
REPLACING THE BLADE
1. Open the battery door and remove the
battery pack. Remove the safety key, and
close the battery door.
NOTE: Unhook the grass catcher from the
product. Close the rear door.
2. Tilt the product on its side.
WARNING: The blade on the product is
sharp. Use extreme caution, and wear heavy-
duty gloves when fitting, replacing, cleaning,
or checking bolt security.
3. Remove all grass clippings and debris
from the cutting deck and blade.

15
Maintenance
1
2
7
5
6
1
2
4
4. Insert a piece of wood into the cutting
deck to prevent the blade from spinning
during loosening of the blade nut. Loosen
the blade nut.
5. Remove the blade nut, spacer, and
washer. Remove and properly dispose of
the old blade.
6. Install the new blade, washer, spacer,
and nut.
7. Insert a piece of wood into the cutting
deck to prevent the blade from spinning
during tightening of the blade nut. Hand-
tighten the nut until the blade is secured
and does not shake.Then use a spanner
to further tighten the nut by 1/2 turn (35-
40 Nm torque).
WARNING: Ensure to remove the blade
change lock and place it back into the
compartment before reinstalling the battery
pack to begin mowing again.
15 mm

16
Maintenance
EMPTYING THE GRASS CATCHER
NOTE: Stop mowing when the grass catcher
is full. Empty the grass catcher before
resuming operation.
1. Release the on/off lever to turn off the
product.
2. Raise the rear door, and remove the
grass catcher.
3. Remove the grass clippings from the
grass catcher into a bin.
3
2
1
3
2
1

17
Storage
2
1
2
4
CLEANING AND STORING THE
PRODUCT
1. Open the battery door. Remove the
battery pack. Remove the safety key, and
close the battery door.
2. Remove all foreign materials from the
product. Clean the product with a soft,
dry cloth or cleaning brush.
WARNING: Do not use water to clean the
product.
3. Raise the rear door, and remove the
grass catcher.
4. Loosen the handle knobs, and fold down
the top handle.
2
1
3
3
1
2
3
4
1

18
Storage
20230119v5d1
7
5
6
5. Fold down the bottom handle, resting it
on top of the product.
6. Fold the grass catcher and place it on top
of the product.
7. Store the product in a cool, dry, and
well-ventilated place that is inaccessible
to children. Keep the product away
from corrosive agents, such as garden
chemicals and de-icing salts. Do not store
the product outdoors.

PRODUCT SPECIFICATIONS
Cordless lawnmower
Model R18XLMW50
Rated voltage 18 V d.c.
Width of cut 33 cm
Height of cut 25 - 90 mm
No-load speed 4200±5% /min max
Weight (without battery) 9.3 kg
Blade bolt torque 35.8 ~ 40.8 Nm
Vibration level (in accordance with Annex FF of AS/NZS
62841.4.3)
Left handle ah = 0.9 m/s2
Right handle ah = 0.8 m/s2
Uncertainty of measurement K = 1.5 m/s2
Noise emission level (in accordance with AS/NZS
62841.4.3)
A-weighted sound pressure
level at operator’s position LpA = 79.3 dB(A)
Uncertainty of measurement K= 3 dB
A-weighted sound power level LWA = 91.18 dB(A)
Uncertainty of measurement K= 3 dB
LWA + KWA 95 dB(A)
BATTERY AND CHARGER
Model R18XLMW54 R18XLMW50
Battery pack RB1840C -
Charger RC18115 -
Compatible
battery packs
RB18L13, RB18L13Z, RB18L15,
RB18L15A, RB18L15B, RB1815C,
RB18L20, RB18L20A, RB1820C,
RB18L25, RB18L25A, RB18L26,
RB18L30, RB18L30A, RB18L40,
RB18L40A, RB1840C, RB1840X,
RB1840T, RB18L50, RB18L50A,
RB1850C, RB1850X, RB1860X,
RB18L60, RB18L60A, RB18L90,
RB18L90A
REPLACEMENT PARTS
Blade 682072002
WARNING! The declared vibration total values and the
declared noise emission values given in this instruction
manual have been measured in accordance with a
standardised test and may be used to compare one tool with
another. They may be used for a preliminary assessment
of exposure.
The declared vibration and noise emission values represent
the main applications of the tool. However, if the tool is used
for dierent applications, used with dierent accessories,
or poorly maintained, the vibration and noise emission
may dier. These conditions may signicantly increase the
exposure levels over the total working period. An estimation
of the level of exposure to vibration and noise should take
into account the times when the tool is turned o or when
it is running idle. These conditions may signicantly reduce
the exposure level over the total working period.
Identify additional safety measures to protect the operator
from the eects of vibration and noise, such as maintaining
the tool and the accessories, keeping the hands warm (in
case of vibration), and organising work patterns.

Imported by:
Techtronic Industries Australia Pty Ltd
31 Gilby Road, Mount Waverley, VIC 3149
Melbourne, Australia
Techtronic Industries N.Z. Limited
Unit C, 70 Business Parade South,
Highbrook, Auckland 2013, New Zealand
RYOBI is a trade mark of Ryobi Limited, and is used under license.
961479087-03
This manual suits for next models
2
Table of contents
Other Ryobi Lawn Mower manuals

Ryobi
Ryobi RY48131 User manual

Ryobi
Ryobi RY48ZTR100-1A User manual

Ryobi
Ryobi RY18LMX37A User manual

Ryobi
Ryobi RLM36X46X240 User manual

Ryobi
Ryobi RYRM8001 User manual

Ryobi
Ryobi RLM4852L User manual

Ryobi
Ryobi RY14110 User manual

Ryobi
Ryobi R18XLMW20 User manual

Ryobi
Ryobi RLM1956MEB User manual

Ryobi
Ryobi RLM18X36250 User manual

Ryobi
Ryobi RM480ex Series User manual

Ryobi
Ryobi RLM18C34H25 User manual

Ryobi
Ryobi RLM13E33H User manual

Ryobi
Ryobi RY401017 User manual

Ryobi
Ryobi RY40LM03 User manual

Ryobi
Ryobi RLM4619SMB User manual

Ryobi
Ryobi RY18LMX40A User manual

Ryobi
Ryobi RY401012 User manual

Ryobi
Ryobi RLM36X41H50L RLM36B41H User manual

Ryobi
Ryobi P1109 User manual