Ryobi R36XLMW20 User manual

FRONT PAGE
R36XLMW20
R36XLMW26

2
Original Instructions
IMPORTANT!
It is essential that you read the instructions
in this manual before assembling, operating,
and maintaining the product.
Subject to technical modication.
Safety, performance, and dependability have
been given top priority in the design of your
cordless lawnmower.
INTENDED USE
The cordless lawnmower is intended for
outdoor use only.
The product is designed for domestic lawn
mowing. It is a pedestrian-controlled walk-
behind mower designed to be pushed by hand
or used with the self-propel feature.
The product should never be operated with the
wheels o the ground. It should not be pulled
or ridden on.
Do not use the product for any other purpose.
GENERAL SAFETY WARNINGS
■Keep the instructions safe for later use.
■The product should be operated only with
the battery packs specified in this manual.
When using a battery-operated product,
basic safety precautions should always be
followed to reduce the risk of fire, leaking
batteries, and personal injury.
PERSONAL SAFETY
■Never allow children or people with reduced
physical, sensory, or mental capabilities,
or persons who are not familiar with these
instructions to operate, clean, or maintain
the product. Local regulations may restrict
the age of the operator. Children should be
adequately supervised to ensure that they
do not play with the product.
■Be familiar with the controls and the correct
use of the product.
■Wear heavy, long trousers, long sleeves,
and sturdy anti-slip footwear. Do not wear
short trousers, sandals, or go barefoot.
Avoid wearing clothing that is loose-fitting
or that has hanging cords or ties.
■Use the product across the face of slopes;
never up and down. Exercise extreme
caution when changing direction on slopes.
Keep firm footing and balance. Walk; never
run.
■Do not use the product near drop-offs,
ditches, excessively steep slopes, or
embankments.
■Always wear safety glasses.
■The product is capable of amputating hands
and feet, and of throwing objects. Failure to
observe all safety instructions could result
in serious injury or death.
■Stay alert, watch what you are doing,
and use common sense when operating
the product. Do not operate the product
while tired, ill, or under the influence of
drugs, alcohol, or medication. A lapse in
concentration while operating the product
may result in serious personal injury.
WORK AREA SAFETY
■Never use the product while people,
especially children, or pets are within 15
m because of the danger of objects being
thrown by contact with the blade.
■Always use the product in daylight or good
artificial light.
■Do not operate the product on wet grass or
in the rain.
■Keep in mind that the operator or user
is responsible for accidents or hazards
occurring to other people or their property.
■Objects struck by the lawnmower blade
can cause severe injuries to persons.
Thoroughly inspect the area where the
product is to be used, and remove all rocks,
sticks, metal, wire, bones, toys, or other
foreign objects. Remember, string or wire
may entangle with the cutting means.
■Do not operate the product in explosive
atmospheres, such as in the presence
of flammable liquids, gases, or dust. The
product creates sparks, which may ignite
dust or fumes.
■Do not use the product when there is a risk
of lightning.
■Tragic accidents can occur if the operator
is not alert to the presence of children.
Children are often attracted to the product
and the mowing activity. Never assume
that children will remain where you last saw
them.
■Use extra care when approaching blind
corners, shrubs, trees, or other objects,
including overhanging shrubs, which may
block your view.

3
Original Instructions
BATTERY TOOL USE AND CARE
■Read, understand, and always follow
the safety instructions which came with
your battery and charger. Failure to do
so may result in electric shock, fire or
other hazardous situations. Keep all the
instructions together in a safe place for
future reference.
■Battery-operated products do not have to be
plugged into an electrical outlet; therefore,
they are always in operating condition.
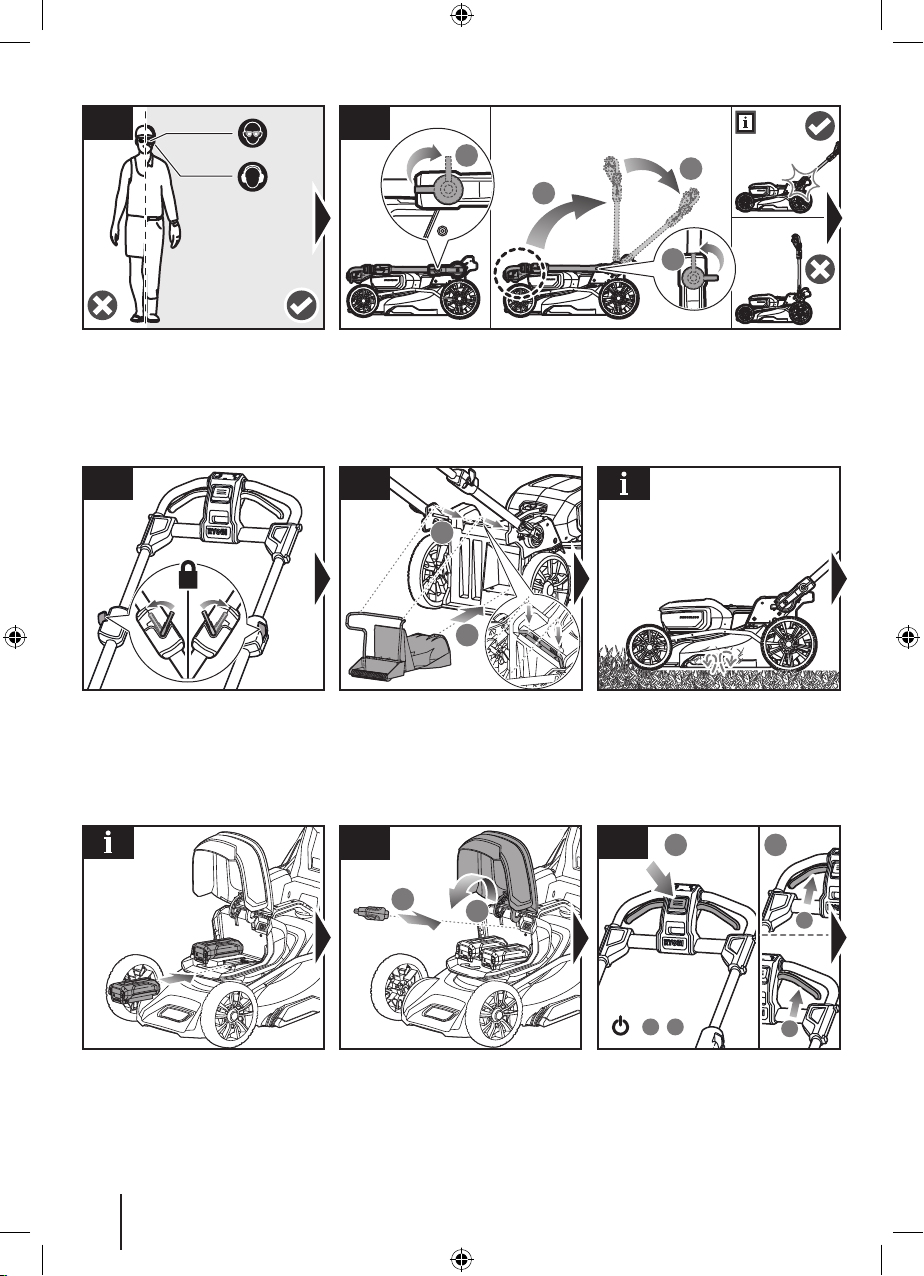
Remove the isolator key whenever you are
not operating the product.
■Remove the battery pack before making
any adjustments, cleaning, or removing
material from the product.
■Ensure the isolator key is removed before
inserting battery pack.
■A battery pack must be recharged only with
the charger specified by the manufacturer.
Using a charger with an incompatible
battery pack may create a risk of fire. Use
battery pack only with charger listed.
■Use only battery pack intended specifically
for the product. Use of any other battery
packs may result in a risk of fire, electric
shock, or injury to persons.
■When battery pack is not in use, keep it away
from other metal objects like, paper clips,
coins, keys, nails, screws, or other small
metal objects, that can make a connection
from one terminal to another. Shorting the
battery pack terminals together may cause
sparks, burns, fire or explosion.
■Do not place battery products or their
batteries near fire or heat. This increases
the risk of explosion and possibly injury.
■Do not open or mutilate the battery pack.
Released electrolyte is corrosive and may
cause damage to the eyes or skin. It may be
toxic if swallowed.
■Protect the battery pack against moisture
and water. Do not charge the product in a
damp or wet location. Following this rule will
reduce the risk of electric shock.
■In case of damage and improper use of the
battery, vapour may be emitted. Provide
for fresh air and seek medical help in case
of complaints. The vapour can irritate the
respiratory system.
■Do not leave the battery pack inside a
vehicle in hot or cold conditions.
■Do not incinerate the battery.
■Under abusive conditions, liquid may be
ejected from the battery; avoid contact.
If contact accidentally occurs, flush with
water. If liquid contacts eyes, additionally
seek medical help. Liquid ejected from the
battery may cause irritation or burns.
CORDLESS LAWNMOWER SAFETY
WARNINGS
■Before use, always visually inspect the
product to ensure that blades, blade bolts,
and cutter assembly are not worn or
damaged. Replace worn or damaged blades
and bolts in sets to preserve balance.
■Bring the product to an authorised service
centre to replace damaged or unreadable
labels.
■Do not pull the product backwards unless
absolutely necessary. If you must back the
product away from a wall or obstruction, first
look down and behind to avoid tripping or
pulling the product over your feet.
■Turn off the product and allow the blade
to stop if the product has to be tilted for
transportation when crossing surfaces
other than grass, and when transporting the
product to and from the work area.
■Never use the product with defective guards
or shields, or without safety devices, such
as deflectors and grass catchers, in place.
■Do not tilt the product when turning on
the motor or while the motor is running. If
absolutely necessary, you may raise the
front of the lawnmower by no more than 5
cm to enable easier starting. Press down on
the handlebar to achieve this. Always return
the lawnmower to its normal position with all
wheels on the ground before cutting. Tilting
the lawnmower exposes the blade and
increases the probability of objects being
thrown and accidentally making contact
with the blade.
■Do not start the product when standing in
front of the grass discharge opening.
■The product must be started with the user
behind the handlebars in the operator safety
zone. Never start the product if:
●The grass discharge chute is exposed
and is not protected by the grass catcher
and grass discharge chute cover.
●Hands and feet of all persons are not
clear of the cutting enclosure.
■Turn on the product carefully according to
instructions, and keep hands and feet away
from the blades. Do not put hands or feet

4
Original Instructions
near or under rotating parts. Keep clear of
the discharge opening at all times.
■Never pick up or carry the product while it
is running.
■Turn off the product, and remove the isolator
key and the battery pack. Make sure that all
moving parts have come to a complete stop:
●whenever leaving the product unattended
(including disposal of grass clippings)
●before clearing blockages or unclogging
the discharge chute
●before checking, cleaning, or working on
the product
●before removing the grass catcher or
opening the grass discharge chute cover
●after striking a foreign object; inspect the
product for damage and make repairs
as necessary before restarting and
operating the product
●if the product starts to vibrate abnormally
(check immediately)
–inspect for damage, particularly the
blades
–replace or repair any damaged parts
–check for and tighten any loose parts
■The cutting blade should rotate
approximately parallel to the ground over
which it is being wheeled.
■The blade on the product is sharp. Use
extreme caution, and wear heavy-duty
gloves when fitting, replacing, cleaning, or
checking bolt security.
■Never operate the product if the on/off
switch on the handlebar does not properly
start and stop the product.
■Never attempt to lock the on/off switches in
the on position; this is extremely dangerous.
■Do not force the product. It will do the job
better and safer at the speed for which it
was designed.
■Stop the blade when crossing gravel
surfaces.
■Avoid holes, ruts, bumps, rocks, property
stakes, or other hidden objects. Uneven
terrain could cause a slip-and-fall accident.
■Always ensure that the motor control cable
is never trapped, pinched, or otherwise
damaged during assembly or when folding
the handle.
■Injuries may be caused, or aggravated, by
prolonged use of the product. When using
the product for prolonged periods, ensure to
take regular breaks.
ADDITIONAL BATTERY SAFETY
WARNINGS
To reduce the risk of re, personal injury, and
product damage due to a short circuit, never
immerse the tool, battery pack, or charger in
uid or allow uid to ow inside them. Corrosive
or conductive uids, such as seawater, certain
industrial chemicals, and bleach or bleach-
containing products, etc., can cause a short
circuit.
PRODUCT FEATURES
OVERLOAD AND OVERHEAT
PROTECTION
The product has an overload protection device.
When overloading is detected, the product
automatically turns o. If the overload protector
is actuated, the on/o lever must be released.
Press the start button, and squeeze the on/o
lever to restart the product. If the product still
does not start, reinstall the battery pack.
The battery pack has overheat protection.
Excessive temperatures will cause the battery
to stop powering the product. If the battery
pack is too warm, allow it to cool down before
resuming operation. If the product still does not
work, recharge the battery.
NOTE: The battery pack LED indicator will
not work if the battery protection feature has
caused the battery pack to stop powering
the product. Turn o the product or remove
the battery pack from the product, and the
battery pack LED indicator will resume normal
function.
GENERAL MOWING TIPS
The run time of the battery depends on the
condition, length, and density of the grass.
Adjust the cutting height of the lawnmower to
suit the current condition of the lawn.
■For best performance, always cut off one-
third or less of the total height of the grass.
■When cutting long grass, reduce walking
speed to allow for more effective cutting and
a proper discharge of the clippings.
■A higher cutting height extends the run time
of the battery pack.
TRANSPORTATION AND STORAGE
■Turn off the product, and remove the isolator
key and the battery pack. Make sure that
all moving parts have come to a complete

5
Original Instructions
stop. Allow the product to cool down before
storing or transporting.
■Remove all foreign materials from the
product. Store the product in a cool, dry, and
well-ventilated place that is inaccessible
to children. Keep the product away from
corrosive agents such as garden chemicals
and de-icing salts. Do not store the product
outdoors.
■For transportation in vehicles, remove the
isolator key, and secure the product against
movement or falling to prevent injury to
persons or damage to the product.
■Use extreme caution when lifting or tilting
the product for maintenance, cleaning,
storage, or transportation. The blade is
sharp. Keep all body parts away from the
blade while it is exposed.
TRANSPORTING LITHIUM BATTERIES
Transport the battery in accordance with local
and national provisions and regulations.
Follow all special requirements on packaging
and labelling when transporting batteries by a
third party. Ensure that no batteries can come
in contact with other batteries or conductive
materials while in transport by protecting
exposed connectors with insulating, non-
conductive caps or tape. Do not transport
batteries that are cracked or leaking. Check
with the forwarding company for further advice.
MAINTENANCE
■Use only original manufacturer’s
replacement parts, accessories, and
attachments. Failure to do so can cause
possible injury, can contribute to poor
performance, and may void your warranty.
■Servicing requires extreme care and
knowledge and should be performed only
by a qualified service technician. Have the
product serviced by an authorised service
centre only.
■Turn off the product, and remove the isolator
key and the battery pack. Make sure that all
moving parts have come to a complete stop
before any cleaning or maintenance task.
■Replace worn or damaged parts for safety.
■Frequently check the grass catcher for wear
or deterioration.
■Check all nuts, bolts, and screws at frequent
intervals for proper tightness to ensure that
the product is in safe working condition.
■Be careful during adjustment of the product
to prevent entrapment of the fingers
between moving blades and fixed parts of
the product.
■When servicing the blades, be aware that
even though the power source is turned off,
the blades can still be moved.
■You may make adjustments and repairs
described in this manual. For other repairs,
have the product serviced by an authorised
service centre only.
■After each use, clean the plastic parts with
a soft, dry cloth. Any part that is damaged
should be properly repaired or replaced by
an authorised service centre.
■The blade on the product is sharp. Use
extreme caution, and wear heavy-duty
gloves when fitting, replacing, cleaning, or
checking bolt security.
■The blade bolts must be adequately
tightened. See the manufacturer’s
recommendations for blade bolt torque,
which can be found in the product
specification table in this manual.
CLEARING BLOCKAGES
■Turn off the product, and remove the isolator
key and the battery pack. Make sure that all
moving parts have come to a complete stop.
■Always wear heavy-duty gloves when
checking or clearing a blockage. The blades
are sharp, and the blockage itself could be
a sharp object.
■Remove the grass catcher. Check and
carefully clear the grass catcher for
obstructions.
■Check the grass discharge chute, and
carefully clear blockages.
■Turn the product on its side. Check
its underside and the area around the
blade. Carefully remove any blockages.
Remember that the blade may move during
cleaning.
SYMBOLS ON THE PRODUCT
Safety alert
Read and understand
all instructions before
operating the product. Follow
all warnings and safety
instructions.

6
Original Instructions
Beware of thrown or ying
objects. Keep all bystanders,
especially children and pets,
at least 15 m away from the
operating area.
Beware of sharp blades.
Blades continue to rotate
after the motor is turned o.
Remove the isolator key
before maintenance.
Remove the battery pack
before starting any work on
the product.
Wear ear protection.
Wear eye protection.
Do not operate the product
on inclines greater than 15°.
Mow across the face of slopes,
never up and down.
100
Guaranteed sound power level
Do not expose the product to
rain or damp condition.
Regulatory Compliance Mark
(RCM).
Product meets applicable
regulatory
requirements.
Waste electrical products
should not be disposed of
with household waste. Please
recycle where facilities exist.
Check with your local authority
or retailer for recycling advice.
SYMBOLS IN THIS MANUAL
Note
Warning

7
Know your product
R36XLMW20
R36XLMW26
Self-propel lever
Dashboard
and fuel gauge
Speed adjustment
slider
On/o lever
Start button
Telescopic handle
Handle lever
Isolator key
Height adjustment
release key
Quick-release fastener
EASYCATCH™ grass
catcher
Battery door
Blade change U-bolt
Rear wheel
Front wheel
Operator's manual
Charger
Battery pack
Mulching plug

8
Getting started
Press the start button, then squeeze
and hold either side of the on/off lever
to start the product.
NOTE: Both battery ports are active.
The product can function using one or
two battery packs. SMART BOOST™
performance can be achieved when
two battery packs are inserted to
discharge a higher current and provide
higher power.
Adjust the operating angle of the handle to your preference. Turn the quick-
release fastener 90° clockwise. Align the handle to the preferred locking slot. Turn
the fastener 90° counterclockwise, and ensure that the fastener is secured into
the slot.
NOTE: The mulching plug covers
the rear discharge opening to allow
the blade to cut and recut for finer
clippings. The product will not start
without a catcher or mulch plug
securely installed.
For mulching operation, insert the
metal frame of the mulching plug into
the magnetic slot on the mower, and
insert the mulching plug into the rear
discharge chute.
Insert the isolator key, and close the
battery door.
Wear full eye protection, ear protection,
non-slip heavy-duty gloves, substantial
footwear, and long trousers at all times
while operating the product. Do not
operate the product when barefoot or
wearing open sandals.
1
2
6a
1
5
A
1
A
+ /
B
B
2
9a
Rotate the handle lock levers clockwise
to lock and secure the upper handle.
1
3
4
2
2
2
1
8

9
Getting started
Open the battery door. Install one or
two battery packs. Make sure that
the latch snaps in place and that the
battery pack is secured to the product
before operating.
NOTE: The on/off lever must be
continuously held during use. To turn
the product off, release the on/off lever.
For bagging operation, insert the metal
frame of the grass catcher into the
magnetic slot on the mower, and make
sure that the grass catcher fully covers
and aligns with the rear discharge
chute.
NOTE: The grass catcher collects
grass clippings preventing them from
being discharged across the lawn
while mowing. The product will not
start without a catcher or mulch plug
securely installed.
Fully extend the upper handle. Make sure that the upper handle is fully
extended.
Rotate the handle lock levers
counterclockwise to unlock the upper
handle.
1
2
6b
3
5
4
9b
To use the self-propel feature, press
the self-propel lever. The self-propel
speed can be adjusted with the thumb-
slide above the self-propel lever.
10
Release the self-propel lever to stop the
product.
2
1
7

10
7
6
8
9
10
7
6
8
9
10
p.19
p.18
p.14
Replacing the blade
p.11 p.12
p.14p.15
Using the grass
catcher
Adusting the
cutting height
Cleaning and
storing the product
Cutting with EASY
EDGE
Emptying the grass
catcher
Using the mulching
plug

11
Operation
15˚Max.15˚
1
2
3
2
1
2
2
1
4
3
1
USING THE GRASS CATCHER
WARNING: Avoid holes, ruts, bumps, rocks,
property stakes, or other hidden objects.
WARNING: Do not operate the product on
inclines greater than 15°. Mow across the
face of slopes, never up and down.
1. Open the battery door. Insert one or two
battery packs into the product. Make
sure that the latch on the battery pack
clicks in place, and that the battery pack
is secured before operating the product.
Insert the isolator key. Close the battery
door.
NOTE: The product does not start without
the isolator key. Ensure that the isolator
key is installed in the product.
2. Remove the mulching plug.
3. Insert the metal frame of the grass
catcher into the magnetic slot on the
mower, and make sure that the grass
catcher fully covers and aligns with the
rear discharge chute. EASYCATCH™
allows for the grass catcher to easily be
passed through the handles.
NOTE: The grass catcher collects
grass clippings preventing them from
being discharged across the lawn while
mowing. The product will not start without
the catcher securely installed.

12
Operation
A
+or
B
A
1
B
2
4
A
B
5
4. Press the start button, then squeeze and
hold either side of the on/off lever to start
the product. Release the start button and
keep holding the on/off lever to keep
using the product.
NOTE: Allow up to 2seconds for the self-
propel function to reach full speed.
5. To stop the product, release either the left
or right on/off lever.
15˚Max.15˚
USING THE MULCHING PLUG
WARNING: Avoid holes, ruts, bumps, rocks,
property stakes, or other hidden objects.
WARNING: Do not operate the product on
inclines greater than 15°. Mow across the
face of slopes, never up and down.

13
Operation
1
2
3
2
1
2
A
+or
B
A
1
22
B
4
B
A
5
2
1
4
3
1
1. Open the battery door. Insert one or two
battery packs into the product. Make
sure that the latch on the battery pack
clicks in place, and that the battery pack
is secured before operating the product.
Insert the isolator key. Close the battery
door.
NOTE: The product does not start without
the isolator key. Ensure that the isolator
key is installed in the product.
2. Remove the grass catcher.
3. Insert the metal frame of the mulching
plug into the magnetic slot on the mower,
and insert the mulching plug into the rear
discharge chute.
NOTE: The mulching plug covers the rear
discharge opening to allow the blade to
cut and recut for finer clipppings.
4. Press the start button, then squeeze and
hold either side of the on/off lever to start
the product. Release the start button and
keep holding the on/off lever to keep
using the product.
5. Release the on/off trigger to stop the
product.

14
Operation
CUTTING WITH EASY EDGE
EASY EDGE allows the product to easily cut
the grass along walls or the edge of the lawn.
NOTE: EASY EDGE pulls grass towards the
blade when the product is running along a
wall or the edge of the lawn.
7
6
8
9
10
7
6
8
9
10
1
ADJUSTING THE CUTTING HEIGHT
NOTE: Properly hold the carry handle while
adjusting the cutting height.
1. Slide forward the cutting height release
key to unlock the cutting deck.

15
Operation
77
6
6
8
8
9
9
10
10
2
2. Pull up or push down the deck to the
preferred cutting height. Refer to the
height label and indicator. Make sure that
the cutting height is securely locked into
position before mowing.
NOTE: The cutting height can be adjusted
to 10 positions. Cutting heights may vary in
particular products. Start the mower at the
highest position, before cutting the grass. If
the height adjustment key is difficult to slide
forward, try lifting up the handle slightly and
then sliding forward to set your preferred
height adjustment.
2
1
4
3
1
1
2
REPLACING THE BLADE
1. Open the battery door. Remove the
battery packs. Remove the isolator key,
and close the battery door.
NOTE: Open the battery door. Remove the
blade change-U bolt from its compartment.

16
Maintenance
2
3
5
1
2
4
2. Tilt the product on its side.
WARNING: The blade on the product is
sharp. Use extreme caution, and wear
heavy-duty gloves when fitting, replacing,
cleaning, or checking bolt security.
3. Remove all grass clippings and debris
from the cutting deck and blade.
4. Insert the U-shape plug into the cutting
deck holes to prevent the blade from
spinning during loosening the blade nut.
Loosen the blade nut.
5. Remove the blade change U-bolt.

17
Maintenance
6. Remove the blade nut, spacer, and
washer. Remove and properly dispose of
the old blade.
7. Install the new blade, washer, spacer,
and nut.
8. Insert the blade change U-bolt into the
cutting deck holes to prevent the blade
from spinning during tightening the blade
nut. Hand-tighten the nut until the blade is
secured and does not shake. Then use a
spanner to further tighten the nut by 1/2
turn (35-40 Nm torque).
6
7
1
2
8
Blade bolt tightening
torque (35~40 Nm)

18
Maintenance
B
A
A
or
B
1
3
2
1
2
EMPTYING THE GRASS CATCHER
NOTE: Stop mowing when the grass catcher
is full. Empty the grass catcher before
resuming operation.
1. To stop the product, release either the left
or right on/off lever.
2. Remove the grass catcher.
3. Remove the grass clippings from the
grass catcher into a bin.

19
Storage
B
A
A
or
B
1
3
2
1
4
2
1
4
3
2
CLEANING AND STORING THE
PRODUCT
1. Release the on/off lever to turn off the
product.
2. Open the battery door. Remove the
battery packs. Remove the isolator key,
and close the battery door.
3. Remove all foreign materials from the
product. Clean the product with a soft,
dry cloth, or cleaning brush.
WARNING: Do not use water to clean the
product.
4. Remove the grass catcher.

20
Storage
1
2
5
6
1
2
3
4
7
8
20210810v1d8
1
2
9
5. Open the handle locks. Push the upper
handle into the lower handle until the
handle is fully retracted.
6. Close the handle locks to secure the
handle.
7. Turn the quick-release fastener 90°
counterclockwise. Push the handle
forward until it is perpendicular to the
floor, then turn back the quick-release
fastener to align with the handle. Fold
down the lower handle, resting it on top
of the product.
8. Fold the grass catcher and place it on top
of the product.
NOTE: The product may be stored vertically.
There is a latch on the back of the user
interface panel to hang the grass catcher.
NOTE: Ensure that the battery packs are
removed and that all the handles are securely
locked before storing the product in a vertical
position.
9. Store the product in a cool, dry, and
well-ventilated place that is inaccessible
to children. Keep the product away
from corrosive agents, such as garden
chemicals and de-icing salts. Do not store
the product outdoors.
This manual suits for next models
1
Table of contents
Other Ryobi Lawn Mower manuals

Ryobi
Ryobi RY401010 User manual

Ryobi
Ryobi RLM5317SME User manual

Ryobi
Ryobi RY72ZTRX76 User manual

Ryobi
Ryobi RY48ZTR100 User manual

Ryobi
Ryobi RLM4617SME User manual

Ryobi
Ryobi RLM46175YB User manual

Ryobi
Ryobi RLM46175S User manual

Ryobi
Ryobi RY48111 User manual

Ryobi
Ryobi P1100VNM User manual

Ryobi
Ryobi RY40106 User manual

Ryobi
Ryobi RYAC130 User manual

Ryobi
Ryobi RY401021 User manual

Ryobi
Ryobi 4000475152 User manual

Ryobi
Ryobi R80XZTR54 User manual

Ryobi
Ryobi RLM18C33B25 User manual

Ryobi
Ryobi ONE+ RY18EGA User manual

Ryobi
Ryobi RY48RM76A Product guide

Ryobi
Ryobi RLM36X40S240 User manual

Ryobi
Ryobi RY48110 User manual

Ryobi
Ryobi RLM36X46X240 User manual