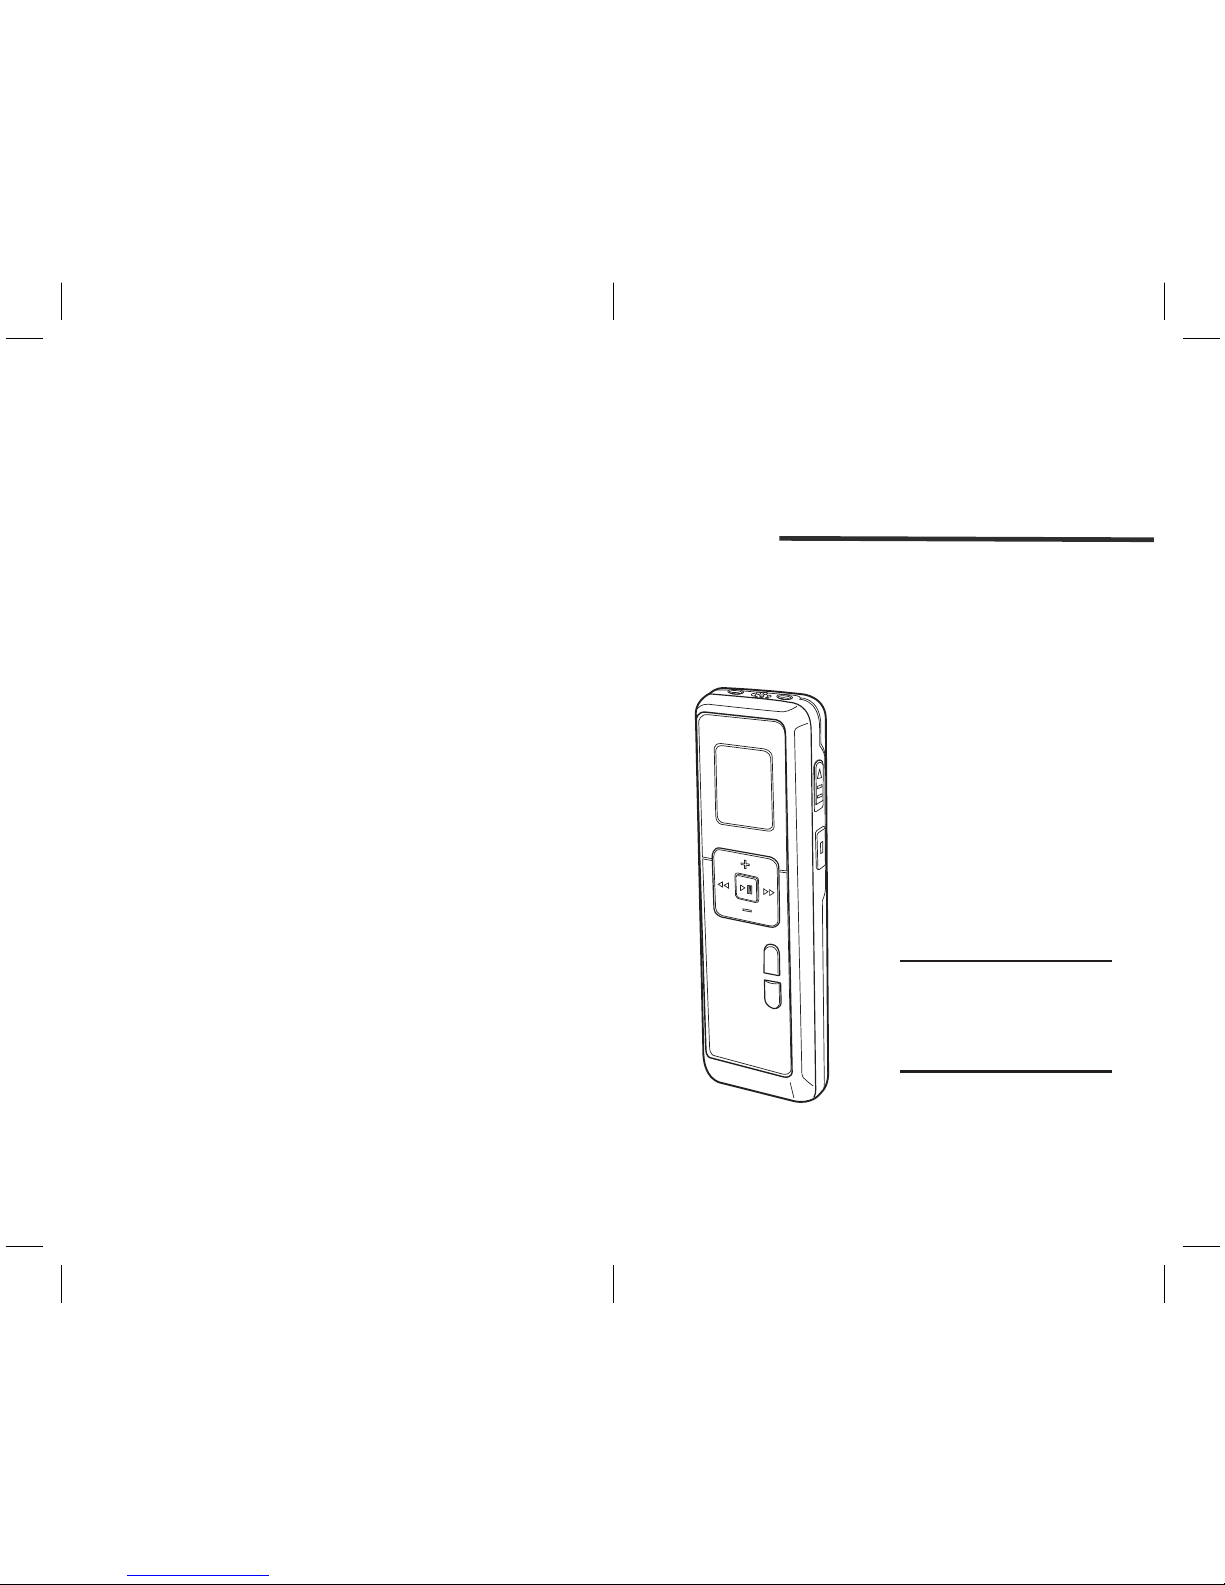
Safa Media SRM520 User manual

Instructions for use
Digital Voice Recorder
Thank you for purchasing this
product. Please read this manual
carefully before using the product.
Familiarizing yourself with the
instructions and functions.

Contents
Parts Information ........ 3
............................ 4
LCD Indicators and
Icons
.. 5
Replacing the Battery
............ 5
Getting Started
....................
7
Recording
Switching the Voice
Record On................... 6
......... 7Setting the Clock
..... 8
................ 7
Switching the Voice
Recorder Off
... 9
2) Recording with an
External Microphone
........... 9
3) Recording from an
External Device
..................................... 9
4) FM Radio Recording
1) Recording with the
Built-in Microphone
1
-
Please read this manual before use.
Keep the manual in a safe place for future refer
ence.
Note
This handling description is printed prior to product
development.
When a part of the product specification must be changed
to improve operability or other functions, priority is given
to the product specification itself. In such instances, the
instruction manual may not entirely match all the functions
of the actual product.
Therefore, the actual product and packaging, as well as
the name and illustration, may differ from the manual.
The screen/LCD display shown as an example in this
manual may be different from the actual screen/LCD
display.
2
Accessories 3.................
Hold function 6...............
USED TO USB POWER
5....................................
1) Normal Playback 10
....
2) Slow Playback 10
........
......................
10
Playback
7) Beep Setting 21............
3) Search 10....................
5) Divide: Automatically
Recording to a new file
every 60 minutes 20.........
6) VOR selection: Voice
Operating Recording 20...
4) Repeat Playback 11.....
.... 13
FM Radio Reception
... 14
MP3 Player Function
.................. 16
Menu Entry
............................16
1) Erase: Deleting a
single file or all files in a
folder
..................... 18
2) Recording Quality
Selection
.................... 18
3) Microphone Recording
Sensitivity
..................................... 19
4) Recording Input Setup
8) Format: Deleting
all files 21
.........................
9) Clock Set Mode 22
.......
10) Timer Setup 23
...........
11) Alarm Setup 24
...........
Playing back the
transferred files using
the Media Player ....... 29
S/W Installation ........ 29
Playback .................. 31
Formatting the unit's data
................................. 34
Troubleshooting guide
.................................... 35
Specifications .......... 36
12) File Preview: Playing
the first seconds of each
file 25
.............................
13) Version: Displaying
the firmware version
and release date 26
.......
...... 27
Firmware Upgrade
Connecting to PC ....... 28
Recommended PC
environment ................28

LCD Indicators and Icons
4
Parts Information
3
1. Earphone socket
Accessories
Users Manual, Battery, USB Cable, Stereo Earphone,
Tel adaptor, Line-in cable, Pin-mic
HQ SP LP
REC
LOW
SENSE
MUSIC
F M
LINE-IN
VOR
ALL REPEAT
SLOW SHUFF
MHz
A B
Folder indicator ; A,B,C,D, MUSIC
Recording quality & Microphone
input sense indicator
Battery level indicator
Alarm enabled indicator
Line input indicator
Timer recording enabled indicator
Voice operated recording function
indicator
Repeat mode indicator
Record mode indicator
FM radio reception indicator
File number, menu value, FM radio
channel indicator
Play/recording time indicator
Menu entries
FM radio frequency indicator
HQ SP LP
REC
LOW
SENSE
MUSIC
F M
LINE-IN
VOR
MHz
ALL REPEAT
A B
12
13
14
1
3
4
56
7
8
9
10
11
2
12. FOLDER/REPEAT ;
Folder change,
Repeat mode change
Repeat A↔B, FM Auto preset
2. Line & External Microphone
input socket
3. Built-in microphone
4. RECORD/STOP/POWER ON
EQ mode change
5. LCD DISPLAY
6. HOLD switch
7. PLAY/STOP/POWER ON
FM channel save, Slow play,
Menu set
8. + ; VOLUME UP
9. - ; VOLUME DOWN
10. BACK ; Fast rewind,
file change, Menu change
FM Freq./CH down,
FM Auto search down
11. NEXT ; Fast forward,
file change, Menu change
FM Freq./CH up,
FM Auto search up
13. MODE/MENU ; Mode select
(VOICE/MUSIC/FM),
Menu entry, Speaker on/off
14. Mini-USB socket ;
PC download

Replacing the Battery
5
USED TO USB POWER (PC or DC Adapter)
1. Be sure that the Voice Recorder is switched off.
Switch off the Voice Recorder by pressing the
PLAY/STOP button for a few moments in stop mode.
→ Do not replace the battery while the Voice Recorder
is switched on, as this may cause the device to
malfunction.
6
2. Open the battery cover.
3. Insert the battery
- Make sure that the battery is inserted properly size
AAA and close the cover.
- Press the PLAY/STOP button for a few moments to
switch the Voice Recorder on.
→ Remove the battery if you will not be using the Voice
Recorder for an extended period. Leaking battery may
damage the Voice Recorder.
1. Connect the USB jack with your PC by means of an
USB cable.
2. Press the PLAY/STOP button for a few moments to
switch power on, and then Voice Recorder is in normal
operating mode.
3. Speaker operates only when Voice Recorder insert the
battery.
4. Speaker is not sound when Voice Recorder removes
the battery. You can hear to sound only the Ear-Phone.
Hold function
1. When the HOLD switch on the up side of the Voice
Recorder is in the Hold position, all buttons on the
device are inactive.
2. Slide the HOLD switch to the OFF position to enable
the buttons on the Voice Recorder.
Getting Started
Getting Started
Switching the Voice Record On
1. Press and hold the PLAY/STOP button for a few
moments to switch on the Voice Recorder. The Voice
Recorder is in Stop mode (Fig.1) or Clock set mode (Fig.2).
→ The Voice Recorder switches on in the same mode
that it was switched off.
→ If the time is not set, the Voice Recorder will switch on
in Clock set mode.
→ The Voice Recorder will change to Stop mode when you
set the time or when you press the MODE/MENU button.
2. Press and hold the REC/STOP button for a few moments
to begin recording immediately.
3. If the HOLD switch is in the Hold position, “On HOLD”
will be shown briefly on the display, and the display will
turn off (Fig.3). Unlock the Voice Recorder by moving
the HOLD switch to the OFF position.
Full
Approximately half used
Almost empty
Battery empty
HQ HQ
Fig.1 Fig.2 Fig.3
→ Should your Voice Recorder malfunction, please
remove the battery and insert them again.

Recording
7
Setting the Clock
1. Put the Voice Recorder in stop mode.
8
2. Press and hold the MODE/MENU button for a few
moments to enter Menu mode. Follow the instructions
in the chapter Menu Entry.
Switching the Voice Recorder Off
In STOP or FM Radio mode, you can switch off the Voice
Recorder by pressing and holding the PLAY/STOP button
for a few moments.
→ Switch off your Voice Recorder when you are finished
using it for recording or playback for maximum battery life.
Recording
1. Press the FOLDER/REPEAT button to select the desired
folder. The Voice Recorder will move to the next folder
each time you press the button.
2. Set the desired VOR (Voice Operated Recording) function
and quality (HQ, SP, LP) before you start recording
(see the Menu Entry chapter for more details.)
3. Make a test recording to make sure that the Voice
Recorder settings are correct.
4. Press and hold the PLAY/STOP button during recording for
a few moments to display the remaining recording capacity.
→ The maximum number of files in each folder is 99, for a
total capacity of 396 files (99 files × 4 folders).
→ If the recording time exceeds the available capacity or the
number of files reaches 396, “FULL” will be displayed and
you cannot continue recording (Fig.4, 5). If this happens,
delete some recordings or move them to an external
device (Computer or Audio).
→ Do not remove the battery during recording.
This may cause the Voice Recorder to malfunction.
→ If you intend to record for a prolonged period of time,
replace the battery before beginning recording.
→ When the Voice Recorder is in VOR mode recording will stop
automatically when no sound is detected. Disable the VOR
function when recording important conversations (Fig.6).
→ Press the REC/STOP button while playing back an MP3 or
WMA file in the Music Folder to enable the equalizer.
1) Recording with the Built-in Microphone
1. Press and hold the REC/STOP button for a moment to switch
the Voice Recorder on and start recording (Fig.7, Fig.8).
2. Point the Voice Recorder’s built-in microphone towards the
sound source. Press and hold the PLAY/STOP button during
recording to display the remaining recording capacity.
3. Press the NEXT button to create a new file while you are
recording (File separation function).
4. Press the REC/STOP button to stop the recording.
5. The total time of the recording is displayed when you stop
recording by pressing the REC/STOP button (Fig.9).
REC
VOR
HQ
Fig.4 Fig.5 Fig.6
HQ
REC
HQ
REC
Fig.7 Fig.8 Fig.9
HQ
REC

Recording
9 10
2) Recording with an External Microphone
To record with an external microphone, connect the
microphone to the LINE input socket and follow the same
procedure as for the built-in microphone.
1) Normal Playback
1. Press the PLAY/STOP button for a few moments to switch
the Voice recorder on.
→ If you are in FM Radio mode, press the MODE/MENU
button to exit this mode.
3) Recording from an External Device
1. Switch the Voice Recorder on.
→ If the Voice Recorder is in FM Radio mode, press the
MODE/MENU button for a few moments to exit this mode.
2. Go to Menu mode and setup the input
source line (L). For details please read
the explanation under Menu Entry –
Recording Input Setup.
“LINE-IN” will be shown on the display
(Fig.10).
Playback
Fig.10
HQ
REC
LINE-IN
3. Connect the MIC jack with the audio
source by means of an audio cable.
4. Press the FOLDER/REPEAT button to select the folder
you want to record.
5. Press the REC/STOP button to begin recording.
→ To stop recording, follow the same procedure
as for recording with the built-in microphone.
4) FM Radio Recording
1. Switch the Voice Record on.
2. If you are not in FM Radio mode, press the MODE/MENU
button to enter this mode.
3. Select the station you want to record.
For details, please read the FM Radio
Reception chapter.
4. Press the REC/STOP button to record
the currently selected FM Radio
station (Fig.11).
HQ
REC
F M
MHz
Fig.11
2. Press the FOLDER/REPEAT button to go the folder where
the desired file is stored.
3. Press the PLAY/STOP button.
The playback time will be shown on
the display.
4. Adjust the volume using the Volume
UP/DOWN button(FIG.12).
HQ
Fig.12
5. Press the PLAY/STOP button during
playback to Stop. The total playback
time of the current file will be shown on the display.
6. Press the PLAY/STOP button again to continue playback
from the previous position.
2) Slow Playback
→ Available for voice-file playback only.
1. Press the PLAY/STOP button for a
few moments to switch from normal
playback to slow playback (Fig.13).
2. Press the PLAY/STOP button for a
few moments again to return to
normal playback. Fig.13
HQ
SLOW
3) Search
1. Press and hold the NEXT or BACK button for a few
moments during playback to scan forward or backward
in the current file at a fast speed.

Playback
11 12
2. When you release the NEXT or BACK button, playback
will resume at the selected speed (normal or slow) from
the point where you release the button.
4) Repeat Playback
Repeating a Section
Repeating a File
1. During playback, press the FOLDER/REPEAT button at
the beginning of the section you want to repeat.
The indicator will blink on the display (Fig.14).
A B
2. Press the FOLDER/REPEAT button again at the end of
the section you want to repeat (Fig.15).
Repeating a Folder
1. With the Voice Recorder in File Repeat
mode, press the FOLDER/REPEAT
button for a few moments.
1. Press the FOLDER/REPEAT button for a few moments
during playback. The repeat indicator will be shown on
the display.
Fig.14
HQ
A B
HQ
A B
Fig.15
→ The selected section will repeat continuously until you
press the FOLDER/REPEAT button.
→ Press the FOLDER/REPEAT button to stop Section
Repeat mode and return to normal playback.
2. The current file will be repeated as
long as the repeat indicator is shown
on the display (Fig.16).
→ Press the PLAY/STOP button to stop
playback. The Voice Recorder will
remain in File Repeat mode.
Fig.16
HQ
REPEAT
HQ
ALL REPEAT
Fig.17
2. “ALL REPEAT” will be shown on the
display, and the current folder will
repeat (Fig.17).
→
Press the PLAY/STOP button to stop playback.
The Voice Recorder will remain in Folder Repeat mode.
Shuffle mode
2. While the Voice Recorder playing a file, press the
FOLDER/REPEAT button three times for a few moments
each.
1. With the Voice Recorder in Stop mode, press the
MODE/MENU button to select the MUSIC folder.
3. “SHUFF” will be shown on the display,
and the files in the MUSIC folder will
play in random order (Fig.18).
MUSIC
SHUFF
Fig.18
→ If you press and hold the NEXT button until the end of the
current file, the Voice Recorder will continue scanning
through the next file.
→ Shuffle mode is only available in the
MUSIC folder.
→ Press and hold the FOLDER/REPEAT
button for a few moments during
playback to exit Shuffle mode.
When you press the PLAY/STOP button to stop
playback, the Voice Recorder will remain in Shuffle mode.

MP3 Player Function
13 14
1) Frequency Scanning
Programming up to 20 Radio Stations
2) Manual Programming
3) Automatic Programming
1. With the Voice Recorder in the Stop mode, press the
MODE/MENU button to select the FM folder.
2. Connect the earphone.
FM reception is not possible if you do not connect the
earphone because they function as the antenna.
1. Press the NEXT button for a few moments.
2. The Voice Recorder will scan the FM Frequency band
automatically, stopping at the first station that it finds.
3. Press the PLAY/STOP button briefly to save the current
station. Then, repeat step 1.
1. Press the NEXT button once. The frequency will increase
by 100kHz .
2. Continue pressing the NEXT button briefly until you reach
the desired frequency.
3. Press the PLAY/STOP button briefly to save the selected
station.
→ You can use the BACK button to search in the opposite
direction.
1. Press the FOLDER/REPEAT button for
a few moments.(Fig.19)
Fig.19
F M
MHz
Button Function Overview at FM Radio mode
FM Radio Reception
MUSIC
Fig.20
MP3 Player Function
2. Press the MODE/MENU button to
select the MUSIC folder(Fig.20).
1. Copy MP3 or WMA files from your computer to the
MUSIC folder of Voice Recorder.
Button Function
VOL UP/DOWN
PLAY/STOP
MODE/MENU
FOLD/REP
RECORD/STOP
FF/REW
Press
Short
Long
Short
Long
Short
Long
Short
Long
Short
Long
Short
Long
FM Radio Reception
mode
FM Scanning mode
Volume up, down
Volume fast up, down
Channel save
Power off
Exit FM Radio mode
Speaker on/off
Freq/Pres switch
Auto Preset
FM Radio Record
Stereo/Mono switch
Manual search
Auto search
No function
No function
No function
Power off
No function
No function
No function
No function
No function
No function
Stop at frequency
Stop after scanning
next station

15 16
MP3 Player Function Menu Entry
3. Press the NEXT button to select the desired file,
and then press the PLAY/STOP button.
Fig.21 Fig.22 Fig.23
Fig.24
MUSIC MUSIC MUSIC
MUSIC MUSIC
Fig.25
→ During playbac k, press the REC/STOP button to
change the EQ mode (Normal -> Jazz -> Rock ->
Pop -> Classic) (Fig.21, 22, 23, 24, 25).
→ Slow playback mode is not available for MP3 or WMA
files saved in the MUSIC folder.
Attention: Please adjust the sound level with the volume
control. Listening to music at high volumes can
permanently damage your hearing.
→ Menu mode is available in Stop mode.
→ The following description is based on Stop mode in a
voice folder.
→ The available menu items differ depending on whether
you are in a voice folder or a MUSIC folder.
1) Erase: Deleting a single file or all files in a folder
1. With the Voice Recorder in stop mode, select the file you
want to delete.
2. Press the MODE/MENU button for a few moments (Fig.26).
Deleting a file
A. Press the PLAY/STOP button briefly. The file number (02)
will blink, and “ERASE” is shown on the display (Fig.27).
B. Press the PLAY/STOP button again briefly. The file number
indicator will be replaced with “N” (no) and blink (Fig.28).
C. Press the NEXT button to change the confirmation
indicator to “Y” (yes) (Fig.29).
Fig.26 Fig.27 Fig.28
Fig.29 Fig.30

17 18
Menu Entry
Deleting the files in a single folder or all files
E. With the Voice Recorder in File Delete mode (Fig.27),
press the NEXT button to select the folder from which you
want to delete all files. (A -> B -> C -> D -> M -> A B C D M)
→ “ERASE” is shown on the display, and the indicator is
shown for the chosen folder (Fig.31, 32).
Fig.31
MUSIC
Fig.32
F. Press the PLAY/STOP button briefly.
G. The confirmation indicator “n” (no) will blink on the
display (Fig.33).
H. Press the NEXT button to change the confirmation
indicator “Y” (yes) (Fig.34).
Fig.33 Fig.34
D. Press the PLAY/STOP button briefly to delete the
selected file (Fig.30).
I. Press the PLAY/STOP button to delete all files in the
selected folder or folders (Fig.35, 36, 37).
Fig.35 Fig.36 Fig.37
2) Recording Quality Selection
→ This function is only available in voice folders.
1. With the Voice Recorder in Stop mode,
press the MODE/MENU button for a
few moments (Fig.26).
2. Press the NEXT button briefly and then
press the PLAY/STOP button (Fig.38).
Fig.38
3. “REC” is shown and “HQ” blinks on the display.
4. Press the NEXT button to select the desired recording
quality (Fig.39, 40, 41).
5. Press the PLAY/STOP button to save your setting and
then the MODE/MENU button to exit Menu mode.
Fig.39 Fig.40
HQ SP LP
Fig.41
3) Microphone Recording Sensitivity
→ This function is only available in voice folders
1. With the Voice Recorder in Stop mode, press the
MODE/MENU button for a few moments (Fig.26).

19 20
Menu Entry
Fig.48 Fig.49 Fig.50
2. Press the NEXT button 2 times (Fig.42).
3. Press the PLAY/STOP button briefly.
4. “SENSE” is shown and “HI” blinks on the display (Fig.43).
5. Press the NEXT button to select the desired microphone
recording sensitivity (Fig.44).
Fig.42 Fig.43 Fig.44
6. Press the PLAY/STOP button to save your setting and
then the MODE/MENU button to exit Menu mode.
4) Recording Input Setup
→ This function is only available in voice folders.
1. With the Voice Recorder in Stop mode, press the
MODE/MENU button for a few moments (Fig.26).
2. Press the NEXT button briefly 3 times (Fig.45).
3. Press the PLAY/STOP button briefly. “INPUT” is shown
and “V” blinks on the display (Fig.46).
4. Press the NEXT button to select “L” (Line) or “V” (Voice)
(Fig.47).
5. Press the PLAY/STOP button to save your setting and
then the MODE/MENU button to exit Menu mode.
5) Divide:
Automatically Recording to a new file every 60 minutes
→ This function is only available in voice folders.
1. With the Voice Recorder in Stop mode, press the
MODE/MENU button for a few moments (Fig.26).
2. Press the NEXT button 4 times. “DIVIDE” is shown on
the display (Fig.48).
3. Press the PLAY/STOP button briefly the indicator
“n” blinks on the display (Fig.49).
4. Press the NEXT button to change the indicator to “Y” (Fig.50).
5. Press the PLAY/STOP button to save your setting and then
the MODE/MENU button to exit Menu mode.
Fig.45 Fig.46 Fig.47
6) VOR selection: Voice Operating Recording
→ This function is only available in voice folders.
1. With the Voice Recorder in Stop mode, press the
MODE/MENU button for a few moments (Fig.26).
2. Press the next button 5 times. “VOR” is shown on the
display (Fig.51).
3. Press the PLAY/STOP button briefly the indicator “OF”
blinks on the display (Fig.52).

21 22
Menu Entry
7) Beep Setting
1. With the Voice Recorder in Stop mode, press the
MODE/MENU button for a few moments (Fig.26).
2. Press the NEXT button briefly 6 times (Fig.54).
3. Press the PLAY/STOP button briefly.
4. “BEEP” is shown and “On” blinks on the display (Fig.55).
5. Press the NEXT button to select “OF” (off) or “On” (Fig.56).
Fig.54 Fig.55 Fig.56
6. Press the PLAY/STOP button to save your setting and
then the MODE/MENU button to exit Menu mode.
8) Format: Deleting all files
→ This function deletes all files on the Voice Recorder,
including all programmed FM Radio stations.
1. With the Voice Recorder in Stop mode, press the
MODE/MENU button for a few moments (Fig.26).
2. Press the NEXT button repeatedly until “FRMAT” is
shown on the display (Fig.57).
3. Press the PLAY/STOP button briefly. “N” blinks on the
display (Fig.58).
4. Press the NEXT button to change the indicator to “Y” (Fig.59).
5. Press the PLAY/STOP button to format the Voice Recorder
and delete all files on it (Fig.60, 61).
Fig.60 Fig.61
9) Clock Set Mode
1. With the Voice Recorder in Stop mode, press the
MODE/MENU button for a few moments (Fig.26).
2. Press the NEXT button repeatedly until “CLOCK” is
shown on the display (Fig.62).
3. Press the PLAY/STOP button briefly.
4. The default system data is shown, “01” for the day and
month, and “07” for the year (Fig.63).
5. Press the NEXT button to set the desired year and then
press the PLAY/STOP button.
Fig.57 Fig.58 Fig.59
4. Press the NEXT button to select “OF” (off) or “On” (Fig.53).
Fig.51 Fig.52 Fig.53
VOR
5. Press the PLAY/STOP button to save your setting and
then the MODE/MENU button to exit Menu mode.

23 24
Menu Entry
8. The time will now blink. Set the time in the same manner
as you set the date, using the NEXT or BACK buttons to
select the desired values (Fig.64).
9. After you set the minutes, press the PLAY/STOP button to
save your settings and then the MODE/MENU button to
exit Menu mode.
→ The clock will begin to run as soon as you save your
time setting.
→ With the Voice Recorder in stop mode, Press the
FOLDER/REPEAT button briefly, current time is shown.
Press the FOLDER/REPEAT button briefly again,
go back previous display.
Fig.62 Fig.63 Fig.64
10) Timer Setup
1. With the Voice Recorder in Stop mode, press the
MODE/MENU button for a few moments (Fig.26).
2. Press the NEXT button repeatedly until “TIMER” is shown
on the display (Fig.65).
3. Press the PLAY/STOP button briefly, “OF” (timer setup
off) blinks on the display (Fig.66).
4. Press the NEXT button to select “V” (Voice) or “Fm”(FM).
→ When you select the “Fm”, current frequency of FM will
be recorded (Fig.67, 68).
5. Press the PLAY/STOP button briefly and then press the
NEXT or BACK buttons to enter the desired hours (Fig.69).
6. Press the PLAY/STOP button to set up the recording interval
(Fig.70), press the NEXT button to set the interval time.
7. Press the PLAY/STOP button to select the folder you
want to record to (Fig.71).
8. Choose the folder to record to by pressing the NEXT button.
6. The month will now blink “01”, press the NEXT button to
select the desired month and press the PLAY/STOP button.
7. The day will now blink “01”, press the NEXT button to
select the desired day and press the PLAY/STOP button.
9. Press the PLAY/STOP button to save your setting and
then the MODE/MENU button to exit Menu mode.
11) Alarm Setup
1. With the Voice Recorder in Stop mode, press the
STOP/MENU button for a few moments (Fig.26).
5. Press the PLAY/STOP button briefly to set the alarm time (Fig.74).
4. Press the NEXT button to change the indicator to “On” .
3. Press the PLAY/STOP button briefly. “OF” (alarm setup off)
blinks on the display (Fig.73).
2. Press the NEXT button repeatedly until “ALARM” is shown
on the display (Fig.72).
Fig.69 Fig.70 Fig.71
Fig.65 Fig.66 Fig.67 Fig.68
Once you have set the hours, press the PLAY/STOP
button and then set the minutes.

25 26
Menu Entry
7. Press the PLAY/STOP button to save your setting and
then the MODE/MENU button to exit Menu mode.
6. Press the NEXT button to select the desired hour, and
press the PLAY/STOP button to select the desired minutes
in the same manager (Fig.75).
Fig.72 Fig.73 Fig.74
Fig.75
12) File Preview: Playing the first seconds of each file
1. With the Voice Recorder in Stop mode, press the
MODE/MENU button for a few moments (Fig.26).
2. Press the NEXT button repeatedly until “SCAN” is shown
on the display (Fig.76).
Fig.76
3. Press the PLAY/STOP button briefly. “N” blinks on the
display (Fig.77).
Fig.77 Fig.78 Fig.79
13) Version:
Displaying the firmware version and release date
1. With the Voice Recorder in Stop mode, press the
MODE/MENU button for a few moments (Fig.26).
2. Press the NEXT button repeatedly until “VER” is shown
on the display (Fig.80).
3. Press the PLAY/STOP button briefly to display the version
number (Fig.81).
4. Press the NEXT button to display the firmware release
date (Fig.82).
5. Press the PLAY/STOP button and then the MODE/MENU
button to exit Menu mode.
Fig.80 Fig.81 Fig.82
5. Press the PLAY/STOP button to play the first seconds or
each file starting with the first file of the current folder
(Fig.79).
4. Press the NEXT button to change the indicator to “Y”
(Fig.78).

27 28
Firmware Upgrade Connecting to PC
1. Download the firmware update for your Voice Recorder
from internet website. Extract the file and place it in the
Voice Recorder ROOT directory(Fig83).
2. Press the PLAY/STOP button for a few moments to switch
power on, and then automatically to upgrade (Fig.84, 85).
Fig.83 Fig.84 Fig.85
Warnings
1. Do not attempt to open, repair, or modify your Voice Recorder.
2. Do not use your Voice Recorder where the use of
electronic devices is prohibited (such as in aircraft, etc.).
3. Do not put your Voice Recorder or its accessories in
your mouth.
4. Do not immerse your Voice Recorder or spill liquids on it.
5. Do not expose Voice Recorder or its accessories to
shocks, as this may cause malfunctions.
6. Do not apply excessive force to the LCD display, as this
may damage the display or cause malfunctions.
7. Do not expose Voice Recorder to direct sunlight or any
source of heat for a prolonged period.
8. Remove the battery if you will not be using the Voice
Recorder for an extended period.
9. Do not pull attached earphone, microphone, or USB cable
with excessive force.
The information in this User Manual is subject to change
without notice.
Recommended PC environment
Supported PCs IBM PC/AT compatible
Supported OS Windows XP Professional
Windows XP Home Edition
Windows Millennium Edition(Me)
Windows 2000 Professional
Windows 98 Second Edition
Windows 98
USB port One required for connection
Sound board 16-bit Windows-compatible sound
board supported
Other Speakers or headphones required
- Supplied windows 98 usb driver files from seller.
- Operation is not guaranteed for Macintosh PCs.
- Operation is not guaranteed for the following
environments.
Upgraded Windows environments
Windows 95, Windows NT
Dual-boot Windows environments
- Standby, suspend, and other modes may not work
properly with your particular environment. If this is the
case, do not use those modes.
Note
Supplied Windows 98 USB driver files

Playing back the transferred
files using the Media Player
29
2. Execute setup.exe file which is saved in the root folder
of voice recorder.
3. Click Install button on the bottom of the menu.
You can play transferred ZVR file using windows media
player on your pc.
In case of the plug-in file for ZVR file play is not preinstalled
you need to install program described as following procedure.
SW installation
1. Connect the voice recorder to PC
30

Playing back the transferred
files using the Media Player
31
3. Click and select [ZVMPDISK [E:]].
Playback
1. Select [All Programs] > [Windows Media Player] from
[Start] menu.
" Windows Media Player" starts.
2. Select [Open] from [File] menu.
Select
32
2) Select
1) Click
4. Click [Files of type] and select [Any File [*.*]].
2)Select
1) Click

Playing back the transferred
files using the Media Player
33
Formatting the unit' s data
Always format data using the unit itself (See page 21).
Using your PC to do the formatting might stop the unit
from recording normally.
If you accidentally formatted using your PC, reformat it
using the unit.
5. Select the playback file > click [Open].
6. Read the message first.
Click [Don't ask me again for this extension.] > click
[Yes]. Playback starts.
2) Click
1) Select
34
2) Click
1) Select

35 36
Troubleshooting Specifications
Symptom
LCD is Blankt
Can’t record
Can’t playback
Can’t stop,
pause, play
or record
No sound from
the speaker
No sound from
the earphone
The HOLD switch is engaged.
The battery is exhausted.
Nothing has been recorded
yet.The volume is at the
lowest setting.
The HOLD switch is engaged.
The earphone is plugged in.
The volume is at the lowest
setting.
The earphone is not plugged
in properly.The volume is
at the lowest setting.
The HOLD switch is engaged.
The battery is exhausted.
The maximum number of
recordings has been reached
or the recording capacity is
full.
Possible cause
The battery is exhausted.
The battery is not inserted
correctly
Correction
Replace the battery.
Insert the battery
correctly.
Slide the HOLD switch
to the Off position.
Replace the battery.
Check the number of
recordings.Adjust the
volume.
Slide the HOLD switch
to the Off position.
Remove the earphone.
Adjust the volume.
Plug in the earphone
properly.
Adjust the volume.
Slide the HOLD switch
to the Off position.
Replace the battery.
Delete some recordings
or move recordings to
an external device.
Specification
32kbps/ 8kHz/ZVR, Mono
6.4kbps/ 8kHz/ZVR, Mono
4kbps/ 8kHz/ZVR, Mono
Internal microphone (Mono)
external microphone (Mono)
Line (Stereo at HQ mode)
FM (Stereo at HQ mode)
87.50~108.00 MHz
ON / OFF
YES
Total 396 (99 per folder × 4)
All bit rates
32~192kbps, no DRM supported
USB 1.1
AAA (LR03, UM-4) alkaline battery
106 mm X 31mm X 16 mm
Items
Encoder HQ
SP
LP
Recording source
FM Radio Reception Band
Alarm function
Timer recording function
Maximum number of recordings
Playback capability MP3
WMA
USB support
Power supply
Dimensions
Recording time
Important information
HQ
SP
LP
128MB 256MB 512MB
9HR 19 MIN
46 HR 36MIN
74 HR 33 MIN
18 HR 34 MIN
92 HR 50 MIN
148 HR 32 MIN
37 HR 12 MIN
186 HR 2 MIN
297 HR 40 MIN
1GB
74 HR 29 MIN
372 HR 27 MIN
595 HR 56 MIN
8 hours
Battery life
(Record/Playback Earphone)
Because its products are subject to continuous improvement,
it is reserved the right to modify product designs and
specifications without notice and incurring any obligation.
Table of contents
Other Safa Media Voice Recorder manuals