manuals.online logo
Brands
  1. Home
  2. •
  3. Brands
  4. •
  5. Safco
  6. •
  7. Desktop
  8. •
  9. Safco Picco 1953 User manual

Safco Picco 1953 User manual

Top Panel 1 1953-01
Screw Post 8 HFFMFB
Back Panel 1 1953-04
Locking Cam 8 HFFMFC
Keyboard Shelf 1 1953-07
Left Shelf Rail 1 1970-17
Right Shelf Rail 1 1970-18
Small Flat Head Screw 12 1902-23
Left Side Panel 1 1953-02
Right Side Panel 1 1953-03
Left Cabinet Rail 1 1970-15
Right Cabinet Rail 1 1970-16
Large Screw 4 8917-27
Caster Bracket 4 8917-10
Caster without Brake 2 8917-25
Caster with Brake 2 8917-24
Small Pan Head Screw 2 1951-23
Bumper 2 1951-28
Mouse Tray 1 1951-08
Clevis Pin 1 1951-26
Plastic Washer 4 1951-31
Hairpin Cotter 1 1951-27
Mouse Pad 1 1951-11
Wrist Rest 1 1972-10
Lay the C Back Panel down with the large holes
facing up. Insert four D Locking Cams, with the
arrows pointing toward the nearest SIDE edge.
A
B
C
D
E
F
G
H
I
J
K
L
M
N
O
P
Q
R
S
T
U
V
W
X
MODEL
NUMBER 1953
1953-37: 1 of 2; Rev. 1; 08/02
PiccoTM Computer Workstation
ASSEMBLED
UNIT
MODEL 1953
For questions or concerns, please call
Safco Consumer Hot Line 1-800-664-0042
available Monday-Friday 8:00 AM to 4:30 PM (Central Time)
(English-speaking operators)
Safco Products Company, New Hope, MN 55428
1
Q
Q
Q
Q
Q
Q
Q
Q
Q
Q
Q
Q
Q
Q
Q
Q
Q
Q
Q
Q
Q
Q
Q
Q
LETTER
CODE DESCRIPTION QTY. PART NO.
PARTS LIST
Sort and count your parts! QQ
QQ
Q
A
QQ
QQ
Q
B
QQ
QQ
Q
D
QQ
QQ
Q
C
QQ
QQ
Q
K
QQ
QQ
Q
E
QQ
QQ
Q
G
QQ
QQ
Q
D
QQ
QQ
Q
I
QQ
QQ
Q
F
Work on a smooth, clean surface.
Locate the A Top Panel and position it with the
holes up. Insert four B Screw Posts into the holes,
and tighten with a screwdriver (do not overtighten!)
Locate the E Keyboard Shelf and position it with the
holes along the edges facing up. Fasten a F Left
Shelf Rail and a G Right Shelf Rail (Z-shaped ends)
at the sides of the Shelf, with the rollers toward the
BACK of the shelf. Use three H Small Flat Head
Screws per Rail.
QQ
QQ
QQQ
QQ
Q
QQ
QQ
QQQ
QQ
Q
23QQ
QQ
QQQ
QQ
Q
QQ
QQ
Q
QQ
QQ
Q
QQ
QQ
Q
L
QQ
QQ
Q
K
QQ
QQ
Q
G
QQ
QQ
Q
F
Properly identify the
four types of rails
used!
The Cabinet Rails (K,
L) have C-shaped
cross sections; rollers
are at the FRONT, and
the Left Cabinet Rail is
stamped “CL” near the
roller, while the Right
Cabinet Rail is
stamped “CR”.
The Shelf Rails (F, G)
have Z-shaped sec-
tions; rollers are at the
BACK, and they are
stamped “DR” for
Right and “DL” for Left.
QQ
QQ
Q
A
QQ
QQ
Q
B
QQ
QQ
Q
C
QQ
QQ
Q
D
QQ
QQ
Q
G
QQ
QQ
Q
F
QQ
QQ
Q
H
ROLLERS
BACK EDGE OF
SHELF
RAIL FLUSH
WITH SHELF
FRONT
USE THIS HOLE
FOR FRONT
SCREW
QQ
QQ
Q
E
TOOLS REQUIRED: Phillips Screwdriver
(Two People Recommended)
QQ
QQ
Q
H
QQ
QQ
Q
J
QQ
QQ
Q
L
QQ
QQ
Q
M
QQ
QQ
Q
M
QQ
QQ
Q
N
QQ
QQ
Q
N
QQ
QQ
Q
O
QQ
QQ
Q
P
QQ
QQ
Q
Q
QQ
QQ
Q
S
QQ
QQ
Q
T
QQ
QQ
Q
U
QQ
QQ
Q
V
QQ
QQ
Q
X
QQ
QQ
Q
R
QQ
QQ
Q
W
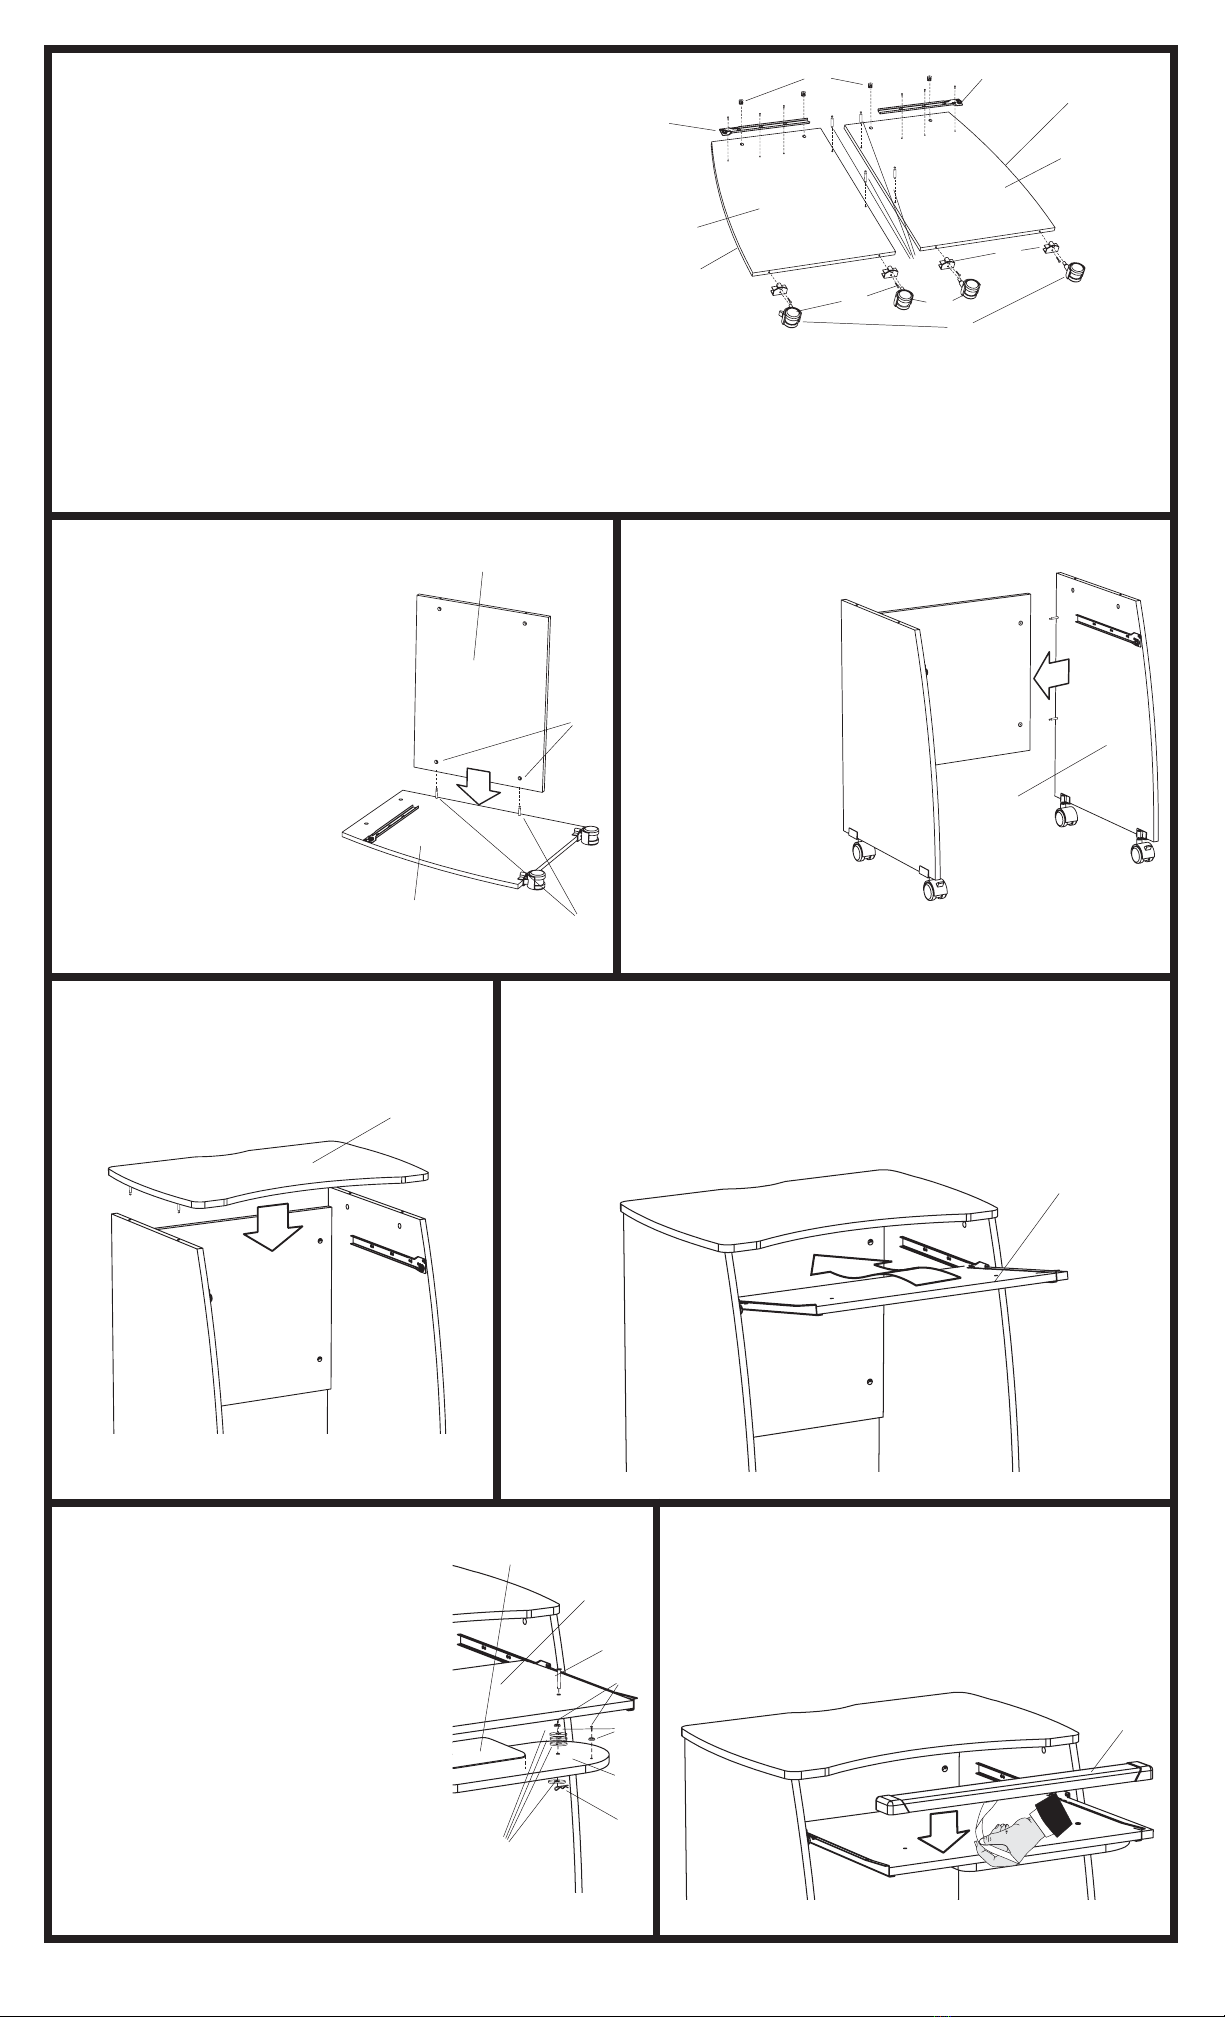
Lay out the I Left Side Panel and the J Right Side
Panel with the holes facing up.
Insert two D Locking Cams into the large holes at the top
of each Side Panel with the arrows pointing toward the
TOP edge.
On the Left Side Panel, install the K Left Cabinet Rail (C-
shaped ends), using three Small Flat Head Screws, into
the small set of holes in the Side Panel, making sure that
the rollers are facing the FRONT (curved edge) of the
Panel and using the hole CLOSEST to the roller.
Do the same with the Right Side Panel, using the L Right
Cabinet Rail.
Screw two B Screw Posts into the holes along the back
edge of each Panel.
Install the E Keyboard Shelf onto the set of Cabinet Rails: lift
the back rollers on the Shelf Rails over the front rollers on the
Cabinet Rails, tilt the Shelf enough to start the Shelf moving, and
lower the shelf to push it all the way into place.
1953-37: 2 of 2; Rev. 1; 08/02 Safco Products Company, New Hope, MN 55428
Lift the C Back Panel over
the I Left Side Panel,
aligning the B Screw
Posts on the back edge of
the Left Side Panel with the
holes in the end of the
Back Panel. Slide the Back
Panel down onto the Screw
Posts, and secure by
turning each of the two D
engaged cams clockwise
until they stop.
IMPORTANT: to prevent
possible damage during
assembly, a second person
should support the Back
Panel in its upright position.
56Carefully lift the
assembly upright.
While one person
holds it in
position, slide the
Screw Posts on
the J Right Side
Panel into the
holes in the edge
of the Back
Panel. Tighten
both Cams as
before.
7Slide the A Top Panel
into position, and lock
the remaining Cams on
the Side Panels.
QQ
QQ
Q
QQ
QQ
Q
QQ
QQ
Q
QQ
QQ
Q
QQ
QQ
Q8QQ
QQ
Q
4QQ
QQ
Q
QQ
QQ
Q
QQ
QQ
Q
QQ
QQ
Q
QQ
QQ
Q
QQ
QQ
Q
QQ
QQ
Q
J
QQ
QQ
Q
I
QQ
QQ
Q
D
QQ
QQ
Q
K
QQ
QQ
Q
L
QQ
QQ
Q
B
CURVED
EDGE
CURVED
EDGE
QQ
QQ
Q
C
QQ
QQ
Q
IQQ
QQ
Q
B
QQ
QQ
Q
D
QQ
QQ
Q
J
QQ
QQ
Q
A
Using Q Small Pan Head Screws,
screw the two R Bumpers into the off-
center holes on the S Mouse Tray.
From the top side of the E Keyboard
Tray, insert the T Clevis Pin through
the appropriate hole (the left center
hole if the Mouse Tray is to swing to the
left, otherwise the right hole). Place
three U Plastic Washers onto the shaft
of the Clevis Pin, then the Mouse Tray
(bumper side against the Keyboard
Shelf), one more Plastic Washer, and
secure with the V Hairpin Cotter
through the bottom hole in the Clevis
Pin. Place the W Mouse Pad on the
Mouse Tray.
9QQ
QQ
Q
QQ
QQ
Q
R
Remove the protective paper strip from the
bottom of the X Wrist Rest, and place the Wrist
Rest onto the Keyboard Shelf; the Wrist Rest
should be flush with the front edge of the Shelf.
Press down firmly to affix the Wrist Rest.
10 QQ
QQ
Q
QQ
QQ
Q
X
Using one M Large Screw each, attach the N Caster
Brackets to the bottom edges of the Side Panels (caster
sockets should be on the same side as the Panel holes.)
Push the two O Casters without Brakes into the back
Caster Brackets. Push the P Casters with Brakes into
the front Brackets.
QQ
QQ
Q
M
QQ
QQ
Q
N
QQ
QQ
Q
OQQ
QQ
Q
P
QQ
QQ
QQQ
QQ
Q
QQ
QQ
QQQ
QQ
Q
QQ
QQ
Q
QQ
QQ
Q
E
QQ
QQ
QQQ
QQ
Q
QQ
QQ
Q
QQ
QQ
Q
QQ
QQ
Q
QQ
QQ
Q
S
QQ
QQ
Q
T
QQ
QQ
Q
E
QQ
QQ
Q
U
QQ
QQ
Q
V
QQ
QQ
Q
QQ
QQ
Q
QQ
QQ
Q
W
QQ
QQ
Q
Q

Other Safco Desktop manuals

Safco MUV 1925 User manual

Safco

Safco MUV 1925 User manual

Safco 5210 User manual

Safco

Safco 5210 User manual

Safco 1901 User manual

Safco

Safco 1901 User manual

Safco 1901 User manual

Safco

Safco 1901 User manual

Popular Desktop manuals by other brands

HP Compaq Presario Specifications

HP

HP Compaq Presario Specifications

HP Pavilion t600 - Desktop PC Technical specifications

HP

HP Pavilion t600 - Desktop PC Technical specifications

Lenovo IDEACENTRE K3 user guide

Lenovo

Lenovo IDEACENTRE K3 user guide

COMDYNA GP-6 Operator's manual

COMDYNA

COMDYNA GP-6 Operator's manual

Acer Predator PO5-615s user guide

Acer

Acer Predator PO5-615s user guide

HP Workstation xw4000 Series Hardware installation

HP

HP Workstation xw4000 Series Hardware installation

Chen Hsong CDC-2000 Operational manual

Chen Hsong

Chen Hsong CDC-2000 Operational manual

Sharp MZ-5500 Tehnical manual

Sharp

Sharp MZ-5500 Tehnical manual

Tescam X-48 Release notes

Tescam

Tescam X-48 Release notes

HP Pavilion t100 - Desktop PC Setup poster

HP

HP Pavilion t100 - Desktop PC Setup poster

Compaq 124708-001 - ProLiant Cluster - 1850 White paper

Compaq

Compaq 124708-001 - ProLiant Cluster - 1850 White paper

HP EliteDesk 800 G3 Disassembly instructions

HP

HP EliteDesk 800 G3 Disassembly instructions

Moxa Technologies MC-5157-AC/DC user manual

Moxa Technologies

Moxa Technologies MC-5157-AC/DC user manual

IBM NetVista A20 reference guide

IBM

IBM NetVista A20 reference guide

Comco WS2200 Series Operation and service instructions

Comco

Comco WS2200 Series Operation and service instructions

Avid Technology DS 4.02 Setup guide

Avid Technology

Avid Technology DS 4.02 Setup guide

Dell OptiPlex 270 Service manual

Dell

Dell OptiPlex 270 Service manual

Zotac ZBOX series user manual

Zotac

Zotac ZBOX series user manual

manuals.online logo
manuals.online logoBrands
  • About & Mission
  • Contact us
  • Privacy Policy
  • Terms and Conditions

Copyright 2025 Manuals.Online. All Rights Reserved.