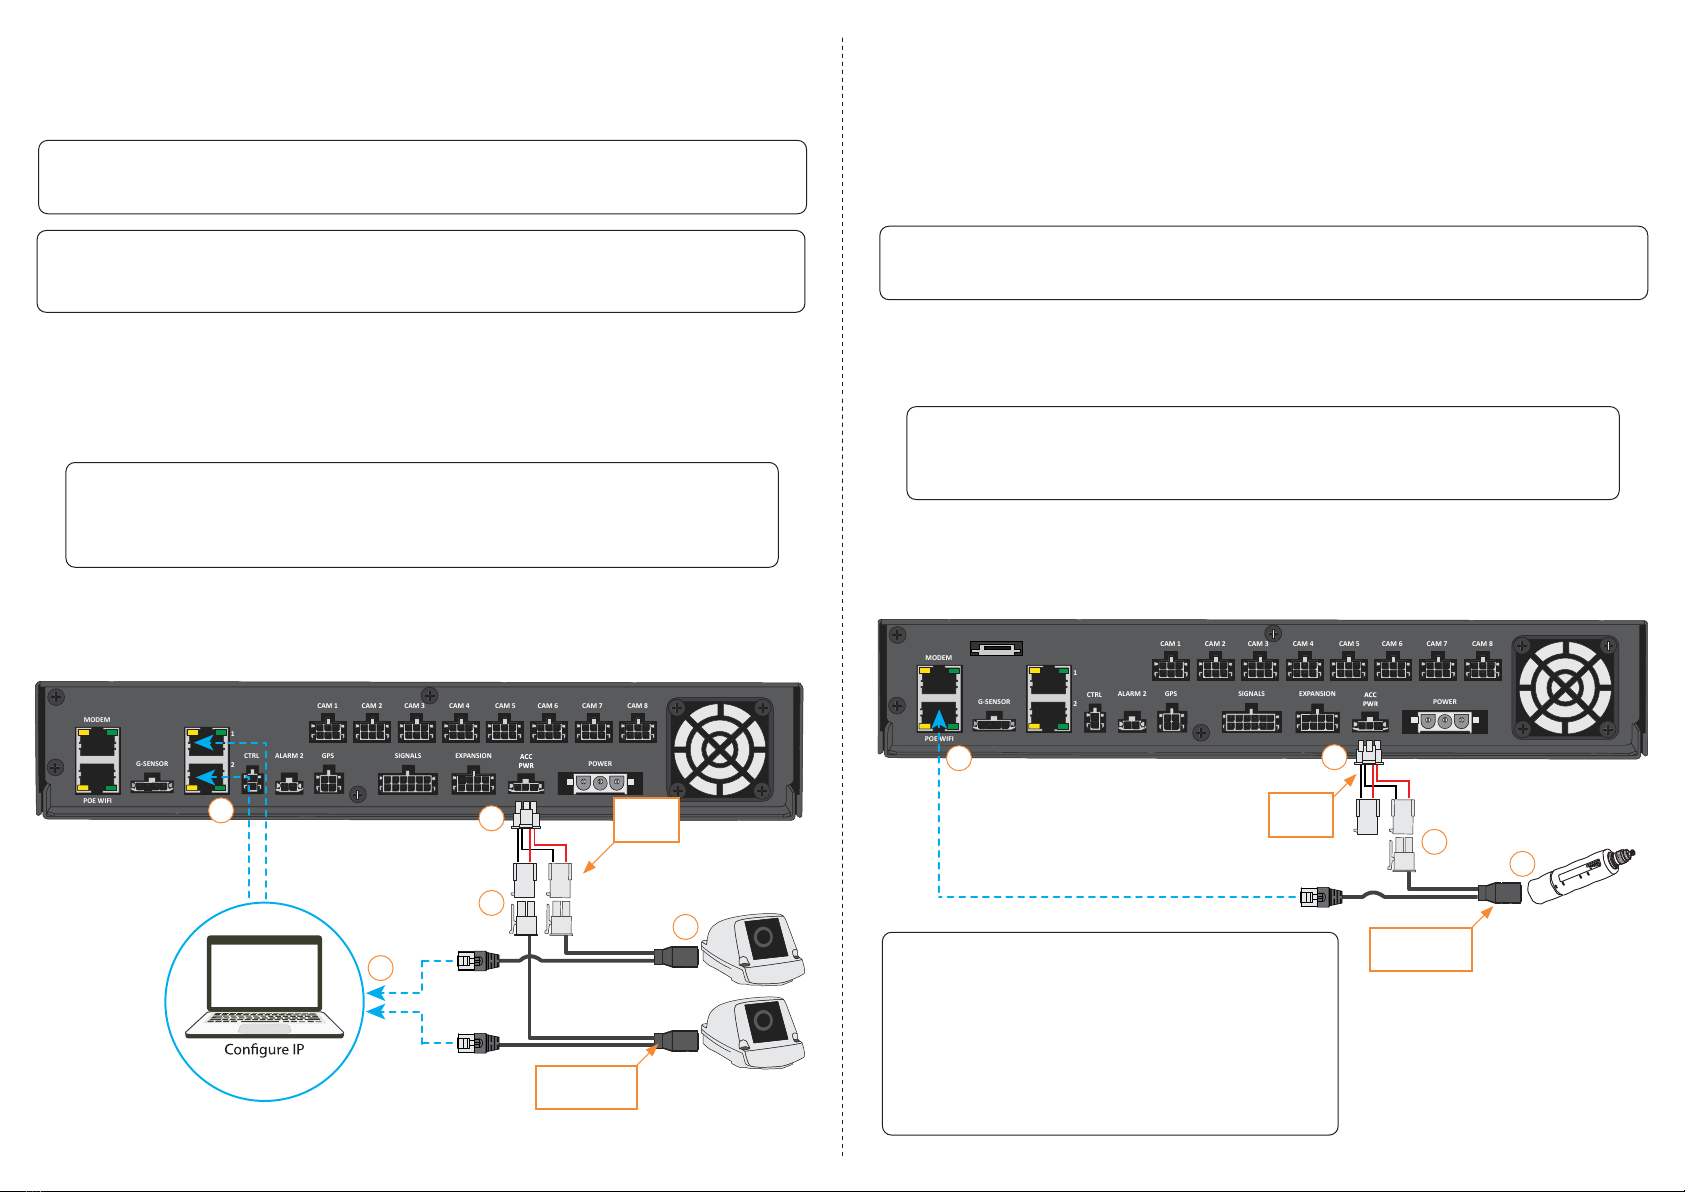
12 V POE Kit Installation Diagram (Smart-Reach Lite WiFi Bridge)
e-SATA
POE IP CAM
1
2
3
4
POE Injector
Power Harness
Y-Power
Harness
12 V POE Kit Installation Diagram (CHW8 Cameras)
Camera Settings
1
2
3
4
5Y-Power
Harness
POE Injector
Power Harness
Conguring TH8 and NH16K Recorders to work with 12 V IP Cameras
After connecting an IP camera, you’ll need congure your recorder in order for the cameras to work. To do this,
refer to page 4 of document #700-1200 (CHW8 Quick Setup Guide for TH8 & NH16K Recorders).
Installing the 12 V POE Kit with a Smart-Reach Lite WiFi Bridge
(NH16 Recorder Only)
NOTE: Smart-Reach Lite Installation and Recorder Conguration
For WiFi bridge installation and recorder conguration details, see the Smart-Reach Lite
documentation on the Safe Fleet Community, or contact Technical Support.
1. Connect the Y-Power Harness to the recorder’s ACC PWR output.
2. Connect the other end of the Y-Power Harness to the matching end of the POE Injector Power Harness.
3. Connect the POE Injector Power Harness directly to the Smart-Reach Lite WiFi bridge.
4. Plug the POE Injector Power Harness’ Ethernet Connector into the recorder’s rear-panel POE WIFI port,
as shown in the diagram.
IMPORTANT: CHW8 vs. CHW8PD
The CHW8 (12 V) and the CHW8PD (48 V) are two distinctly different cameras. For the 12 V POE kit, you
can only connect to a CHW8 camera.
NOTE: Conguring CHW8 for the Recorder
This procedure is covered on pages 2-3 of document #700-1200 (CHW8 Quick Setup Guide for TH8
& NH16K Recorders). Please refer to that document and follow the instructions before proceeding
to the next step.
Installing the 12 V POE Kit with CHW8 Cameras
(TH8 & NH16K Recorders Only)
1. Connect the Y-Power Harness to the recorder’s ACC PWR output.
2. Connect the other end of the Y-Power Harness to the matching end of the POE Injector Power Harness.
3. Connect the POE Injector Power Harness directly to the CHW8 camera.
4. Plug the POE Injector Power Harness’ Ethernet connector into a laptop running Internet Explorer 11 or
later, and proceed to congure the CHW8 camera to work with the recorder.
5. Once the CHW8 is congured to work with the recorder, plug the POE Injector Power Harness’ Ethernet
Connector into the recorder’s rear Ethernet port 1 or 2 as shown in the diagram.
WARNING: Ensure Recorder is Powered Down
Do not proceed unless the recorder is shut down.
WARNING: Ensure Recorder is Powered Down
Do not proceed unless the recorder is shut down.
NOTE: Supported Smart-Reach WiFi Bridges†
The following models are compatible with the 12 V POE kit
and the NH16 recorder:
• Ubiquiti Bullet M2HP (part #: 080-0163)
• MikroTik Groove 2.4/5GHz (part #: 080-1080)
• MikroTik-N Groove 52HPn 2.4/5GHz (part #: 080-1083)
† If your bridge is not listed, please contact Technical Support.


