manuals.online logo
Brands
  1. Home
  2. •
  3. Brands
  4. •
  5. Safety
  6. •
  7. Lock
  8. •
  9. Safety 48517 User manual

Safety 48517 User manual

BEFORE YOU BEGIN:
• Read all instructions before installing.
• Keep these instructions for future use.
• Remove all contents from packaging and discard box, and/or poly bags.
• Lay out and identify all parts.
• Do not return this product to the place of purchase. If any parts are
missing, e-mail [email protected], call Consumer Relations at
(800) 544-1108, or fax at (800) 207-8182. You can also visit our web site
at www.safety1st.ca. Have the model number ready (48517) and date
code (manufacture date) located on product.
AVANT DE COMMENCER:
• Lire toutes les instructions avant l’installation.
• Conservez ces instructions pour référence ultérieure.
• Enlevez tout le contenu de la boîte et jetez la boîte, et/ou sacs en plastique.
• Étalez et identifiez toutes les pièces.
• Ne pas retourner ce produit au magasin. Si des pièces sont manquantes,
faites parvenir votre demande par courriel à [email protected], appelez
le Service à la clientèle au (800) 544-1108, ou par télécopieur au
(800) 207-8182. Vous pouvez également visiter notre site internet au
www.safety1st.ca. Ayez en main le numéro de modèle (48517) et le code de
date (date de fabrication) situé sur le produit.
1
A
B
CC
A
Tank stop
Swing arm
Unlock button
Sliding lock button
SecureTechTM indicator
Base
D
CAUTION:
• Thisproductisnotatoy.Donotallowchildrentoplaywithit.
Whennotinuse,keepoutofreachofchildren.
• Thisproductisonlyadeterrent.Itisnotasubstituteforproper
adultsupervision.Discontinueusewhenchildbecomesold
enoughtodefeatit.
©2009 Dorel Juvenile Group. All Rights Reserved. Tous Droits Réservés.
www.djgusa.com (800) 544-1108 www.safety1st.ca Made in CHINA. Fabriqué en CHINE.
Styles and colors may vary. Les styles et les couleurs peuvent varier.
Distributed by (distribué par) Dorel Juvenile Group, Inc., 2525 State St., Columbus, IN 47201-7494
Dorel Distribution Canada, 873 Hodge, St. Laurent, QC H4N 2B1
08/31/09 4358-4998
ATTENTION:
• Ceproduitn’estpasunjouet.Nepaspermettreauxenfantsdejouer
avec.Quandiln’estpasutilisé,gardez-lehorsdeportéedesenfants.
• Ceproduitestseulementunmoyendedissuasion.Ilneremplacepasla
surveillanceappropriéed’unadulte.Cessezl’utilisationdèsquel’enfant
estcapabledeledéjouer.
Swing Shut Toilet Lock
48517
User Guide
Verrou de toilette basculant
48517
Mode d’emploi
Parts & Features Pièces & Caractéristiques
F
WARNING:
•ADULTASSEMBLYREQUIRED.KEEPSMALLPARTS
AWAYFROMCHILDRENDURINGASSEMBLY.
•NEVERLEAVECHILDUNATTENDEDINBATHROOM.
•Thisproductisforuseon“hard”toiletlidandseat
assembliesonly.Itisnotintendedforuseonsoftor
paddedlidsorseats.
•Whenproperlyinstalled,thetoiletlidshouldliftno
morethan1.5”(3.8cm).
AVERTISSEMENT:
•ASSEMBLAGEPARUNADULTEREQUIS.GARDEZLESPETITES
PIÈCESLOINDESENFANTSPENDANTL’ASSEMBLAGE.
•NEJAMAISLAISSERUNENFANTSANSSURVEILLANCE
DANSLASALLEDEBAIN.
•Ceproduitdoitêtreutilisésurdessiègesetdescouverclesde
toilette«rigides»seulement.Iln’estpasconçupourêtreutilisé
surdessiègesetdescouverclesmousourembourrés.
•Quandilestinstallécorrectement,lecouvercledela
toilettenedevraitpasseleverplusque1,5”(3.8cm).
To Install Installation
B
E
D
F
Green = Locked
Red = Unlocked
Vert = Verrouillé
Rouge = Déverrouillé
E
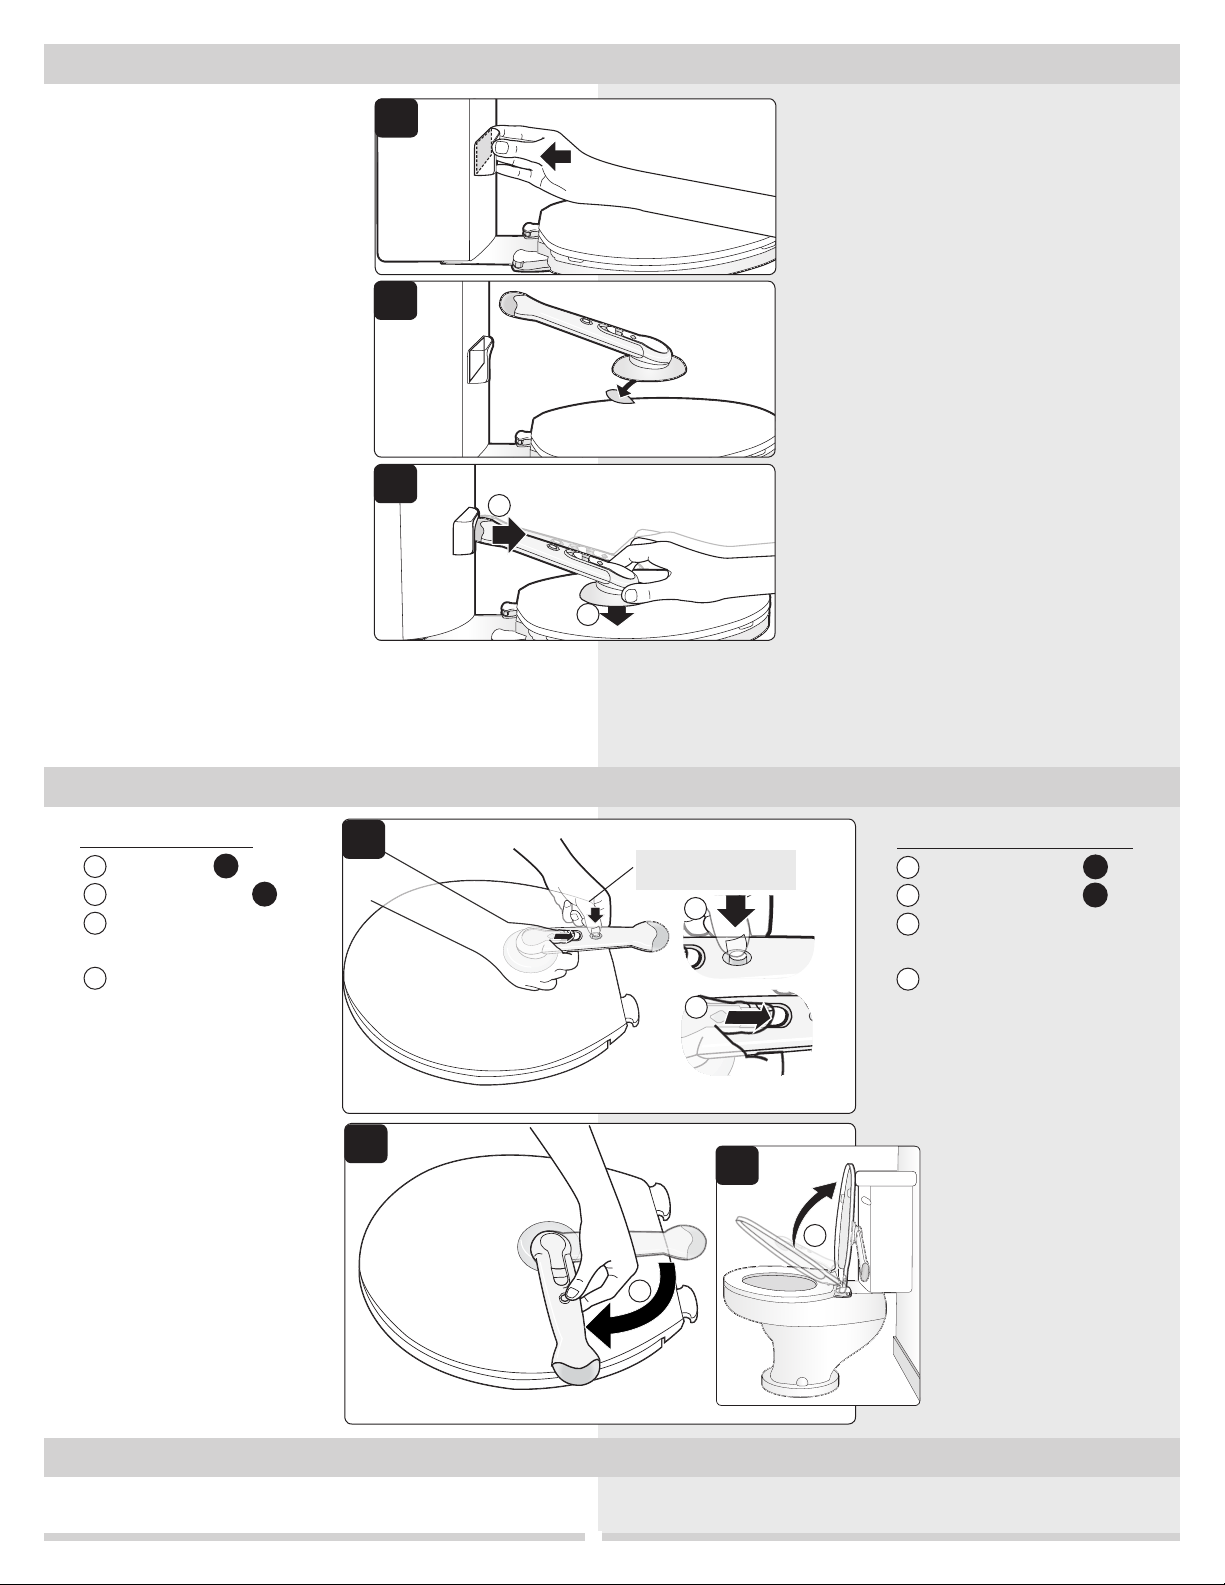
NOTE: Be sure toilet lid and tank are
dry before installing.
1
Test out the location where you will
install the toilet lock: With paper
still on adhesive, place the tank stop
and swing arm on the toilet to see
where it will be positioned (Figure
1). Raise the tank stop a little, a few
millimeters at most, so that there will
be clearance for the swing arm to
rotate out of the way to the unlocked
position.
2
Keep a finger at the bottom and top
right corners to help prevent the tank
stop from slipping. With the right
edge of the tank stop held in place,
lift up the left side and peal paper off
adhesive (Figure 2).
1
2
A
B
C
Taquet du réservoir
Bras pivotant
Bouton de déverrouillage
Bouton de verrou coulissant
Indicateur SecureTech™
Base
D
E
F
NOTE: Assurez-vous que le couvercle et
le réservoir de la toilette sont secs avant
l’installation.
1
Vérifier l’endroit où le verrou de toilette
sera installé: Avec le papier toujours sur
l’adhésif, placez le taquet du réservoir et
pivotez le bras sur la toilette pour voir
où il sera placé (Figure 1). Remontez
légèrement le taquet du réservoir,
quelques millimètres tout au plus, afin
qu’il y ait dégagement pour permettre de
basculer le bras pivotant à l’écart pour la
position déverrouillée.
2
Gardez un doigt dans les coins
inférieur et supérieur droits pour aider
à empêcher le taquet de glisser. En
maintenant le côté droit du taquet en
place, soulevez le côté gauche et pelez
le papier de l’adhésif (Figure 2).
1
2
Wipe clean with bleach or bathroom sanitizer.
To Clean Pour nettoyer
To Use Utilisation
1
1
Dual action unlocking:
Push button , (Figure 1)
then slide button .
Rotate swing arm to the
right (Figure 2)
and lift lid (Figure 3).
2
After you lower the lid, the
swing arm rotates automatically
back to the locked position. Test
lid to ensure it is locked.
2
To Install (continued) Installation (suite)
3
Push tank stop against tank to set
adhesive (Figure 3).
4
Remove a small portion of paper (no
more than 1/2”) from the swing arm
base adhesive (Figure 4). This will
allow you to hold the swing arm in
place while you test the lid.
5
Slide the swing arm into tank stop,
but do not allow the tip of the swing
arm to touch the tank stop or it will
prevent the swing arm from rotating
smoothly and the swing arm may
not lock automatically (Figure 5).
6
Lower the swing arm base onto the
toilet lid and press firmly to set the
small section of exposed adhesive.
7
Unlock (see To Use) and test
swing arm to make sure tip doesn’t
interfere with the tank stop. Lift
toilet lid to make sure the tank stop
doesn’t interfere with the lid staying
up on its own. It is recommended to
use the tank stop.
NOTE: If tank stop interferes with
the lid staying up on its own,
remove the tank stop and position
toilet lock slightly closer to the tank.
8
Remove remaining paper from the swing arm base, position base
as described in step 5 and press firmly to set adhesive.
2
Dual action unlocking:
Déverrouillage
Double Action
Nettoyez avec un produit javellisant ou un assainisseur de salle de bain.
2
3
3
4
4
1
3
4
5
1
2
C
D
3
1
Déverrouillage Double Action:
Poussez sur le bouton , (Figure 1)
puis glissez le bouton .
Pivotez le bras pivotant vers la
droite (Figure 2) et soulevez le
couvercle (Figure 3).
2
Après avoir baissé le couvercle,
le bras pivotant pivote
automatiquement à la position
verrouillée. Vérifiez le couvercle
pour vous assurer qu’il est bien
verrouillé.
3
Pressez le taquet du réservoir contre le réservoir
pour faire adhérer fermement (Figure 3).
4
Enlevez une petite partie du papier (pas
plus que 1/2”) de l’adhésif à la base du bras
pivotant (Figure 4). Cela vous permettra de
tenir le bras pivotant en place pendant que
vous vérifiez le couvercle.
5
Glissez le bras pivotant dans le taquet,
mais ne laissez pas le bout du bras pivotant
toucher le taquet du réservoir sinon cela
empêchera le bras pivotant de pivoter
librement et le bras pivotant peut ne pas se
verrouiller automatiquement (Figure 5).
6
Abaissez la base du bras pivotant sur le
couvercle de la toilette et pressez fermement
pour fixer la petite section de l’adhésif
exposé.
7
Déverrouillez (voir la section “Utilisation”) et
vérifiez le bras pivotant pour vous assurer que le
bout ne nuit pas au taquet du réservoir. Soulevez
le couvercle de la toilette pour vous assurer
que le taquet du réservoir ne nuit pas quand
le couvercle reste relevé par lui-même. Il est
recommandé d’utiliser le taquet du réservoir.
NOTE: Si le taquet du réservoir nuit quand le
couvercle reste relevé par lui-même, enlevez
le taquet du réservoir et placez le verrou de toilette un peu plus près
du réservoir.
8
Enlevez le reste du papier de la base du bras pivotant, placez la base
tel que décrit à l’étape 5 et pressez fermement pour fixer l’adhésif.
2
3
4
1C
D

Popular Lock manuals by other brands

JNF IN.08.MFU.16 quick start guide

JNF

JNF IN.08.MFU.16 quick start guide

Safety 1st 33110039 Installation

Safety 1st

Safety 1st 33110039 Installation

Ingersoll-Rand Schlage Camelot FE365-CAM-GEO Programming guide

Ingersoll-Rand

Ingersoll-Rand Schlage Camelot FE365-CAM-GEO Programming guide

Aleko LM176 user manual

Aleko

Aleko LM176 user manual

Assa Abloy IKON VERSO CLIQ V551 operating instructions

Assa Abloy

Assa Abloy IKON VERSO CLIQ V551 operating instructions

Glutz 50022 Fixing instructions

Glutz

Glutz 50022 Fixing instructions

SDC HI-SHEAR EMLOCKS 1565 installation instructions

SDC

SDC HI-SHEAR EMLOCKS 1565 installation instructions

Blue Giant STRONGARM HVR303 owner's manual

Blue Giant

Blue Giant STRONGARM HVR303 owner's manual

RIB ACG9152 quick start guide

RIB

RIB ACG9152 quick start guide

Captain E202 user manual

Captain

Captain E202 user manual

Schlage S-480 user manual

Schlage

Schlage S-480 user manual

U-tec Ultraloq UL3 user manual

U-tec

U-tec Ultraloq UL3 user manual

Hafele Sola operating instructions

Hafele

Hafele Sola operating instructions

Sargent and Greenleaf 6631 Operating and Combinatiion Changing Instructions

Sargent and Greenleaf

Sargent and Greenleaf 6631 Operating and Combinatiion Changing Instructions

Schlage 2 link System setup

Schlage

Schlage 2 link System setup

Alarm Lock CYLINDER ADAPTER KIT Addendum Using

Alarm Lock

Alarm Lock CYLINDER ADAPTER KIT Addendum Using

Assa Abloy Corbin Russwin HPSK installation instructions

Assa Abloy

Assa Abloy Corbin Russwin HPSK installation instructions

lawrence doors AC Cleaning instructions

lawrence doors

lawrence doors AC Cleaning instructions

manuals.online logo
manuals.online logoBrands
  • About & Mission
  • Contact us
  • Privacy Policy
  • Terms and Conditions

Copyright 2025 Manuals.Online. All Rights Reserved.