Sage Smart Fryer BDF500 Product guide

the Smart Fryer™
BDF500
EN INFORMATION BOOK

2
Contents
2 Sagerecommendssafetyrst
6 Components
7 Assembly
8 Functions
11 Tips
14 Care & Cleaning
SAGE
RECOMMENDS
SAFETY FIRST
At Sage®we are very safety
conscious. We design and
manufacture consumer
products with the safety of
you, our valued customer,
foremost in mind. In addition
we ask that you exercise a
degree of care when using
any electrical appliance
and adhere to the following
precautions.
IMPORTANT
SAFEGUARDS
READ ALL INSTRUCTIONS
BEFORE USE AND SAVE FOR
FUTURE REFERENCE
•Before using for the rst
time please ensure that your
electricity supply is the same
as shown on the rating label on
the underside of the appliance.
If you have any concerns
please contact your local
electricity company.
•Your Sage®appliance includes
a BS 13 amp moulded mains
plug on the supply cord.
•Should you need to change
this plug, please complete the
rewiring as follows (after safe
disposal of the moulded plug).
•Please note that a cut o plug
inserted into a socket is a
serious danger risk.
•Wires are coloured as follows:
−Blue = Neutral
−Brown = Live
−Green & Yellow = Earth
• As the colours of the wire
may not correspond with the
coloured markings which
identify the terminals in
your plug, please refer to
the following:
−The Blue wire must be
connected to the terminal
which is marked ‘N’.
−The Brown wire must
be connected to the
terminal which is marked
with the letter ‘L’.
−The Green & Yellow wire
must be connected to
the terminal which is
marked with the letter E
or the earth symbol .
• Please note that if a 13 amp
plug is used, a 13 amp fuse
should be used.
•Remove and safely discard
any packaging material and

3
promotional labels before using
the appliance for the rst time.
•Before using for the rst
time please ensure that your
electricity supply is the same
as shown on the rating label on
the underside of the appliance.
If you have any concerns
please contact your local
electricity company.
•To eliminate a choking hazard
for young children, remove and
safely discard the protective
cover tted to the power plug
of this deep fryer.
•Do not place the deep fryer
near the edge of a bench or
table during operation. Ensure
the surface is level, clean and
free of water.
•Do not place the deep fryer on
or near a hot gas or electric
burner, or where it could touch
a heated oven.
•Place the deep fryer at least
20cm away from walls and
curtains. Provide adequate
space above and on all sides
for air circulation around the
deep fryer.
•Do not use on metal surfaces,
for example, a sink drain
board.
•Always insure the deep fryer
is properly assembled before
use. Follow the instruction
provided in this book.
•Ensure the deep fryer is
completely dry and free of
water before adding any oil.
•Extreme caution must be used
when the deep fryer contains
hot oil or other liquid. Do not
move the appliance during
cooking. Allow the deep fryer
to cool before removing oil or
other liquid.
•Solid oil products, such as
butter, margarine or animal
fats of any kind should not be
used in the deep fryer as they
may overheat and cause a re
hazard.
•Do not touch hot surfaces.
•The deep fryer will generate
a lot of heat and steam during
and after the cooking process.
To prevent the risk of burns,
do not touch or block the
steam ventilation area on
the lid. Remove lid to reduce
condensation build up.
•Take care when opening the
lid. This product generates
heat and steam at high
temperatures, which will
escape immediately when the
lid is opened.
•Do not place anything on top
of the deep fryer when the lid
is closed, when in use and
when stored.
•Always ensure the deep fryer
switch OFF button has been
pressed and the appliance
is switched o at the power
outlet and unplugged when
not in use, if left unattended
if attempt to move and
before assembling and

4
disassembling, cleaning or
storing.
•Keep the appliance clean.
Follow the cleaning instructions
provided in this book.
IMPORTANT
SAFEGUARDS
FOR ALL
ELECTRICAL
APPLIANCES
•Fully unwind the power cord
before use.
•Do not let the power cord hang
over the edge of a bench or
table, touch hot surfaces or
become knotted.
•To protect against electric
shock do not immerse the
|deep fryer control panel,
element, power cord, power
plug or appliance in water or
any other liquid.
•This appliance shall not be
used by children from 0 year
to 8 years.This appliance can
be used by children aged from
8 years and above if they are
continuously supervised. This
appliance can be used by
people with reduced physical,
sensory or mental capabilities
or lack of experience and
knowledge if they have been
given supervision or instruction
concerning use of the appliance
in a safe way and understand
the hazards involved. Keep the
appliance and its cord out of
reach of children aged less
than 8 years. Cleaning and
user maintenance shall not
be made by children.
•Cooking appliances should be
positioned in a stable situation
with the handles (if any)
positioned to avoid spillage
of the hot liquids.
•Surfaces are liable to get hot
during use.
•Do not use the appliance if
power cord, power plug or
appliance becomes damaged
in any way. If damaged or
maintenance other than
cleaning is required, please
contact Sage Customer
Service
•This appliance is for
household use only. Do not
use this appliance for anything
other than its intended use. Do
not use in moving vehicles or
boats. Do not use outdoors.
Misuse may cause injury.
•The appliance is not intended
to be operated by means of
an external timer or a separate
remote control system.

5
Symbol IEC 60417-
5041(2002–10) means
the temperature of
accessible surfaces may
be high when the appliance
is operating.
The symbol shown
indicates that this
appliance should not
be disposed of in normal
household waste. It should
be taken to a local authority
waste collection centre
designated for this purpose
or to a dealer providing this
service. For more information,
please contact your
localcounciloce.
To protect against
electric shock, do not
immerse the power plug, cord
or appliance in water or any
liquid.
FOR HOUSEHOLD USE ONLY
SAVE THESE INSTRUCTIONS

6
Components
A
GF E
C
D
E
F
H
I
J
B
A. LCD display
B. Scroll/Select Knob
C. Mesh lter
D. Cord storage
E. ‘Cool Zone’ technology
F. Cool touch handles
G. Large viewing window
H. Large 4 litre capacity
I. Stainless steel exterior
J. Non-skid feet
K. Frying basket with fold down handle
L. Powerful 3000 watt removable element
K L
Rating Information
220–240V ~ 50Hz 3000W

7
Assembly
STEP 1
Remove lid from the deep fryer by
grasping the handle on top and lift o.
STEP 2
The wire frying basket has a hinged handle
for compact storage. Remove the basket
from the deep fryer. Extend and lock the
basket handle into position by squeezing the
two handle prongs together, pull back and
lock behind the two wire supports extending
from edge of basket.
STEP 3
Lift the control panel with attached element
upwards and away from the deep fryer.
STEP 4
Remove the inner frying bowl by
grasping the rim and lifting upwards.
STEP 5
To reassemble the deep fryer, reverse
steps 1–4.
WARNING
When assembling your deep fryer for
use, please ensure the narrow tongues
in the control panel are inserted into the
corresponding grooves of the deep fryer
body. The deep fryer will not operate unless
correctly assembled.
BEFORE FIRST USE
Remove any promotional materials and
packaging materials before use.Wash the lid,
removable inner bowl, stainless steel outer
body and wire frying basket in hot soapy
water, rinse and dry thoroughly.
Wipe the element with a soft, damp cloth
and dry thoroughly. Reassemble and ensure
the bowl is completely free of water before
adding any oil.
1. Place the deep fryer on a dry, level
surface. Ensure the deep fryer is not too
close to the edge of the bench top, and
that the power cord or basket handle does
not extend over the edge.
2. Remove the frying basket from the
deep fryer and add oil to the bowl. Do not
add less than the minimum level mark
(2.5 litres) or exceed the maximum level
mark (4 litres).
IMPORTANT
NEVER exceed the maximum level mark with
oil (maximum is 4 litres).This product must
be lled with oil to the exact marked level.
The product will be severely damaged if
heated without oil in the frying bowl.
3. Replace the lid.
4. Plug in the power cord. Ensure cord is fully
extended.The deep fryer will beep once
for self checking, the display panel will
illuminate with white background light.
The deep fryer enters COOK mode.
5. To change temperature format, press and
hold the SCROLL/SELECT knob
for three seconds. If the temperature
format is set to Celsius, it will change to
Fahrenheit after pressing the SCROLL/
SELECT knob for three seconds. Change
the format one time per command.To
change the format again, release the
knob, and again press and hold the
SCROLL/SELECT knob for
three seconds.
NOTE
When the deep fryer is unplugged from the
power outlet and them plugged back in,
the cooking temperature format display will
default to the last selected format, Celsius
or Fahrenheit.
STAND BY MODE
When the deep fryer remains inactive for
10 minutes, it will enter stand by mode.
The white backlight will turn o and
STANDBY will display.The fryer will come out
of stand by mode by pushing any button or
turning the SCROLL/SELECT knob and then
is ready to start a cooking operation.

8
Functions
COOK MODE
When the unit is turned on the rst selection
available is cooking mode.
The display panel options will be:
The display panel options will be
The default cooking mode will be:
The default cooking mode will be
Selecting a dierent cooking mode will
change the time and temperature settings.
As each mode is selected, the times and
temperatures will update to show the default
time and temperature for each menu item.
The time and temperature in every mode can
be adjusted.
Turn the knob clockwise to scroll down
and counterclockwise to scroll up.
Push the SCROLL/SELECT knob to select a
mode and to move on to the next setting.
FRESH/FROZEN Setting
For Chips, FISH, CALAMARI, the next
setting will be FRESH or FROZEN. Highlight
the desired option.The selected option
will display and the unselected option will
disappear.The FRESH/FROZEN setting
will automatically adjust the time and
temperature.
Time Setting
If cooking time is to be adjusted for a
selected cooking mode, push the SCROLL/
SELECT knob to move to the time setting.
Then turn the knob to adjust to the time
desired.
Initially the time will be displayed in Minutes
and Seconds and will be adjusted in 30
second increments. Once the time reaches
9 minutes 30 seconds, the time will show in
minutes only (the display will read :10 MIN at
10 minutes). At this stage time will change in
1 minute increments.
After the cooking mode has been selected,
the program will move onto the next setting.
To get back to the mode menu, the SCROLL/
SELECT knob must be pushed to cycle
through the other settings until the program
returns to the mode menu.
Temperature Setting
If temperature is to be adjusted for a selected
cooking mode, push the SCROLL/SELECT
knob to move to the temperature setting.
Then turn the knob to increase or decrease
the temperature. Temperature can be
adjusted in 5 degree increments for both
Celsius and Fahrenheit.
START/CANCEL BUTTON
Press the START/CANCEL button to conrm
the chosen settings.When START/CANCEL
is pushed, the elements will turn on, the
display will turn orange, HEATING will display
and the actual temperature of the oil will
show. Pressing this button again will cancel
any operation and turn o the elements.
The HEATING display will turn on whenever
the elements are turned on.
Ready for Frying
Once the oil has been heated to the set
temperature the HEATING display will turn
o. Time, Temperature, the selected cooking
mode, PRESS TIMER and FRESH or
FROZEN will display. Place the basket with
food into the oil. Push the TIMER button to
start the timer. PRESS TIMER display will
disappear.

9
Completed Frying
When the timer has nished counting
down the fryer will beep. PRESS TIMER
will display. Push the TIMER button to
reset for cooking or START/CANCEL to turn
o the elements.
Note on adjusting temperature
or time during cooking
The set temperature can be adjusted during
the heating process. Press the SCROLL/
SELECT knob so that the arrow indicates
temperature. Turn the SCROLL/SELECT
knob and the display will change from
the actual temperature of the oil to the set
temperature. Turn the knob to adjust the
temperature and then press to conrm the
new temperature.
The set time can be adjusted during cooking
operation. Press the SCROLL/SELECT knob
so the arrow indicates time. Turn the knob to
adjust the time. Press the SCROLL/SELECT
knob to conrm the new time.
TIMER BUTTON
After the oil is heated, press the TIMER
button to start the timer.
Once the timer has nished counting down,
the alarm will sound. Push the TIMER button
to stop the alarm.
NOTE
• When the timer nishes counting down,
the elements will not turn o. They will
remain on until the START/CANCEL button
is pushed.
• When the timer is set but not started,
PRESS TIMER will display. As soon as
the TIMER button is pushed, the PRESS
TIMER graphic will disappear.
• If the TIMER button is pushed without
a set time instead of the timer counting
down it will count up to show how long the
ingredients have been cooking.
• When the timer is counting up or down and
is pushed once, it will pause. It will continue
counting if pushed again.To reset, push the
TIMER button twice in rapid succession
(double click).
Twice Fried Chips
When TWICE FRIED CHIPS mode
is selected and conrmed by pressing
the SCROLL/SELECT knob, 1ST FRY/
2ND FRY displays.
1. Select 1ST FRY by highlighting and
pressing SCROLL/SELECT knob to
conrm. 1ST FRY ashes to indicate it
is the selected option. Once the selection
has been conrmed, the unselected
option display turns o. After TWICE
FRIED CHIPS and 1ST FRY have been
selected, the fryer will automatically set
the time and temperature.
NOTE
For TWICE FRIED CHIPS, FRESH is the
only available option as frozen chips have
been precooked.
2. Start the heating process by pushing the
START/CANCEL button.The display will
turn orange to indicate heating.TWICE
FRIED CHIPS, FRESH, 1ST FRY,
HEATING and the actual temperature of
the oil will be displayed.
Thedeep fryer will now preheat the oil.
Once the deep fryer has reached the
correct temperature, the deep fryer will
beep once to indicate it is ready to cook.
PRESS TIMER will display.
3. Lower the basket of fresh chips into the
oil and press the TIMER button.
When the TIMER button is pressed,
the timer will start to count down, and
the cooking process begins.
NOTE
When cooking chips using the Twice Fried
method, it is not recommended to cook with
the lid on due to the possible build up of
excess condensation.
4. The fryer is programmed to heat to the
correct overshoot temperature because
when the cooler chips are lowered into
the oil, the temperature of the oil will fall.
The overshoot temperature ensures that

10
the chips cook at the optimal temperature,
even after they initially cause the oil
temperature to drop.
5. When the timer nishes counting down,
the alarm will sound to signal the end of
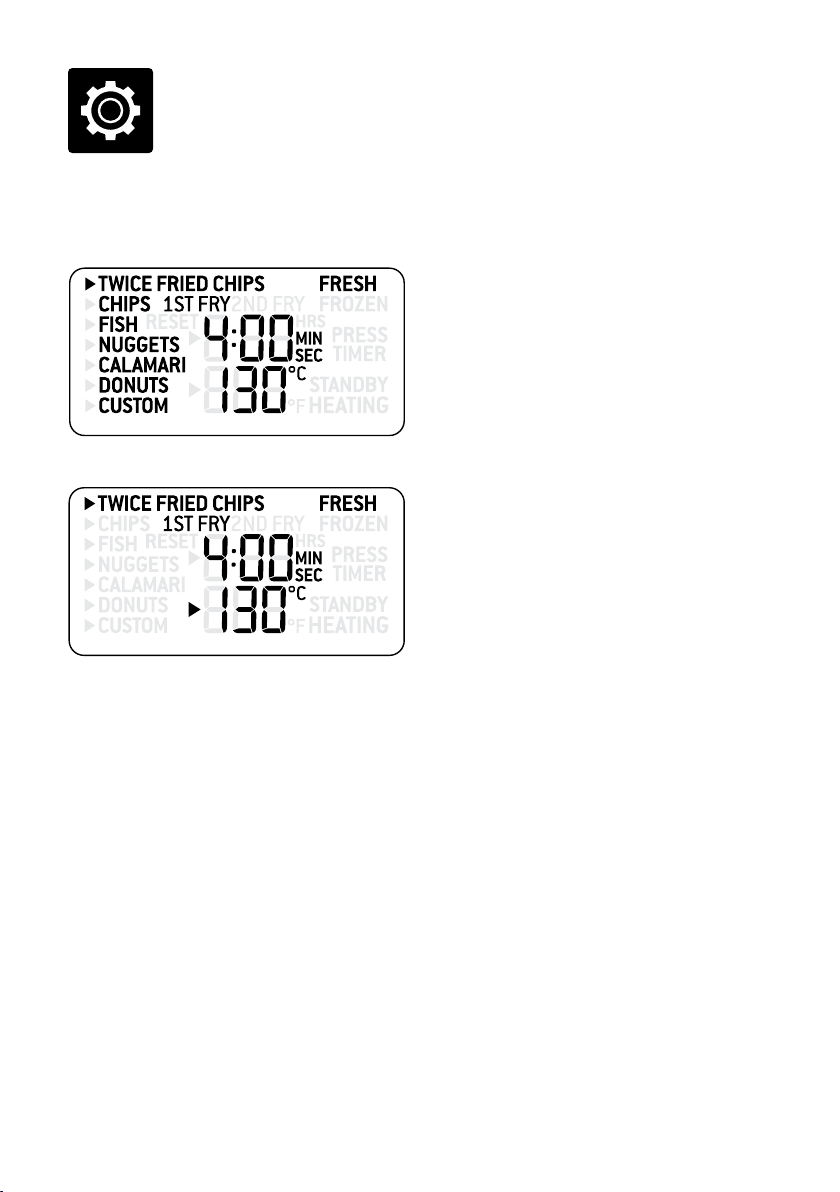
the cooking cycle. PRESS TIMER, TWICE
FRIED CHIPS, 1ST FRY and FRESH, the
time and temperature will be displayed.
6. Push the TIMER button to stop the alarm
and raise the basket. The deep fryer will
automatically begin to reheat.
Once the deep fryer has reached the
correct temperature, it is ready to proceed.
NOTE
In TWICE FRIED CHIPS mode it is possible
to adjust the timer and temperature once
the timer has started but it is not possible to
switch between 1ST FRY and 2ND FRY.
At this point, the fryer is able to proceed to
either the 2ND FRY or to another 1ST FRY
of a second batch of chips, depending on
the total quantity to be fried.TWICE FRIED
CHIPS, FRESH, 1ST FRY, PRESS TIMER,
the time and cooking temperature display.
NOTE
If a second batch of chips is to be cooked,
we recommend to 1ST FRY both batches
and then proceed to the 2ND FRY for both
batches.This process means less heating
and cooling of oil, providing better results and
is more time ecient.
Proceeding to 2ND FRY
1. Empty the contents of the basket
onto a plate lined with paper towel
to cool slightly.
2. Push the SCROLL/SELECT knob.
1ST FRY starts to ash and 2ND
FRY is displayed.Turn the SCROLL/
SELECT knob to highlight 2ND FRY.
2ND FRY starts to ash to show it has
been highlighted. Press the SCROLL/
SELECT knob to conrm. 1ST FRY will
now disappear. The deep fryer will move
to the heating stage until the correct
temperature is reached.TWICE FRIED
CHIPS, FRESH, 2ND FRY, HEATING and
the actual temperature of the oil will show.
When the oil has reached the correct
temperature, PRESS TIMER will display.
3. Fill the basket with the 1st fried batch.
Lower the basket into the deep fryer and
press the TIMER button. PRESS TIMER
will disappear.The timer will begin to
count down. When the timer nishes
counting down, the alarm will sound to
signal the end of the cooking cycle.
PRESS TIMER displays.
4. Press the TIMER button and raise the
basket. Allow to drain and cool, then turn
out into a lined bowl.
Repeating 1ST FRY with new
batch of fresh chips
1. Empty the contents of the basket onto a
plate lined with paper towel to cool.
2. Follow the instructions for 1ST FRY above.
CUSTOM MODE
The CUSTOM cooking mode has a default
setting of 5:00 minutes and 180°C.This can
be changed by turning the SCROLL/SELECT
knob to CUSTOM and then changing either
the time or temperature or both. If the default
settings in custom mode are changed, the
deep fryer will remember the last settings
that have been selected, even after being
unplugged.
NOTE
If using the lid during and immediately after
cooking, steam may rise through the lter
vent openings in the lid.This is normal,
however avoid touching this area during
cooking to prevent steam burns as the steam
generated is at a high temperature.
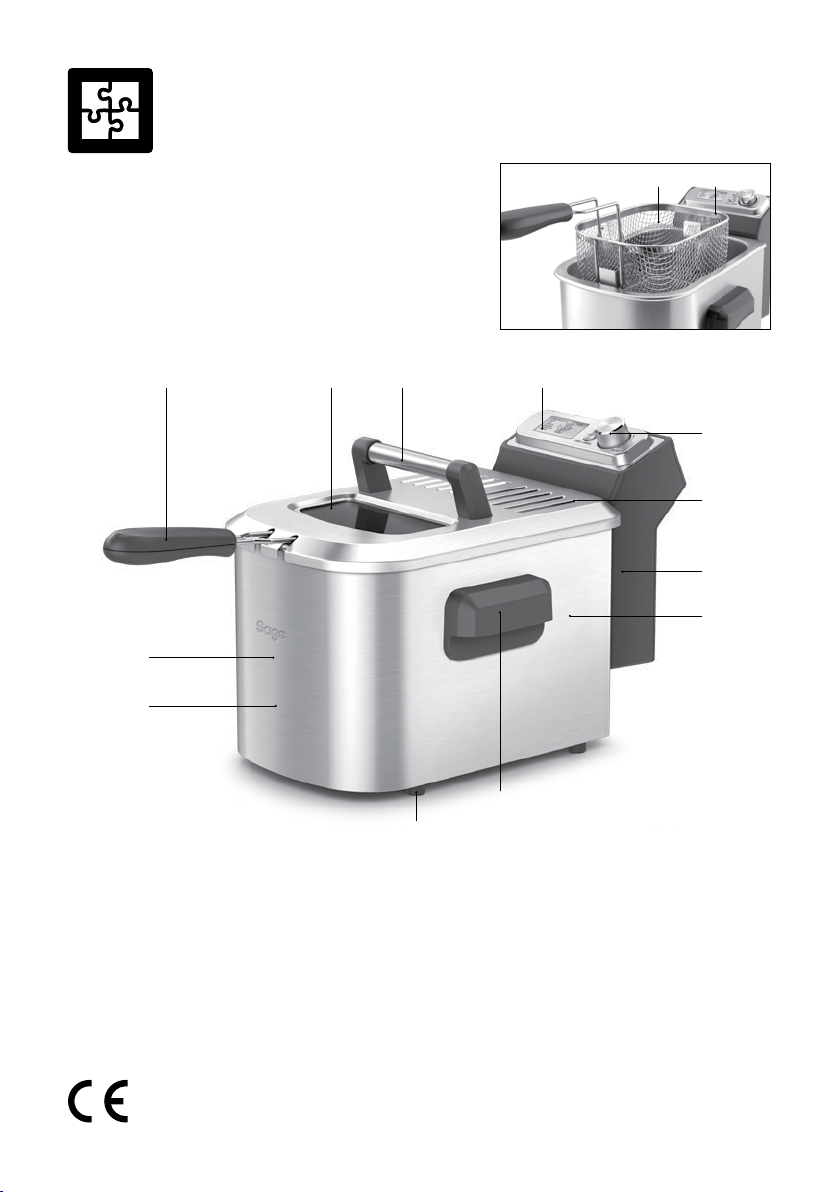
As the basket gets very hot, only use the
handle to hold or carry the basket for serving.
Ensure the basket handle is locked into
position.
Solid oil products, such as butter, margarine
or animal fats of any kind should not be used
in the deep fryer as they may overheat and
cause a re hazard.

11
Water and oil do not mix – never add any
water or other liquid to hot oil. Even small
amounts of water will cause the oil to splatter.
The deep fryer will generate a lot of heat and
steam during and after the cooking process.
To prevent the risk of burns, do not touch or
block the steam ventilation area on the lid.
Extreme caution must be used when the
deep fryer is lled with hot oil or other liquid.
Do not move the deep fryer during cooking
and allow it to cool before removing oil.
Tips
Foods should be crisp when deep fried.
If results are soggy, the oil isn’t hot enough.
This can be attributed to one or more of
the following:
• Not enough preheating time.
• Temperature too low.
• Too much food in the basket
(do not ll more than two thirds full).
• Do not use solid frying oil, only use liquid
oils.
Use good quality liquid oil. For best results,
use the below recommended oils.
NOTE
We don't recommend cooking more that 1kg
of food at a time.
The most suitable oils for
deep frying include:
All oils have dierent smoke points. Smoke
points are the point at which the fat begins to
break down into visible gaseous products.
• The smoke point of dierent fats is
determined by the free fatty acid content
of the fat. Generally, the lower the free
fatty acid content the more stable the
fat and the higher the smoke point.
• Free fatty acid levels are generally
lower in rened vegetable oils with a
smoke point of around 230°C.Where
as animal fats are around 190°C.
• The smoke point of a deep-frying
fat is lowered every time it is used.
Food particles are always left
behind after cooking.This will also
lower the smoke point of the fat.
• Olive oil is not recommended
or deep frying due to its low
smoke-point temperature.
• Suitable oils for deep frying include:
Peanut oil, Vegetable oil, Canola oil,
Saower oil and Rice Bran oil.
Peanut Oil
Peanut oil is obtained from the kernels
of the ground nut or peanut. It has a
delicate avour, nutty odour and has a
high smoke point. Peanut oil is high in
mono-unsaturated oil and Vitamin E.
Vegetable Oil
A general term that refers to a blend
of oils extracted from various seeds and
fruits.Vegetable oil has a very mild flavour
and aroma. It is low in cholesterol and
saturated fats.
Canola Oil
Made from seeds of the canola plant.
It is relatively low in saturated fats, contains
Omega 3 fatty acids and has a bland,
neutral flavour.
SaowerOil
The oil is extracted from the seeds of the
sunower plant. It is pale yellow in colour
with virtually no avour. Sunower oil is
high in polyunsaturated fats and low in
saturated fats.
Rice Bran Oil
The oil is extracted from the germ and husk
of rice. It has a mild, nutty avour and high
smoke point. It is high in vitamin E and
antioxidants.
NOTE
Do not overll the basket. Large quantities
of food may cause the oil to bubble and
overow. Small batches of food cook much
better and make operation of the deep fryer
safer.

12
Method for the perfect chips
1. Select any of the following oils: peanut oil,
rice bran oil, sunower oil, vegetable oil.
2. Use a oury unwashed potato such
as Sebago or King Edward. Using the
freshest potatoes will give the best results.
3. Wash and peel potatoes.
4. Cut into 1cm thick chips and place into a
large bowl. Cover with cold water & soak
for 30 minutes.
5. When ready to use, drain and dry
thoroughly with paper towel or a clean
teatowel. It is important to dry the chips
thoroughly as water and oil do not mix -
even contact with small amounts of water
can cause the oil to spatter.
6. Fill deepfryer with 4 litres of oil.
7. Set deepfryer to TWICE FRY CHIPS/
FRESH setting.
8. Select 1ST FRY and press the START/
CANCEL button to PREHEAT the oil.
9. Cook up to 1kg batch of chips at a time.
10.Place chips into basket and lower into hot
oil. Press TIMER button. Cook until the
alarm sound signals end of cooking cycle.
11.Remove chips from oil and drain on a tray
lined with paper towel to cool slightly.
12.Continue this method until all the potatoes
have been through the 1ST FRY.
13.Alternatively, to continue cooking
chips directly onto 2ND FRY, leave
blanched chips in basket and drain on
basket hook.
14.Select TWICE FRY CHIPS/FRESH
setting and choose 2ND FRY. Press
START/CANCEL button to PREHEAT the
oil and continue as below.
15.Place chips into basket and lower into hot
oil. Press TIMER button. Cook until the
alarm sound signals end of cooking cycle.
16.Remove chips from basket and drain onto
a tray lined with paper towel.
17.Season with sea salt and serve
immediately.
NOTE
Twice fried chips temperatures are based
on 1kg load of fresh hand cut potato chips.
Types of potatoes that make the most
succulent chips include the following:
Bintje, Kennebec, Red rascal, Sebago,
Russet, King Edward.
When should I change the oil?
What should I look for?
It is recommended to change the oil every
week if deep fryer is used every day.
If using once or twice a week, the oil can be
changed every three weeks.
There are distinct indicators that will show
you when your oil is no longer deep frying
eectively. These include:
• The surface of the oil will begin
to foam once heated.
• Smoke will appear on the surface of
the oil before the recommended deep
frying temperatures are reached.
• Oils can develop an ‘o’ smell. This
indicates that the oil has become rancid.
• The oil’s odour is that of the foods
you have cooked eg. seafood.
• The oil will change in viscosity, that
is, it will pour slowly and become
thick with a syrupy appearance.
Storage and preparation of used oil
Re-using your oil is best achieved if proper
methods are used after and during cooking.
1. Never season or salt food before or during
cooking as it will burn and discolour the
oil.This in turn shortens the lifespan of
your oil.
2. Cool oil completely before pouring
through a coee lter or cloth to remove
food solids and debris.
3. Store in a sealed container either in the
refrigerator or in a cool dark cupboard.
4. Repeat the ltering and cleaning
process after each use.
5. Properly dispose of old used oil according
to council requirements.

13
COOKING GUIDE
FOOD TEMPERATURE APPROX. COOKING TIME
Mushrooms 160°C 3–4 mins
Chicken pieces (crumbed) 175°C 12–15 mins
Chicken Strips 180°C 3–4 mins
Prawn cutlets (raw, crumbed) 175°C 3–4 mins
Fish cakes or pieces 190°C 4–6 mins
Onion rings 190°C 2–4 mins
Potato wedges 170°C 7–10 mins
Spring rolls, small 180°C 4–6 mins
Fruit fritters 180°C 4–5 mins
PRESET WEIGHTS/TEMPERATURES/TIME CHART
QUANTITY TEMPERATURE TIME
FROZEN FOOD
Frozen chips 500g chips 180°C 6 min
Frozen nuggets 10 pieces (approx 230g total weight) 160°C 4 min
Frozen battered/crumbed
sh llets 3–4 pieces (approx 300g total weight) 160°C 6 min
Frozen crumbed calamari/
salt and pepper squid 200g batches 180°C 3 min
FRESH FOOD
Fresh crumbed sh 6 llets (220g total batch weight) 160°C 3.5 min
Fresh battered sh llets
(Recommend dropping
the basket into the oil rst,
followed by the battered
sh llets. It will prevent the
batter from sticking to the
basket.)
2–3 x 100g each athead llets 160°C 5 min
Fresh chicken nuggets 6 as per recipe 180°C 4 min
Home made donuts 2–3 x 9cm donuts 170°C 3.5 min
Fresh crumbed calamari/
salt and pepper squid 200g batch 180°C 3 min
Hand cut chips 500g: 1cm–1.5cm thick hand cut chips 1st Fry: Preheat 130°C
2nd Fry: Preheat 180°C
3 min
5 min
Hand cut chips 1kg: 1cm–1.5cm thick hand cut chips 1st Fry: Preheat 130°C
2nd Fry: Preheat 180°C
4 min
8 min
Hand cut chips: Single fry 500g: 1.5cm thick hand cut chips 190°C 8 min
Hand cut chips: Single fry 1kg: 1.5 cm thick hand cut chips 190°C 12 min

14
NOTE
• These times and temperatures are specic
for the weights.
• Variations in thickness and variety
of sh, potatoes and chicken will vary
the cooking times.
• Cooking temperatures and times
were determined using fresh peanut oil.
Only 4–5 uses.
Care & Cleaning
ERROR MESSAGE
When the deep fryer needs to be reset a
RESET message will ash on the display. To
reset, allow the deep fryer to cool completely,
and then press the two red reset buttons
located above the cord storage area at the
back of the control panel.
If the Temperature Control detects oil
temperature to be less than -20°C it will
display the message ER1.
If the Temperature Control detects the oil
temperature to exceed 210°C the display
will show the message ER2. Reset the unit
as per above.
AUTO CUTOUT SAFETY FEATURE
Always add the required amount of oil
BEFORE inserting the power plug into the
power outlet. An Auto Cut-Out safety switch
will be activated if the deep fryer is turned
on without oil in the bowl.The fryer will then
need to be reset as above.
CLEANING
• Before cleaning, always ensure the deep
fryer is turned o and disconnected
from the power outlet.
• Ensure the deep fryer and oil are
completely cool. Oil will retain its
temperature for a long time after
use. Do not attempt to move or
carry the deep fryer, element or
control panel while they are hot.
• Wash the frying basket in hot, soapy
water. Rinse and dry thoroughly.
• Remove the control panel/element of the
deep fryer by lifting upwards.
Place the element onto kitchen paper
to absorb excess oil.Wipe element with
a soft, damp cloth and dry thoroughly.
• Grasp each side of the removable
frying bowl and lift upwards.
• Empty the cooled oil from the frying
bowl. Oil can be reused several times,
depending on the type of food cooked.
Filter the oil through a ne sieve.

15
NOTE
Oil should be ltered after each use
and stored in a clean, airtight container in
a cool area. Good quality oil can be used
several times.
Do not store the oil in the deep fryer.
Discard used oil in a sealed container
with household waste. Do not pour down
a sink or drain.
• Wash the lid, removable inner frying bowl,
stainless steel outer body and wire frying
basket in hot soapy water, rinse and dry
thoroughly The removable inner bowl
allows for easy cleaning. Wipe the bowl
with paper towel, then a damp cloth and a
little mild detergent. Finish o with a clean
damp cloth followed by a clean dry cloth.
• The removable inner frying bowl, frying
basket and stainless steel outer body are
dishwasher safe.
NOTE
Do not use any abrasive cleaners, such as
steel wool to clean the surface of your deep
fryer as they will scratch the surface.
• Wipe over the control panel with a soft,
damp cloth and a little mild detergent.
Finish o with a clean damp cloth and
dry thoroughly with a clean dry cloth.
• Reassemble the deep fryer for
storage. Do not place anything on top
of the deep fryer during storage.
IMPORTANT
Never immerse the deep fryer control
panel, element or cord in water or any other
liquid. Always unplug cord before attempting
to move the appliance and before cleaning.

SDF500UK D19
www.sageappliances.com
GBR IRE
BRG Appliances Limited
Unit 3.2, Power Road Studios, 114 Power Road, London, W4 5PY
Freephone (UK Landline): +44 (0)808 178 1650
Mobile Calls (National Rate): 0333 0142 970
Registered in England & Wales No. 8223512.
Due to continued product improvement, the products illustrated or photographed in this document may vary slightly from the actual product.
Copyright BRG Appliances 2019.
Table of contents
Other Sage Fryer manuals

Sage
Sage The Smart Oven Air Fryer User manual

Sage
Sage Smart Fryer BDF500UK User manual

Sage
Sage SOV860 UK User manual

Sage
Sage Smart Oven Air Fryer SOV860 User manual

Sage
Sage the Smart Oven SOV860BSS User manual

Sage
Sage Smart Oven User manual

Sage
Sage Smart Oven BOV860 User manual

Sage
Sage Smart Oven SOV860BTR User manual