4 5
WARNING
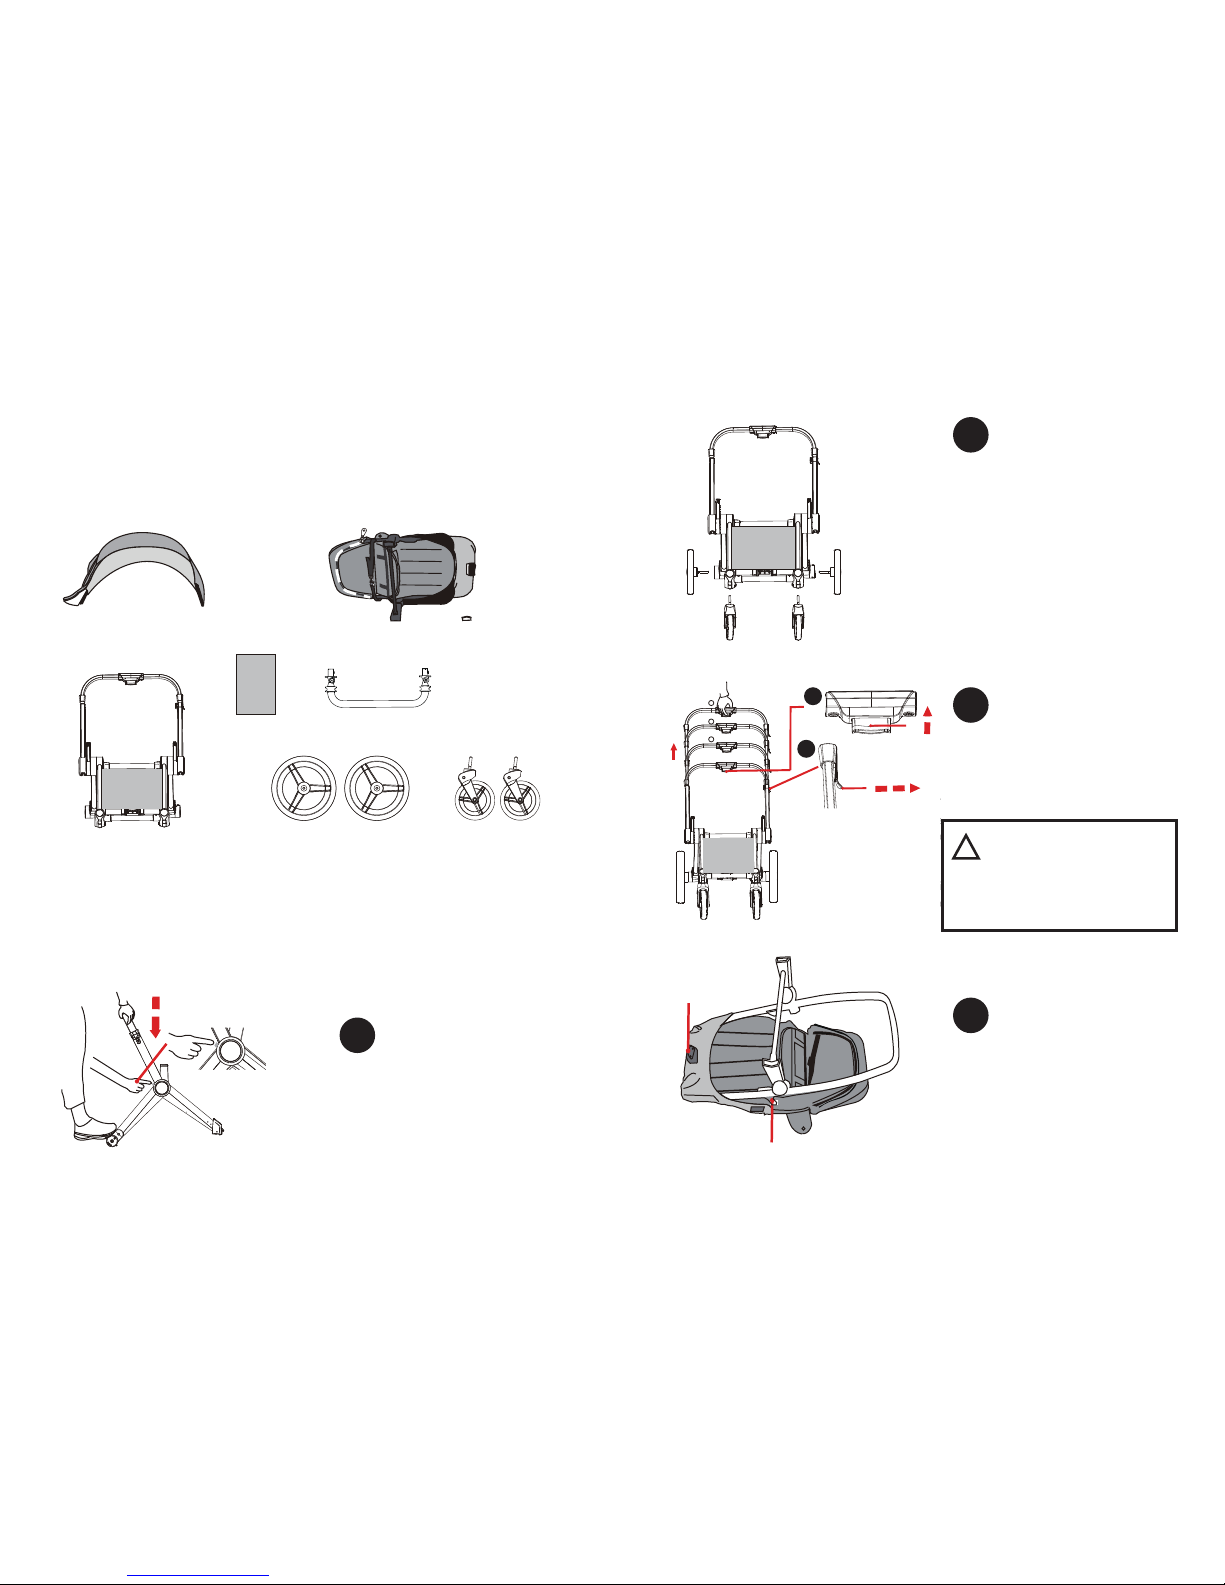
Components
Whats inside the box:
getting started - assembly
Press button as shown to
open frame.
Insert the wheels as shown;
push wheel pins into the frame
sockets until ‘clicked’ into
place.
Apply the brake (red foot brake)
and lengthen the handle before
tting the seat.
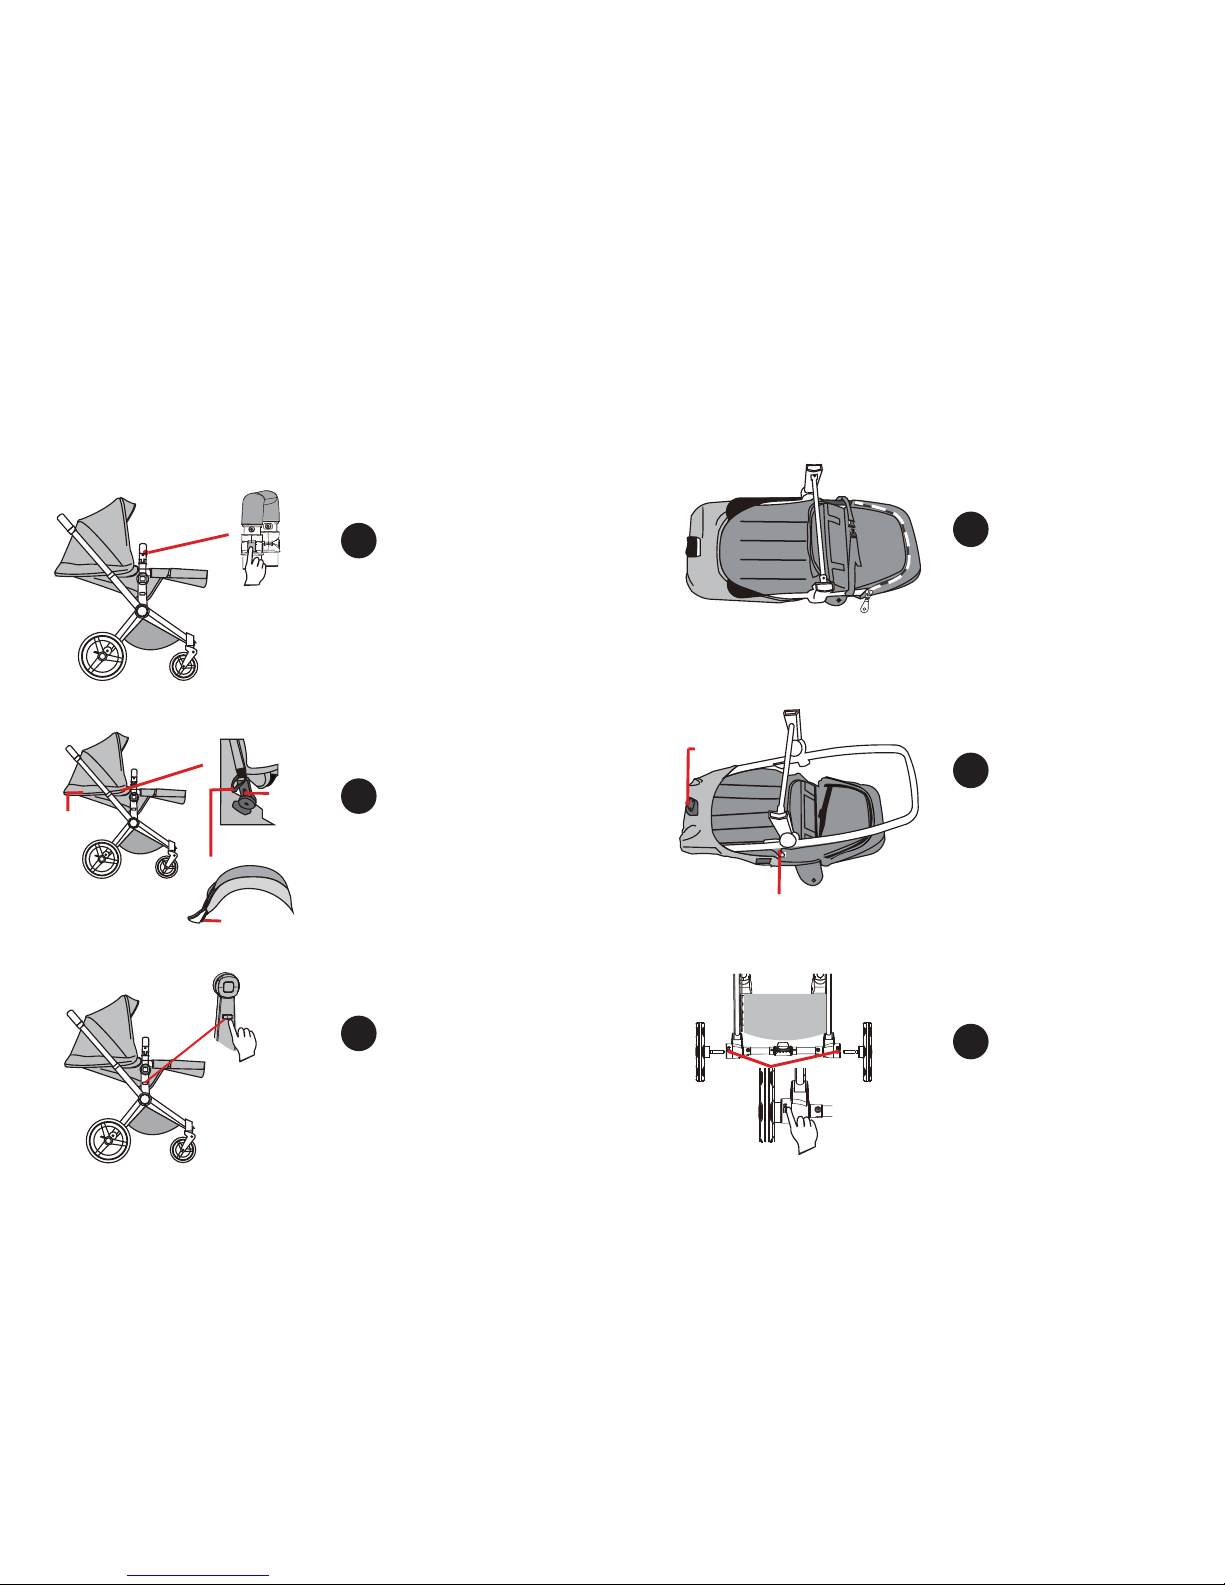
Aline and zip the soft seat
cover to the seat frame, using
the recline lever as a starting
point and guide.
,OPXUIFTUSVDUVSFPGUIFTFBUBOEBDDFTTPSJFTὉ
130%6$54536$563&
8"3/*/(
5IFNBYJNVNMPBEPOUIFMPDBMLHEPOPUPWFSMPBEVTF
$BSSZJOHCBTLFUTQMFBTFEPOPUQVUNPSFUIBOLHHPPET
5PBWPJETVGGPDBUJPOQMBTUJDNVMDIBOEPUIFSQBDLBHJOHNBUFSJBMTBXBZGSPNUIFCBCZ
5IFEFGBVMUJTTVJUBCMFGPSBHFENPOUIT
8IFOUIFCBDLSFTUBOETFBUTVSGBDFJTMFTTUIBOEFHSFFTJTOPUTVJUBCMFGPSJOGBOUTVOEFSNPOUITPGVTF
#FGPSFZPVVTF
*OPSEFSUPDPSSFDUMZVTFDIJMESFOTDBSUQMFBTFSFBEUIFJOTUSVDUJPONBOVBMDBSFGVMMZBOEQMFBTFQSPQFSMZLFQUGPSGVUVSFSFGFSFODF
*GZPVEPOUGPMMPXEJSFDUJPOTVTFNBZBGGFDUUIFTBGFUZPGUIFDIJMESFO*GBUSBOTGFSQMFBTFUIFEFMJWFSZJOTUSVDUJPOTBUUIFTBNFUJNF
"XOJOHT
4FBU
'SBNF 'SPOUXIFFM
#BDLXIFFM
"SNSFTU
4QFDJGJDBUJPO
*OTUBMMBUJPOBOEVTBHF
澝6XKYYZNKH[ZZUTGYYNU]T
OTZNOYVUYOZOUT]ORRHKV[Z
JU]TH_NGTJNKGXJVG
NGYUVKTKJ
澝'YYNU]TOTZNKLXUTZGTJ
XKGX]NKKRYXKYVKIZO\KR_
OTYKXZKJOTZUGNURKOTZNK
LXGSKGXKIUXXKYVUTJOTM
NKGXJVGYG_YOZNGYV[ZOT
VRGIK
澝/TYKXZGYKGZOYGJP[YZOTM
JK\OIKGZUTKKTJULZNKIRUZN
ZNKYKGZULGJP[YZOTMJK\OIK
U[ZLXUSZNKIRUZN'IIUXJOTM
ZUZNKIRUZNZNKGXSXKYZ
YNU[RJ]KGXU[ZULGNURK
IUTZXURGVVGXGZ[Y
GXSXKYZLXGSK
1
2
4
Canopy Seat - Soft Cover and Frame
Product Manual Belly Bar
Frame Back Wheels Front Wheels
Recline Lever
Seat Frame
*OTUBMMBUJPOBOEVTBHF
*OTUBMMBUJPOBOEVTBHF
澝:NKNUUQUTZNKLXGSK
ZUHXKGQ U[ZULZNKLXGSK
UTZNKH[SV[VZUXGOYKS_
NGTJGLZKXNKGXJVGGLZKX
YZUV'IIUXJOTMZUZNKYZUV
VUYOZOUTGYYNU]TOTLOM[XK
UTZNKH[ZZUTZNKGJP[YZGHRK
NGTJZULOZZNKOXU]TNKOMNZ
'YYNU]TOTLOM[XK
V[RRYGZZNKZUVULZNK
YKGZGJP[YZOTMJK\OIK
IGTGJP[YZZNK'TMRK
ULZNKYKGZ
'YYNU]TV[RRZNK
G]TOTMYLXUTZKTJ
G]TOTMYIGTHKGJP[YZKJ
=ORRHKJU]TZNK
RUIGZOUTULZNKH[ZZUT
GYYNU]TOTZNKLXUTZ
]NKKRRUIQ6[YNZU
IUSVRKZKZNK[TRUIQ
RUIQKJLXUTZ]NKKRIGT
TUZXUZGZK[TRUIQKJZNK
LXUTZ]NKKRIGTXUZGZK
LXKKR_
HXGQK
2UIQIGTTUZZ[XT]ORR
HXGQKJU]TUTZNKXKGX
]NKKRY=ORRHKIUSVRKZKJ
ZNKXKGXHXGQKXKYVUTYK
RK\KRZU[TRUIQLXKKXUZGZOUT
A
B
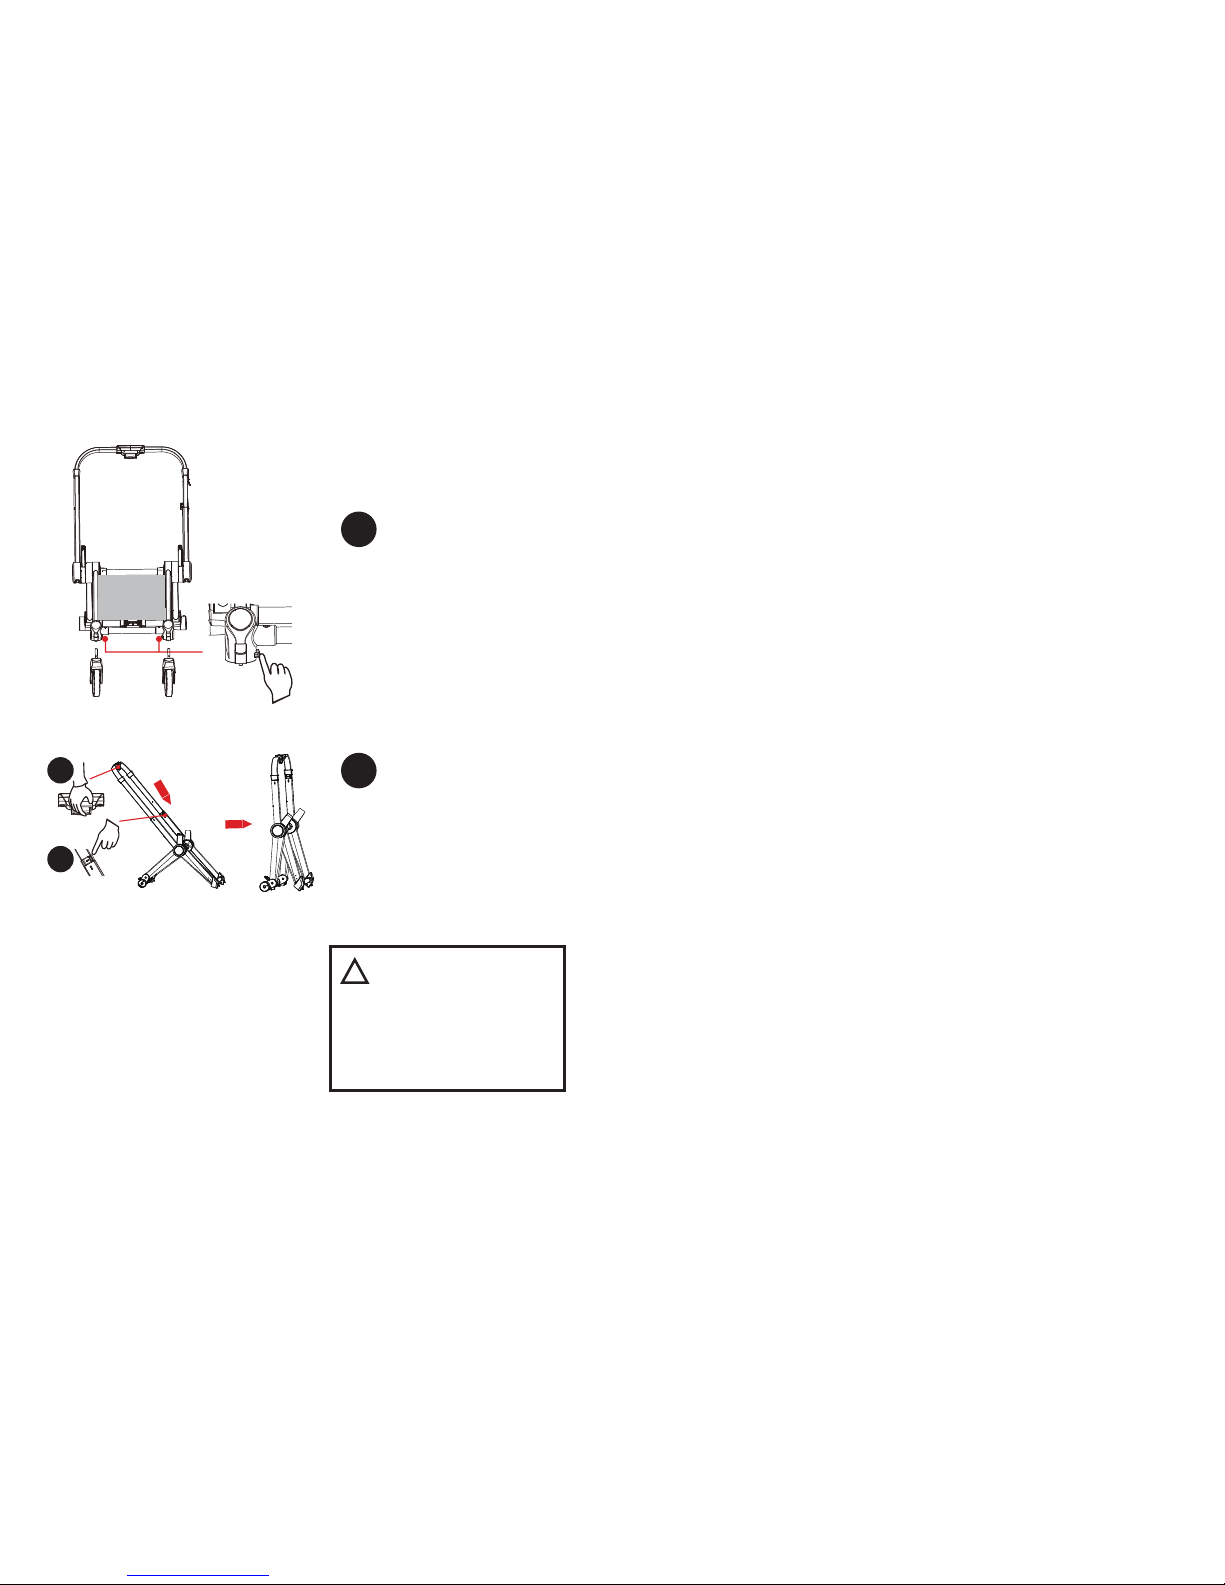
!
Ensure that all locking devices
are engaged before use.
,OPXUIFTUSVDUVSFPGUIFTFBUBOEBDDFTTPSJFTὉ
130%6$54536$563&
8"3/*/(
5IFNBYJNVNMPBEPOUIFMPDBMLHEPOPUPWFSMPBEVTF
$BSSZJOHCBTLFUTQMFBTFEPOPUQVUNPSFUIBOLHHPPET
5PBWPJETVGGPDBUJPOQMBTUJDNVMDIBOEPUIFSQBDLBHJOHNBUFSJBMTBXBZGSPNUIFCBCZ
5IFEFGBVMUJTTVJUBCMFGPSBHFENPOUIT
8IFOUIFCBDLSFTUBOETFBUTVSGBDFJTMFTTUIBOEFHSFFTJTOPUTVJUBCMFGPSJOGBOUTVOEFSNPOUITPGVTF
#FGPSFZPVVTF
*OPSEFSUPDPSSFDUMZVTFDIJMESFOTDBSUQMFBTFSFBEUIFJOTUSVDUJPONBOVBMDBSFGVMMZBOEQMFBTFQSPQFSMZLFQUGPSGVUVSFSFGFSFODF
*GZPVEPOUGPMMPXEJSFDUJPOTVTFNBZBGGFDUUIFTBGFUZPGUIFDIJMESFO*GBUSBOTGFSQMFBTFUIFEFMJWFSZJOTUSVDUJPOTBUUIFTBNFUJNF
"XOJOHT
4FBU
'SBNF 'SPOUXIFFM
#BDLXIFFM
"SNSFTU
4QFDJGJDBUJPO
*OTUBMMBUJPOBOEVTBHF
澝6XKYYZNKH[ZZUTGYYNU]T
OTZNOYVUYOZOUT]ORRHKV[Z
JU]TH_NGTJNKGXJVG
NGYUVKTKJ
澝'YYNU]TOTZNKLXUTZGTJ
XKGX]NKKRYXKYVKIZO\KR_
OTYKXZKJOTZUGNURKOTZNK
LXGSKGXKIUXXKYVUTJOTM
NKGXJVGYG_YOZNGYV[ZOT
VRGIK
澝/TYKXZGYKGZOYGJP[YZOTM
JK\OIKGZUTKKTJULZNKIRUZN
ZNKYKGZULGJP[YZOTMJK\OIK
U[ZLXUSZNKIRUZN'IIUXJOTM
ZUZNKIRUZNZNKGXSXKYZ
YNU[RJ]KGXU[ZULGNURK
IUTZXURGVVGXGZ[Y
GXSXKYZLXGSK
Actuate lever A and button B to
pull up the handle bar to lock
frame in place.
3