Salamander Designs XL Series User manual

Salamander Designs - XL Electric Lift, Mobile Display Stands www,salamandercommercial.com 501-680 [04.20] page 1 of 24
CAPACITY
Supports most displays up to 300 lb (136 kg)
VESA Mounting Compliant
Horizontal – 400, 500, 600, 700, 800, 900, 1000, 1100, 1200, 1300
Vertical – 100, 200, 300, 400, 500, 600
FPS1XL/EL/GG
E479586
ADA
COMPLIANT
SOLUTIONS
fps1XL/el/gg
XL Electric Lift, Mobile Stand
user manuAl

Salamander Designs - XL Electric Lift, Mobile Display Stands www,salamandercommercial.com 501-680 [04.20] page 2 of 24
PARTS
ID QTY PART NUMBER DESCRIPTION
(1) PHK-740 (bag) Display Mounting Fastener Set - Metric
A (4) 301-695 M8 x 16mm Pan phillips screw
B (4) 301-710 M6 x 20mm Pan phillips screw
C (4) 301-720 M4 x 20mm Pan phillips screw
D (4) 301-715 M5 x 20mm Pan phillips screw
E (4) 301-700 M8 x 30mm Pan phillips screw
F (4) 301-735 M8 x 40mm Pan phillips screw
G (4) 302-281 M6 x 14mm Pan phillips screw
H (6) 300-518 5/16-18 x 1/2” Button Head Screw - for Display Bracket
I(8) 301-010 5/16-18 x 3/4” Button Head Screw - for Leg Attachment
J (4) 400-010 Cable ties
K (3) 400-125 Velcro cinch strap
L (1) 400-060 3/16” Hex wrench - long arm
M (1) 400-080 5/32” Hex wrench
N (1) 400-070 1/8” Hex wrench
O (2) 305-062/GT Display Interface Brackets
J
L
K
HI
M
N
O
301-720 301-715 301-700 301-735 300-485302-281
AB
301-720 301-715 301-700 301-735 300-485302-281
C D
E F G

Salamander Designs - XL Electric Lift, Mobile Display Stands www,salamandercommercial.com 501-680 [04.20] page 3 of 24
warnings [English]
WARNING! Failure to comply with these instructions
may result in accident involving serious personal injury.
Failing to follow these instructions can result in the
product being damaged or being destroyed or voiding
of the warranty.
WARNING! For use with video monitors weighing 300
lbs (136 Kg) or less. Use with heavier televisions
may result in instability causing tip over resulting
in death or serious injury.
IMPORTANT SAFETY INSTRUCTIONS
When using an electrical furnishing, basic precautions should always be followed, including the following:
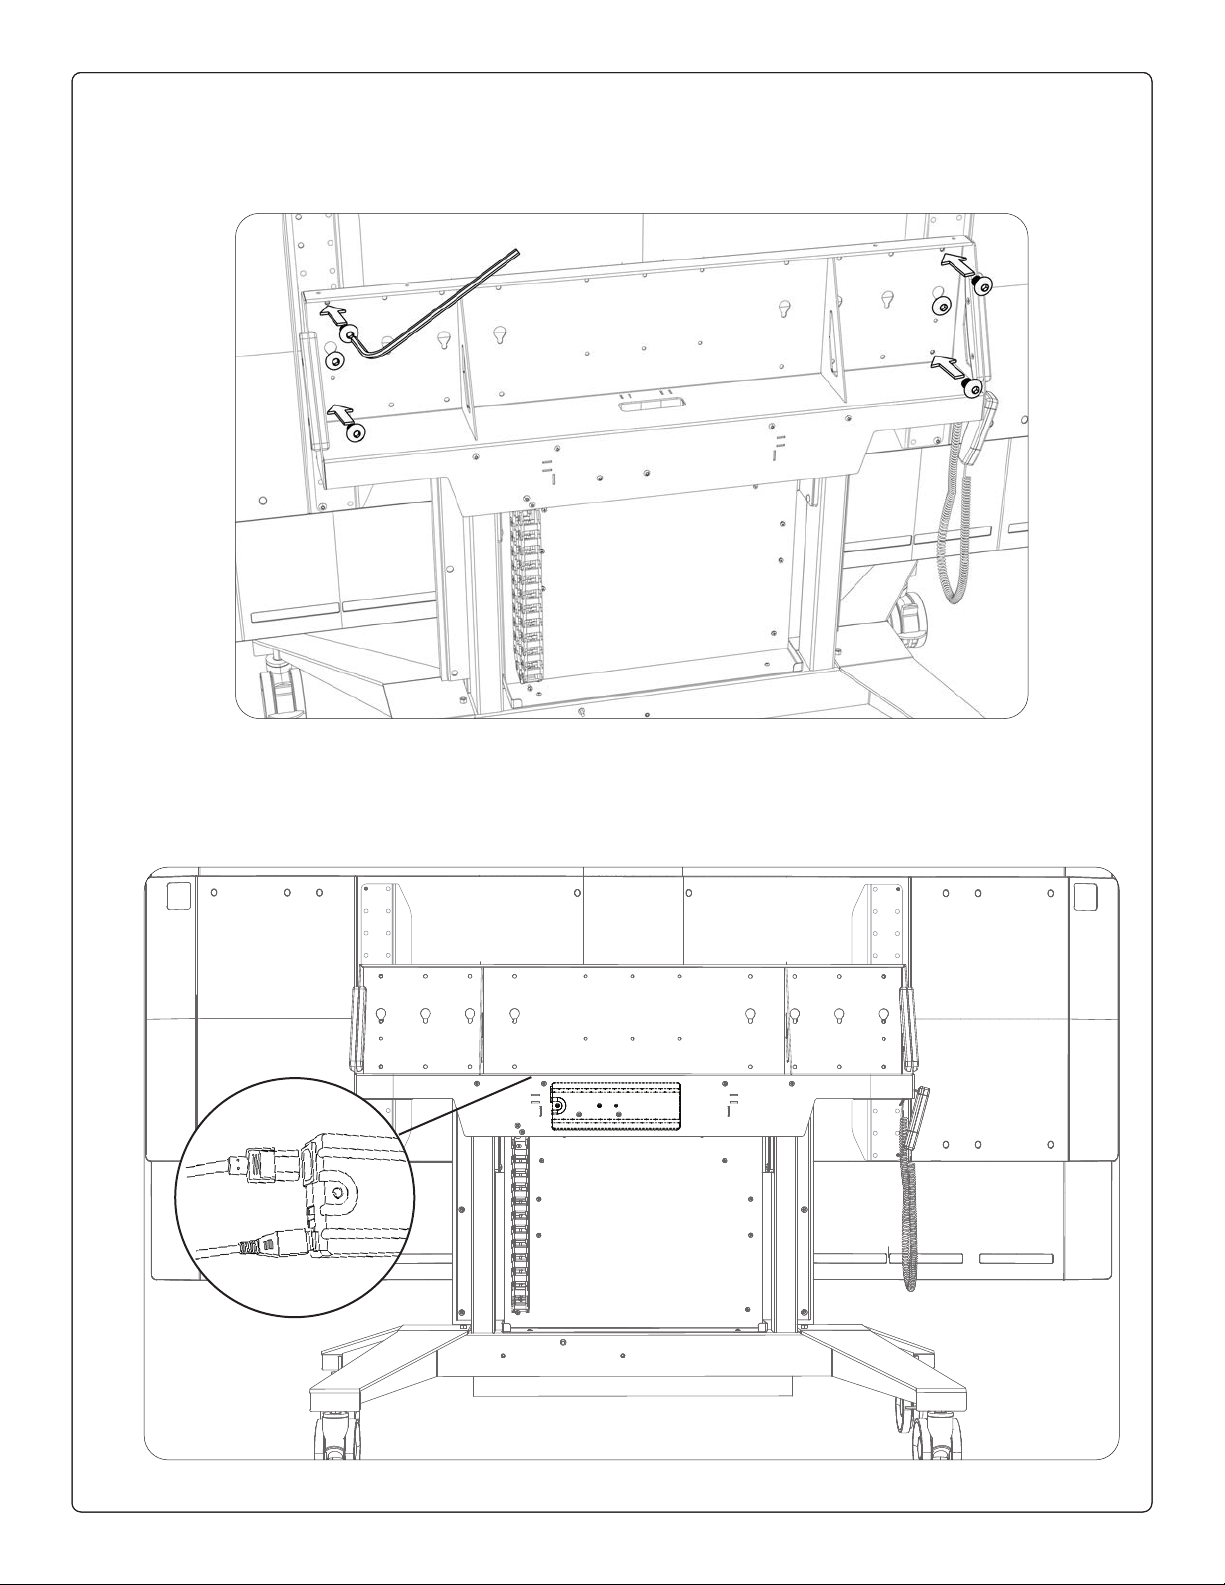
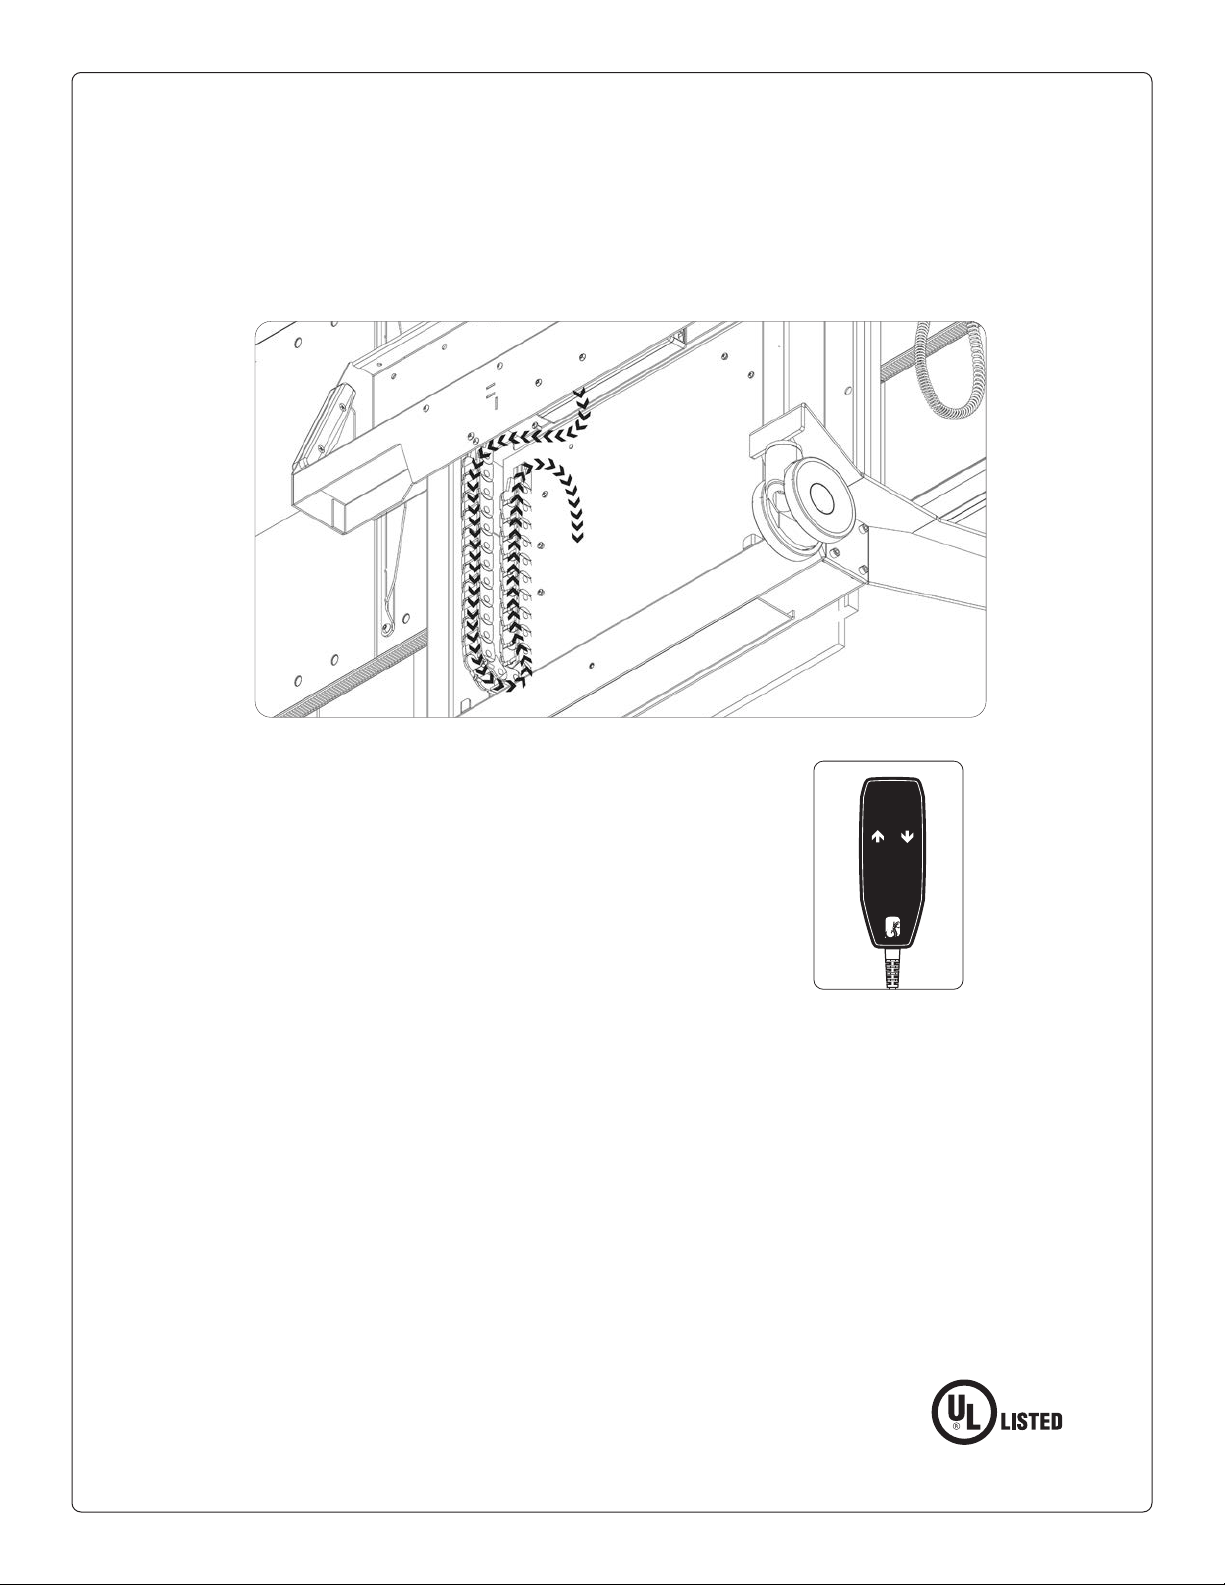
WARNING – Keep hands away from moving parts while operating device.
CAUTION! Manage cables carefully. Use cable ties to keep wires away from moving parts.
WARNING – Children must be under surveillance to ensure that they do not operate, touch,
climb, or play with the product.
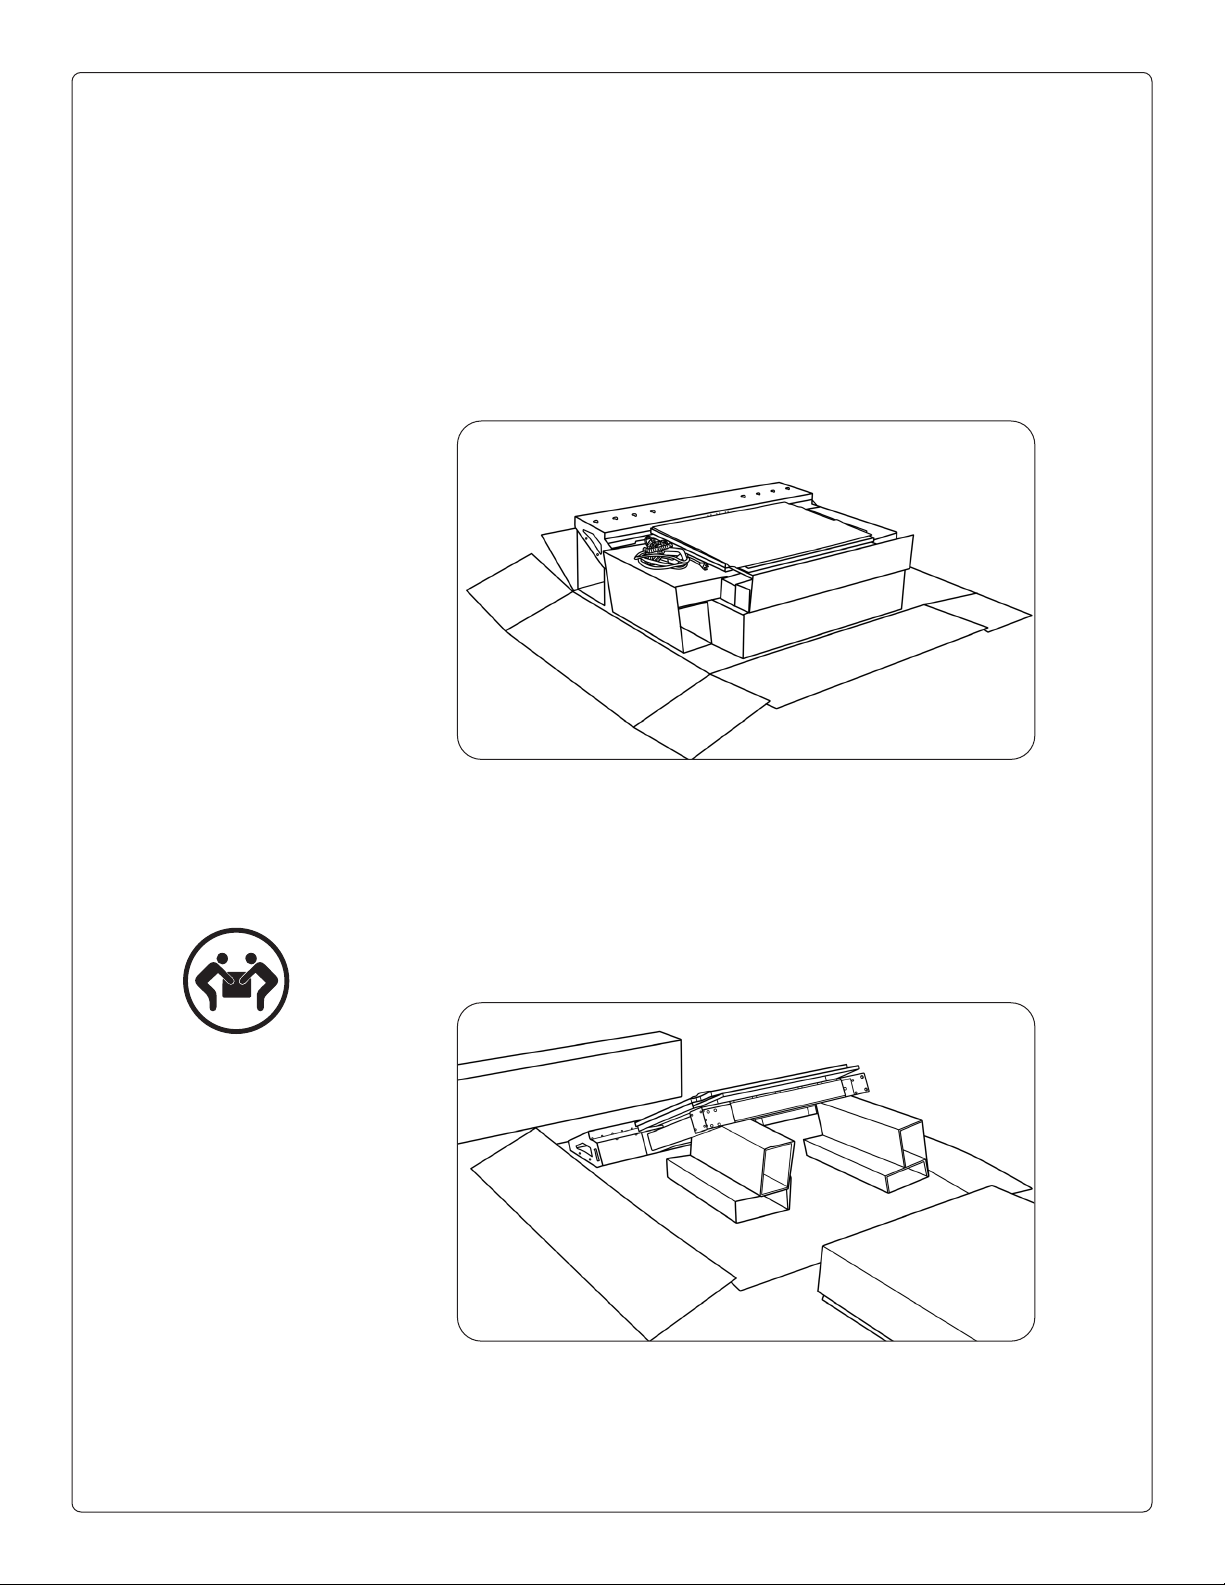
CAUTION! When relocating the device, set to lowest position and use handle to move
and position the device.
WARNING – To reduce the risk of burns, re, electric shock, or injury to persons:
• For indoor use in dry locations only.
• For commercial use.
• Disconnect power when installing, relocating or before servicing.
• Unplug from outlet before putting on or taking off parts.
• Close supervision is necessary when this furnishing is used by, or near children,
invalids, or disabled persons.
• Use this device only for its intended use as described in these instructions.
Do not use attachments not recommended by the manufacturer.
• Protect the power cord from being walked on or pinched.
• Keep the cord away from heated surfaces.
• Never drop or insert any object into any opening.
• Do not operate where aerosol (spray) products are being used or where
oxygen is being administered.
• The device shall not be exposed to dripping or splashing and that no objects
lled with liquids, such as cups or vases, shall be placed on the furnishing.
• Unplug this apparatus during lightning storms or when unused for long periods of time.
• Never operate the device if it has a damaged cord or plug, if it is not working properly,
if it has been dropped or damaged.
• If the device makes unusual noise or smells, switch off the mains voltage immediately.
Return the device to a service center for examination and repair.
Electrical Specications:
Input: 90V - 240V ~, 48 Hz - 63HZ
Operation: 10% Max 2min./18min.

Salamander Designs - XL Electric Lift, Mobile Display Stands www,salamandercommercial.com 501-680 [04.20] page 4 of 24
Duty Cycle of the motor control system:
The duty cycle is 10% ~ 6 min./ hour or max. 2 min. of continuous use, irrespective of the load.
This must NOT be exceeded as this will result in a superheating of the motor. Exceeding the duty
cycle will result in a dramatic reduction of the life of the system.
The motor control system range contains the following components:
• 1 control box
• 2 Telescoping actuators
• 1 exchangeable main power cable
• 2 motor cables
• 1 Wired remote control
Troubleshooting / Initialization of the motor control system
If motor control system malfunctions follow these steps;
The system is initialized by pressing the down button once or twice and holding it down until unit runs
into end stop, it will then automatically run approx. 3 mm out again and hereafter slowly running in
again. Only release the down button when the movement has completely stopped. If the key is released
before the sequence is completed then the initialization is interrupted and must be started again from
the beginning. It is sometimes necessary to press the down button twice to start the initialization
this is because the system can be in different modes when the initialization starts.
WARNING: Risk of Electric Shock – Connect the device to a properly grounded outlet only. Do not
defeat the safety purpose of the polarized or grounding-type plug. A polarized plug has two blades
with one wider than the other. A grounding type plug has two blades and a third grounding prong.
The wide blade or the third prong is provided for your safety. If the provided plug does not t into
your outlet, consult an electrician for replacement of the obsolete outlet. Do not use a plug adapter
that defeats the ground pin of the AC plug.
WARNING: Do not overload the wall outlet where this device is being connected. Do not overload this
device. Ensure the total load to this device does not exceed that which is listed in the specications
section of this manual.
Maintenance
• DANGER – To reduce the risk of electrical shock: Always unplug this device from
the electrical outlet before cleaning.
• Clean dust and dirt with a dry cloth, on the outside of the system at appropriate
intervals and inspect for damage.
• Inspect the connections, cables, and plugs and check for correct functioning
as well as video monitor xing points.
Repairs
• Refer all servicing to qualied service personnel. Servicing is required when the device
has been damaged in any way, such as power-supply cord or plug is damaged, liquid
has been spilled or objects have fallen into the device, the device has been exposed
to rain or moisture, does not operate normally, or has been dropped.
• There are no user-serviceable components within this device. Removal of
the cover from this device may present a shock hazard, and void the warranty.
Accessories and Spare Parts
Please contact your nearest Salamander Designs dealer or www.salamandercommercial.com
FPS1XL/EL/GG
E479586

Salamander Designs - XL Electric Lift, Mobile Display Stands www,salamandercommercial.com 501-680 [04.20] page 5 of 24
ASSEMBLY
UNBOX & INSTALL LEGS
Fold box sides down at
Prop base of unit up on cardboard supports

Salamander Designs - XL Electric Lift, Mobile Display Stands www,salamandercommercial.com 501-680 [04.20] page 6 of 24
INSTALL LEGS
Install legs by having one person hold leg and other person fasten with “I”
screws. Please note that the leg has a long side and short side - the long side with
caster brake faces the front of the unit.
After legs have been securely fastened to stand, use two-people lift stand
to upright position.
There are 6 “I” screws per leg. The fth screw is installed on the top
of the leg as shown above.
I x 10
L

display installation
Attach Brackets to Display
Check depth of screw threads in display before inserting screws. Inserting a screw that
is longer than the hole could result in damage to display. Depth can be conrmed by
inserting hex wrench into hole and marking its length then conrming this length is
sufcient by comparing it to the screw you are using.
Install interface mounting brackets (O) onto display as shown using supplied phillips
screws (A-G) or screws specied by the display manufacturer. Hand tighten rst
to conrm thread and depth match. Note: Afx display brackets “Ears-Out” as shown
Touch Presenter Motorized Mobile Stand
FPS1XL_EL Instruction 4-7-20 Attach Display Brackets
Attach Brackets to Display
(USE ALL TEXT AND UPPER IMAGES FROM 501-680 (07.18) PAGE 7 OF 24)
USE BELOW IMAGE TO REPLACE ITEM "J" ON PARTS PAGE 2
Ears out

Salamander Designs - XL Electric Lift, Mobile Display Stands www,salamandercommercial.com 501-680 [04.20] page 8 of 24
Attach Display to Stand
Loosely install ONE (1) “H” screw to the center of each display bracket.
This will act as an alignment screw for the next step.
Two people are needed to install the display on the stand. Position alignment
screw into the “key hole” slot as shown and continue holding display.
Attach Display to Stand
FPS1XL_EL Instruction 4-7-20 Attach Display Brackets
Attach Brackets to Display
(USE ALL TEXT AND UPPER IMAGES FROM 501-680 (07.18) PAGE 7 OF 24)
USE BELOW IMAGE TO REPLACE ITEM "J" ON PARTS PAGE 2

Salamander Designs - XL Electric Lift, Mobile Display Stands www,salamandercommercial.com 501-680 [04.20] page 9 of 24
Immediately use (4) “H” screws to afx the mounting brackets
to the cart-side mechanism as shown. Tighten all screws rmly.
Connect Power
Insert power cord into supply as shown in illustration below:

Salamander Designs - XL Electric Lift, Mobile Display Stands www,salamandercommercial.com 501-680 [04.20] page 10 of 24
Route Cables from Display to Stand
Manage cables carefully. Use cable ties to keep wires away from pinch points.
• Route cables between the back of display and the hole on the front of stand.
• Manage cables through cable chain.
LIMITED LIFETIME WARRANTY
Salamander Designs Ltd. Limited Lifetime Warranty on Furniture and Seating products are guaranteed to be free from defects in design, material
and workmanship, given normal use and proper care in a normal single shift Commercial environment, with the exceptions noted below. Salamander
will repair or replace, at its discretion without charge to the original purchaser, any product or part thereof which fails as the result of such defects
during the warranty period. The repair or replacement will not exceed the original purchase price. Salamander assumes no responsibility for repairs
to products that result from user modications, attachments to a product, misuse, abuse, alteration, or negligent use. Except as stated above,
Salamander makes no expressed or implied warranties as to any product, and, in particular, makes no warranty of merchantability or tness for any
particular purpose. Salamander shall not be liable for consequential or incidental damages or commercial loss arising from any product defect.
Furniture Warranty Limitations
Frame - Lifetime
Wood Components - 7 Years
Electronic Accessories - 3 Years
Casters - 7 Years
For a complete Warranty, please visit www.salamandercommercial.com
Operation: Remote Control
Hold down the “down” button to initialize unit.
Up button will raise display to presentation mode
Down button will lower display to transport mode.
Troubleshooting
Double check that power cord is plugged into power supply fully.
Hold down the “down” button to reset unit.
FPS1XL/EL/GG
E479586
This manual suits for next models
1
Table of contents
Popular Industrial Monitor manuals by other brands

Dynamic Displays
Dynamic Displays 17C3 A/D Series user manual

Electro-mech
Electro-mech LX2056 owner's manual

Hope Industrial Systems
Hope Industrial Systems HIS-ML15-***E Series user manual

Austin Hughes
Austin Hughes CyberView RP-F617 user manual

Lika
Lika LD350 Mounting instructions

Honeywell
Honeywell W8600F installation instructions

Acnodes
Acnodes APH 9220 user manual

AFI Branding
AFI Branding ReFrame ILS140 Assembly instructions

Austin Hughes
Austin Hughes CyberView RP-920 user manual

Hope Industrial Systems
Hope Industrial Systems HIS-UM17-*A Series user manual

Nexcom
Nexcom VTK 33M-01 user manual

Crystal Image Technologies
Crystal Image Technologies RMP-161-19R user manual