Salicru SLC ADAPT X Series User manual

SLC serie ADAPT X
UNINTERRUPTIBLE POWER SUPPLY
USER'S MANUAL

2SALICRU
General index
1. INTRODUCTION.
1.1. THANK-YOU LETTER.
2. SAFETY INFORMATION.
2.1. USING THIS MANUAL.
2.1.1. Conventions and symbols used.
2.1.2. Safety considerations.
3. QUALITY ASSURANCE AND STANDARDS.
3.1. STATEMENT BY THE MANAGEMENT.
3.2. STANDARDS.
3.2.1. First and second environment.
3.2.1.1. First environment.
3.2.1.2. Second environment.
3.3. ENVIRONMENT.
4. PRESENTATION.
4.1. VIEWS.
4.1.1. Views of the subracks.
4.2. DEFINITION OF THE PRODUCT.
4.2.1. Subrack and battery module nomenclatures.
4.3. GENERAL DESCRIPTION.
4.3.1. Introduction.
4.3.2. Architecture.
4.3.2.1. Structural diagram.
4.3.2.2. Parallel system.
4.3.3. Operating modes.
4.3.3.1. Normal mode.
4.3.3.2. Battery mode.
4.3.3.3. Auto-start mode (automatic start).
4.3.3.4. Bypass mode.
4.3.3.5. Manual bypass mode (maintenance bypass).
4.3.3.6. Parallel-Redundant Mode.
4.3.3.7. ECO mode.
4.3.4. Battery management (factory preset settings).
4.3.4.1. Basic functions.
4.3.4.2. Advanced functions.
4.3.4.3. Protection of batteries.
5. INSTALLATION.
5.1. RECEPTION.
5.1.1. Reception, unpacking and contents.
5.1.2. Storage.
5.1.3. Unpacking.
5.1.4. Transport to the site.
5.2. LOCATION.
5.2.1. Location of the ADAPT X.
5.2.2. Room for the batteries.
5.2.3. Physical location.
5.3. ENTRY OF THE CONNECTION CABLES.
5.4. PROTECTIVE DEVICES AND CROSS SECTION OF THE
CONNECTION CABLES.
5.4.1. Input, bypass and output.
5.4.2. Battery installation and maintenance.
5.4.2.1. General recommendations.
5.4.2.2. Installing the batteries. Preliminary considerations before
connecting them and their protections.
5.4.3. Access to the interior of the subrack for its connection.
5.5. CONNECTION.
5.5.1. Connecting the device to the mains.
5.5.2. Separate static bypass line connection. In version B only.
5.5.3. Connection of the output, terminals (X6 to X9).
5.5.4. Connection of the battery terminals of the equipment with
those of the battery module.
5.5.5. Earth bonding terminal connection.
5.5.6. Parallel connection, 6-slot subracks only.
5.5.6.1. Parallel bus connection.
5.5.7. Interface and communications.
5.5.7.1. Digital inputs, dry contacts and communications.
5.5.7.2. Analogue input of battery and ambient temperature probes.
5.5.7.3. Signal input of the remote EPO button (Emergency Stop).
5.5.7.4. External manual bypass auxiliary contact input.
5.5.7.5. Signal shunt trip circuit breaker of BCB battery switch and
auxiliary contact.
5.5.7.6. Dry contacts.
6. OPERATION
6.1. INTRODUCTION.
6.2. COMMISSIONING OF THE UPS.
6.2.1. Controls before commissioning.
6.2.2. Commissioning.
6.3. TRANSFER PROCEDURES BETWEEN OPERATING MODES.
6.3.1. Transfer from Normal Mode to Bypass Mode.
6.3.2. Transfer from Bypass Mode to Normal Mode.
6.4. OPERATIONS OF THE MANUAL BYPASS SWITCH
(MAINTENANCE).

3
6.4.1. Procedure to switch from Normal Mode to Maintenance
Bypass Mode.
6.4.2. Procedure to switch from Maintenance Bypass Mode to
Normal Mode.
6.5. EPO PUSH BUTTON (EMERGENCY STOP). PROCEDURE.
6.5.1. Complete shutdown of the UPS, with EPO.
6.5.2. UPS restart after complete shutdown with EPO.
6.6. AUTOMATIC RESTART.
6.7. OPERATING INSTRUCTIONS FOR MAINTENANCE OF
POWER MODULES.
6.7.1. Maintenance guide for power modules.
6.7.1.1. With the system operating in Normal Mode and the normal
bypass voltage and frequency, with at least 1 power module
as redundant:
6.7.1.2. No power modules operating as redundant:
6.8. OPERATING INSTRUCTIONS FOR MAINTENANCE OF THE
BYPASS AND MONITORING MODULE.
6.8.1.1. With the system operating in Normal Mode and normal
bypass voltage and frequency, transfer the load over the
manual bypass.
6.9. LANGUAGE SELECTION.
6.10. CHANGING THE CURRENT DATE AND TIME
6.11. LEVEL 1 CONTROL PASSWORD.
7. MONITORING PANEL WITH LCD TOUCH
SCREEN.
7.1. INTRODUCTION.
7.2. DIAGRAM OF ENERGY FLOW TO LEDS.
7.2.1. Acoustic alarm.
7.3. DESCRIPTION OF THE SCREENS SHOWN ON THE LCD
TOUCH SCREEN.
7.3.1. Start menu or main screen.
7.3.2. System information menu.
7.3.3. Information menu of the module or power modules (PM).
7.3.4. Setting menu.
7.3.5. Setting menu.
7.3.6. Operation menu.
7.3.6.1. Function icons.
7.3.6.2. Command icons.
7.3.7. Oscilloscope menu.
8. OPTIONAL
8.1. INSTALL AN SNMP DRIVE.
8.2. ROOM TEMPERATURE SENSOR.
9. WARRANTY.
9.1. WARRANTY CONDITIONS.
9.1.1. Terms of the warranty.
9.1.2. Exclusions.
9.2. TECHNICAL SERVICES NETWORK.
10. PRODUCT SPECIFICATIONS.
10.1. INTERNATIONAL STANDARDS.
10.2. ENVIRONMENTAL CHARACTERISTICS.
10.3. MECHANICAL CHARACTERISTICS.
10.4. ELECTRICAL CHARACTERISTICS.
10.4.1. Electrical characteristics (rectifier input).
10.4.2. Electrical characteristics (DC Bus or DC).
10.4.3. Electrical characteristics (Inverter output).
10.4.4. Electrical characteristics (Bypass input).
10.5. EFFICIENCY.
EMi3 SERVOMOTOR VOLTAGE STABILISERUSER'S MANUAL

4SALICRU
SALICRU
1. INTRODUCTION.
1.1. THANK-YOU LETTER.
We thank you in advance for the trust placed in us in the pur-
chasing of this product. Read this instruction manual carefully
in order to familiarize yourself with its content, since the more
you know and understand the equipment the greater your sat-
isfaction, level of safety and optimization of its functionalities
will be.
We remain at your disposal for any additional information or
queries that you may wish to make.
Yours sincerely.
•The equipment described herein is capable of causing
significant physical damage in the event of improper
handling. For this reason its installation, maintenance
and/or repair must be carried out exclusively by our per-
sonnel or by qualified personnel.
•Although no effort has been spared to ensure that the in-
formation in this user manual is complete and accurate, we
are not responsible for any errors or omissions that may
exist.
The images included in this document are for illustrative
purposes and may not represent exactly the parts of the
equipment shown, therefore they are not contractual. How-
ever, any divergence that may arise will be remedied or
solved with the correct labelling on the unit.
•Following our policy of constant evolution, we reserve
the right to modify the characteristics, operations
or actions described in this document without prior
notice.
Consequently, the contents of this manual may differ from
the latest version available on our website. Check that you
have the latest version of the document (listed on the back
cover, on the logo of our brand) and download it from the
website.
•Reproduction, copying, assignment to third parties,
modification or total or partial translation of this
manual or document, in any form or by any means, without
previous written authorization by our firm is prohib-
ited, with the full and exclusive property rights over the
same being reserved by our firm.

5
2. SAFETY INFORMATION.
2.1. USING THIS MANUAL.
The documentation of any standard equipment is
available to the customer on our website for download
(www.salicru.com).
•For equipment “powered by socket”. This is the intended
portal for obtaining the user manual and safety instructions
EK266*08.
•For equipment "with permanent connection", connection to
terminals. Although it can be downloaded from the web-
site, a CD-ROM or Pen Drive can be delivered with the UPS
with all the necessary information for its connection and
commissioning, including EK266*08 safety instructions.
Before carrying out any action on the equipment relating to its
installation or commissioning, change of location, configuration
or manipulation of any kind, you must read the safety instruc-
tions carefully.
The purpose of the user manual is to provide information re-
garding safety and explanations of the procedures for installa-
tion and operation of the equipment. Read them carefully and
follow the steps indicated in the order established.
Compliance with the "Safety Instructions" is
mandatory and the user is legally responsible for
compliance and enforcement.
The equipment is delivered properly labelled for the correct
identification of each of the parts, which together with the in-
structions described in this user manual allows the operations
of installation and commissioning to be performed in a simple
and orderly manner without having any doubts whatsoever.
However, because the product is constantly evolving,
discrepancies or slight contradictions may arise. If in
any doubt, the labelling on the equipment itself will al-
ways prevail.
Finally, once the equipment is installed and operating, it is rec-
ommended to save the documentation downloaded from the
website, CD-ROM or Pen Drive in a safe and easy-to-access
place, for any future queries or doubts that may arise.
When a system differs from that shown in the figures in
Section 4, except when the number of modules con-
nected in parallel and/or the technical specifications
are modified, additional explanatory annexes will be
edited if deemed appropriate or necessary. These will
usually be printed on paper.
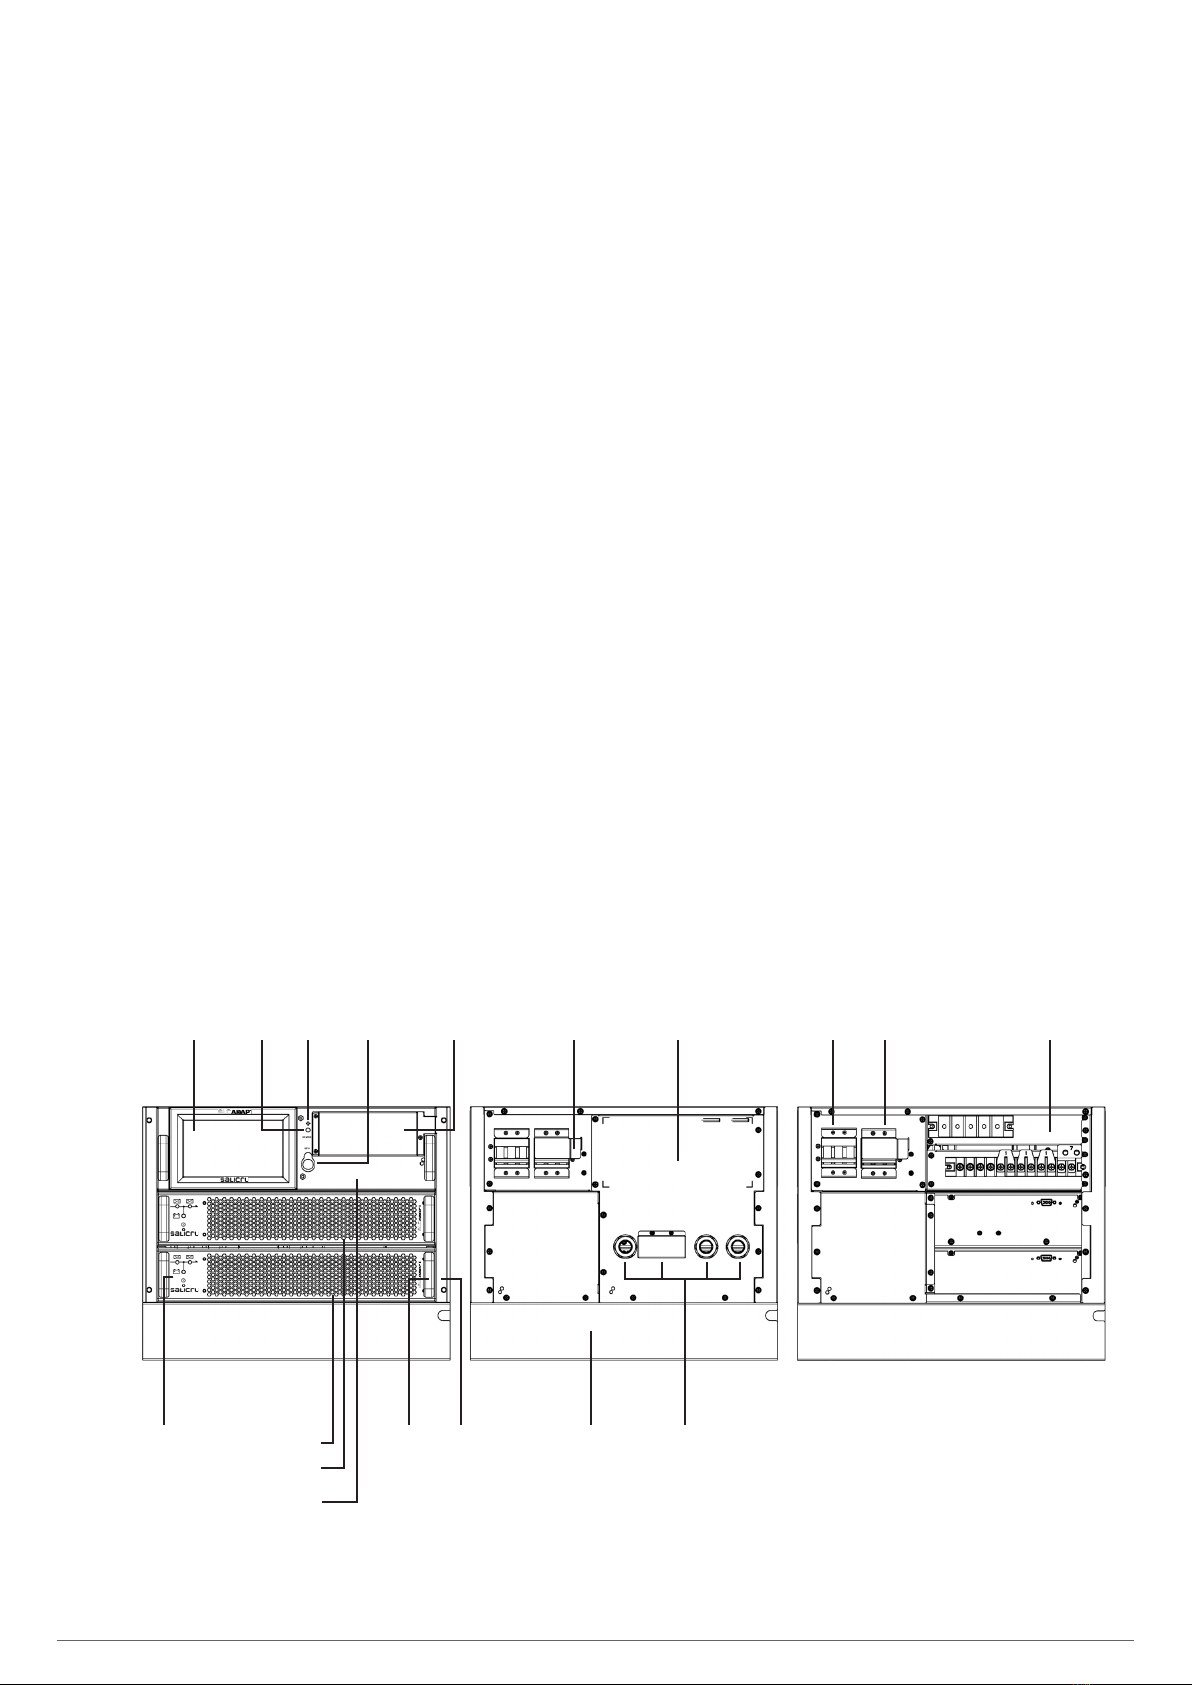
This user manual is useful for SLC ADAPT X subrack equip-
ment, with the following configurations:
•Model with two slots. It allows the installation of one or
two modules.
•Model with four slots. It allows the installation of between
one and four modules.
•Model with six slots. It allows the installation of between
one and six modules and is parallelable in turn with five
subracks.
Conceptually, they are designed to be assembled into a 19“
rack cabinet, whether they share the batteries or not.
While the customer can perform these adaptations on their
own or otherwise, we can also manufacture any configuration
on demand.
For those systems shipped from the factory and assembled in a
rack cabinet, we have the supplementary and generic EL096*00
document in which the parts (connection terminals, switching
mechanisms, etc.) and the corresponding operations are identi-
fied.
The following terms are used interchangeably in the document
to refer to:
•“SLC ADAPT X, ADAPT X, ADAPT, UPS, system, equip-
ment or unit.”.- Uninterruptible Power Supply ADAPT se-
ries of subfamily X.
Depending on the context of the phrase, it can refer either
to the actual UPS itself or to the the UPS and the batteries,
regardless of whether it is all assembled in the same metal
casing - box - or not.
•“Batteries or accumulators”.- Group or set of elements
that stores the flow of electrons by electrochemical means.
•“T.S.S.”.- Technical Service and Support.
•"Client, installer, operator or user ".- These are used
interchangeably and by extension to refer to the installer
and/or operator who will carry out the corresponding ac-
tions, and the same person may be responsible for carrying
out the respective actions when acting on behalf of, or in
representation of, same.
2.1.1. Conventions and symbols used.
Some symbols may be used and appear on the equipment, bat-
teries and/or in the context of the user manual.
For more information, see section 1.1.1 of document EK266*08
on "Safety instructions".
In the event that there are differences in relation to the safety
instructions between document EK266*08 and the user's
manual of the equipment, the latter will always prevail.
2.1.2. Safety considerations.
•While the security-related considerations will be dealt with
in more detail in Section 5, the following will be taken into
account:
Inside the battery cabinet there are accessible parts
with HAZARDOUS VOLTAGE and consequently risk of
electric shock, so they are classified as RESTRICTED
ACCESS ZONES. Therefore, the key of the battery cab-
inet will not be available to the OPERATOR or USER,
unless such person has been properly instructed.
In case of intervention inside the battery cabinet either
during the connection, preventive maintenance or re-
pair procedure, it will be taken into account that the
voltage of the battery set exceeds 400 V DC and
consequently safety measures must be taken.
Any operation of connecting and disconnecting the
cables or handling inside a cabinet will not take place
for around 10 minutes in order to allow the internal
discharge of the capacitors of the equipment. Even so,
check with a multimeter that the voltage at terminals is
less than 36 V.
In case of installation in neutral IT mode, the switches,
circuit breakers and thermal magnetic protection must
cut the NEUTRAL in addition to the three phases.
EMi3 SERVOMOTOR VOLTAGE STABILISERUSER'S MANUAL

6SALICRU
3. QUALITY ASSURANCE AND STANDARDS.
3.1. STATEMENT BY THE MANAGEMENT.
Our goal is customer satisfaction, therefore this Management
has decided to establish a Quality and Environment Policy,
through the implementation of a Quality and Environmental
Management System that will enable us to comply with the
requirements demanded in the ISO 9001 and ISO 14001 and
also by our Customers and Stakeholders.
Likewise, the management of the company is committed to
the development and improvement of the Quality and Environ-
mental Management System, through:
•Communication to the entire company of the importance of
satisfying both the client's requirements as well as legal
and regulatory requirements.
•The dissemination of the Quality and Environment Policy
and the setting of the Quality and Environment objectives.
•Conducting reviews by the Management.
•Providing the necessary resources.
3.2. STANDARDS.
The SLC ADAPT X product is designed, manufactured and
marketed in accordance with EN ISO 9001 Quality Assurance.
The mark indicates conformity to the EEC Directives through
the application of the following standards:
•2014/35/EU. - Low voltage safety.
•2014/30/EU. - Electromagnetic Compatibility - EMC-.
•2011/65/EU. - Restriction of the use of certain hazardous
substances in electrical and electronic equipment -RoHS-.
According to the specifications of the harmonized standards.
Reference standards:
•EN-IEC 62040-1. Uninterruptible Power Supplies -UPS-.
Part 1-1: General and safety requirements for UPS used in
user access areas.
•EN-IEC 60950-1. Information technology equipment.
Safety. Part 1: General requirements.
•EN-IEC 62040-2. Uninterruptible Power Supplies -UPS-.
Part 2: EMC requirements.
The manufacturer is not liable in case of modification or
intervention on the equipment by the user.
WARNING:
This is a category C3 UPS. This is a product for commer-
cial and industrial application in the second environ-
ment; Installation restrictions or additional measures
may be necessary to avoid disturbances.
It is not appropriate to use this equipment in basic
life support applications [BLS], where a failure of the
former can render vital equipment out of service or
significantly affect its safety or effectiveness. It is also
not recommended in medical applications, commercial
transport, nuclear installations, or other applications or
loads, where a failure of the product can lead to per-
sonal or material damages.
The EC declaration of conformity of the product is avail-
able to the customer upon express request to our head-
quarters.
3.2.1. First and second environment.
The environment examples that follow cover most UPS instal-
lations.
3.2.1.1. First environment.
Environment including residential, commercial and light in-
dustry installations, directly connected, without intermediate
transformers, to a low voltage public power grid.
3.2.1.2. Second environment.
An environment that includes all commercial, light industrial
and industrial establishments that are not directly connected
to a low voltage power grid supplying buildings used for resi-
dential purposes.
3.3. ENVIRONMENT.
This product has been designed to respect the environment and
manufactured according to ISO 14001.
Recycling of the equipment at the end of its useful life:
Our company undertakes to use the services of authorized and
regulatory companies to treat the set of products recovered at
the end of their useful life (contact your distributor).
Packaging:
For the recycling of the packaging there must be compliance
with the legal requirements in force, according to the specific
regulations of the country where the equipment is installed.
Batteries:
Batteries pose a serious danger to health and the environment.
The disposal of them shall be carried out in accordance with
the laws in force.

7
4. PRESENTATION.
4.1. VIEWS.
4.1.1. Views of the subracks.
The illustrations in Fig. 1 to 3 are represented with the max-
imum of modules installed in each subrack, although the unit
may differ mainly due to the number of integrated modules de-
pending on the required power.
Basically the operation and technical specifications are the
same, except for the indicated power.
The copper rods placed between the connection terminals that
can be seen in the illustrations Fig. 1 to 3, correspond to equip-
ment with three-phase input and output, with a common input
for the rectifier and the static bypass. Fig. 6 to 11 shows all
possible input and output configurations.
The subracks incorporate a control panel with 7” colour touch
screen as an interface between the equipment and the end-
user, which provides different information through menus struc-
tured in categories (see section 7).
In the system of subracks connected in parallel, each one has
its own control panel through which the individual parameters
can be checked.
Touch
screen
Static
bypass
switch
Manual
bypass
switch
Cover for
communication
connections
Power
terminals (see
Fig. 6 to 11)
Power
terminal
cover
Acoustic
alarm
EPO
pushbutton
Led
Status
Manual
bypass
block
HandleModule: No.1
No.2
Control and
Bypass
Led
synoptic
of module
Trim cables Base
support
Cable gland
Fig. 1. Subrack model with 2 slots, to install 1 or 2
modules.
EMi3 SERVOMOTOR VOLTAGE STABILISERUSER'S MANUAL

8SALICRU
Touch
screen
Static
bypass
switch
Manual
bypass
switch
Cover for
communication
connections
Power
terminals (see
Fig. 6 to 11)
Power
terminal
cover
Acoustic
alarm
EPO
pushbutton
Led
Status
Manual
bypass
block
HandleModule: No.1
No.2
No.3
No.4
Control and
Bypass
Led
synoptic
of module
Trim for cable
passage
Base
support
Cable gland.
Fig. 2. Subrack model with 4 slots, to install between 1
and 4 modules.

9
Touch
screen
Manual
bypass
switch
Interface
terminal block
cover
J2 - 10
Power
terminals (see
Fig. 6 to 11)
Power
terminal
cover
Acoustic
alarm
EPO
pushbutton
Led
Status
Manual
bypass
block
HandleModule: No.1
No.2
No.3
No.4
No.5
No.6
Control and
Bypass
Led
synoptic
of module
Trim for cable
passage
Swivel
castors
with brake
Cable gland on
frame base
Synoptic
LEDs and
control
panel
keypad
SNMP
Slot RS232
RS485
Access cover to
cable gland and
cable passage
Parallel
bus cover
P1 - 2
Parallel
Switch
Cover
SW1 - 2
Fig. 3. Subrack model with 6 slots, to install between 1
and 6 modules.
EMi3 SERVOMOTOR VOLTAGE STABILISERUSER'S MANUAL

10 SALICRU
4.2. DEFINITION OF THE PRODUCT.
4.2.1. Subrack and battery module nomenclatures.
SLC-4+1/6-ADAPT 60X R P2LBDCS B1 380V 60Hz WCO EE666502
M BAT ADAPT 0/2x40AB147/213 100A BC WCO EE666502
EE* Particular customer specifications.
CO “Made in Spain” marking in UPS and packaging (for customs).
W Neutral marking equipment.
60Hz Frequency of the equipment. Skip for 50 Hz.
380V Input-output voltage. Skip for three-phase 3x400V+N
(phase-to-phase voltage) or single-phase 230V (phase-
to-neutral) equipment.
B1 Equipment with external batteries.
S Ambient temperature probe.
C Subrack assembled over battery box module.
D Transient voltage surge supressor.
B Separate bypass line.
Input-output configuration, three-phase-three-phase.
L Input-output configuration, single-phase-single-phase.
M Input-output configuration, single-phase-three-phase.
N Input-output configuration, three-phase-single-phase.
2 Parallel subrack number.
P Parallel kit (material needed for parallel subracks).
R In subrack format (not integrated inside cabinet).
X Sub-family of the ADAPT series (2U modules)
60 Maximum installed capacity in subrack in kVA.
ADAPT UPS Series.
6 Maximum number of installable modules in subrack.
+1 Redundant modules.
4 Number of modules installed from factory.
SLC Acronym abbreviation brand.
CF 50/60 or 60/50 Hz frequency converter (1).
EE* Particular customer specifications.
CO “Made in Spain” Marking in UPS and packaging (for customs).
W Neutral mark equipment.
BC Common battery set (parallel subracks).
100A Protection size.
213 Three last digits of the type-2 battery code.
147 Three last digits of the type-1 battery code.
AB Initials of the battery family.
40 Number of batteries in each string.
2x Number of parallel battery strings.
0/ Cabinet batteries without them, with the necessary ac-
cessories to install them.
ADAPT UPS Series.
M BAT Battery module.
(B1) The equipment is supplied without batteries and without the accessories (screws and electric cables). Predictably the batteries
will be installed in an external cabinet or rack. On request, the cabinet or rack and the necessary accessories can be supplied.
For an equipment ordered without batteries, their acquisition, installation and connection will always be borne by the customer
and under their responsibility. However, our T.S.S. may be required to intervene in order to carry out the necessary instal-
lation and connection work.
The data concerning the batteries in terms of quantity, capacity and voltage are indicated on the battery label affixed to the side
of the equipment nameplate, strictly observe these data and the connection polarity of the batteries.
For equipments with separate static bypass line, an isolation transformer must be installed between any of the two power lines
of the UPS (rectifier input or static bypass), to avoid the direct connection of the neutral of the two lines through the internal

11
4.3. GENERAL DESCRIPTION.
The SLC ADAPT X series is classified as an on-line double
conversion Uninterruptible Power Supply with DSP control and
three-level IGBT inverter technology, modular topology and
high flexibility.
Reliability: The DSP control associated with three-level PWM
technology extends the system efficiency and, together with
module redundancy, significantly extends the mean time be-
tween failures, MTBF.
Availability: Its “hot-swap” modules can be added or replaced
during operation, thereby improving the mean time to repair
-MTTR- and reducing maintenance costs. Moreover, both the
control display and the bypass module can be replaced without
affecting the operation of the device. In addition, the system’s
remote management, which can be integrated into any plat-
form, also facilitates operation. The extensive back-up options
available, along with smart battery charging, ensure continuous
operation of the protected critical loads.
Flexibility: It allows configurable solutions from 10 to 450
kVA, combining power modules of 10 and 15 kVA with the dif-
ferent available subracks of 2, 4 and 6 slots and the parallel of
up to 5 subracks of the last one, only this last format allows its
paralleling.
This enables the gradual upgrading and scaling of the power of
the equipment according to the need for protection "pay as you
grow", improving the total cost of ownership [TCO] and a high
level of flexibility.
At the operational level it is considered as a single UPS, a sub-
rack formed by 'N' modules or different subracks connected
together in parallel.
Any expansion or structural modification in the number of mod-
ules is possible even during normal operation, without implying
that the hot-swappable system should stop, all with the help
of a screwdriver used to remove or tighten the fixing screws of
the module/s.
Input-output configuration: Originally the system can be
shipped from the factory with different types of input and
output or can be modified at site by our T.S.S. and/or distribu-
tors.
It is not allowed or authorized to change the configuration by
the end-user, since this involves the modification of copper
rods between the power terminals by the addition or removal
of them, in order to get the required configuration, moreover
changes are necessary in the parameters of the access menus
by "Password" through the control panel.
The possible input/output configurations are:
•Three-phase/three-phase.
•Single-phase/single-phase.
•Single phase/three phase.
•Three-phase/single-phase.
In 10 kVA modules, the output power factor 1 is kept for any of
the configurations.
Autonomy: The capacity of the batteries determines the back
up time of the system that will supply its usual source of energy
during the mains failures. The battery set is always common to
any module assembled in the same subrack.
Batteries, owned by the customer or supplied together with
the UPS, and depending on different factors in addition to the
power and/or autonomy requested, can be installed on a rack in
one or more cabinets, or in the cabinet of the equipment itself
when the subrack is assembled in a 19” rack cabinet.
Typology of the
power supply Input and output
voltage
(V)
Power per
module
(kVA)
Subrack power range (kVA) System power range (kVA)
Number of modules per subrack Number of subracks of 6 slots in parallel
Input Output 1.. 2 1.. 4 1.. 6 2 3 4 5
III III 3x380.. 3x415
(Three phases + N)
220.. 240
(Phase and neutral
-N-)
10 10.. 20 10.. 40 10.. 60 10.. 120 10.. 180 10.. 240 10.. 300
I I
IIII
III I
III III 15 15.. 30 15.. 45 (1) 15.. 90 15.. 180 15.. 270 15.. 360 15.. 450
(1) Maximum 3 modules of 15 kVA due to the limitation of the static bypass block.
Tabla 1. SLC ADAPT X configurations and their power
range.
connection of the equipment. This applies only when the two power lines come from two different grids, such as:
- Two different electricity companies. - An electricity company and a power generator, etc.
(1)In the case of UPSs with different input and output frequencies or frequency converters, the static bypass is disabled and
the manual bypass switch of the equipment must not be operated, because the input frequency and the frequency required by
the load are different.
EMi3 SERVOMOTOR VOLTAGE STABILISERUSER'S MANUAL

12 SALICRU
4.3.1. Introduction.
The SLC ADAPT X series UPS basically consists of:
•Subrack with 2, 4 or 6 slots to install the power modules.
•Power modules, consisting of the following blocks:
PCF-Rectifier-AC/DC-.
Battery charger.
Inverter -DC/AC-.
Digital control and UPS management.
•Centralized bypass module: control of UPS and parallel pa-
rameters.
•Maintenance bypass
•Control panel with touch screen (see section 7 for more in-
formation).
•Batteries (Quantity, type and location depending on the
back-up time).
4.3.2. Architecture.
4.3.2.1. Structural diagram.
Fig. 4 shows a single-line diagram of the equipment with three-
phase input and output, as an example.
All subrack units are structured according to the same criteria,
separate power supply for the PFC-rectifier and static bypass.
However, unless otherwise requested, separate grids, origi-
nally from the factory will connect the terminals of the phases
of both blocks by means of the copper rods in order to have a
single common input.
When separate power supplies are required, it is man-
datory to remove the copper rods between phases of
both blocks before connecting the power cables,
leaving the one for the neutral terminals.
STATIC BYPASS MODULE
DC / AC
INVERTER
MANUAL BYPASS
REC / PFC
BAT / DC
DC / DC
INVERTER
BYPASS
STATIC BYPASS LINE INPUT
-R, S, T-
N
POWER MODULE # 1
DC / AC
INVERTER
REC / PFC
BAT / DC
DC / DC
INVERTER POWER MODULE #N
•
•
•
OUTPUT U, V, W
N
BATTERY MODULE
BCB
BATTERY MODULE
BCB
Connection copper rod
between phases for
common grid.
Q1
Q2
UPS INPUT
-R, S, T-
Not installed in 6-slot
sub-rack.
The batteries are represented in
the structural scheme as they are
an essential part of any UPS,
although they will never be
included in the sub-rack itself. The
batteries can be supplied in the
same rack cabinet in which the
ADAPT subrack is assembled, in a
separate cabinet, on a rack or
when the customer does not have
them available, not supply them
at all.
Fig. 4. Structural single-line diagram as an example.

13
4.3.2.1.1. Power modules -PM-.
The power modules are the basic core of the SLC ADAPT X
system. Apart from the static bypass block and the LCD touch
screen, each power module contains all the converters and
functionalities of a traditional UPS. Since this equipment is
structured by a number of variable modules depending on the
subrack used, a multi-parallel system is obtained with the be-
haviour equivalent to the stand alone UPS and the advantages
of a modular UPS.
The system supplies power to the critical load (such as com-
munication and data processing equipment) with uninterrupted
high quality AC power. The power supplied by the unit is stable,
without voltage and/or frequency variations and free from
other disturbances such as power outages or blackouts, sine
wave flucutations, electrical noise, anomalies commonly pre-
sent in the commercial AC grid.
This is achieved through the double-conversion high frequency
Pulse Width Modulation -PWM-, in combination with a digital
control based on a Digital Signal Processor -DSP-, which pro-
vides high reliability and availability.
As it can be seen in Fig. 4, the AC power supplied to the UPS
input is converted to DC voltage. This voltage supplies a con-
verter that transforms the voltage type from DC to AC, clean
of disturbances and variations of the AC input mains. In case
it fails, the PFC-Rectifier changes the input source of the AC
network to the batteries, feeding similarly through the output
of the UPS to the load for a limited time, the back-up time is
determined by the battery set.
4.3.2.1.2. Static Bypass.
Static transfer switch.
In case of inverter failure, overload or overtemperature, the
voltage connected to the static bypass line can supply power
to the load connected to the UPS output.
The Static Bypass Module identified in Fig. 4 contains the
power management and control circuits that allow the most
optimum decision in each scenario to be made, in order to se-
lect the most favourable power to the critical load connected
to the output of the UPS, either from the inverter or from the
static bypass itself.
During normal system operation, the load is connected to the
inverter and in case of overload or fault, it will automatically
transfer to the static bypass line. In order to provide a clean
transfer (without no break) between the inverter output and
the bypass line, they must be fully synchronized during normal
operation. This is achieved through real-time digital control of
the inverter, so that the frequency of the inverter follows the
frequency of the bypass line if the bypass is within the range of
acceptable frequencies.
In addition, a Manual Bypass, which is very useful during the
periods of maintenance or fault, is included and allows contin-
uous feeding of the critical load while the UPS is out of service.
When the UPS is operating on bypass mode (over static
bypass) or manual bypass mode (maintenance or re-
pairing period), the connected loads are not protected
against power outages or blackputs, overvoltages,
voltage and/or frequency fluctuations, as they are di-
rectly fed from the commercial AC grid.
Input terminals of the UPS and Static Bypass.
Fig. 5 shows the physical layout of the terminal block for the 2
and 4-slot subracks as well as the 6-slot subrack.
These illustrations show the connection copper rods between
the terminals of both inputs (PFC-rectifier input and static by-
pass) for a common supply, usually the most common one.
PE
Output U
Output V
Output W
Bypass R
Input R
Bypass S
Input S
Bypass T
Input T
Bypass N
Input N
Bat. +
Bat. N
Bat. –
OUTPUT N
Terminal block in 2-slot and 4-slot subrack.
BATT
+ N –
INPUT
R S T N
OUTPUT
U V W N
Terminal block in 6-slot subrack.
Fig. 5. Terminal block for three-phase/three-phase con-
figuration and common input (PFC-rectifier and
static bypass).
When separate AC mains are available to separately feed the
PFC-rectifier and static bypass inputs, the connection copper
rods between the phases must be removed depending on the
available subrack model -see Fig. 6-.
In this configuration, the static bypass and maintenance bypass
share the same AC source independent of the PFC-rectifier
source.
Although the ADAPT X equipment is configurable in
terms of type of input and output, any modification by
the customer or user is restricted, since in addition to
modifications in the connection copper rods, it is neces-
sary to make settings through the password-restricted
screen, exclusively reserved to T.S.S. or distributors.
EMi3 SERVOMOTOR VOLTAGE STABILISERUSER'S MANUAL

14 SALICRU
PE
Output U
Output V
Output W
Bypass R
Input R
Bypass S
Input S
Bypass T
Input T
Bypass N
Input N
Bat. +
Bat. N
Bat. –
OUTPUT N
Terminal block in 2-slot and 4-slot subrack.
BATT
+ N –
BYPASS
R S T N
INPUT
R S T N
OUTPUT
U V W N
Terminal block in 6-slot subrack.
Fig. 6. Terminal block for three-phase/three-phase con-
figuration and separate inputs (PFC-rectifier and
static bypass).
The illustrations of Fig. 5 and 6 show the arrangement of the
connection terminals on three-phase/three-phase input/output
equipment. For other configurations see Fig. 7 to 10.
4.3.2.1.3. Manual bypass switch for maintenance.
The equipment has a manual bypass switch useful for periods
of preventive maintenance or repairing. This switch transfers
the load power directly onto the AC input mains, allowing the
intervention on the UPS without disturbing the feeding of the
loads.
When the UPS is operating in bypass mode (over static
bypass) or manual bypass mode (maintenance or re-
pairing period), connected equipment is not protected
against power outages or blackouts, overvoltages,
voltage and/or frequency fluctuations, as they are di-
rectly fed from the commercial AC grid.
Before operating this switch it is necessary to transfer the load
power over the static bypass through the respective command
from the touch screen. The switching of the power mode on
the static bypass and from that to the manual bypass is done
without interruption in the supply of the load.
When a subrack is assembled inside a cabinet, the
input, output and static bypass protections must be in-
stalled, as well as a manual bypass switch, on the front
of the enclosure itself to facilitate all operations.
Respect the selectivity indicated in the documentation
referred to in the "Recommended Installation” docu-
ment downloaded from the website or supplied in the
CD-ROM or Pen Drive.
Section 6.4 describes all operations related to the manual
maintenance bypass.
4.3.2.2. Parallel system.
4.3.2.2.1. Parallel system considerations.
•All UPS modules have hardware and software that is suit-
able and compatible with the requirements of parallel sys-
tems.
•Although all modules installed in a subrack are internally
connected in parallel, the parallel connection between
subracks is only possible in those of 6 slots, with their
series available on the communication board for this func-
tion, having a maximum of up to 5 subracks -30 modules-.
The resulting power range, according to the input-output
typology, and the individual power of each module, is re-
flected in Tab. 1.
•The hardware adjustments referring to the change of input
and output configuration are reserved exclusively to the
manufacturing process itself or subsequently at site pro-
cess performed by the T.S.S.
•The subracks are supplied with a single power terminal and
control bus connectors.
Depending on the power of the system the input and output
connections are made by cables or against a busbar when
the currents or the installation condition it.
Using the DB15 signal connectors, the control bus is con-
nected in the form of a closed ring, linking the different
subracks that configure the system in parallel.
Smart parallel logic provides maximum flexibility to the
user. For example, shutting down or starting up a parallel
system can be done in any sequence, through any sub-
rack. In a parallel system as in a single subrack, transfers
between Normal and Bypass modes and vice versa are
synchronized. For example, once an overload of a parallel
system is detected and processed, it is automatically trans-
ferred to Bypass. If the overload disappears, the parallel
system automatically recovers the normal operation, trans-
ferring the load from Static Bypass to the Inverter.
•Usually the sizing of a parallel system is based on the
power required by the loads, plus the modules in redun-
dancy that are estimated with the expression N+n; where
“N” is the number of modules in parallel in order to obtain
the required nominal power and “n” is the number of redun-
dant equipments.
Beyond this planned over-sizing, all the modules are oper-
ated by load sharing, delivering the same power to get the
total amount required, which implies a lower efficiency
than desired.

15
Bat. +
Bat. N
Bat. –
OUTPUT N
INPUT N
INPUT ROUTPUT U
Terminal block in 2-slot and 4-slot subrack.
BATT
+ N –
INPUT
R N
OUTPUT
U N
Terminal block in 6-slot subrack.
Fig. 7. Single-phase/single-phase configuration and
common input.
Bat. +
Bat. N
Bat. –
OUTPUT N
BYPASS R INPUT /
BYPASS N
INPUT ROUTPUT U
Terminal block in 2-slot and 4-slot subrack.
BATT
+ N –
BYPASS
R N
INPUT
R N
OUTPUT
U N
Terminal block in 6-slot subrack.
Fig. 8. Single-phase/single-phase configuration and
separate inputs.
Bat. +
Bat. N
Bat. –
OUTPUT N
BYPASS R INPUT /
BYPASS N
R S T
INPUT
OUTPUT U
Terminal block in 2-slot and 4-slot subrack.
BATT
+ N –
BYPASS
R N
INPUT
R S T N
OUTPUT
U N
Terminal block in 6-slot subrack.
Fig. 9. Three-phase/single-phase configuration and sep-
arate inputs.
Bat. +
Bat. N
Bat. –
OUTPUT N BYPASS
R S T
INPUT /
BYPASS N
INPUT R
U V W
OUTPUT
Terminal block in 2-slot and 4-slot subrack.
INPUT
R N
OUTPUT
U V W N
BYPASS
R S T N
BATT
+ N –
Terminal block in 6-slot subrack.
Fig. 10. Single-phase/three-phase configuration and sep-
arate inputs.
EMi3 SERVOMOTOR VOLTAGE STABILISERUSER'S MANUAL

16 SALICRU
In order to solve this problem and increase the efficiency of
the system, one of the two sleep modes can be activated
from factory or subsequently by the T.S.S.:
Smart Sleep. This advanced technology applied to the
UPS ADAPT series, allows you to look for the point of
maximum efficiency, even when working with small
loads. This is achieved by activating one of the two
possible modes, although each has a different purpose:
–Normal Sleep mode. The inverter of the modules
with the option activated is in standby, with its
output disconnected from the load. The time for
them to finish operating is a few seconds.
–Deep Sleep mode. All the power converters of the
modules with the option activated are completely
off and the output is disconnected from the load.
The time for them to finish operating is a few min-
utes.
In addition to this and to get the same ageing of all the
modules, a cycling function is available. This consists
of alternating the stopped modules with those that are
running. The minimum programmable cycling period is
three months.
Distribution of the load in normal operation.
Distribution of loads and cycling of the UPS.
Fig. 11. Graphic example of normal operation or cycling
modes.
4.3.2.2.2. Features of the parallel system
The performance of an SLC ADAPT X parallel system is similar
to a large UPS with the advantage of greater reliability and
adaptability. For a system to operate correctly with the load,
the following requirements must be met:
1. All UPSs must be identical.
2. Must be powered by the same AC line.
3. In case of equipment with separate bypass line, the power
supply grid will be the same for all of them.
4. Both power supplies, points 2 and 3, must be referenced to
the same neutral potential.
Isolation transformers are optionally available for
installations where both sources do not share the
same neutral reference or where it is not available.
4.3.3. Operating modes.
The modular system described is part of the on-line double con-
version UPS family, with static bypass line and manual mainte-
nance bypass. The available operating modes are:
•Normal mode.
•Battery mode.
•Auto-start mode (automatic start).
•Bypass Mode.
•Manual bypass mode (maintenance bypass).
•Parallel-Redundant Mode.
•ECO mode.
During the description of the operating modes the operation
is described referring to the PFC-rectifier and inverter parts as
functional parts of a module, although there will be as many of
them as modules connected in parallel there are.
4.3.3.1. Normal mode.
The inverter of the power module installed in the UPS feeds
the critical load. The PFC-rectifier, which is supplied by the AC
mains, simultaneously supplies direct current to the inverter
and the battery charger, which keeps them in an optimal state
of charge.
PFC rectifier
AC/DC
BAT / DC
DC / DC Battery
Charger
Inverter
DC / AC
Static bypass
Manual bypass
Batteries
AC Input
Bypass
AC Input
Rectifier
AC Output
Connection copper
rods between phases
for common input.
Fig. 12. Flowchart in Normal Mode.
4.3.3.2. Battery mode.
This mode is activated in the event of any fault in the AC mains,
in which the PFC-rectifier switches its AC mains input power
to the battery. The inverter, powered from the batteries, sup-
plies power to the critical load. This automatic transition from
"Normal Mode" to "Battery Mode" is performed with no break
in the output voltage.
When the AC mains voltage is restored, "Normal Mode" is au-
tomatically reset without any intervention.
PFC rectifier
AC/DC
BAT / DC
DC / DC Battery
Charger
Inverter
DC / AC
Static bypass
Manual bypass
Batteries
AC Input
Bypass
AC Input
Rectifier AC Output
Connection copper
rods between phases
for common inputs.
Fig. 13. Flowchart in Battery Mode.

17
4.3.3.3. Auto-start mode (automatic start).
If there is a failure of the AC input power for an extended period
of time, the battery may reach the end of discharge -EOD- and
the inverter switches off. If the "Auto Recovery after EOD" (fac-
tory preset) UPS setting is set, the device will restart after the
the AC power is restored.
4.3.3.4. Bypass mode.
If the inverter capacity is exceeded in "Normal Mode", or in
cases where the inverter-PFC-rectifier set can not supply power
to the load for any reason, the "Bypass Mode" will be activated
automatically without interruption of service at the output.
PFC rectifier
AC/DC
BAT / DC
DC / DC Battery
Charger
Inverter
DC / AC
Static bypass
Manual bypass
Batteries
AC Input
Bypass
AC Input
Rectifier AC Output
Connection copper
rods between phases
for common input.
Fig. 14. Flowchart in Bypass mode.
In case the inverter is not synchronized with the bypass, this
transition will be made with a short break at the output of a few
milliseconds to avoid the occurrence of high current peaks due
to the parallel of non-synchronized alternating voltage sources.
The time of this break is variable, the typical value being less
than ¾ parts of the input signal cycle (less than 15 ms for 50 Hz
and 12.5 ms for 60 Hz).
4.3.3.5. Manual bypass mode (maintenance bypass).
If the UPS requires intervention due to breakdown or mainte-
nance (for example, because there is a power module, the by-
pass or the LCD display with anomalies), there is the possibility
of continuing to supply the loads through the internal manual
bypass (maintenance bypass).
When the UPS is operating in "Manual Bypass Mode”
(maintenance or repairing period), the connected equip-
ment is not protected against power outages or black-
outs, overvoltages, voltage and/or frequency
fluctuations, ... when are directly fed from the commer-
cial AC grid.
DANGER:
During Manual Bypass Mode, the input, output and by-
pass terminals [version B] are under potential, although
all modules are off.
It is recommended in this operating mode:
–Remove the fastening screws of all power, control
and bypass modules.
–Slightly pull the handles on each of them until you
remove them 4-5 cm from the socket, in order to
remove them from the connector on the backplane
of the equipment.
Before any change of operating mode and after carrying
out the possible corrective actions, it is necessary to
correctly insert the modules into their original position
and fix them with their screws.
PFC rectifier
AC/DC
BAT / DC
DC / DC Battery
Charger
Inverter
DC / AC
Static bypass
Manual bypass
Batteries
AC Input
Bypass
AC Input
Rectifier AC Output
Connection copper
rods between phases
for common input.
Fig. 15. Flowchart in Manual bypass mode (maintenance
bypass).
4.3.3.6. Parallel-Redundant Mode.
This operating mode allows to obtain a greater capacity, reli-
ability or both, being able to be configured like upgrading of
power or like redundancy.
In addition in the subracks of 6 slots can be configured in par-
allel up to 5 subracks. The controller included in each one guar-
antees the automatic sharing of the load in all of them and in
all its modules.
4.3.3.7. ECO mode.
This is a special operating mode to improve the efficiency of the
system. The load will be fed directly from the AC mains through
the bypass line, while the voltage and/or the input frequency
are acceptable. The inverter that is in Standby mode will start
up and power the load when the voltage and/or frequency of
the commercial AC network goes out from the margins estab-
lished as nominal. The performance in the ECO Mode can reach
up to 98%.
During the transfer of the load on the inverter from the
"ECO Mode" a small break (less than 10 ms) occurs. It is
very important to ensure that the critical load fed into
this UPS mode, tolerates that break.
EMi3 SERVOMOTOR VOLTAGE STABILISERUSER'S MANUAL

18 SALICRU
PFC rectifier
AC/DC
BAT / DC
DC / DC Battery
Charger
Inverter
DC / AC
Static bypass
Manual bypass
Batteries
AC Input
Bypass
AC Input
Rectifier AC Output
Connection copper
rods between phases
for common input.
Fig. 16. Flowchart in ECO mode.
4.3.4. Battery management (factory preset settings).
4.3.4.1. Basic functions.
•Charging at constant current.
The charge current of the battery responds to the formula
of I ch = 0.2 x C
The UPS is designed to provide 100% of its nominal power
to the load and additionally has a unique reserve power to
charge the batteries that can be set between 0 and 20% of
the rated power of the UPS, depending on the capacity of
the batteries and the charging current.
•Fast charging at constant current.
This voltage can be set according to the requirements of
the battery type. For example, for valve-regulated lead-acid
batteries -VRLA-, the maximum fast charge voltage should
not exceed 2.4 V / cell.
•Floating load.
The floating voltage can be set to the type of batteries. For
batteries -VRLA-, the floating voltage must be between 2.2
V and 2.3 V. By default it is set to 2.25 V.
•Compensation of the floating voltage according to tempera-
ture.
The compensation value of this voltage can be set ac-
cording to the temperature and type of batteries. To do this,
it is necessary to install the supplied temperature sensor in
the battery cabinet. The compensation range is 0 to 5 mV /
ºC and the default value is 3 mV / ºC.
•Protection of the battery by end of discharge -EOD-.
If the battery voltage is lower than the value set as end of
discharge voltage -EOD-, the battery voltage converter BAT
/ DC will turn off and the batteries will be disconnected to
avoid a deep discharge that could be destructive. The value
is adjustable between 1.6 to 1.75 V / cell -VRLA-.
4.3.4.2. Advanced functions.
•Two battery-related tests can be performed as long as there
are no alarms or warnings on the UPS.
Battery test:
–Transfer the system to the battery mode for 20 sec-
onds to test its correct status.
Maintenance of batteries:
–Transfer system to "Batteries Mode" up to the voltage
value -1.05 x EOD voltage of the battery pack.
•The minimum conditions for running the battery test are as
follows:
The battery voltage should be greater than 90% of the
floating voltage.
Minimum load of 25 to 100% of the nominal capacity
of the UPS.
Executable in one of two ways:
–Manually. Using the Battery Maintenance Test
command on the LCD panel
–Automatically. By enabling the Auto-Test with the
self-test interval setting (configurable from 720 to
3000 hours).
4.3.4.3. Protection of batteries.
•Low battery alarm.
The low battery alarm is activated prior to the end of dis-
charge -EOD- alarm. When activated it has about minutes
of autonomy at full load.
•End of discharge protection -EOD-.
When the battery voltage reaches this minimum value, the
battery block is disconnected to avoid the deep discharge
that could irreversibly damage them. There are two voltage
levels of end of discharge and the actual is calculated by
interpolating the following two values:
-EDO- Voltage / Cell @ 0.6 C Discharge current. By de-
fault 1.65 V / cell.
-EDO- Voltage / Cell @ 0.15 C Discharge current. By
default 1.75 V / Cell)
The end of discharge voltage values are factory configu-
rable from 1.6 to 1.75 V / cell.
•Battery protection disconnect alarm -MCB-.
This alarm will be available when using the mechanism
provided for the external batteries, a circuit breaker -MCB-
with shunt trip release voltage connected to the control
circuit of the UPS. The alarm will be activated if the battery
protection -MCB- is switched off.
Activation and deactivation of this protection is done
through the EPO button on the control panel or remote EPO.

19
5. INSTALLATION.
•Read and respect the Safety Information, described
in section 2 of this document. Failure to obey some
of the instructions described in this manual can result in a
serious or very serious accident to persons in direct contact
or in the vicinity, as well as faults in the equipment and/or
loads connected to it.
•In addition to the user manual itself and the safety instruc-
tions, other documents are available on the Website, on the
CD-ROM or the Pen Drive, referred to as "Recommended
installation". Consult and use them as a guide to define the
sections and protections of the installation.
•This section introduces the relevant requirements for lo-
cating and wiring the SLC ADAPT X modular UPS. Because
each site has its particularities of location and installation,
it is not the purpose of this section to provide precise step-
by-step instructions, rather it should be used as a guide for
general procedures and practices to be observed by quali-
fied personnel (figure recognized and defined in safety in-
structions EK266*08).
5.1. RECEPTION.
•All subracks are supplied on wood pallet mechanically at-
tached to it, with a cardboard packaging or protection wood
according to model. While the risk of dump is minimized, it
will be handled with caution, especially for subracks with 6
slots because of their greater height and when there is slope.
It is dangerous to manipulate the equipment on
the pallet in an unwise way, as it could overturn
and cause serious or very serious injury to the operators
as a result of the impact due to possible fall and/or en-
trapment. Pay attention to section 1.2.1. of the safety
instructions -EK266 * 08- in all matters relating to the
handling, movement and location of the unit.
•Use the most suitable means to move the UPS while it is
packed, with a transpalet or forklift.
•Any manipulation of the equipment will be done according
to the weights indicated in the section «9. Annexes» in the
technical specifications according to model.
5.1.1. Reception, unpacking and contents.
•Reception. Check that:
The data on the label affixed to the packaging corre-
spond to those specified in the order. Once the UPS is
unpacked, check the previous data with those of the
equipment nameplate.
If there are discrepancies, file the disagreement as
soon as possible, quoting the equipment serial number
and the delivery note references.
It has not suffered any mishaps during transportation
(packaging and impact indicator in perfect condition).
Otherwise, follow the protocol indicated on the label at-
tached to the impact indicator, located on the packaging.
•Unpacking.
To check the contents it is necessary to remove the
packaging.
Complete the unpacking according to the proce-
dure of section 5.1.3.
•Content.
The equipment itself.
Documentation of the equipment in computer support
CD-ROM or Pen Drive. In default download from the
Web.
•Once the reception is completed, it is advisable to re-pack
the UPS until it is put into service in order to protect it
against mechanical shock, dust, dirt, etc.
5.1.2. Storage.
•Equipment storage shall be done in a dry, ventilated place
and protected from rain, dust, water splashes or chemical
agents. It is advisable to keep each equipment in its original
packaging as it has been specifically designed to ensure
maximum protection during transport and storage.
•Do not store the devices where the ambient temperature
exceeds the thresholds given in section 'Annexes’.
•When a battery pack is supplied with the subrack of the
UPS, either in a cabinet, loose to be installed in a cabinet
of its property, to be installed on a rack or in any other way
and not installed together immediately, it will be stored in
a cool, dry and ventilated place, at a controlled temperature
between 20 and 25ºC.
In general and except in particular cases when
batteries are supplied they are hermetically
sealed lead-calcium batteries. To avoid degradation
during storage, they must be recharged at the indicated
intervals according to the temperature at which they
are exposed (see date of last charge noted on the label
affixed to the packaging of the battery unit Fig. 17).
Fecha carga / Fecha recarga /
Charging date : Recharging date:
DY933B00 - 401AF000001
BACK MATERIAL
MUY IMPORTANTE PARA LA VIDA DE LAS BATERÍAS DE Pb-Ca: Para evitar
su degradación deben ser recargadas en los intervalos indicados. Respetar
el procedimiento referido en el manual de usuario del equipo.
VERYIMPORTANT FOR THELIFETIME OF Pb-CaBATTERIES:In order to avoid
their degradation, they must be recharged according to the stated interval
times. Respect the procedure referred in the equipment user’s manual.
0 - 20 12
21 - 30 9
31 - 40 5
41 - 50 2,5
Meses /
Months
ºC
Charge date shipped from factory.
Space to write down the date of the new recharge.
**-**-****
Data label corresponding to the model .
Fig. 17. Label on the packaging of the battery pack.
After the period of time, connect the batteries with the
equipment and this to the mains following the safety
and connection instructions.
Proceed to commissioning. See Section 6.
Leave it in this mode for at least 12 hours.
Once the battery recharging is completed proceed to
stop the equipment, disconnect it electrically and save
the UPS and the batteries in their original packaging,
EMi3 SERVOMOTOR VOLTAGE STABILISERUSER'S MANUAL

20 SALICRU
noting the new date of recharge of the batteries in the
field of the label - see Fig. 17.
Units that are part of a parallel system will be treated
as individual equipment for battery recharging and
therefore no additional connection is required.
5.1.3. Unpacking.
•The packaging of the equipment consists of wooden pallet,
carton or wood enclosure according to cases, polystyrene
foamed corners [EPS] or polyethylene foam [EPE], polyeth-
ylene sheath and strap, all recyclable materials; so if you
are going to get rid of them you must do it according to the
laws in force. We recommend storing the packaging in case
it should be used in the future.
Fig. 18. Example of transfer of packed ADAPT X with pallet
jack.
Fig. 19. Example of removal of carton enclosure.
•To unpack the equipment, cut the straps of the carton en-
closure and remove it as if it were a cover (see Fig. 18 and
19) or disassemble it with the necessary tools if the casing
is made of wood; remove the corners and the plastic sheath
and the UPS will be naked on the pallet. The Figs. 18 to 20
shows the 6-slot subrack as an example.
Fixing
screws
Fixing angle
Fig. 20. Equipment unpacked as an example on pallet.
•Remove the screws and/or the fixing angles, indicated in
Fig. 20.
•With the help of one or two people on each side,
download it from the wooden pallet. Pay special at-
tention to the subrack with 6 slots, as incorporating castors
could fall from the pallet and cause an accident, beyond the
material damage itself.
5.1.4. Transport to the site.
•If the receiving area is far from the installation site, it is
recommended to move the ADAPT X using a pallet truck or
other suitable means of transport, assessing the distance
between the two points, the weight of the unit, the charac-
teristics of the passageway and site (floor type, floor resist-
ance kg/m2,... ).
•The 6-slot subracks incorporate four castors (with mechan-
ical locking), so it is easy to move it to the installation site
once unpacked.
•However, when the distance is considerable, it is recom-
mended to move the packaged equipment to the imme-
diate vicinity of the installation site and its subsequent
unpacking.
5.2. LOCATION.
5.2.1. Location of the ADAPT X.
•The following premises will be taken into account when
locating a modular UPS ADAPT X, as this is a safety equip-
ment in terms of power and not to prevent or invalidate its
own role:
Not suitable for outdoor installation. Protection degree
by default IP20.
The location will be in a ventilated room, controlled
temperature and humidity to keep the equipment in the
environmental parameters within the specified oper-
ating range. The cooling capacity of the air conditioner
will be selected according to the heat losses of the UPS
and other equipment that can cohabit in the same room.
The room will have adequate filters to prevent dusty
or lint-free environments from contaminating the
Table of contents
Other Salicru Power Supply manuals

Salicru
Salicru DC POWER-L Series User manual

Salicru
Salicru DC POWER-S DC-36-S User manual

Salicru
Salicru ILUEST NE Series Operation instructions

Salicru
Salicru SPS 16 ATS User manual

Salicru
Salicru DC POWER-L Series User manual

Salicru
Salicru SPS One Series User manual

Salicru
Salicru DC POWER-L DC-75-L 12P 110V EE671774-1 User manual

Salicru
Salicru SPS.400.HOME User manual
Popular Power Supply manuals by other brands

Puls
Puls Dimension CP20.241-C1 installation manual

Tagan
Tagan PipeRock TG600-BZ Features & specifications

Pulsar
Pulsar Rack Power RSFUPS108 manual

Apevia
Apevia Dark Side Power ATX-AS600W user manual

Micro Technic
Micro Technic Micronix PC/104 Power Supply PV-1075-CAR Installation and user manual

Puls
Puls PIANO Series manual