manuals.online logo
Brands
  1. Home
  2. •
  3. Brands
  4. •
  5. Salsbury Industries
  6. •
  7. Outdoor Furnishing
  8. •
  9. Salsbury Industries Wood 77781-ADA Series Programming manual

Salsbury Industries Wood 77781-ADA Series Programming manual

Wood ADA Locker Bench (without back)
Assembly & Installation Instructions
Thank you for selecting Salsbury Wood ADA locker benches. We are confident that the quality and construction of this product will provide years of
maintenance free use.
Preliminary Notes
There are two basic steps to assembly and installation:
1. The bench pedestals must be assembled to the bench top.
2. The bench assembly must be bolted to the floor.
Failure to bolt the bench assembly to the floor could result in
injury to persons sitting on the bench.
Since various types of floors require different types of fasteners, floor
installation hardware is not provided.
Two bench pedestals are provided for each bench top. All necessary
holes are pre-drilled in the wood bench top. Eight (8) 1/4” diameter x
1” long lag screws are provided for attaching the bench pedestals to
the bench top.
Assembly
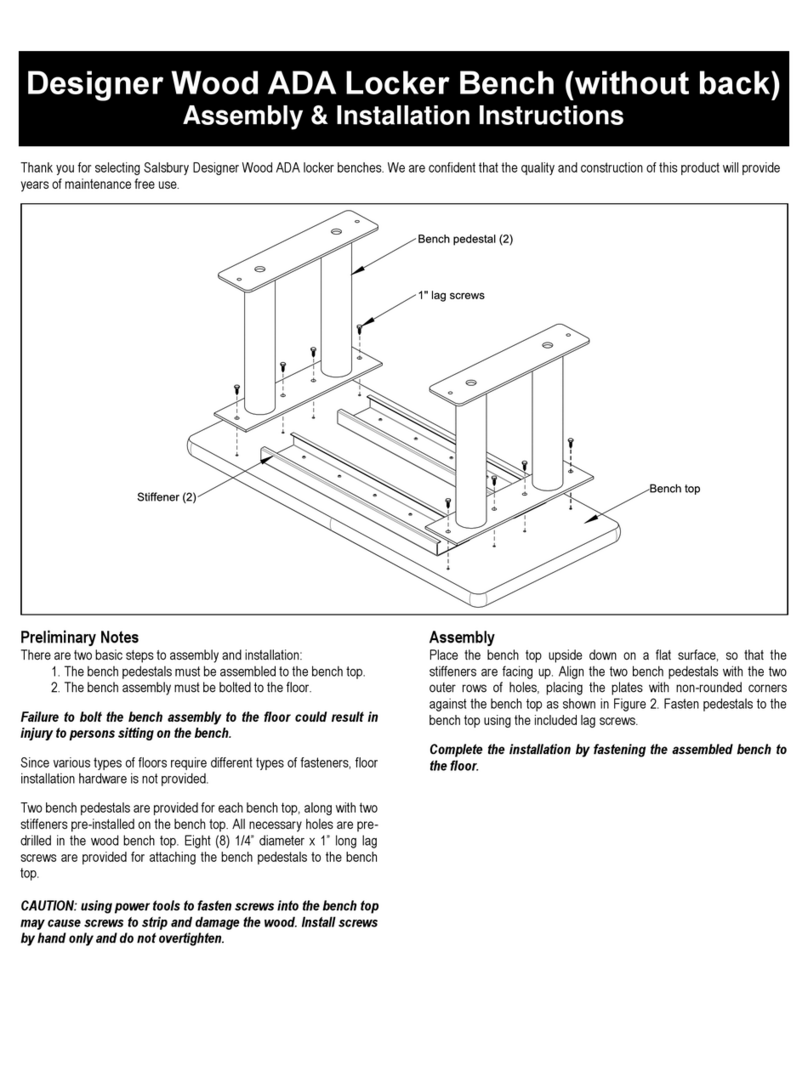
Place the bench top upside down on a flat surface, so that the pre-
drilled holes are facing up. Align the two bench pedestals with the two
rows of pre-drilled holes, placing the plate with non-rounded corners
against the bench top as shown in the diagram. Fasten pedestals to
the bench top using the included lag screws.
Complete the installation by fastening the assembled bench to
the floor.
Wood ADA Locker Bench (with back)
Assembly & Installation Instructions
Thank you for selecting Salsbury Wood ADA locker benches. We are confident that the quality and construction of this product will provide years of
maintenance free use.
Preliminary Notes
There are two basic steps to assembly and installation:
1. The bench pedestals must be assembled to the bench top.
2. The bench assembly must be bolted to the floor.
Failure to bolt the bench assembly to the floor could result in
injury to persons sitting on the bench.
Since various types of floors require different types of fasteners, floor
installation hardware is not provided.
Two bench pedestals are provided with identical bench tops. All
necessary holes are pre-drilled in the wood bench tops. Sixteen (16)
1/4” diameter x 1” long lag screws are provided for attaching the bench
pedestals to the bench tops.
Assembly
Place one bench top upside down on a flat raised work surface, so that
the pre-drilled holes are facing up. Align the vertical members of the
two bench pedestals with the two rows of pre-drilled holes, as shown
in Figure 1. Fasten pedestals to the bench top using the eight (8) lag
screws, and install round hole plugs in all holes on the pedestals’
vertical members.
Place the remaining bench top upside down on the work surface. Align
the horizontal members of the pedestals as before, and as shown in
Figure 2. Fasten pedestals to the bench top using the remaining lag
screws, and install round hole plugs on the horizontal members.
Complete the installation by fastening the assembled bench to
the floor.

This manual suits for next models

1

Other Salsbury Industries Outdoor Furnishing manuals

Salsbury Industries Designer Wood 77781D-ADA Series Programming manual

Salsbury Industries

Salsbury Industries Designer Wood 77781D-ADA Series Programming manual

Salsbury Industries 4325 User manual

Salsbury Industries

Salsbury Industries 4325 User manual

Salsbury Industries 4325 User manual

Salsbury Industries

Salsbury Industries 4325 User manual

Salsbury Industries Regency 3308R User manual

Salsbury Industries

Salsbury Industries Regency 3308R User manual

Popular Outdoor Furnishing manuals by other brands

felton industries FELEPG5T6 Assembly instruction

felton industries

felton industries FELEPG5T6 Assembly instruction

Dreamo OTF-503S quick start guide

Dreamo

Dreamo OTF-503S quick start guide

Garden Furniture Direct Borrowdale Assembly instructions

Garden Furniture Direct

Garden Furniture Direct Borrowdale Assembly instructions

Rowlinson Clarendon Assembly instructions

Rowlinson

Rowlinson Clarendon Assembly instructions

Garden Treasures 8201268 Assembly instructions

Garden Treasures

Garden Treasures 8201268 Assembly instructions

Safavieh Outdoor Marson PAT7062 quick start guide

Safavieh Outdoor

Safavieh Outdoor Marson PAT7062 quick start guide

SSC-LUXon 990070716 Assembly & operating instructions

SSC-LUXon

SSC-LUXon 990070716 Assembly & operating instructions

supremo LEISURE 2-Seat Stool 110*40cm Assembly instruction

supremo LEISURE

supremo LEISURE 2-Seat Stool 110*40cm Assembly instruction

Hatteras Hammocks DCA1-K-HH instructions

Hatteras Hammocks

Hatteras Hammocks DCA1-K-HH instructions

Lemeks Palmako PA120-5959 Assembly, installation and maintenance manual

Lemeks

Lemeks Palmako PA120-5959 Assembly, installation and maintenance manual

OLT 24 Assembly manual

OLT

OLT 24 Assembly manual

forest-style HACIENDA 2354 Building instructions

forest-style

forest-style HACIENDA 2354 Building instructions

Courtyard Creations RUS0188-WM Assembly instructions

Courtyard Creations

Courtyard Creations RUS0188-WM Assembly instructions

kingsley-bate MC-55 Assembly instructions

kingsley-bate

kingsley-bate MC-55 Assembly instructions

Weltevree Carrier product manual

Weltevree

Weltevree Carrier product manual

Grange Fencing Elite Arch Assembly instructions

Grange Fencing

Grange Fencing Elite Arch Assembly instructions

Grosfillex AUVENT YR14 Assembly instructions
Grosfillex

Grosfillex AUVENT YR14 Assembly instructions

X-METAL EAGLE 33511 Assembly instructions

X-METAL

X-METAL EAGLE 33511 Assembly instructions

manuals.online logo
manuals.online logoBrands
  • About & Mission
  • Contact us
  • Privacy Policy
  • Terms and Conditions

Copyright 2025 Manuals.Online. All Rights Reserved.