Saluki MO1072 Series User manual

MO1072 Series Modular Oscilloscope
70MHz, 250MSa/s, 10K Memory Depth, WIFI Connection
No.367, Fuxing N. Rd.,105 Taipei,Taiwan Tel: +886.2.2175 2930
Key Features
Support iPhone / iPad / Android Device / PC
WIFI / USB 2.0 connection
70MHz bandwidth
250MSa/s Real Time sample rate
20 more automatic measurement function
PASS / FAIL Check function
2 CH Oscilloscope or 16CH Logic Analyzer / 1CH Oscilloscope + 8CH Logic Analyzer
Waveform averaging, afterglow, lightness control, reverse, add, subtract, multiply, divide,
X-Y display
Waveform data can be output as EXCEL, BMP, JPG according to time and voltage
Software Support: IOS, Android, Win10, Win 8, Win 7, Windows NT, VISTA, etc.
Typical Applications
Education and training
Service and Repair

MO1072 Series Modular Oscilloscope
70MHz, 250MSa/s, 10K Memory Depth, WIFI Connection
No.367, Fuxing N. Rd.,105 Taipei,Taiwan Tel: +886.2.2175 2930
Saluki MO1072 Series Modular Oscilloscope is designed based on the platform of IOS,
Android and Windows system. With a simple App, you can easily used it in your iPhone, iPad,
Android device or PC, then get a Multi-touch operation. Meanwhile, It can be connected with
multiple devices at the same time, such as when operating on iPad, it can also be observed on
iPhone. WIFI communication without cable is very convenient during your application. Build-in
Lithium Battery with 4 hours endurance, no need of external power. Good mechanical design
with small size which is convenient for traveling.
Technical Specifications
Model
MO1072L (with Logic Analyzer)
MO1072
Acquisition
Bandwidth
70MHz
Channel
2 CH
Real-time Sampling Rate
250MSa/s(single channel), 125MSa/s(two channels)
Sampling Mode
Sampling, Vmax, Vrms
Average Sampling
Average waveform, times: 4, 8, 16, 32, 64, 128
Input
Input Coupling
DC, AC, GND
Input Impedance
Resistance: 1MΩ; Capacitance:25pF
Probe Attenuation Coefficient Setting
1×, 10×, 100×, 1000
Max Input Voltage
35Vpk(DC+peak)
Horizontal
Horizontal sweep
4ns/div - 1h/div (1-2-4 sequences)
Time Base Precision
±50ppm
Waveform Interpolation
Step, Linear, Sin(x)/x
Memory Depth
10K

MO1072 Series Modular Oscilloscope
70MHz, 250MSa/s, 10K Memory Depth, WIFI Connection
No.367, Fuxing N. Rd.,105 Taipei,Taiwan Tel: +886.2.2175 2930
Vertical
Vertical Resolution
8Bit
Vertical Displacement Range
10mV - 5V/div @ x1 probe
100mV - 50V/div @ x10 probe;
1V - 500V/div @ x100 probe
10V - 5KV/div @ x1000 probe
Position Range
±4division
Bandwidth Limit
20MHz
Low Frequency Response
≤10Hz(at input BNC)
Rise time
≤5ns
DC Gain Accuracy
±3%
Trigger
Trigger Source
CH1, CH2, EXT
Trigger Mode
Auto, normal, singal
Trigger Type
Edge, Alternative
Trigger Sensitivity
0.02 division
Trigger Range
±4V
Trigger Precision
±4division
Measurement
Cursors Measurement
Cross, Trace, Horizontal, Vertical
Auto Measurement
Vpp, Vamp, Vmax, Vmin, Vtop, Vmid, Vbase, Vavg, Vrms,
Vcrms, Preshoot, Overshoot, Frequency, Period, Rise Time,
Fall Time, Positive Width, Negative Width, Duty Cycle
Waveform Signal Process
+, -, x, ÷, FFT, invert
Logic Analyzer (MO1072L)
Channel
1CH Oscilloscope + 8CH Logic Analyzer
16CH Logic Analyzer
Max Input Impedance
100K (C=10p)
Input Voltage
2V -3.3V
Compatible input
TTL, CMOS, ECL

MO1072 Series Modular Oscilloscope
70MHz, 250MSa/s, 10K Memory Depth, WIFI Connection
No.367, Fuxing N. Rd.,105 Taipei,Taiwan Tel: +886.2.2175 2930
General Information
Temperature
Operating: 0℃ - 40℃; Non-operating: -20℃ - 60℃
Humidity
Below 35℃, ≤90% relative humidity; 35℃-40℃, ≤60% relative humidity
Volume
190mm x 100mm x 35mm
Weight
0.7KG (net weight)
Standard Package
230x175x75cm. Gross weight: approx 1kg including all accessories
Standard Package
Main Machine
2 passive probes
Plug
USB Cable
Note: Information will conduct the necessary updates
,
the contents of this document are subject to
change without notice

MO1072 Modular WIFI Oscilloscope
User Manual
Saluki Technology Inc.

www.salukitec.com
3
Preface
Thank you for choosing MO1072 Modular WIFI Oscilloscope produced by Saluki Technology Inc.
We devote ourselves to meeting your demands, providing you high-quality measuring instrument and the best after-
sales service. We persist with “superior quality and considerate service”, and are committed tooffering satisfactory
products and service for our clients.
Document No.
MO1072-03-02
Version
Rev01 2017.04
Saluki Technology
Document Authorization
The information contained in thisdocument is subjectto change without notice. The powerto interpret the contents of
and terms used in this document rests with Saluki.
Saluki Tech owns the copyright of this document which should not be modified or tampered by any organization or
individual, or reproduced or transmitted for the purpose of making profit without its prior permission, otherwise Saluki
willreserve the right to investigate and affixlegal liabilityof infringement.
Product Quality Assurance
The warranty period ofthe product is 36 months from the date of delivery. The instrument manufacturer will repair or
replace damaged parts according to the actual situation within the warranty period.
Product Quality Certificate
The product meets the indicator requirements of the document at the time of delivery. Calibration and measurement
are completed bythe measuring organization with qualifications specified bythe state, and relevant data are
provided for reference.
Quality/Settings Management
Research, development, manufacturing and testing of the product comply with the requirements of the quality and
environmental management system.

www.salukitec.com
5
Content
1General Safety Summary...................................................................................................................................................7
2Brief Introduction................................................................................................................................................................9
2.1 Minimum system requirements..................................................................................................................................9
3Quick Start.......................................................................................................................................................................10
3.1 Connections and Indications....................................................................................................................................11
3.2 Set Connection Mode..............................................................................................................................................12
3.3 Charging the battery................................................................................................................................................13
3.4 General Check.........................................................................................................................................................13
3.5 Probe Compensation...............................................................................................................................................13
3.6 Function Check........................................................................................................................................................14
3.7 Self Calibration........................................................................................................................................................15
4PC Application..................................................................................................................................................................16
4.1 Install Software........................................................................................................................................................17
4.2 Install Driver.............................................................................................................................................................20
4.3 Set Connection Mode with PC.................................................................................................................................26
4.4 The User’s Interface.................................................................................................................................................27
4.5 The Menu System....................................................................................................................................................29
4.6 Setup the Oscilloscope............................................................................................................................................30
4.7 Set Horizontal System.............................................................................................................................................30
4.7.1 Horizontal Setting................................................................................................................................................30
4.7.2 Application of the X-Y Operation .........................................................................................................................31
4.8 Set Vertical System..................................................................................................................................................33
4.9 Set Trigger System..................................................................................................................................................34
4.9.1 Trigger Setting.....................................................................................................................................................34
4.9.2 Capturing a Single-Shot Signal............................................................................................................................36
4.10 Math and FFT..........................................................................................................................................................36
4.10.1 MATH ..................................................................................................................................................................36
4.10.2 Fast Fourier Transform Function.........................................................................................................................38
4.11 Save and Load.........................................................................................................................................................39
4.11.1 Save and load file................................................................................................................................................39
4.11.2 Set Reference......................................................................................................................................................39
4.11.3 Save/Load Setup.................................................................................................................................................41
4.12 Display System........................................................................................................................................................41
4.13 Measure System......................................................................................................................................................43
4.13.1 Scale measurement.............................................................................................................................................43
4.13.2 Cursor Measure...................................................................................................................................................44
4.13.3 Automatic Measurement......................................................................................................................................47

www.salukitec.com
6
4.14 Acquisition Modes....................................................................................................................................................49
4.15 Interpolation.............................................................................................................................................................49
4.16 Utility Function.........................................................................................................................................................50
4.16.1 Record.................................................................................................................................................................51
4.16.2 Pass/Fail..............................................................................................................................................................51
4.16.3 Self Calibration....................................................................................................................................................53
4.16.4 Factory Setup......................................................................................................................................................53
4.16.5 Language.............................................................................................................................................................53
4.17 Print And Print Preview............................................................................................................................................54
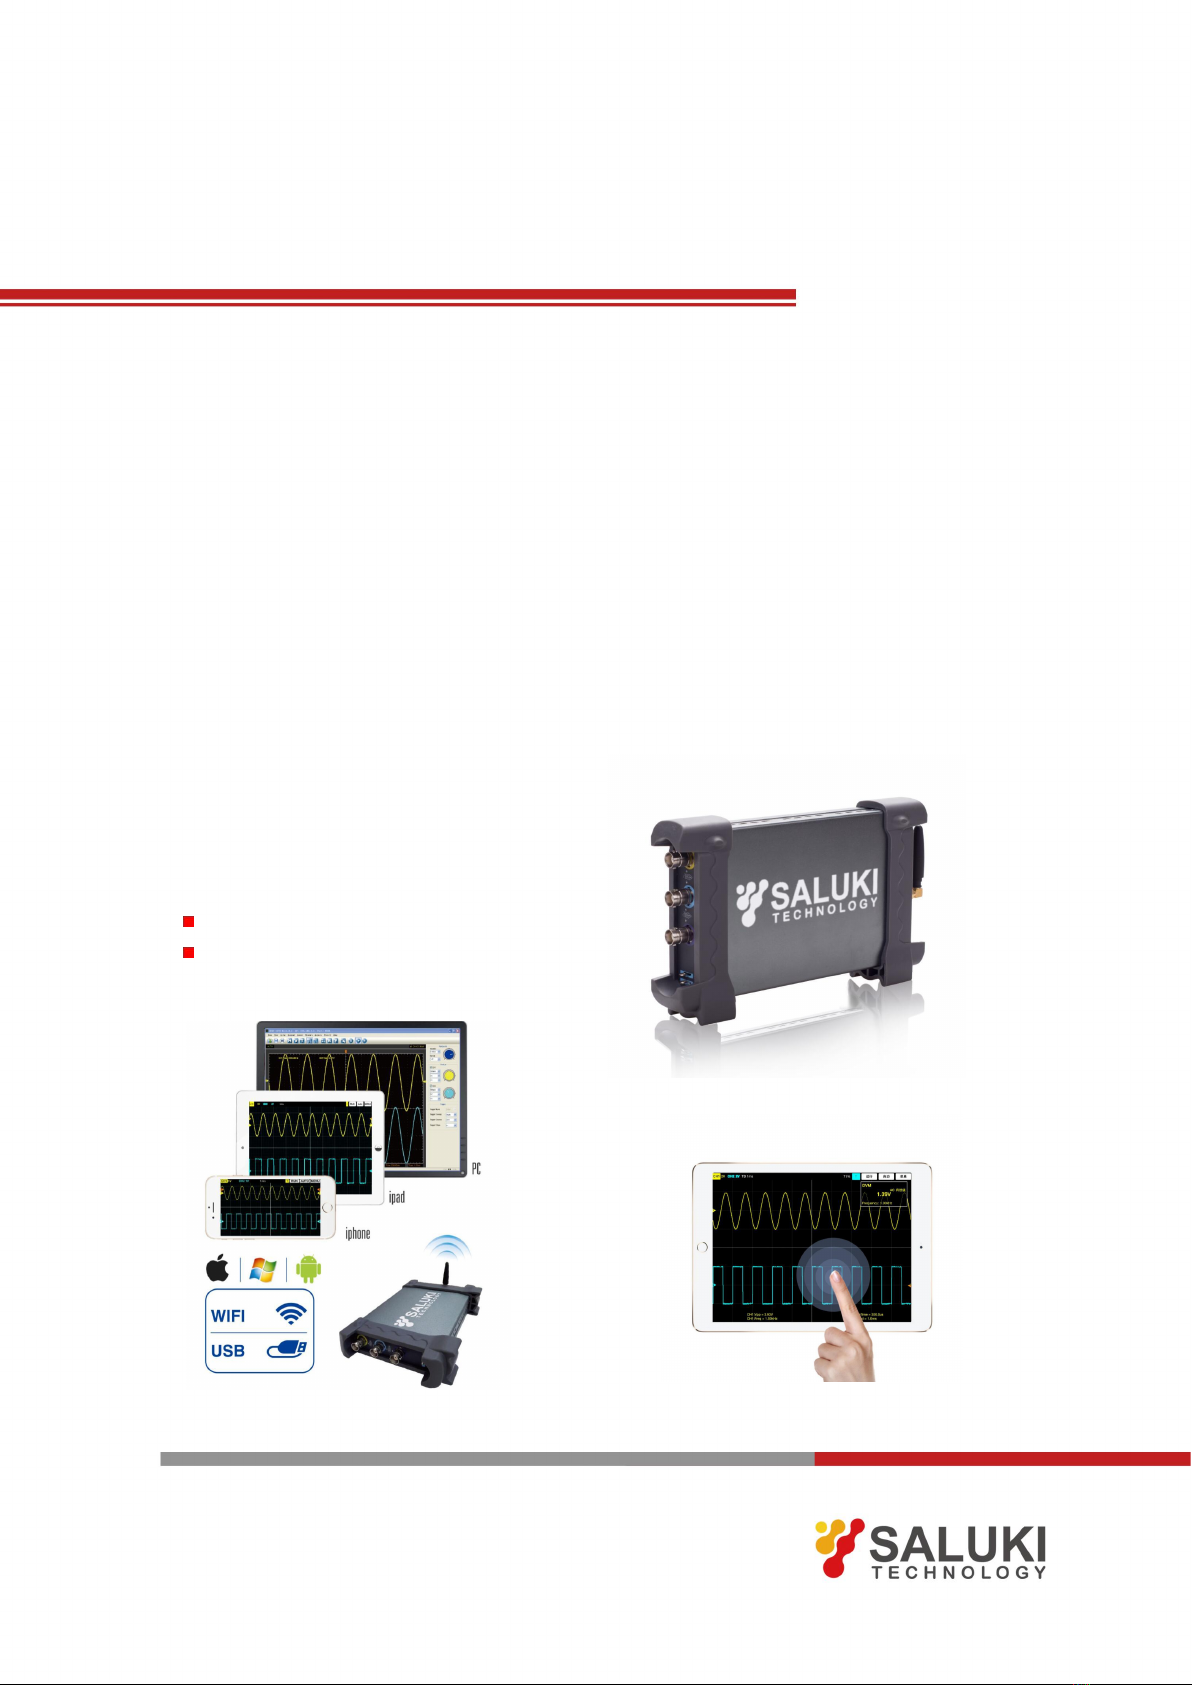
5IOS Application................................................................................................................................................................55
5.1 User Interface..........................................................................................................................................................56
5.2 Menu System...........................................................................................................................................................57
5.3 Connect With Apple.................................................................................................................................................58
5.4 Set Horizontal System.............................................................................................................................................59
5.4.1 Horizontal Setting................................................................................................................................................59
5.4.2 The Application of the X-Y Operation..................................................................................................................60
5.5 Set Vertical System..................................................................................................................................................60
5.6 Set Trigger System..................................................................................................................................................61
5.7 Save and Load.........................................................................................................................................................62
5.7.1 Save/Load File.....................................................................................................................................................62
5.7.2 Save/Load Reference..........................................................................................................................................62
5.7.3 Save/Load Setup.................................................................................................................................................64
5.8 Display System........................................................................................................................................................64
5.9 Measure Signal........................................................................................................................................................64
5.9.1 Cursor..................................................................................................................................................................64
5.9.2 Measure...............................................................................................................................................................65
5.10 Acquire.....................................................................................................................................................................66
5.10.1 Capture Mode......................................................................................................................................................66
5.10.2 Interpolation.........................................................................................................................................................66
6Android Application..........................................................................................................................................................67
6.1 User Interface..........................................................................................................................................................68
6.2 Menu System...........................................................................................................................................................69
6.3 Connect with Android in direct mode.......................................................................................................................70
6.4 Set Vertical System..................................................................................................................................................70
6.5 Set Trigger System..................................................................................................................................................70
6.6 Measure Signal........................................................................................................................................................71
7Specifications...................................................................................................................................................................72
8General Maintenance.......................................................................................................................................................74

www.salukitec.com
7
1General Safety Summary
Review the following safety precautions carefully before operate the device to avoid any personal injuries or
damages to the device and any products connected to it. To avoid potentialhazards, use the device as specified by
this user’s guide only.
To Avoid Fire or Personal Injury.
Connect and Disconnect Properly.
Do not connector disconnect probes or test leads whilethey are connected to a voltagesource.
Connect and Disconnect Properly.
Connectthe probeoutput to the measurement device before connecting the probe to the circuit undertest.
Disconnect theprobe input and theprobe reference lead from the circuitunder test beforedisconnecting the probe
from the measurement device.
Observe All Terminal Ratings.
To avoid fire or shock hazard, observe all ratings and markingson the product.Consult the product manual for
further ratings information before making connectionsto the product.
Use Proper Probe.
To avoid shock hazard, use a properly rated probe for your measurement.
Avoid Circuit or Wire Exposure.
Do not touch exposed connections and components when power ison.
Do Not Operate with Suspected Failures.
If suspected damage occurs with the device, have it inspected by qualified service personnel before further
operations.
Provide Proper Ventilation.
Refer to the installation instructions for proper ventilation of the device.
Do not operate in Wet/Damp Conditions.
Do not operate in an Explosive Atmosphere.
Keep Product Surfaces Clean and Dry.
Safety Information
In orderto ensure the correct using and the bestefficient service, please carefullyread the user’s manual.
System Symbols
These symbols may appearin this manual or on the instrument.
Warning: “Waring” identifies conditionsand actions that pose hazards to the users.

www.salukitec.com
8
Caution: “Caution”identifies conditions and actions that may damage the product or other properties.
System Terms
The following terms may appear on the instrument:
Danger: The term “Danger”is used in the manual to indicate that when you readthis mark, personal injury may be
caused to immediately.
Waning: The term “Danger” is used in the manual to indicate that when you readthis mark,personal injurymay not
be caused to you immediately,but you need tobe cautionary.
Notice: The term “Noise” is usedin this manual to indicatethat damagesmay be causedon this product or other
properties.
DANGER:
High Voltage Refer to
the manual Protective Condutor
Terminal
Chassis grand
Earth(grand) Terminal

www.salukitec.com
9
2Brief Introduction
MO1072 is WLAN dual-channeldigitalstorage oscilloscopegeared towards tablet computers,it's a small, lightweight,
portable, battery powered, fully featured two channel oscilloscope. The oscilloscope is ideal for production test,
research and design and all of the applications involving analog circuits test and troubleshooting, as well as
education and training.
Instead of a built-in screen ituses your tablet iOS, Android or PC (Windows) to display the measurements. Data
exchangebetweenthe tablet and the oscilloscope is via WLAN, there are no cables. Also, as there is no physical
connection between the oscilloscope and the tablet, it is a very safe instrument to use. Due to the wireless principle,
the oscilloscopeand the ‘screen’ do not need tobe at the same location.
The communication protocol between the oscilloscope and the tablet is freely available, so it is easy for third-party
developers to develop applications for other purposes. Finally, it isequipped with a USB port for charging of the
internalbattery. If desired, itcan also connect to a PCvia the USB port, instead of wireless.
Model Channels Bandwidth Sample Rate
MO1072 2 70MHz 250Msa/s
Features
Excellent industrial design-the same anodized aluminum casing as iPad, which is not only beautiful and tasteful
but also greatlyenhanced the hardness ofaluminumalloy surface, and has good heat resistance and strong
wearability.
USB2.0 interface, USB power source required, easy to use.
Li-ion rechargeable battery include
DVM readouts
20 measurement functions, PASS/FAIL Check,be suitable for technicalapplication.
Waveform average,persistence, intensity, invert, addition, subtraction, multiplication, division, X-Y plot.
Save waveform inthe following: text file, jpg/bmp graphic file, MS excel/word file.
FFT
2.1 Minimum system requirements
iOS
Android™ 4.0 or higher
Windows XP or higher
Tablet or PC

www.salukitec.com
11
3.1 Connections and Indications
1) CH 1: Input connectors forwaveform display.
2) CH 2:Input connectors for waveform display.
3) EXT.: Input connector foran external trigger source. Use the Trigger menu to select the Ext. source.
4) CAL.: Probe compensation output.
5) GND.: Ground terminal.
6) Power Button: Power on/off button.
7) USB PORT: Connect the B-Type Plug of USB cable to this port.
8) ANT: Antenna
9) Indications
: Power on/off.
: Battery charging
: Battery full
1 2 3 4 5
6
7 8 9 10

www.salukitec.com
12
: USB/WI-FI indication ②
: Hotspot, creates it's ownwireless local area network (WLAN). Yellowlight is always flashing.
: When the device is connected with PC and communicates with PC successfully via USB cable,the light
blinks in green for long.
: Send signals whenthe connection is successful with the tablet/PC. ③
: App connection indicates when there is connection over the WLAN network with the tabletapplication. ④
10) Easylink: Press this button to restart the device and set Wi-Fi connection mode.
Note
①Poweron.Keeppressingpowerbuttonuntilpowerindicatorlightsup.Theindicatorisblinkingwhenitgetbattery
level. When the batteryis lower than 10%, the indicatoris quickblinking.When thebatteryis not less than 10%,
the indicator is slow blinking.
②The indicator keeps lighting in USB mode and slowblinking in Wi-Fi mode.
③If there is data transfer between the device and APP, this indicator is quick blinking. Otherwise, the indicator is
off.
④In Wi-Fimode,ifthereiscommunicationlinkbetweenthedeviceandAPP,theindicatorkeepslightingnormally.
3.2 Set Connection Mode
There aretwo connection modesof the Wi-Fi mode and USB mode.
Wi-Fi mode: Keep pressing power button until power indicator lights up. Then the communication indicator
USB/Wi-Fi lights up and slow blinking. You can connect the device with tablet/PC via Wi-Fi.
USB mode: Keep pressing power button until power indicator lights up. Press reset Easy-Link Wi-Fi setting
button within 5 seconds, then the USB/Wi-Fi communication indicatorlightsup and keeping light. You can
connect the device with PC via USB cable.
Note:
1) In Wi-Fi mode: The device will power off when the time of no communication between the device and application
more than ten minutes. There are three situations about no communication:
a) When the software of Windows is close.
b) When iOS APP quits or works on background.
c) When Android APP quits orthe screen is lock.

www.salukitec.com
13
2) In USB mode, if the driver isinstalled successfully ona PC, thesoftware can communicate with the device
automatically, so the device won’t power off when connect it with thePC. If the driverisn’t installed successfully
on a PC, there is no communication, so the device will power off more than ten minutes.
3.3 Charging the battery
There are two ways to charge the battery:
1) Connect B-Type Plug of USB cable to the device USB port. Connect the A-type Plug of USB cable to power
adapter (5V, 1A).
2) Connect B-Type Plug of USB cable to the device USB port. Connect the A-type Plug of USB cable to PC’s USB
port.
Note:
It is recommended to charge the rechargeablebattery completely before using theoscilloscope for the firsttime.
When the battery is out of power, please use power adapter to charge it for a period of time beforeusing.
3.4 General Check
Please check theinstrument as following stepsafter receiving an oscilloscope:
Check the shipping container for damage:
Keep the damaged shipping container or cushioning materialuntil the contents of the shipment have been checked
for completenessand the instrument has been checked mechanically and electrically.
Check the accessories:
Accessories supplied with the instrument are listed in "Accessories"in this guide. Ifthe contents are incomplete or
damaged, please notify the franchiser.
Check the instrument:
In case there isany mechanicaldamage ordefect,or the instrumentdoes not operate properly orfails performance
tests, please notify the franchiser.
3.5 Probe Compensation
Performthis function to match the characteristics ofthe probe and the channel input. This shouldbe performed
wheneverattaching a probe to any input channel at the first time.
1) From the “Probe”menu, select attenuation to 1:10. Set the switchto “X10”on the probe and connect it to CH1of
the oscilloscope. When using the probe hook-tip, insert the tip onto theprobe firmly to ensure a proper
connection.
2) Connect the probe tip with a 1 KHz, 2 Vp-p square, select CH1, and then press the“AUTOSET”button into the
menu or the toolbar.
3) Check the shape ofthe displayed waveform.

www.salukitec.com
14
Correctly Compensated
Over compensated
Under Compensated
4) If necessary, use a non-metallic tool to adjust the trimmer capacitor of the probe for the fattest square wave
being displayed on the oscilloscope.
5) Repeat if necessary.
WARNNING: To avoid electric shock while using the probe, be sure theperfection of the insulated cable, anddo not
touch the metallic portions of the probe head while it is connected with a voltage source.
3.6 Function Check
Perform this functional check to verify that your oscilloscope isoperating correctly.

www.salukitec.com
15
Connect the oscilloscope with PC, iOS or Android
1) Connect with PC via USB cableor Wi-Fi. Please refer to Connect with PC.
2) Connectwith IOS via Wi-Fi. Please refer to Connect WITH APPLE.
3) Connect with Android via Wi-Fi. Please refer to Connect WITH Android.
Input a signal to a channel of the oscilloscope
The oscilloscope is equipped with twochannels plus external trigger.
Please input signal in the following steps:
1) Set theattenuation switch on the probeas 10X and connect the probe on the oscilloscope with CH1. Aim the
slot in the probe connectorat the faucet on BNC of CH1 and insert, then, turn right to lockthe probe. Finally,
attach the tip of probe and ground nip to the Connector of Probe compensator.
2) Set the CH1 probe attenuation of the oscilloscope to X10. (The default isX1).
3) Attach the tip of probe and ground nip to the Connector of Probe compensator. Click the AUTO button. A square
wave will be displayed within a severalseconds. (Approximately 1 KHz, 2V, peak- to- peak).
4) InspectCH2 withthe samemethod. Repeat steps 2 and 3.
3.7 Self Calibration
The self calibration routine lets you optimize theoscilloscope signalpath for maximummeasurement accuracy. You
can runthe routine at anytime but you should always run the routine if the ambient temperature changes by 5℃or
more. For accurate calibration,power on the oscilloscope and wait twenty minutes to ensure it is warmed up. To
compensate the signal path, disconnect anyprobes orcables fromthe input connectors. Then, access the “Utility ->
Calibrate/Self Calibration”option and follow the directionson the screen. The selfcalibration routine takes about
several minutes.

www.salukitec.com
16
4PC Application
Install Software
Install Driver
Set Connection Mode with PC
The User’s Interface
The Menu System
Set Oscilloscope
Set Horizontal System
Set Vertical System
Set Trigger System
MATH an FFT
Save and Load
Display System
Measure System
Acquisition Modes
Interpolation
Utility Function
Print
Table of contents
Other Saluki Test Equipment manuals