Salus MD22A Installation manual

www.salus-tech.com
DEFENDER
Full Flow Magnetic Filter
5
Y
E
A
R
W
A
R
R
A
N
T
Y
DEFENDER
Full Flow Magnetic Filter
5
Y
E
A
R
W
A
R
R
A
N
T
Y
Full Flow Magnetic Filter
Models: MD22A
OPERATION MANUAL
SALUS Controls plc, SALUS House, Dodworth Business Park South,
Whinby Road, Dodworth, Barnsley S75 3SP

MD22A INSTRUCTION MANUAL2
INTRODUCTION
Today, high eciency boilers oer excellent performance for heating systems,
however this performance can be eroded signicantly if little attention is
given to the cleanliness of the complete central heating system. Historically
the majority of systems suer from iron oxide contamination, which takes the
form of sludge deposits which are caused by corrosion of the heating system.
The iron oxide particles vary in size and the sub-micron particles are present
in the system uid continuously during system operation. The oxide particles
can cause premature failure of valves and pumps and boiler eciency is
reduced dramatically as the particles contaminate the boilers heat exchanger,
and the complete system pipework.
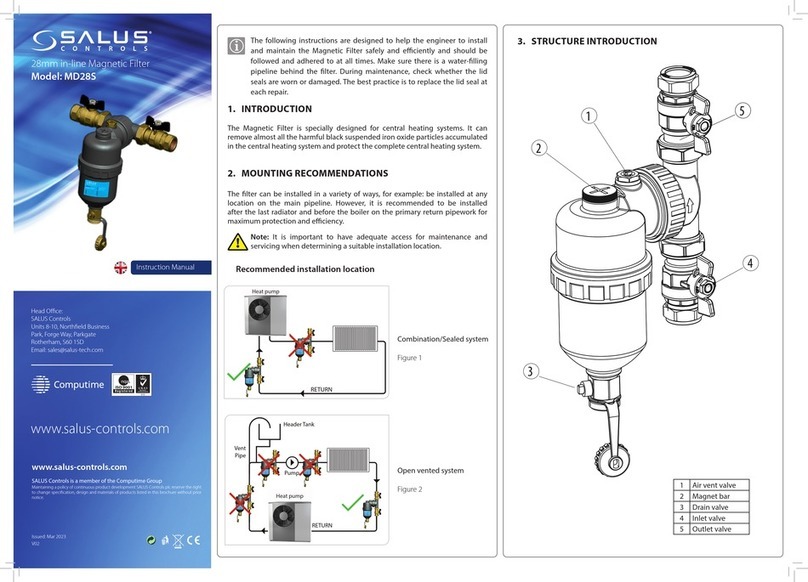
The SALUS Mag Defender oers system protection and increased eciency,
as it has been designed to remove the suspended iron oxide particles without
reducing ow rate through the system.
Installation is simple; isolation valves rotate 360º so a number of location
options can be facilitated.
An added advantage to installers is the bottom mounted valve for servicing.
Once isolated the bottom valve allows the easy discharge of contaminants.
The main body is 500mL, which allows the installer to add the correct amount
of corrosion inhibitor when the isolation valves are closed.
In the SALUS MD22A box:

MD22A INSTRUCTION MANUAL 3
RETURN
Boiler
Pump
Header Tank
Vent
Pipe
RETURN
Boiler
INSTALLATION
In order to achieve the best protection for the boiler, it is recommended
that the Mag Defender is tted after the last radiator before the boiler.
How to service and clean
QUICK REFERENCE GUIDE
110mm
154mm
How to install

MD22A INSTRUCTION MANUAL4
In determining a suitable location for installation, it is important to ensure
you allow adequate access for servicing.
The following instructions are designed to assist engineers in the safe
and eective installation and servicing of the SALUS Mag Defender and
should be followed at all times. Any queries arising from either installation
or servicing, contact SALUS Controls direct on 01226 323961.
Dos:
• Install the ller upright to enable the device to be fully evacuated of
air during commissioning. Pipe runs are vertical, horizontal or any
angle in between. The inlet and outlet can also be swapped to suit.
• Where the device is tted to the metallic building structure earth-
bonding continuity is required around the device. All bonding
connections must be accessible and labelled “Safety Electrical
Connection - Do Not Remove”
Don’ts:
• Magnets may affect or interfere with sensitive mechanical and
electronic instruments such as heart pacemakers, computers/magnetic
media and watches. Always keep magnets at least 300mm (1ft) away
from such equipment.
• NEVER close the INLET or OUTLET isolation valves, or UNDO the lid when
the pump is running!

MD22A INSTRUCTION MANUAL 5
Release system pressure then drain the pipe run where the device is to be
located (it may be necessary to drain the whole system). When installing
below a boiler or other object, allow 250mm clearance from the top of the
canister to beneath the object, to enable the lid assembly to be removed
when servicing.
The device has been designed to facilitate various inlet and outlet
congurations. Most congurations will require Elbows. For soldering we
recommend 28x Yorkshire Solder Ring Elbow YP1222mm (code08290), or
for compression we recommend 2 Yorkshire copper KS61522mm (code
61124K) and the tting instructions (which follow) are based around
dimensions of these elbows. For clarity the recommended solder and
compression ttings require the same dimension of cutout.
Vertical pipe run: Measure and mark a 110mm section for a 22mm unit,
as shown below. Remove this marked section using a pipe cutter as
shown. Now create 64mm and 106mm of 22mm copper pipe to attach
between the respective elbow and compression tting on the inlet/
outlet. Tip: Reuse the cut out section.
Horizontal pipe runs: Measure and mark 73mm section and remove
the marked section with a rotary tube cutter. Create 64mm and 134mm
lengths of 22mm copper pip to attach between the respective elbow and
compression tting on the inlet/outlet. Tip: Reuse the cut out section.
Prepare the pipe and ttings, lubricate the olives and connect the
valves on the pipe work, only hand tighten the connections at rst.
1

Now Loosen off the valve flange
nuts and insert the rubber washers
provided. (There are 2 supplied with
this product).
Fit the drain valve assembly to the
bottom of the Mag Defender making
sure the outlet is at the front of the
assembly and being careful not to
overtighten as this may cause damage.
Loosely secure the Mag Defender to
the valves.
MD22A INSTRUCTION MANUAL6
2
4
3

Now the heating system is ready to be
lled, ensure the inlet and outlet valves
are both in the open position, with the
drain valve in the closed position, and
then run the central heating system.
Bleed through top air vent, bleed the
MD22A again after the system has
reached temperature. Take care as the
water may be hot.
Always service (see page 8) the lter
before leaving the premises. The
Mag Defender spanner can be left
with the customer.
MD22A INSTRUCTION MANUAL 7
NOTE: Drain valve closed
6
5
7
Grip the Mag Defender and tighten
the compression ttings being careful
not to over tighten as this may cause
damage.

MD22A INSTRUCTION MANUAL8
Important – Before carrying
out any servicing work, turn off
electrical supply to the boiler and
let the water cool down to a safe
working temperature. Using the
Mag Defender spanner provided
turn both isolation valves to the
OFF position.
Remove magnet and put in a safe
place.
SERVICING
1
2

MD22A INSTRUCTION MANUAL 9
After approximately 30 seconds,
remove drain valve cap and use to
open drain valve. Have bucket or pipe
connection ready to collect debris.
3
Open inlet to ush out debris.
4
Once all debris has been ushed
re-insert the magnet.
5

MD22A INSTRUCTION MANUAL10
Replace cap on drain valve and run
the central heating system. Bleed air
through air vent if required.
8
Close drain valve using drain cap,
ensure the cap is alligned correctly so
the valve is fully closed.
6
Open outlet.
7

MD22A INSTRUCTION MANUAL 11
After step 4 in servicing, close inlet
valve.
CHEMICAL DOSING
1
Replace cap on drain valve.
3
Close drain valve using drain cap,
ensure the cap is alligned correctly so
the valve is fully closed.
2

MD22A INSTRUCTION MANUAL12
Pour a bottle of water treatment
corrosion and scale inhibitor, we
suggest SALUS Inhibitor. The canister
will hold 500ml.
Using the MAG Defender spanner
provided, carefully unscrew the lid.
4
Remove magnet cover and rinse under
tap if required.
5
6

MD22A INSTRUCTION MANUAL 13
Re-insert magnet cover.
7
8Now replace the lid onto the canister
and tighten with the Mag Defender
spanner. (Do not over tighten).
Re-insert magnet.
9

Open the isolation valves and start the
heating system.
10
11 Bleed through top air vent, bleed the
MD22A again after the system has
reached temperature. Take care as the
water will be hot.
Always service the filter before
leaving the premises. The Mag
Defender spanner can be left with
the customer.
MD22A INSTRUCTION MANUAL14

IMPORTANT
Ensure that the Standard Electrical Best Practice guidelines are followed
when installing Mag Defender. A copy of these guidelines can be found
at www.hse.gov.uk/electricity.
The inlet and outlet on the Mag Defender are reversible and there is no
ow restriction.
Following installation, don’t forget to complete the warranty card.
Alternatively, complete the registration online at www.salus-tech.com.
Faulty components must be returned under the SALUS warranty process.
NOTES
MD22A INSTRUCTION MANUAL 15

MD22A INSTRUCTION MANUAL16
Where can I t the Mag Defender?
In order to achieve the best protection for the boiler, it is
recommended that the Mag Defender is tted between the last
radiator and the boiler (see diagram on Page 3).
Which connection on the Mag Defender is the ow and which
is the return?
The inlet and outlet on Mag Defender are reversible and there is
no ow restriction.
How often do I service the Mag Defender?
Servicing is required once a year with the annual boiler service.
Can I use chemicals with the Mag Defender?
Yes, you can use any chemical on the
market with Mag Defender, however
we recommend you use
SALUS LX products with
the Mag Defender.
QUESTIONS AND ANSWERS
Q
A
Q
A
Q
A
Q
A

MD22A INSTRUCTION MANUAL 17
How long will the Mag Defender last?
Mag Defender has been developed to last for the lifetime of the
boiler, normally ten years. It provides continuous protection and
comes with a ve year warranty.
How do I isolate the valves?
Simply turn the valves to the marked OFF position using the
spanner provided. Important: Remember to switch off the
electrical supply to the boiler when servicing the Mag Defender.
Will the Mag Defender aect my pacemaker?
As with all magnetic products, if you have a pacemaker caution
should be taken when handling the Mag Defender at all times.
When the Mag Defender is installed, the magnetic eld outside
the canister is approximately one tenth of an average fridge
magnet.
Q
A
Q
A
Q
A

For more products in the
SALUS range visit...
www.salus-tech.com
MD22A INSTRUCTION MANUAL 19
MAG Defender NEW Manual 018_Layout 1 04/12/2013 11:38 Page 20
MD22A INSTRUCTION MANUAL18
WARRANTY
SALUS Controls warrants that this product
will be free from any defect in materials or
workmanship, and shall perform in accordance
with its specication, for a period of ve years
from the date of installation. SALUS Controls sole
liability for breach of this warranty will be (at its
option) to repair or replace the defective product.
Customer Name: ......................................................................................
......
Customer Address: .................................................................................
.......
..........................................................................................................................
......................................................... Post Code: ........................................
.....
Tel No: ............................... Email: ............................................................
......
Engineers Company: ..............................................................................
.....
Tel No: ............................... Email: ............................................................
5
Y
E
A
R
W
A
R
R
A
N
T
Y

For more products in the
SALUS range visit...
www.salus-tech.com
MD22A INSTRUCTION MANUAL 19
MAG Defender NEW Manual 018_Layout 1 04/12/2013 11:38 Page 20
MD22A INSTRUCTION MANUAL 19

Sales:
Technical:
SALUS DOC No. 00004 VER020
www.salus-tech.com
Nylon Compression Cap
Neodymium magnet
assembly, hermetically
sealed in SSTL304
500ml hydrolysis resistant circulation chamber
22mm compression Inlet
and outlet 360 swivel
isolation valve (x2)
½” BSP drain valve
Hydrolysis resistant Nylon Lid
assembly with EPDM “O” ring
Specication and contents
Also Supplied:
Mag Defender Spanner
Instruction manual including warranty form
SALUS Controls plc, SALUS House, Dodworth Business Park South,
Whinby Road, Dodworth, Barnsley S75 3SP
Table of contents
Other Salus Water Filtration System manuals
Popular Water Filtration System manuals by other brands

Plymovent
Plymovent MISTWIZARD user manual

Pentair
Pentair FRESHPOINT GRO-575M Installation and operation manual

Pentair
Pentair EVERPURE EZ-RO 200/2G Installation & operation guide

GE
GE GNSV70RBL Owner's manual and installation instructions

Aqua
Aqua Salt Evo instruction manual

AQUAPHOR
AQUAPHOR Crystal Solo manual

Magus
Magus BASIKA rho NS 2 Installation, operating and maintenance instructions

Waterco
Waterco HYDROCHLOR ST owner's manual

HEISSNER
HEISSNER FPU10100-00 Instructions for use

Aqua Guard
Aqua Guard Electron RO user manual

Brita
Brita PURITY C iQ Quick installation guide

Watts
Watts GTS450S Installation, operation & maintenance manual