SALZBURGER GETREIDEMÜHLE MT 5 Guide

MT 5
Owner’s Manual and User’s Guide
Before operating the appliance for the first time, please study these
instructions and important safe-guards carefully.

2
Contents
Operating instructions for the electric grain mill MT 5..................................... 5
Before operating the mill for the first time....................................................... 6
Basic rules for more safety ............................................................................... 7
Quick Guide ...................................................................................................... 9
Suitable site ...................................................................................................... 9
Suitable Grain ................................................................................................. 10
Use only cleaned and dry grain! ..................................................................... 10
Check the degree of dryness of your grain ..................................................... 10
Correct storage of grain .................................................................................. 11
Suitable grain types ........................................................................................ 13
Milling ............................................................................................................. 14
Correct milling ................................................................................................ 14
Operating time ............................................................................................... 15
Setting the degree of fineness ........................................................................ 15
Adjusting the degree of fineness .................................................................... 15
Interrupting the milling process ..................................................................... 18
Opening the milling chamber ......................................................................... 18
Closing the milling chamber ........................................................................... 18
Care and cleaning ........................................................................................... 19
Cleaning the milling stones ............................................................................ 19
Smeared milling stones .................................................................................. 19
Cleaning the milling chamber ......................................................................... 19
Protection against moths and insects ............................................................ 20

3
Care and cleaning of the housing ................................................................... 20
Problems and solutions .................................................................................. 21
Warranty ......................................................................................................... 22
Terms of warranty .......................................................................................... 22
Proof of purchase must be provided for any warranty claim ........ 23
Warranty claims ............................................................................................. 23
Before you return the appliance .................................................................... 23
Shipping -Packing ............................................................................................ 23
Warrantor and warranty address ................................................................... 24
Technical Data MT 5........................................................................................ 25
Recipe - Bogenhofener whole wheat bread................................................... 26
Recipe - Spelt brioche .................................................................................... 26

4
Treat natural things naturally......
Dear customer,
We are very pleased that you have bought our grain mill MT 5 and trust that
you will thoroughly enjoy making a wide variety of healthy wholemeal foods.
Your grain mill is a top-quality household appliance that has been
manufactured according to our year long experience.
Please read these operating instructions carefully before you operating your
mill for the first time. Give particular consideration to our recommendations
on safety, quality of grains and the care of your mill and you will enjoy many
years of milling without the slightest problem.
Agrisan Naturprodukte GmbH
Christine Thurner
This mill is designed for the exclusive production of flour
and bran in the household.

5
Control elements of the electric grain mill MT 5
Lid
Hopper
Bayonet Lock
Marking for fine
adjustment Adjustment screw
Flour spout
On/off switch

6
Please read the operating and safety instruction car
efully before using the appliance for the first time
Before using your mill for the first time …
There has never been a „natural-talented “milling expert and so before you
begin the milling process, we wish to give you some information on the
natural stone –granite –which has been used in your mill.
Compared with millstones manufactured from artificial corundum
ceramic material, our natural stone is relatively smooth and reacts
sensitively to damp grain.
Damp grain could become contaminated with or already contain mildew.
Therefore it is essential to pay special attention to good and healthy storage
of your grain. Even long-time users of grain mills can sometimes find it
difficult to decide whether the grain is dry or damp!
Grain containing a high percentage of moisture has the tendency to
smear the millstones, which will cause the mill to stop. Please see the
chapter on operating instructions for further information.
In order to really get used to using your mill properly, we recommend you
to heat your grain in the oven at 50 degrees for about 30 minutes. Afterwards
allow to cool before use!
Following this advice before using your mill for the first time will show
you just how fine your mill can work under the best conditions.
It is, however, not necessary to heat your grain in the oven prior to each
milling process!!!

7
It is only an initial aid, at the same time giving an indication of the
best possible degree of flour fineness achievable.
You will get to know your mill best by adjusting the different fineness
settings. Start by using a coarse setting and then try out finer adjustment
settings.
Basic rules for more safety –important safety
instructions
Please read these operating and safety instructions carefully before
using your grain mill.
This will avoid errors and accidents and can secure the functional and
safe use of the appliance.
Please keep this user manual and should you hand the mill to an third party
ensure the next user has the manual.
When operating this grain mill the following precautionary and safety
measures must be applied:
Read all instructions carefully.
1. The appliance must only be used for its intended purpose
(household production of flour and bran)
2. The mill must only be operated indoors and never outside.
3. Before operating the appliance, it is essential to check its flawless
condition. Special attention must be paid to damaged cables, brittle
or cracked insulations or damaged housings. Should the mains cable
or other parts of the mill be damaged, repair work must be carried
out by the manufacturer, respectively authorized, qualified persons.
4. Repairs may only be carried out by persons authorized by Agrisan
GmbH.

8
5. Defective or deficient electrical appliances must not be operated.
6. The seller must immediately be informed of any defects.
7. Only connect the mill to a correctly installed protective mains
socket. Before doing so, please check that the voltage specified on
the nameplate on the grain mill matches the voltage of the energy
supply.
8. Multiple plugs and extension cables must not be overloaded.
9. The cable of the mill must not be allowed to hang over the edge
of the table or work surface. Any contact with hot plates or any
other sources of heat must be strictly avoided at all times.
surfaces must be avoided
10. Leads to electrical appliances must not be laid or squashed over
sharp edges or moveable parts
11. Appliances must only be operated with the intended switches.
12. Safety devices must not be modified or turned of
13. Should any disturbances occur immediately turn the appliance off
and disconnect the plug.
14. Do not disconnect the plug from the mains socket by pulling on
the cable.
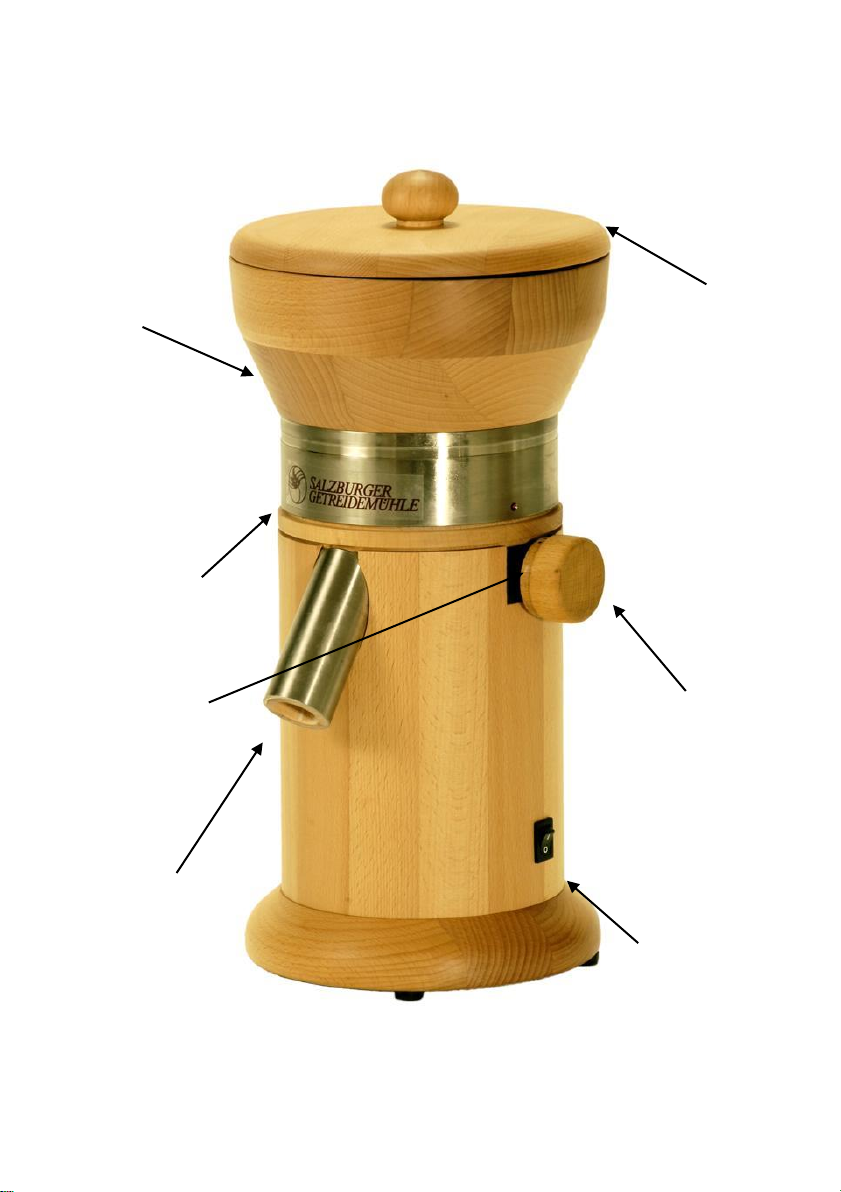
15. Only ever operate the mill on a flat, stable surface. The mill must
be positioned so that slipping of the mill itself or the flour
container during the milling process cannot occur. It is best to
place the mill on a firm surface, (such as a kitchen worktop). This
will ensure that the ventilation slots on the underside of the mill,
which serve to ventilate the motor, remain free.
16. Strict monitoring of the appliance is essential when being used by
children.
17. Strict monitoring of the appliance is essential when being used in
the vicinity of children.
18. Never operate the mill unless under supervision.
19. Always keep the mill out of the reach of children
20. The appliance must not be operated by persons with either

9
physical or mental handicaps or those who do not have sufficient
knowledge of the safe operation of the appliance. The exception
to such operation of the appliance is when used under
supervision of persons responsible for the safety of any
handicapped persons
21. Never immerse the mill or parts of the same into water or other
liquids. Never connect a wet plug to the mains socket or touch it if
your hands are wet.
22. Any screw fittings which require a screw driver to open must not
be opened.
23. Industrial motors can be damaged by longer periods of idle
running. After Use, please always turn the motor off immediately.
Intended use:
Our mill MT 5 is designed and constructed for domestic use. The
appliance is intended for the milling of such grain types as listed in the
owner's manual.
Short Guide:
1. Connect the plug to the mains socket
2. Place a suitable container under the flour spout
3. Switch the motor on
4. Roughly adjust the degree of fineness setting
5. Add the grain
6. Re-adjust the desired degree of fineness setting.
7. At the end of the flour production turn the motor off
Suitable Site
The Salzburger grain mill is made of high quality solid beech (oak or nut)
wood.

10
Wood is a natural product, which during its whole lifetime, is continually
subjected to influences of the environment.
Change of climate and temperature can cause small cracks in the housing
of the mill. However, such cracks will have no effect whatsoever on the
mill’s functioning.
Place your mill in a dry place and protect it from any direct
source of heat.
Avoid the vicinity of radiators and direct sunlight. At the same time steam
and dampness should be avoided (too high humidity) should be avoided.
GRAIN TYPE/CORN TYPE
Please make sure to use only dry and cleaned grain!
Moist grain will smear the millstone.
(Please see the chapter on smeared millstones).
Poorly cleaned grain can include dirt or foreign particles (e.g. small stones
etc.), which can damage the millstones.
Mill to the desired degree of fineness in one process (except when
processing large, hard kernels such as corn).
A second re-milling can result in the grain input funnel becoming
blocked and will not give satisfactory milling results. The Salzburger Grain Mill
will give you powder fine and flaky flour in one milling process.

11
Storage of the grain indoors with up to 60% humidity, allows a
problem-free processing. Storage at humidity levels over 60 % can
result in smearing of the millstones during fine processing.
Especially during wet or damp wet conditions store smaller quantities of
grain in an air-permeable bag (linen, etc.) near a source of heat.
The following test will show you yourself just how dry your
grain is:
Dry grain "cracks", if you crush it on a hard surface with a spoon.
Damp grain can be flattened like an oatmeal flake. If you cut dry
grain kernels with a sharp knife the pieces will “fly” apart. Cutting
damp grain kernels is like cutting bread. Rye should be stored for at least 6
months after the harvest.
Correct storage of grain
Since biblical times it has been a known fact, that grain can be stored.
This is best done under the following conditions: Humidity under 14 %,
temperature under 20 % (the most favourable temperatures are between
5-8 °C).
Once you have bought your grain it does not necessarily keep the same
degree of dryness (as it had at the time of purchase).
Grain can absorb moisture after a short time, does however, also emit the
same. Grain breathes –that means there is a re-distribution of moisture in
the grain kernels which leads to loss of moisture –the grain can, therefore
also begin to “sweat”.
A continual check on the humidity and the temperature is, therefore,
necessary.

12
When purchasing grain, it should be dry, cleaned and well packed. Provided
the grain has been stored in rooms with a humidity of up to 60 %, processing
will not be a problem.
A humidity level of over 60 % can cause the millstones to become
smeared, when using a fine adjustment setting.
Careful storage is especially necessary during the damp seasons.
We therefore recommend purchasing only small quantities at once and to
store them near a source of warmth.
Drying Grain:
Place damp grain into the oven for about 30 minutes at 50° - leave it to cool
afterwards.

13
Suitable Grain Types
Grain type
Adjustment
Remarks
Wheat, spelt, buckwheat,
rye, rice,
barley, millet
green spelt
Any degree of fineness
Rye has higher oil content and can
therefore not be processed so finely
as e.g. spelt or wheat.
Corn and soy beans
Adjust the mill to a
somewhat coarser setting
Use sweet corn kernels and not
popcorn. As there are many different
types of corn please try the different
sorts until you have the result you
want. You can either process corn and
soy beans to the fineness you want or
you can grind them first and then
process the grits to a finer degree
Oats
(Coarser Setting)
Only grind
Linseed, all spices such as
cumin, coriander cloves,
anise, fennel and cinnamon
Mix small amounts to
other grain kernels.
Eventually process a little
coarser
After milling eventually clean the
milling chamber and the flour spout
General Rule:
Flour has double the volume of corn. Using the on/off switch you
can stop the milling process at any time and then re-start the
process.

14
Milling
Mill to the desired degree of fineness in one process (except when
processing large, hard kernels such as corn).
A second re-milling can result in the grain input funnel becoming
blocked and will not give satisfactory milling results.
The Salzburger Grain Mill will give you powder fine and flaky flour in one milli
ng process.
During the milling process the flexibly mounted milling stones will be pressed
slightly apart and will therefore run both quietly and smoothly.
Never let the mill run in idle mode.
Correct Milling:
Place a suitably large container under the flour spout.
Turn the mill on –you will hear the noise of the motor.
Turn the adjustment knob until you hear the slight sound of the stones
grinding against each other.
Loosen the thread a little coarser –so that the stones no longer grind against
each other.
Fill the desired amount of grain into the hopper.
Now correct the degree of fineness of the grain - either coarser in the anti-
clockwise direction - or finer in the clockwise direction.
General Rule: Flour has double the content compared with corn. You
can stop the milling process at any time by using the on-off switch
and then restarting the process.

15
Operating time up to 15 minutes
Your mill has been designed for processing household quantities. Should you
occasionally require an unusual amount of flour that is no problem!
However, the mill may turn itself off during the milling process. There is no
need to worry; the mill has not been damaged! Leave it to cool off for about
1 hour.
Adjusting the degree of fineness
For fixing the milling setting there is an adjustment screw on the right
hand side of the mill. By turning this screw the degree of fineness can
be re-adjusted at any time during the milling process.
Re-Adjustment of the degree of fineness:
Wheat and spelt can be processed to the finest degree. Rye has higher oil
content and has to be processed more coarsely. Oats which are extremely
oily can only be ground. At the same time the degree of dampness or dryness
of the grain is of the utmost importance for the processing results achieved.
The drier the grain and the lower its oil content, the finer you can
produce your flour.
The higher the oil content and the degree of dampness of the grain,
the coarser you will have to mill.
For these reasons it is impossible to supply the mill with a scale suitable
and valid for all types of grain and all the different degrees of dampness,
allowing repeatable results.
Only watching the flour spout and touching the flour will give you reliable
information as to whether you are using the correct adjustment setting, or
whether it has to be altered.

16
At a standstill:
Provided there are no grain kernels between the millstones, any adjustment can
be carried out –even when the mill is at a standstill. With the mill turned on fill
the grain into the hopper.
When the mill is switched off and with a full hopper no finer re-adjustment
should be carried out. The grain, which has not yet been processed and is still
between the millstones, will become wedged. This can cause problems when re-
starting the mill.
During the milling process:
During the milling process re-adjustment from fine to coarse and vice versa
is possible. Re-set from coarse to fine “slowly” in order to give the mill time
to process the grain which is between the stones. If you do the re-
adjustment too quickly the stones could become blocked.
Coarse Setting
The coarsest setting for producing grits is set by turning the adjustment screw
from fine to coarse by giving about 1 turn in the anti-clockwise direction. You
can open the milling stones so far that the corn will come out of the funnel
again.
Continual re-adjustment is possible between these two steps.

17
Normal setting –suitable for bread making
For baking bread, we recommend that you do not choose a too fine setting. The
flour should feel slightly gritty / sandy.
Should you be processing flour for baking bread –an old baker’s
rule can be recommended:
“Mill as coarse as possible and only so fine as necessary”
Finest setting
In order to produce the finest possible flour, you can turn the adjustment
screw in the clockwise direction to the right –watch the flour spout. As long
as there is a continual production of flour, the setting is suitable for the grain
and its degree of dryness. Should no flour come out of the spout
immediately adjust to a coarser setting.
The drier the grain, the finer it can be processed, the lower the temperature
during the milling process the better the better the milling performance of
the grain mill
A change in the degree of fineness of the flour during the milling
process can occur when milling for longer periods of time.
When requiring larger amounts, it is advisable to supervise the mill and if
necessary to correct the fine setting.

18
Interrupting the milling process:
When the hopper is full of very hard kernels like corn, rice or winter wheat, it can
prevent the motor from starting in the finest setting. Should the motor be blocked
turn the adjustment screw to a coarser setting until the motor starts to turn and re-
adjust in the clockwise direction to the desired finer setting.
When milling very hard grain or corn do not interrupt the milling process!
Opening the milling chamber:
Caution: Always disconnect the mill ‘s power cord from the electrical outlet
before opening the milling chamber! Danger of injury!
The upper part of the mill is attached to the motor block by means of a bayonet
connection. The two fixing screws are on the left hand and right hand side on the
motor plate.
In order to open the milling chamber, hold the appliance by its lower
part and turn the funnel approx. 2 cm in the anti-clockwise
direction.
If necessary slight, millimetre wise movements to the left and right
can be applied.
Closing the milling chamber:
Please clean the milling chamber and the support plate from any eventual flour
residue before replacing the funnel (use a brush to do so). Take care that the
milling stones are positioned at the coarsest setting.
Place the hopper in a straight position onto fixing screws on the bottom part of the
mill so that there is no free space between the two parts. Turn the funnel approx.
2 cm in the clockwise direction until you can feel a clear resistance.
The two red marking points on the upper part of the mill and the motor block
should now be positioned exactly over each other. This will enable you to control
whether the appliance has been closed correctly.

19
Care and Cleaning
In order to maintain the functioning of your mill no special care or maintenance
is needed for operation of the mill.
Cleaning of the millstones:
No not apply water or other fluids to clean the millstones!
If you operate your mill regularly cleaning the millstones is not necessary.
Milling of a handful of rice will clean the millstones even removing residue
from oily grain types or spices, etc.
Smeared millstones
If the grain is not dry enough for the fineness chosen, the millstones may
Dry grain "cracks", if you crush it on a hard surface with a spoon. Damp
grain can be flattened like an oatmeal flake. If you cut dry grain kernels
with a sharp knife the pieces will “fly” apart. Cutting damp grain kernels is
like cutting bread. Rye should be stored for at least 6 months after the
harvest.
Cleaning the milling chamber:
Due to functional reasons, when producing fine products, a small residue of
flour will remain in the milling chamber. This small residue will be removed if
after your milling process you let the mill run at the coarsest setting.
Should you be intending not to use your mill over a period of several weeks,
thorough cleaning of the milling chamber is recommended –this especially
for hygienic reasons. First mill a handful of either rice or grain using a coarse
setting. Open the mill and with a vacuum cleaner remove all residue wheat
from the milling chamber.

20
Important! Never leave the mill open in parts (hopper and motor part
separate), but leave the whole mill ready for service. You will thus avoid any
possible deformation of the wooden parts due to humidity.
Against moths and insects:
Place a tea bag (herbal) in the flour spout. Put bay leaves in the upper and
lower parts of the mill.
Moths love dark conditions, where they can survive in peace and quiet!
They eat only flour and no wood. Provided your mill is frequently used, you
will not be offering moths a comfortable place to stay.
Care and cleaning of the housing:
The housings of our Salzburger grain mills are made from solid (beech, nut or
oak) wood, which has been treated with special organic oil-beeswax varnish.
No special maintenance is required.
Please use a damp cloth to remove dust from exterior surfaces. Do not use
water or other detergents for “cleaning”. Stains or small scratches can be
removed with fine-grained sand paper. Finally treat the wood with a natural
protective.
Table of contents
Other SALZBURGER GETREIDEMÜHLE Kitchen Appliance manuals