Salzburger Getreidemühlen MT 18 D User manual

SALZBURG
GRAIN MILL
MT
18
D
Instruction manual
Please read the operating instructions and safety instructions
carefully before using the device for the first time!

2
Content
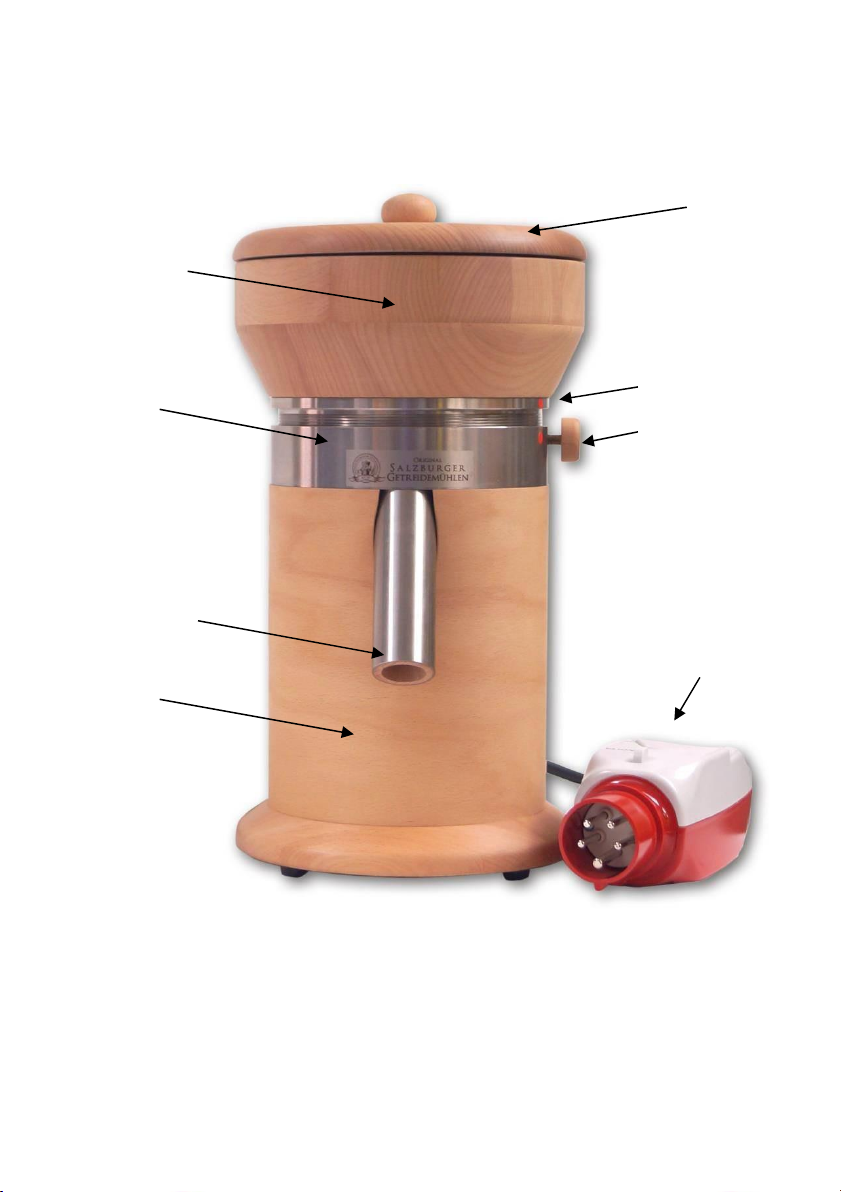
Operating elements of the MT 18 D electric grain mill.......................................5
Important information on the operation of the MT 18D mill.............................5
Before you grind for the first time ....................................................................7
Basic rules for more safety ...............................................................................8
Intended use........................................................................................................... 9
Quick guide.....................................................................................................10
Suitable location.............................................................................................10
The regrind.....................................................................................................11
Use only cleaned, dried grain!.............................................................................. 11
Check the dryness of your grain as follows. ......................................................... 11
Suitable seeds ................................................................................................12
Store grain properly.............................................................................................. 13
Grain drying.......................................................................................................... 13
Grinding process.............................................................................................14
How to grind correctly.......................................................................................... 14
Setting the fineness.............................................................................................. 15
Operation of the fixing screw ............................................................................... 15
Change in the degree of fineness ......................................................................... 16
Interrupting the grinding process......................................................................... 17
Opening the grinding chamber............................................................................. 17
Closing the grinding chamber............................................................................... 17
Care and cleaning ...........................................................................................18
Cleaning the grinding stones ................................................................................ 18
Smudged grinding stones ..................................................................................... 18
Cleaning the grinding chamber............................................................................. 18
Against moths and insects.................................................................................... 19
Cleaning the thread.............................................................................................. 19

3
Cleaning and care of the housing......................................................................... 19
Problem solving ..............................................................................................20
If all this does not help ......................................................................................... 21
Warranty............................................................................................................... 22
Warranty conditions ............................................................................................. 22
Warranty processing............................................................................................. 23
Before returning the device ................................................................................. 23
Shipping - Packing................................................................................................. 23
Warrantor and warranty address....................................................................24
Technical data: MT 18 D .................................................................................25
Recipes...........................................................................................................26

4
For the love of nature...
Dear Customer,
We are pleased that you have decided to purchase the Salzburger Grain Mill MT
18 D and would like to wish you a healthy success with your wholefood dishes in
advance. With your grain mill, you have purchased a high-quality device that
has been built according to our decades of experience.
Please read these operating instructions carefully before operating the device.
Pay particular attention to our tips on the subject of safety, ground material and
care of the mill and we guarantee you many years of unadulterated grinding
pleasure.
Agrisan Natural Products Ltd.
Christine Thurner
Management

5
Operating elements of the MT 18 D electric grain mill
Cover
Filling funnel
Thread
Marking for
grinding
degree -
adjustment
Fixing screw
Flour ejection
Housing
380V / 16A
mains
connection
cable, on-off
switch
Please read the operating instructions and safety
instructions carefully before commissioning the device.

6
Important information on the operation of
the MT 18D mill
Controls:
Instead of the on/off switch, the MT 18 D mill has a motor protection switch with
380-volt connection with 16-amp CEE plug. The switch is located on the plug.
IMPORTANT NOTICE:
When using the mill for the first time, the DIRECTION of the lower millstone must
be checked.
To do this, remove the hopper, turn on the mill and check that the lower stone
rotates clockwise (to the right).
If this is not the case, an authorized electrician must correct the rotating field of
the connection (socket).
If you have any questions, please call us: +43 (0)6245 -83282
Operating time:
We cannot precisely determine the maximum operating time of the motor, as
this depends on various factors:
From the fineness of the desired flour: The finer - the less ejection. Moist grain
generates condensate in the milling chamber and can lead to clumping of the flour.
This can lead to a high degree of heating and thus clog the discharge.
The hardness of the grain: (corn or kamut, for example, is much harder than
wheat or spelt) also affects the heating of the flour at the outlet and can clog it.
Conclusion: Dry, healthy, stored grain allows the milling of the finest flour with
the least possible heating.
Please always follow the instructions in the manual. Never
operate the mill without supervision!!!

7
Before you grind the first time ...
No miller has yet fallen from the sky! Before you start grinding, we would like to
give you some hints about the natural stone - granite installed in your mill.
Our natural stone, unlike artificial grinding stones made of corundum ceramic, is
relatively smooth and sensitive to wet grain.
Moist grain could be or become infested with mold. Therefore, make sure that
the grain is stored in a good and healthy way. It is not so easy to distinguish
moist and dry grain even for long-time users of grain mills.
If the grain has too high a moisture content, the millstones will smear and the
mill will stop. More info about this in this operating manual.
To really get to know your mill, we recommend that for your first grinding
attempt, you place the grain in the oven at 50 degrees for 30 minutes and then
let it cool.
If you proceed in this way, you will see how finely your mill can grind under the
best conditions during your first grinding operation.
However, it is not necessary to carry out the drying in the oven before each
grinding process!!!
This is only a starting aid and at the same time an indication of the best possible
flour fineness as well as a way to dry moist grain.
You will become most familiar with your new mill by making a wide variety of
fineness settings.
Grind coarsely at first and slowly, little by little, make finer adjustments.

8
Basic rules for more safety
Important safety instructions
Please read these operating instructions and safety instructions carefully before
operating your grain mill.
This will help you avoid mistakes and accidents, and you will use the device safely
and functionally.
Please keep the instruction manual and pass it on to any user of the product after
you.
When using this grain mill, the following precautions and
safety instructions must be observed:
1.
Read all instructions carefully.
2.
The equipment may only be used for its intended purpose (production of
flour and meal).
3.
The device must not be used outdoors.
4.
Before putting the device into operation, it is important to make sure that the
device is in perfect condition and to check for defective cables, brittle
insulation, damaged housing. If the power cord or other components of the
mill are damaged, it must be replaced by the manufacturer or a qualified
person authorized to do so.
5.
Repairs may only be carried out by persons authorized by Agrisan GmbH.
6.
Defective or defective electrical equipment must not be put into operation.
7.
Report defects to the seller immediately.
8.
Connect your mill only to a properly installed power outlet. Please check that
the voltage indicated on the nameplate of the grain mill corresponds to that of
the mains supply.
9.
Sockets and extension cords must not be overloaded.
10.
The cable of the mill must not hang over an edge from the table or
work surface. Contact with stove tops or other hot surfaces must be
strictly avoided.
11.
Do not lay or crush supply lines to electrical devices over sharp edges,
corners and moving parts.
12.
Operate equipment only with the designated switch.

9
13.
The safety devices must not be changed or switched off.
14.
Immediately switch off the device if malfunctions occur and pull out the plug.
15.
Do not pull the plug out of the socket by the supply cable.
16.
Always use the mill only on a level, stable surface. The mill must be set up in
such a way that it is impossible for the mill itself and the collecting container
for the ground material to slip off during the grinding process. It is best to
place the mill on a hard surface, such as kitchen countertop. This will ensure
that the ventilation slots on the underside of the unit, which are used to
ventilate the motor, are unobstructed.
17.
The device may only be operated by children under strict supervision.
18.
Strict supervision of the device is also required when the mill is used near
children.
19.
Keep the device out of the reach of children.
20.
The device must not be operated by persons who are physically or mentally
impaired or who do not have the experience or knowledge required to operate
the device properly. The exception is persons who are supervised by a person
responsible for their safety.
21.
Do not place the device or parts of the device in water or other liquids.
Never insert a wet plug into a socket or touch it with wet hands.
22.
Screw connections of the device that can only be opened with a tool must
not be opened
23.
Industrial motors can be damaged by prolonged idling. Therefore, please
switch off the mill immediately after use.
Intended use
The MT 18 D mill is designed and constructed for commercial use. The device is
designed for grinding the types of grain listed in the operating instructions and
similar.
You can find more information on our website
www.getreidemuehle.com under "Mill comparison".

10
Quick guide
1. Insert the mains plug into the socket
2. Place suitable drip tray under flour outlet
3. Turn the thread clockwise until you feel clear resistance
4. Now turn a little counterclockwise until the two red dots are on top
of each other.
5. Switch on motor
6. Fill grain
7. Readjust the desired degree of fineness
8. Switch off the motor after grinding
Suitable location
The Salzburg grain mill is made of high quality beech wood. Wood is a living
material and reacts constantly and throughout its life to environmental
influences. Climate and temperature fluctuations can lead to small cracks in the
housing. This does not affect the function of your mill in any way.
Place your mill in a dry place and protect the device from direct heat source. Avoid
the vicinity of radiators and direct sunlight. Water vapor and humidity (too high
humidity) should also be avoided.

11
The ground material
Use only cleaned, dried grain!
Damp grain smears the millstones! See section "Smudged grinding stones".
Poorly cleaned grain may contain foreign bodies (especially small stones, etc.),
which may damage the grinding stones.
Grind the desired fineness in one pass.
Fine milling twice clogs the grain inlet and does not bring the desired
success. The Salzburg Grain Mill already grinds powder-fine and flaky
flour in one pass.
If the grain is stored in rooms with up to 60% humidity, it can be
processed without any problems. Above 60% humidity can already lead
to smearing of the millstones during fine grinding. Storage
They quite especially during the wet seasons smaller quantities of grain in an
air-permeable bag (linen, etc.) near a heat source.
Check the dryness of your grain as follows:
Dry cereals "crack" when you crush them with a spoon on a hard
surface. Moist grain can be flattened like an oat flake. When you
cut dry grain with a sharp knife, the pieces "pop" apart.
Moist grain can be cut like bread. Rye should be stored for at least 6 months after
harvest.

12
Suitable seeds:
Seeds
Setting
Note
Wheat, spelt,
buckwheat, rice,
rye, barley, millet,
green spelt ...
Any degree of
fineness.
Rye is somewhat more oily and
therefore cannot be ground as
finely as spelt and wheat, for
example.
Corn and soybeans
Can be ground.
To do this, set the
grind a little
coarser.
Use food corn, not popcorn corn.
Since there are many different
types of corn, please try how best
to achieve the desired result. Also
grind larger and harder kernels
immediately to the desired
fineness!
Oats
(coarse
adjustment)
Only grind (for e.g. muesli)
Flaxseed, all spices
such as caraway,
coriander, cloves,
anise, fennel and
cinnamon
Mix small
quantities with
cereals,
grinding a little
coarser if
necessary.
After grinding, clean the grinding
chamber and the discharge tube.

13
Store grain properly
Since biblical times, it has been known that grain is shelf-stable. This is best
given under the following conditions: Humidity below 14%, temperature below
20 °C (temperatures of 5-8 °C are most favorable).
If you bought grain, it does not mean that the dryness, which was given when
you bought the grain, remains.
Grain absorbs moisture in a short time, but also releases it again. Grain breathes -
i.e., moisture redistribution takes place in the grain kernel and, to some extent,
water leakage also occurs - the grain can therefore also
"sweat."
Constant control of humidity and temperature is therefore necessary.
When you buy grain, it should be dry, cleaned and well packed. If the grain is
stored in rooms with up to 60% humidity, it can be processed without any
problems.
More than 60% humidity can lead to smearing of the grinding stones during fine
grinding.
Therefore, pay special attention to storage during the wet seasons. We
recommend to store smaller quantities and this near a heat source.
Drying grain
Put moist cereal in the oven for about 30 min at about 40 degrees - then let
cool.

14
Grinding process
Grind the desired fineness in one pass. Grinding twice clogs the grain
feed and does not bring the desired success!
The Salzburg Grain Mill grinds powder-fine and flaky flour in just one pass.
If there is no grain between the stones, the stones may touch each other at fine
setting.
Therefore, please do not let the mill run in idle mode!
How to grind correctly
1. Place an appropriately sized collecting vessel under the flour outlet.
2. Tighten the thread until you feel significant resistance.
3. Now turn in the direction of coarser (counterclockwise) until the two
red dots on the right side are on top of each other.
4. Turn on the mill - you will hear the motor noise.
5. Fix the thread with the clamping screw or hold the funnel firmly with
one hand. (This is necessary, as otherwise the thread will
automatically close and may jam.
6. Fill the required amount of grain into the hopper.
7. Now correct the fineness of the flour - either coarser counterclockwise
- or finer clockwise.
8. When the desired fineness is reached, fix the thread with the clamping
screw. The mill now operates automatically.
There is no scale on your grinder to give an indication of coarser and finer
settings.
It is impossible to apply a scale that is valid for all types of grain and for
the most diverse degrees of grain moisture.
Wheat and spelt can be ground the finest. Rye is more oily and
must be ground coarser.
The very oily oats can only be milled. In addition, the dryness or moisture of the
grain is of great importance for fine milling results.
The drier and the less oily the grain, the finer you can grind.
The more oily and the moister the grain is, the coarser you need to grind.

15
Only looking at the flour outlet and reaching into the flour will really tell you if you
are grinding at the correct fineness or need to make a correction.
An old baker's rule says:
Grind as coarse as possible and as fine as necessary!
Operating time:
Your mill can grind continuously for several hours. However, the flour can heat up
considerably (especially with hard grain types) due to a long milling time. It is
therefore advisable to check the temperature and let the grinder cool down in
between.
Setting the degree of fineness
The Salzburger grain mill is infinitely adjustable by turning the feed hopper and
can be easily adjusted during grinding. For fixing the grinding setting, the fixing
screw is located on the right side.
Operation of the fixing screw
Turn the locking screw carefully and with feeling into the thread.
Do not use force under any circumstances. You will notice that the
thread locks after only a few turns and that the funnel can no longer
be moved.
If you turn the locking screw too tightly into the thread, the locking screw or the
grinding chamber may be damaged
Tightly screwing in the clamping screw is NOT required.
The thread must not move independently during grinding. If the
thread moves (correct the position of the thread) and turn the locking
screw a little tighter.
Damage to the thread due to incorrect operation of the locking screw could
result in a time-consuming and costly repair that is not covered by warranty.

16
Change of the degree of fineness
At a standstill:
If there is grain between the grinding stones or in the hopper, no adjustment
should be made.
The grain, which is still unground between the grinding stones, is jammed. This
could cause the mill to have difficulty restarting when it is switched on again.
During the meal:
You can change from fine to coarse and vice versa during grinding. Turn
slowly from coarse to fine to allow the mill to grind the grain between the
stones. If you turn from coarse to fine too quickly, the stones could jam.
Coarse adjustment
The coarsest setting for grist can be achieved by turning the feed funnel
approx. 1 turn counterclockwise. (Do not open further than 1 turn during
milling, otherwise the seal will become ineffective) Simply observe the outlet
to see if the flour is coarse enough.
Normal setting
At this setting, the red dots on the threaded part and the funnel coincide. The
flour fineness achievable in this setting is sufficient for many baked goods and
takes into account a normal moisture content of the grain.
Finest setting
To obtain very fine flour, you may go below the normal setting.
To do this, turn the funnel clockwise during grinding.
Pay attention to the flour outlet!
IMPORTANT: When no more flour comes out of the outlet, the stones rub against
each other. This must be avoided at all costs!

17
Even if a slight grinding noise of the millstones can be heard, you have
closed the funnel too far. Immediately turn the funnel coarser -
counterclockwise. Fasten the fixing screw again.
The drier the grain, the finer it can be ground, the lower the flour
temperature and the better the grinding performance of the grain mill.
During grinding, the elastically mounted millstones are pressed apart
slightly and run without contact.
Please note that the setting points "red dot above red dot" will shift
towards "fine" over time due to wear of the millstones.
Interrupting the grinding process
Very hard grain such as corn, rice, or durum wheat can prevent the motor from
starting when the hopper is full.
If the motor does jam, please turn the hopper toward coarser until the unit
begins to grind and then readjust clockwise to the desired fineness.
If possible, do not interrupt the milling process for hard grain types!
Opening the grinding chamber
Never open the grinder without first disconnecting the power plug,
there is a risk of injury! Loosen the fixing screw and turn the funnel
counterclockwise until it can be lifted off the lower part. Please clean
the thread before
Reattach the funnel. The thread is easily adjusted and must not be oiled. Oil
and flour will cause the thread to stick.
Closing the grinding chamber
Place the funnel straight on the lower part and turn until the thread starts to
grip. After putting the funnel back on, find the normal setting by turning the
funnel clockwise as far as it will go in the "fine" direction. Then open the funnel
(counterclockwise) until the two red dots are on top of each other. This is then a
fine bread setting.

18
If you have ground hard grains such as corn or moist grain, moisture
condensation may have collected in the mill.
In this case, leave the mill with the grinding chamber open for about 2 hours to
allow the moisture to dry.
Care and cleaning
To maintain the technical functionality of your mill, no great effort is required
in terms of care and maintenance. All you need to do is make sure that the
thread is clean.
Cleaning the grinding stones
Do not use any liquids!
If you use your grain mill regularly, cleaning the millstones is not necessary. By
grinding a handful of rice, you also clean the millstones from any residues of oil-
containing seeds, spices, etc.
Smudged grinding stones
If your grain was not dry enough for the selected fineness, the grinding stones
may smear. This creates a hard, smooth layer on the outer edge. To clean the
millstones, it is usually sufficient to grind 1 - 2 handfuls of rice on the coarse
setting.
Adhesions are thus well loosened. If necessary, scrape off the coating and
clean the grooves of the stones. If necessary, clean the discharge tube of flour
residues with a bristle brush or vacuum cleaner.
Cleaning the grinding chamber
Due to the function, some flour remains in the grinding chamber during fine
grinding. This small residue is almost completely wiped out if you allow the mill
to run briefly after the grinding process has been completed.
If you do not use your mill for several weeks, a thorough cleaning of the grinding
chamber is necessary for hygienic reasons.
recommended. First grind "coarsely" with a handful of rice or grain, open the
mill and use a vacuum cleaner to suck the flour residues out of the grinding
chamber.

19
Against moths and insects
Insert a tea bag (herbs) into the flour outlet. Put bay leaves into the grinding
chamber.
Moths love darkness and quiet and eat only flour, not wood. If you use your mill
constantly, moths will not find a cozy place to stay.
Cleaning the thread
Clean the thread of flour residues using a small brush or paintbrush and a
vacuum cleaner. Flour residues can impair the functionality of the thread.
Regular cleaning is therefore advisable. The thread is set to run smoothly and
must not be oiled. Oil and flour will cause the thread to stick.
Cleaning and care of the housing
The housing of the Salzburg grain mills is made of solid wood (beech, walnut or
oak) and treated with natural beeswax oil on the outside. It does not require
any special care.
Wiping with a dry, at most slightly damp cloth is enough. Under no
circumstances "wash off" with water or other liquids.
You can remove stains or small scratches with a very fine sandpaper. Then
treat the case again with a natural protective agent.

20
Problem solving
Problem
Cause
Solution
Motor blocked,
device can no
longer be
switched on.
Mill was adjusted from
"coarse" to "fine" at
standstill while whole
grains were still between
the grinding surfaces.
Set coarser, switch on and only
then slowly set finer again.
Grain is too moist.
Grain please dry.
Grain was ground too fine.
Set the unit to a coarser setting
- especially for oily cereals such
as rye.
Thread was tightened too
tightly.
Set basic setting (red dot on red
dot)
Especially small grains
such as quinoa were
ground.
Let especially small grain trickle
slowly into the funnel by hand.
The device has
switched itself
off. (Switching
off after approx.
25 min. is a
normal device
protection!)
The device has been
overloaded. Operating
time has been exceeded or
the motor has been
blocked by overload.
Turn off and allow to cool for
at least two hours.
Flour outlet is clogged -
thus also the grinding
chamber.
Uncover the flour outlet and
grinding chamber. Switch off
and allow to cool for at least
two hours.
Flour backlog due
to collecting vessel.
Empty the collecting vessel.
Switch off and allow to cool for
at least two hours.
Grain too moist or too oily.
Please dry and/or coarsely
grind moist grain. Grain
containing oil smears very
easily - grind coarser.
Table of contents
Other Salzburger Getreidemühlen Kitchen Appliance manuals