Samsung UW-17J11VD User manual

3WAY COMBINATION
TELEVISION
Owner’s Instructions
Before operating the unit,
please read this manual thoroughly,
and retain it for future reference.
REMOTE CONTROL
ON-SCREEN MENUS
VCR / DVD / VCD / CD / MP3 PLAYER
TELETEXT FUNCTION (depending on the model)
C18A_ENG_europe_17"_film 10/10/03 4:11 PM Page 1

2
ENG
Safety Instructions
◆Do not expose the television to extreme temperature conditions or to extreme humidity conditions.
◆Do not expose the television to direct sunlight and other sources of heat.
◆Do not expose the television to any liquids.
◆Never put objects of any kind into the television, and do not place a water-containing vessel on the
television.
◆During a storm conditions (especially when there is lightning) unplug the television from the mains
socket and aerial.
◆Do not step on or twist the power cord.
◆Do not overload wall outlets or extension cords as this can result in a risk of fire or electric shock.
◆Please use a soft and dry cloth (not containing volatile matter) when you clean the TV.
◆If the television is broken, do not try to repair it yourself. Contact qualified service personnel.
◆If the remote control is not used for a long period of time, remove the batteries and store it in a
cool, dry place.
◆Do not drop the remote control.
☛Displaying any stationary images that exceed the long time, it can cause uneven aging of
picture tubes (CRTs) that leave subtle, but permanent burned-in ghost images in the
television picture. To avoid this, vary the programming and images, and primarily display full
screen moving images, not stationary patterns or dark bars.
This device is not for use in industrial environments.
C18A_ENG_europe_17"_film 10/10/03 4:11 PM Page 2

3
ENG
Caution
WARNING: TO PREVENT DAMAGE WHICH MAY RESULT
IN FIRE OR SHOCK HAZARD. DO NOT EXPOSE THIS
APPLIANCE TO RAIN OR MOISTURE.
CAUTION: TO PREVENT ELECTRICAL SHOCK,
DO NOT REMOVE REAR COVER, NO USER
SERVICEABLE PARTS INSIDE. REFER SERVICING TO
QUALIFIED SERVICE PERSONNEL.
RISK OF ELECTRIC SHOCK
DO NOT OPEN
CAUTION
The lightning flash and arrow head
within the triangle is a warning sign
alerting you of “dangerous voltage”
inside the product.
The exclamation point within the
triangle is a warning sign alerting
you of important instructions
accompanying the product.
☛The main voltage is indicated on the
rear of the TV set and the frequency is
50 or 60Hz.
☛EUROPEAN NOTICE
Products with the CE marking comply with the EMC Directive
(89/336/EEC), (92/31/EEC), (93/68/EEC) and the Low Voltage
Directive (73/23/EEC) issued by the Commission of the
European Community. Compliance with these directives
implies conformity to the following European Norms:
■EN55013:1990+A12:1994+A13:1996+A14:1999
Radio Frequency Interference
■EN55020:1994+A11:1996+A12/A13/A14:1999
Electromagnetic Immunity
■EN61000-3-2:1995+A1/A2:1998
Power Line Harmonics
■EN61000-3-3:1995
Voltage Fluctuations
■EN60065:1998
Product Safety
C18A_ENG_europe_17"_film 10/10/03 4:11 PM Page 3

4
ENG
Contents (continued)
◆FOREWORD
■Safety Instructions......................................................................................... 2
■Caution .......................................................................................................... 3
◆CONNECTING AND PREPARING YOUR TELEVISION
■View of Your Television ................................................................................. 6~7
■Infrared Remote Control (Television and Teletext Functions) ....................... 8
■Infrared Remote Control (VCR and DVD Functions)..................................... 9
■Inserting the Batteries in the Remote Control................................................ 10
■Connecting to an Aerial or Cable Television Network ................................... 10
■Switching Your Television On and Off........................................................... 11
■Placing Your Television in Standby Mode..................................................... 11
■Automatic Degaussing to Remove Colour Patches....................................... 12
■Becoming Familiar with the Remote Control ................................................. 13
■Plug and Play Feature................................................................................... 14~15
■Choosing Your Language.............................................................................. 15
◆SETTING THE CHANNELS
■Storing Channels Automatically..................................................................... 16
■Storing Channels Manually............................................................................ 17~18
■Assigning Names to Channels ...................................................................... 19
■Skipping Unwanted Channels ....................................................................... 20
■Fine Tuning Channel Reception.................................................................... 21
■Sorting the Stored Channels ......................................................................... 22
■Activating the Child Lock ............................................................................... 23
■Displaying Information ................................................................................... 24
◆USING YOUR TELEVISION
■Changing the Picture Standard ..................................................................... 24
■Adjusting the Picture Settings........................................................................ 25
■Selecting the Picture Size (depending on the model).................................... 26
■Activating/Deactivating the Digital Noise Reduction Feature ........................ 27
■Using the Tilt Control Feature........................................................................ 27
■Viewing Pictures From External Sources ...................................................... 28
■Setting the Blue Screen................................................................................. 28
■Changing the Sound Standard ...................................................................... 29
■Adjusting the Sound Settings ........................................................................ 29
■Extra Sound Settings..................................................................................... 30
-
Auto Volume
-
Melody
-
Pseudo Stereo / Virtual Surround
-
Turbo Sound
■Selecting the Sound Mode (depending on the model) .................................. 31
■Setting the Current Date and Time................................................................ 32
■Switching the Television On and Off Automatically ....................................... 33
■Setting the Sleep Timer ................................................................................. 34
■Locking the Front Panel................................................................................. 34
◆USING THE VCR FUNCTION (continued)
■Cassette Types and Recording Speeds (Option).......................................... 35
■Protecting a Recorded Cassette.................................................................... 35
■Repeating Playback of a Sequence or Cassette........................................... 36
☛➢
Press Important Note
Symbols
C18A_ENG_europe_17"_film 10/10/03 4:11 PM Page 4

5
ENG
Contents
◆USING THE VCR FUNCTION
■Adjusting the Picture Contours ...................................................................... 37
■Selecting the Type of Cassette Tape ............................................................ 37
■Selecting the Video System (depending on the model)................................. 38
■Selecting the HiFi Mode (depending on the model) ...................................... 39
■Playing a Cassette......................................................................................... 40
■Using the Tape Counter to Search for a Sequence....................................... 41
■Using the Crystal PlayBack ........................................................................... 42
■Adjusting the Picture Quality during Playback............................................... 42
■Rewinding and Fast-forwarding a Cassette................................................... 43
■Playing a Cassette in Slow Motion ................................................................ 44
■Recording a Programme Directly (Option) .................................................... 45
■Recording a Programme with Automatic Stop............................................... 46
■Using the Feature (depending on the model) ............................... 47~48
■Using the Feature (UK Only) ......................................................... 49~50
■Setting the VCR Unit to Record a Programme Automatically........................ 51~52
◆USING THE DVD FUNCTION
■Playing a Disc................................................................................................ 53~56
■Using the Search and Skip Functions ........................................................... 57
■Using the Disc Menu ..................................................................................... 58
■Using the Title Menu...................................................................................... 58
■Displaying the Disc Information ..................................................................... 59
■Using the Zoom Function (DVD/VCD)........................................................... 60
■Using the Bookmark Function (DVD/VCD).................................................... 61
■Repeat Play................................................................................................... 62
■Using the EZ View ......................................................................................... 63
■Program Play................................................................................................. 64
■Changing the Camera Angle ......................................................................... 64
■Setting up the Language Features ................................................................ 65
■Setting up the Audio Options......................................................................... 66
■Setting up the TV Aspect............................................................................... 67
■Setting up the Display Options ...................................................................... 68
■Setting up the Parental Control ..................................................................... 69
◆USING THE TELETEXT FUNCTION
■Teletext Feature ............................................................................................ 70
■Displaying the Teletext Information ............................................................... 71
■Selecting Display Options.............................................................................. 72
■Selecting a Teletext Page.............................................................................. 73
■Storing Teletext Pages .................................................................................. 74
◆ADDITIONAL INFORMATION ON CONNECTIONS
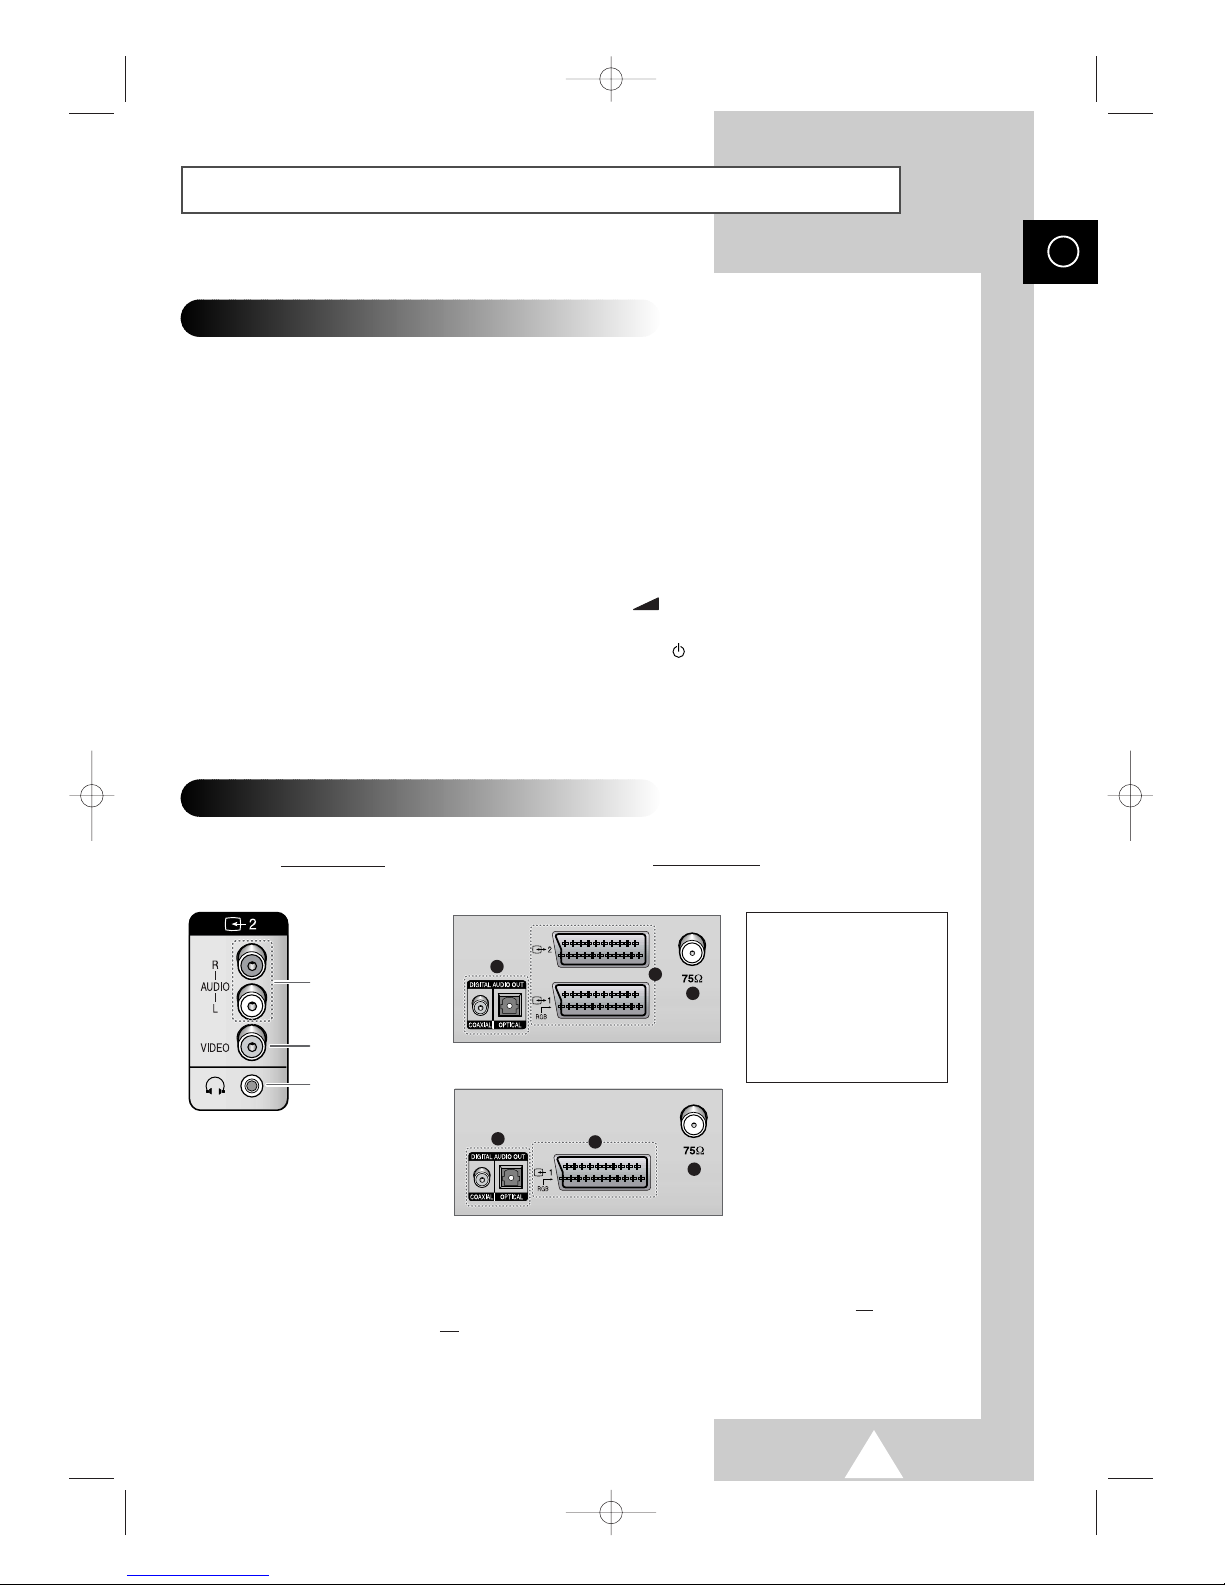
■Connecting to the External Input/Output ....................................................... 75
■Connecting to the Digital Audio Outputs........................................................ 75
■Connecting to the Audio/Video Input............................................................. 76
■Connecting Headphones............................................................................... 76
◆RECOMMENDATIONS FOR USE
■SCART Connector Wiring.............................................................................. 77
■Cleaning the Video Heads............................................................................. 77
■Disc Type and Characteristics....................................................................... 78
■Technical Specifications ................................................................................ 79
■Troubleshooting: Before Contacting Service Personnel................................ 80~81
■Wiring the Mains Power Supply Plug (UK Only)............................................ 82
TM
C18A_ENG_europe_17"_film 10/10/03 4:11 PM Page 5

6
ENG
View of Your Television
➢
The actual configuration on your TV may be different, depending on
your model.
Disc Tray
Load the disc here.
VCR Deck
Insert a standard VHS video tape.
Power
Press to turn the TV on and off.
Control Panels
Disc Tray
Load the disc here.
VCR Deck
Insert a standard VHS video tape.
Power
Press to turn the TV on and off.
UW17J11
UW21J10VD
UW28J10VD
C18A_ENG_europe_17"_film 10/10/03 4:11 PM Page 6

7
ENG
View of Your Television (continued)
Audio
Inputs (R, L)
Rear of the TV
➢For further details about connection, refer to pages 75~76.
☛Whenever you connect an audio or video system to your television, ensure that all
elements are switched off.
Refer to the documentation supplied with your equipment for detailed connection
instructions and associated safety precautions.
➢
The actual configuration on your TV may be different, depending on
your model.
ŒSKIP/SEARCH
(DVD)
Press to skip or search the title, chapter or track.
´PLAY/PAUSE
(DVD)
Press to play or pause the disc
ˇSTOP
(DVD)
Press to stop the disc.
¨OPEN/CLOSE
(DVD)
Press to open and close the disc tray.
ˆSTAND BY
(indicator)
Lit when TV power is Off.
ØTIMER
(indicator)
Lit when the program times are stored.
∏REC
(indicator)
Lit when the VCR is recording.
”Remote Control Sensor
Aim the remote control towards this spot on the
TV.
’REC
(VCR)
Press to begin recording.
˝STOP/EJECT
(VCR)
Press to stop a video tape during play, record,
rewind, or fast forward. Press to eject a video
tape if the tape is stopped.
ÔREW / FF
(VCR)
Press to rewind/fast forward a videotape.
PLAY/PAUSE
(VCR)
Press to play or pause a video tape.
Ò– +
Press to increase or decrease the volume.
Ú▼C/P. ▲
Press to change channels.
ÆMENU
Press to display the on-screen menu.
Side of the TV
Video Input
Headphone
Connector
Connection Panels
12
3
Control Panels (
continued)
UW21J10VD/UW28J10VD
12
3
UW17J11
ŒDigital Audio Outs
´SCART Audio/
Video Input/Outputs
ˇ75ΩCoaxial
Connector for Aerial/
Cable Network
C18A_ENG_europe_17"_film 10/10/03 4:11 PM Page 7

ENG
8
Infrared Remote Control (Television and Teletext Functions)
➣ Operation of remote control may be affected by bright artificial light near to the TV set.
POWER
TELETEXT REVEAL
ONE/TWO-DIGIT CHANNEL
SELECTION
TELETEXT SIZE
TEMPORARY SOUND SWITCH-
OFF
VOLUME ADJUSTMENT
TELETEXT NEXT PAGE
DIRECT CHANNEL SELECTION
TELETEXT INDEX
EXTERNAL INPUT SELECTION
ON-SCREEN DISPLAY
TELETEXT CANCEL
TELETEXT STORE
CHANNEL SELECTION
SOUND MODE SELECTION
TELETEXT MODE SELECTION
(LIST/FLOF)
TELETEXT HOLD
TELETEXT SUB-PAGE
MENU DISPLAY
SWITCH REPEATEDLY
BETWEEN THE LAST TWO
CHANNELS DISPLAYED
MIX BOTH TELETEXT
INFORMATION AND THE NORMAL
BROADCAST
CHANGE CONFIRMATION/
HIGHLIGHTED OPTION SELECTION
MOVE TO THE REQUIRED
MENU OPTION/
ADJUST AN OPTION VALUE
RESPECTIVELY
TELETEXT PREVIOUS PAGE
AUTOMATIC SWITCH-OFF
SOUND MODE SELECTION PICTURE MODE SELECTION
PICTURE SIZE SELECTION
TELETEXT DISPLAY
SWITCH BETWEEN THE
TV/VCR AND DVD MODE
C18A_ENG_europe_17"_film 10/10/03 4:11 PM Page 8

9
Infrared Remote Control (VCR and DVD Functions)
ENG
REPEAT PLAY
ZOOM
TAPE ALIGNMENT ADJUSTMENT
SEARCH BACKWARD
NEXT SKIP THE TITLE,
CHAPTER, OR TRACK
VCR: COUNTER, REMAIN
DVD : DISPLAY
CRYSTAL PLAYBACK (IPC)
ADVANCES PLAY ON FRAME AT
A TIME
PLAY IN SLOW MOTION
DISPLAY SUBTITLES
VCR SPEED SELECTION
(STANDARD PLAY/LONG PLAY)
ACCESS VARIOUS CAMERA
ANGLES ON A DVD
BACK SKIP THE TITLE, CHAPTER,
OR TRACK
SEARCH FORWARD
SHOWVIEW PRESET RECORDING
(The SHOW VIEW printed in
VIDEOPLUS on the Remote
Control Unit for UK )
DVD MENU DISPLAY
OPEN/CLOSE THE DISC TRAY
STOP PLAY/PAUSE
VCR RECORD/
RETURN TO PREVIOUS MENU
TO CANCEL OR CLEAR EACH
SELECTED FUNCTION
C18A_ENG_europe_17"_film 10/10/03 4:11 PM Page 9

10
ENG
You must insert or replace the batteries in the remote control when
you:
◆Purchase the television
◆Find that the remote control is no longer operating
correctly
1Remove the cover on the rear of the remote control by pressing
the symbol ( ) downwards and then pulling firmly to remove it.
2Insert two R03, UM4, “AAA” 1.5V or equivalent batteries taking
care to respect the polarities:
◆
+
on the battery against
+
on the remote control
◆
-
on the battery against
-
on the remote control
3Replace the cover by aligning it with the base of the remote
control and pressing it back into place.
Connecting to an Aerial or Cable Television Network
To view television channels correctly, a signal must be received by
the set from one of the following sources:
◆An outdoor aerial
◆A cable television network
◆A satellite network
1In the first three cases, connect the aerial or network input cable to
the 75Ωcoaxial socket on the rear of the television.
2If you are using an indoor aerial, you may need to turn it when
tuning your television until you obtain a picture that is both sharp
and clear.
For further details, refer to:
◆“Storing Channels Automatically” on page 16
◆“Storing Channels Manually” on page 17
Inserting the Batteries in the Remote Control
Rear of the TV
Cable Television
Network
or
C18A_ENG_europe_17"_film 10/10/03 4:11 PM Page 10

11
The mains lead is attached to the rear of your television.
☛If you have purchased this television in the United
Kingdom, refer to page 82 for further instructions on
plug wiring.
1Plug the mains lead into an appropriate socket.
➢The main voltage is indicated on the rear of the television
and the frequency is 50 or 60Hz.
2Press the “ I” button (On/Off) on the front of the television.
Result:The Standby indicator on the front of the television
lights up.
3Press the POWER ()button on the remote control to switch the
television on.
Result:The programme that you were watching last is re-
selected automatically.
➢If you have not yet stored any channels, No clear picture
appears. Refer to “Storing Channels Automatically” on page
16 or “Storing Channels Manually” on page 17.
4To switch your television off, press again the POWER ()button
on the front of the television.
Switching Your Television On and Off
ENG
Front of the TV
Your television can be placed in Standby mode, in order to reduce
the power consumption.
The Standby mode can be useful when you wish to interrupt
viewing temporarily (during a meal, for example).
1Press the POWER ()button on the remote control.
Result:The screen is turned off and the Standby indicator on
the front of the television lights up.
2To switch the television back on, simply press again the POWER
()button on the remote control.
☛Do not leave your television in Standby mode for long
periods of time (when you are away on holiday, for
example). Turn your television off by pressing the “ l”
button (On/Off) on the front of the television. It is best to
unplug the set from the mains and aerial.
Placing Your Television in Standby Mode
C18A_ENG_europe_17"_film 10/10/03 4:11 PM Page 11

12
ENG
A degaussing coil is mounted around the picture tube so that external degaussing after moving the
receiver is normally unnecessary. If the receiver is moved or placed in a different direction, or, a
coloured patch appears on the screen, the main power switch must be switched to the off position for
120minutes or the power cord must be unplugged for the same interval to allow the automatic degauss
circuits to operate properly.
For safety, the receiver should be switched off from the main power switch when it is unattended.
☛Magnetic fields can cause your television to malfunction. Degaussing is a process that
neutralises magnetic fields.
Automatic Degaussing to Remove Colour Patches
C18A_ENG_europe_17"_film 10/10/03 4:11 PM Page 12

13
The remote control is used mainly to:
◆Change channels and adjust the volume
◆Set up the television using the on-screen menu system
The following table presents the most frequently used buttons and
their functions.
Button Viewing Function Menu Function
Used to display the next
-
stored channel.
Used to display the
-
previous stored channel.
to Used to display the corresponding channels.
-
/
--
Used to select a channel numbered ten or over.
Press this button, and the “P
--
” symbol is displayed.
Enter the two-digit channel number.
PRE-CH Used to switch repeatedly between the last two channels
displayed.
Used to increase the
-
volume.
Used to decrease the
-
volume.
MUTE Used to switch the sound off temporarily.
➢To turn the sound back on, press this button again,
or or button.
MENU Used to display the Used to return to the
on-screen menu system. previous menu or normal
viewing.
-
Used to...
◆Display a submenu
containing selections for
the current menu option.
◆Increase/reduce a menu
option value.
-
Used to confirm your
choice.
Becoming Familiar with the Remote Control
ENG
C18A_ENG_europe_17"_film 10/10/03 4:11 PM Page 13

14
ENG
When the television is initially powered on, several basic customer
settings proceed automatically and subsequently. The following
settings are available.
1If the television is in Standby mode, press the POWER ()button
on the remote control.
Result:The Plug & Play is displayed.
2To start the Plug & Play, press the ENTER button.
Result:The Language menu is displayed.
3Select the appropriate language by pressing the †or …button.
Press the MENU ()button to confirm your choice.
Result:The message Antenna input check is displayed.
4Make sure that the antenna is connected to the TV.
Result:After a little while, the Country menu is displayed.
5Select your country by pressing the ▲or ▼button. Press the
MENU ()button to confirm your choice.
Result:The Auto Store menu is displayed.
6To start the channel store, press the ENTER button.
Result:The search will end automatically. Channels are sorted
and stored in an order which reflects their position in the
frequency range (with lowest first and hialghest last).
➢To stop the search before it has finished or return to normal
viewing, select the Exit and press the ENTER button
.
7When searching and storing is complete, the Time menu is
displayed.
8Press the œor √button to move to the hour or minute. Set the
hour or minute by pressing the ▲or ▼button (refer to “Setting
the Current Date and Time” on page 32).
9When the setting has finished all, the message Enjoy viewing
your new TV is displayed, and then the channel which has been
stored will be activated.
Plug and Play Feature
Auto Store
Country : Belgie
Search : 435.250MHz
Channel
Select Adjust Exit
Plug & Play
ENJOY YOUR WATCHING
P 1 C
-- -----
67.250 MHz 78 3 %
Ant. Input : Check
Exit
Time
Clock - - : - -
Move Exit
Language
English Español
Deutsch Português
Français Italiano
Nederland Sverige
Adjust Select
Auto Store
Country : Belgie
Search : 435.250MHz
Channel
Select Adjust Exit
Exit
C18A_ENG_europe_17"_film 10/10/03 4:11 PM Page 14

15
If you want to reset this feature...
1Press the MENU button.
Result:The main menu is displayed.
2Press the †or …button to select Function.
Result:The options available in the Function group are
displayed.
3Press the œor √button.
4Press the †or …button to select Plug & Play.
5Press the œor √button.
Result:This feature starts with the message Plug & Play is
displayed.
Plug and Play Feature (continued)
ENG
Choosing Your Language
When you start using your television for the first time, you must
select the language which will be used for displaying menus and
indications.
1Press the MENU button.
Result:The main menu is displayed.
2Press the †or …button to select Function.
Result:The options available in the Function group are
displayed.
3Press the œor √button.
Result:The Language is selected.
4Select the appropriate language by pressing the œor √button
repeatedly.
TV/AV : TV
Language : English
Time √
Plug & Play √
Blue Screen : Off
Panel Lock : Off
Function
Select Enter Exit
TV/AV : TV
Language : English
Time √
Plug & Play √
Blue Screen : Off
Panel Lock : Off
Function
Select Adjust Exit
C18A_ENG_europe_17"_film 10/10/03 4:11 PM Page 15

16
ENG
You can scan for the frequency ranges available to you (and
availability depends on your country). Automatically allocated
programme numbers may not correspond to actual or desired
programme numbers. However you can sort numbers manually and
clear any channels you do not wish to watch.
1Press the MENU button.
Result:The main menu is displayed.
2Press the †or …button to select Channel.
Result:The options available in the Channel group are
displayed.
3Press the œor √button.
Result:TheAuto Store is selected.
4Press the œor √button again.
Result:TheAuto Store menu is displayed with the
Country is selected.
5Select your country by pressing the œor √button.
The countries are displayed in the following order:
Belgie
-
Deutschland
-
España
-
France
-
Italia
-
Nederland
-
Sverige
-
Schweiz
-
UK
-
Others.
➢If you have selected the Others option but do not wish to
scan the PAL frequency range, store the channels manually
(see page 17).
6Press the †or …button to select Search.
7Press the œor √button to start the search.
Result:The channels are stored in an order which reflects
their positions in the frequency range. Finally, the
search will end automatically.
➢To stop the search before it has finished or return to normal
viewing, press the MENU button.
8When the channels have been stored, you can:
◆
Assign a name to the stored channels (refer to page 19)
◆
Clear a channel (refer to page 20)
◆
Fine tune channel reception if necessary (refer to page 21)
◆
Sort them in the order required (refer to page 22)
Storing Channels Automatically
Auto Store √
Manual Store √
Name √
Add/Erase √
Fine Tune √
Sort √
Child Lock √
Channel
Select Enter Exit
Auto Store
Country : Belgie
Search : 435.250MHz
Channel
Select Adjust Exit
P 1 C
-- -----
67.250 MHz 78 3 %
Auto Store
Country : Belgie
Search : 435.250MHz
Channel
Select Adjust Exit
Exit
C18A_ENG_europe_17"_film 10/10/03 4:11 PM Page 16

17
You can store the television channels, including those received via
cable networks.
When storing channels manually, you can choose:
◆Whether or not to store each of the channels found
◆The programme number of each stored channel which
you wish to identify
1Press the MENU button.
Result:The main menu is displayed.
2Press the †or …button to select Channel.
Result:The options available in the Channel group are
displayed.
3Press the œor √button.
4Press the †or …button to select Manual Store. Press the œor
√button.
Result:The Manual Store menu is displayed with the Color
System is selected.
5If necessary, select the broadcasting standard required by
pressing the œor √button repeatedly.
Result:The color standards are displayed in the following
order (depending on the model).
◆
AUTO
-
PAL
-
SECAM
-
NTSC4.43
◆
AUTO
-
PAL
-
SECAM
-
NTSC4.43
-
NTSC3.58
6Press the †or …button to select Sound System. Press the œor
√button repeatedly.
Result:The sound standards are displayed in the following
order (depending on the model).
◆
B/G
-
I
-
D/K
-
L/L’
◆
B/G
-
I
-
D/K
-
M
Storing Channels Manually
ENG
Auto Store √
Manual Store √
Name √
Add/Erase √
Fine Tune √
Sort √
Child Lock √
Channel
Select Enter Exit
Manual Store
Color System : AUTO
Sound System : B/G
Search : 435.250MHz
Channel : C 2
Prog. No. : P 1
-----
Store : ?
Channel
Select Adjust Exit
Manual Store
Color System : AUTO
Sound System : B/G
Search : 435.250MHz
Channel : C 2
Prog. No. : P 1
-----
Store : ?
Channel
Select Adjust Exit
C18A_ENG_europe_17"_film 10/10/03 4:11 PM Page 17

18
ENG
7If you know the number of the channel to be stored, see the
following steps.
◆
Press the †or …button to select Channel.
◆
Press the √button.
◆
Press the †or …button to select C(Air channel) or S(Cable
channel).
◆
Press the √button.
◆
Press the †or …button to select the required number.
➢If no sound or abnormal sound, re-select the sound
standard required.
8If you do not know the channel numbers, select Search by
pressing the †or …button. Press the œor √button to start the
search.
Result:The tuner scans the frequency range until the first
channel or the channel that you selected is received
on your screen.
9To assign a programme number to a channel, select Prog.No. by
pressing the †or …button. Press the œor √button to find the
correct number.
10 To store the channel and associated programme number, select
Store by pressing the †or …button. Set to OK by pressing the œ
or √button.
11 Repeat Steps 7to 10 for each channel to be stored.
☛Channel mode
◆P(Programme mode):
When completing tuning, the
broadcasting stations in your area have been assigned to
position numbers from P00 to max P99. You can select a
channel by entering the position number in this mode.
◆C(Real channel mode):
You can select a channel by
entering the assigned number to each air broadcasting station
in this mode.
◆S(Cable channel mode):
You can select a channel by
entering the assigned number for each cable channel in this
mode.
Storing Channels Manually (continued)
Manual Store
Color System : AUTO
Sound System : B/G
Search : 435.250MHz
Channel : C 2
Prog. No. : P 1
-----
Store : ?
Channel
Select Adjust Exit
Manual Store
Color System : AUTO
Sound System : B/G
Search : 435.250MHz
Channel : C2
Prog. No. : P 1
-----
Store : ?
Channel
Adjust Move Exit
Manual Store
Color System : AUTO
Sound System : B/G
Search : 435.250MHz
Channel : C 2
Prog. No. : P 1
-----
Store : ?
Channel
Select Adjust Exit
Manual Store
Color System : AUTO
Sound System : B/G
Search : 435.250MHz
Channel : C 2
Prog. No. : P 1
-----
Store : OK
Channel
Select Adjust Exit
C18A_ENG_europe_17"_film 10/10/03 4:11 PM Page 18

19
ENG
Channel names will be assigned automatically when channel
information is broadcast. These names can be changed, allowing
you to assign new names.
1Press the MENU button.
Result:The main menu is displayed.
2Press the †or …button to select Channel.
Result:The options available in the Channel group are
displayed.
3Press the œor √button.
4Press the †or …button to select Name. Press the œor √button.
Result:The current channels are displayed.
5If necessary, select the channel to be assigned to a new name by
pressing the †or …button.
6Move on the previous or next letter by pressing the œor √button.
Press the †or …button to select a letter (A~Z), a number (0~9)
or a symbol (
-
,
_
, space).
7Repeat Steps 5to 6for each channel to be assigned to a new
name.
Assigning Names to Channels
Auto Store √
Manual Store √
Name √
Add/Erase √
Fine Tune √
Sort √
Child Lock √
Channel
Select Enter Exit
Name
P 1 :
-----
P 2 :
-----
P 3 :
-----
P 4 :
-----
Channel
Select Adjust Exit
Name
P 1 :
-----
P 2 :
-----
P 3 :
-----
P 4 :
-----
Channel
Adjust Move Exit
C18A_ENG_europe_17"_film 10/10/03 4:11 PM Page 19

20
ENG
You can exclude the channels of your choice from the channel scan
operation. When you scan through the stored channels, those that
you have chosen to skip are thus not displayed. All channels that
you do not specifically choose to skip are displayed during
scanning.
1Press the MENU button.
Result:The main menu is displayed.
2Press the †or …button to select Channel.
Result:The options available in the Channel group are
displayed.
3Press the œor √button.
4Press the †or …button to select Add/Erase. Press the œor √
button.
Result:The current channels are displayed.
5Press the †or …button to select the channel to add or erase.
Select Erased or Added by pressing the œor √button.
6Repeat Step 5for each channel to be added or erased.
Skipping Unwanted Channels
Auto Store √
Manual Store √
Name √
Add/Erase √
Fine Tune √
Sort √
Child Lock √
Channel
Select Enter Exit
Add/Erase
P 1 : Added
P 2 : Added
P 3 : Added
P 4 : Added
Channel
Select Adjust Exit
Add/Erase
P 1 : Erased
P 2 : Added
P 3 : Added
P 4 : Added
Channel
Select Adjust Exit
C18A_ENG_europe_17"_film 10/10/03 4:11 PM Page 20
Other manuals for UW-17J11VD
1
This manual suits for next models
1
Table of contents
Other Samsung TV DVD Combo manuals

Samsung
Samsung TX-15X5F User manual

Samsung
Samsung CFTD2085AX User manual

Samsung
Samsung UW21J10VD User manual

Samsung
Samsung CSL 2097DV User manual

Samsung
Samsung TC29J6MNX/XAX User manual

Samsung
Samsung CFTD2085X/SMS User manual

Samsung
Samsung TP29J10 User manual

Samsung
Samsung CFTD2083TX/SMS User manual

Samsung
Samsung CFTD2085 User manual

Samsung
Samsung DW21G6 User manual