S&T RoadEZ Cars PT-REZ-UC-00-1410UET User manual

Version: 1.0
Reference No.: PT-REZ-UC-00-1410UET
Date: August 15, 2014
RoadEZ Cars
vehicle tracker mobile pack (careu ucan)
User Guide

Disclaimer
Systems and Technology Corp. (S&T) assumes no legal responsibility for
damage caused by the improper use of this product. S&T reserves the
right to change and modify the contents of this document at any time
without prior notice.
Copyright
This manual, including all photographs, illustrations, software, to name a
few, is based on the protection of the international copyright laws. S&T
owns the copyrights and other intellectual property rights of this product
and the related information. Anyone is prohibited to reproduce, transmit
and distribute part or all the manual or related copies except that he or
she gets S&T’s prior written authorization.
© 2014 Systems & Technology Corp. All rights reserved.
The S&T logo is a trademark of Systems & Technology Corp. in Taiwan
and/or other countries. The RoadEZ logo is a trademark of Systems &
Technology Corp. in Taiwan, U.S., EU, China and/or other countries. All
other trademarks are the property of their respective owners.
Contact
In case you have problems with the use of the product beyond your
possibilities to solve it, please address them to S&T by email
assistance to you.
1
1 Introduction
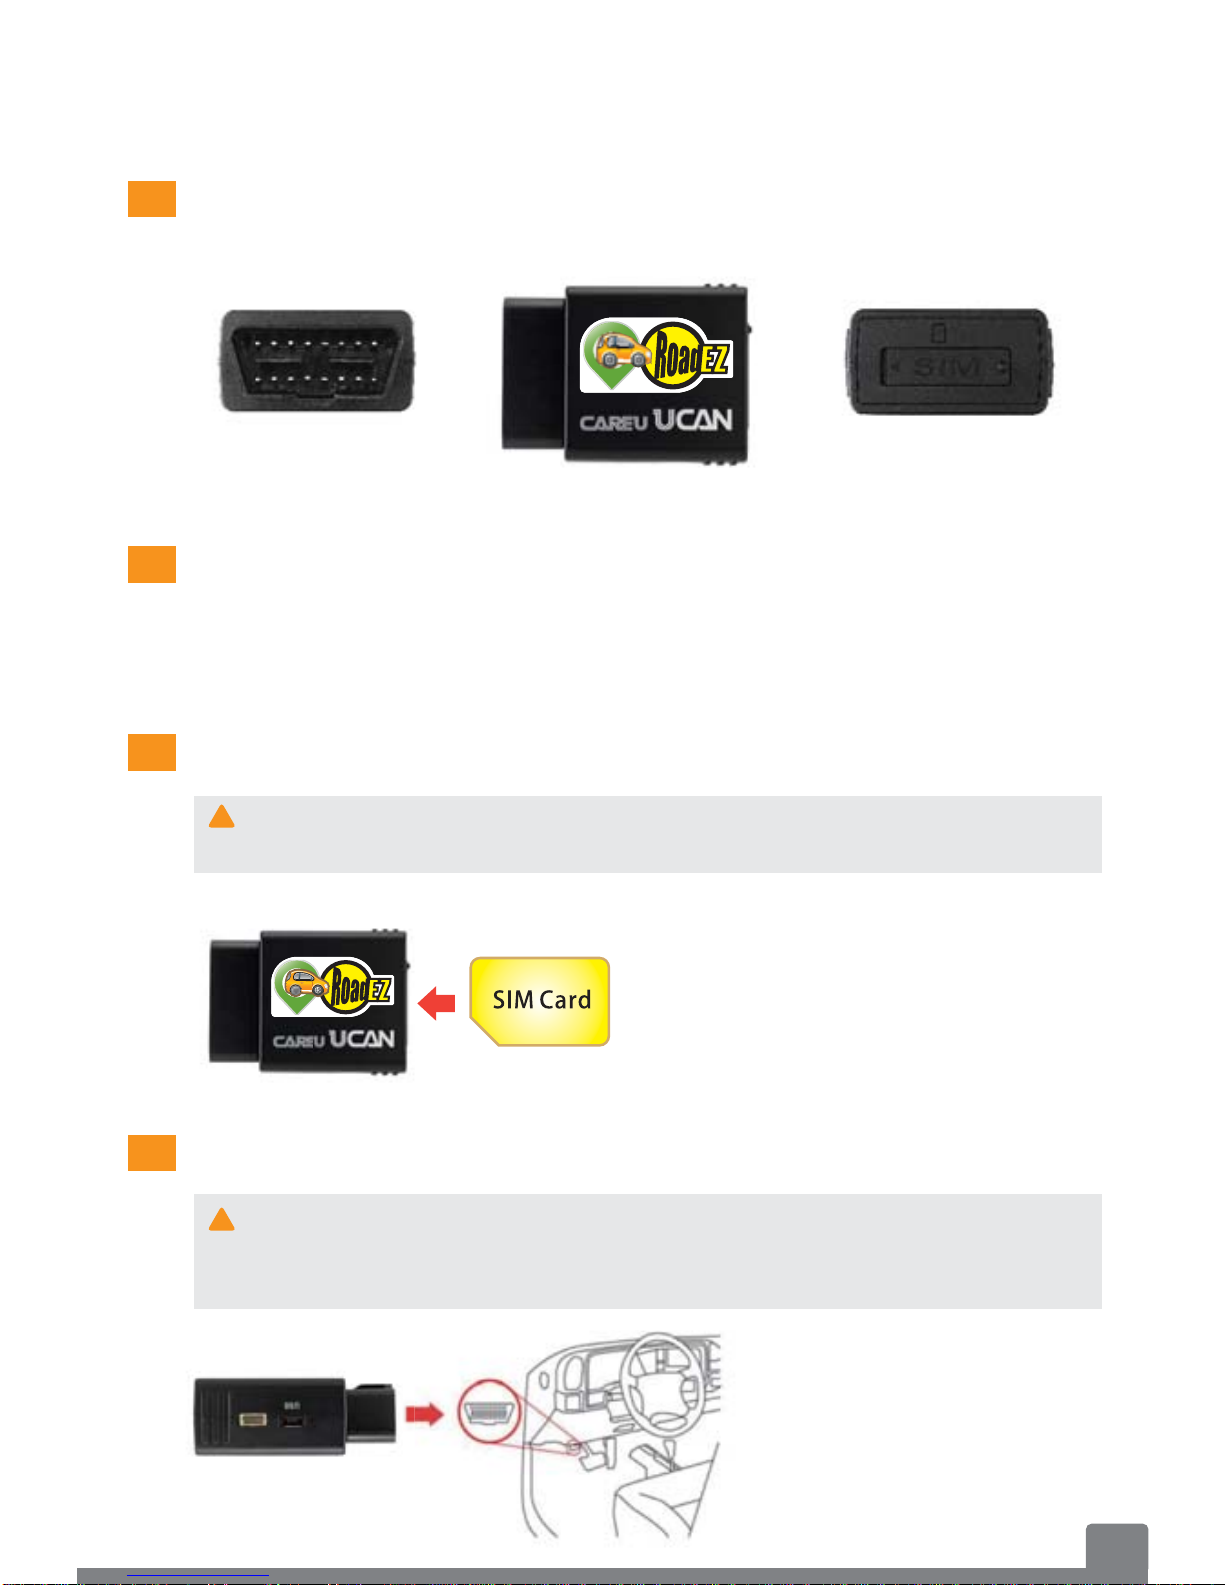
Vehicle Tracker Overview
Vehicle Tracker x 1
User Guide x 1
OBD II Connector SIM Card Slot
Insert the SIM Card
Package Contents
Connect to the OBD II Port
The RoadEZ Cars vehicle tracker requires a SIM card with
SMS services.
OBD II C t
SIM
Ca
rd
Slo
t
!
!
With the angled corner of the
SIM card as shown, carefully
insert the SIM card in the tray
with the correct way.
Connect the tracker to
the OBD II port of the
vehicle.
Most vehicles manufactured after 1996 have an OBD II port
built in. You can find the OBD II port near the foot pedals of
the vehicle or under the steering wheel.

2
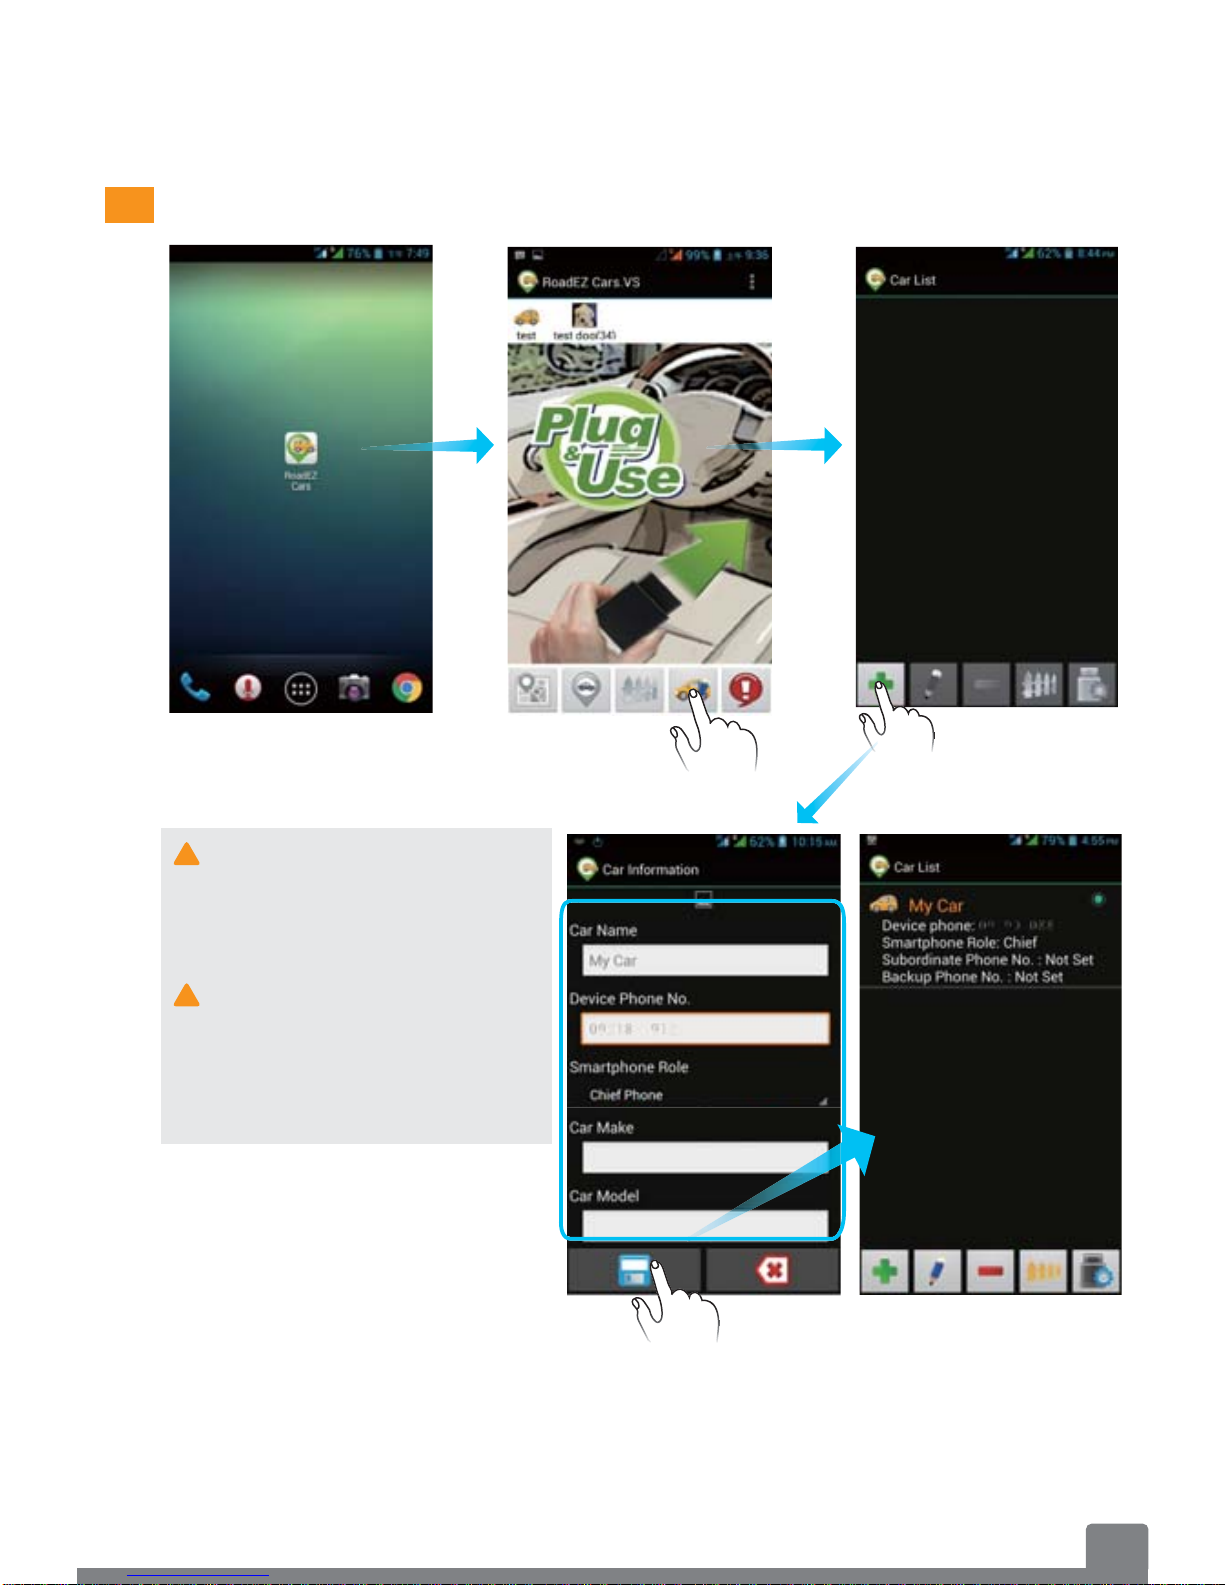
Install the RoadEZ Cars App
!
!
!
!
Please make sure to enable your smartphone’s Unknown
sources.
The RoadEZ Cars app is designed for Android 4.0 or above
smartphones with Google Map Service.
The smartphone must allow sending and receiving SMS
messages from the RoadEZ Cars app.
The app does not support APP2SD and any non branded
smartphones or engineering samples.
The app is available at RoadEZ.systech.com.tw
and Google Play.
After the app installation is complete, you can
find an icon of the RoadEZ Cars app on
Applications.
3
2 RoadEZ Cars App
Add New Device
!Please refar to Page 7
regarding the settings of
the subordinate phone
and the backup phone.
!The iOS smartphone can
be the subordinate phone
to receive messages
without installing the
RoadEZ Cars app.
Type a car name, the
tracker’s SIM card phone
number.
Select Chief Phone as the
smartphone role.
You have successfully added a new device. If the smartphone role is
shown Chief(?), the new device setting is not completed. Please wait
for a while or drive the car to a place with a clear view of the sky to
complete the setting.
Type the car make and model information and click the Save icon.

4
Device Setting
DescriptionItem
Edit Device
Data
Delete
Devices Select a car and tap the icon to delete the device.
1
1
2
2
34
5
7
10
11
6
8
Tap the icon to edit Car Name,Smartphone
Role,Car Make, Car Model,Select Photo,
Remove Photo and Change Device Phone No..
9
5
DescriptionItem
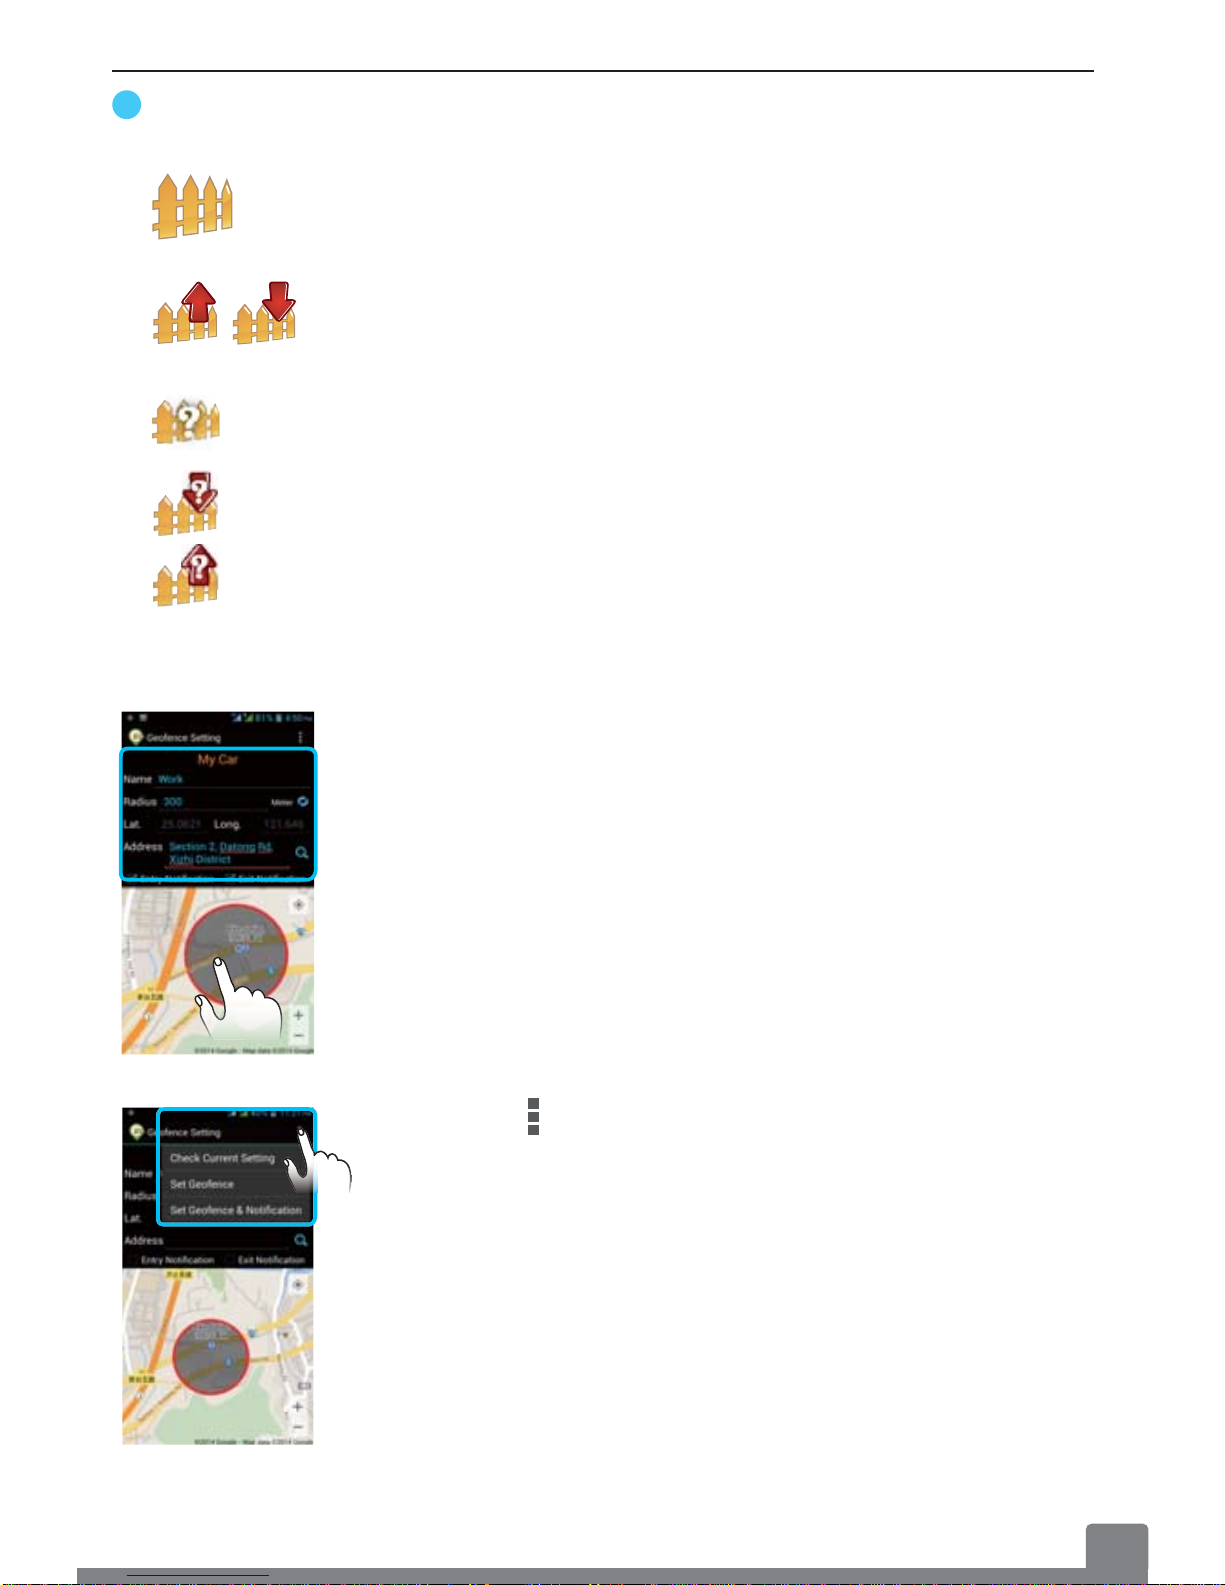
Geofence
Setting
3Tap the icon to set the geofence.
When the car enters and (or) exits the geofence
zone, you will receive exit and (or) entry
notifications.
The waiting icon for the geofence setting.
The waiting icon for the entry notification setting.
The waiting icon for the exit notification setting.
Type a geofence name, the geofence’s radius,
the address, and select Entry Notification and
(or) Exit Notification.
You can also set the geofence zone by tapping
the map.
Tap the icon to check the current geofence
setting, set the geofence, set the notification, set
the geofence and the notification, or disable the
geofence.

6
DescriptionItem
!If you want to delete the phone number of the
subordinate, the backup or the guest, please
tap Remove.
Device
Setting
Impact Alert
Disable Enable
Disable Enable
Car Battery
Alert
Revise Chief
Phone No.
!You may consult your technician about the
values for the battery thresholds.
5
7
6
4
Tap the icon to set Impact Alert, Car Battery Alert,
Chief Phone No., Subordinate Phone No.,
Authority to Get Locations, Backup Phone No.
and Guest Phone No..
Tap the icon to enable or disable the function. When
any abnormal impact occurs, you will receive an alert
with the map view.
The waiting icon for the Impact Alert setting.
Type and save the values of Car Battery Low
Threshold and Car Battery Failure Threshold.
Once the battery voltage is under the threshold, you
will receive an alert with the map view.
The waiting icon for the Car Battery Alert setting.
Tap the icon to revise the chief phone no.
The waiting icon for the chief phone no. setting
B
A

7
!If GPS and GSM signals are lost or weak, the waiting icon may
remain. The settings may be not completed. Please wait for a
while or drive the car to outdoors where the signals are available.
Not Set Set
Not Set Set
Not Set Set
!
!
8Set or Revise
Subordinate
Phone No.
DescriptionItem
Tap the icon to set or revise the backup phone
number.
You can enable the Device Setting function via the
backup phone. The backup phone can be applied
while the chief phone does not work.
The waiting icon for the backup phone no. setting.
To apply the backup phone, you have to set the
backup phone no. in the original chief phone’s
RoadEZ Cars app.
The chief can set a guest phone number to authorize
the Get Location function to the guest.
Tap the icon to set or revise the guest phone no.
The waiting icon for the guest phone no. setting.
To apply the subordinate phone, you have to set
the subordinate phone no. in the chief phone’s
RoadEZ Cars app.
Tap the icon to set or revise the subordinate phone
number. The subordinate phone can receive the
tracker’s messages.
The chief can authorize the Get Location function to
the subordinate.
The waiting icon for the subordinate phone number.
Set or Revise
Backup
Phone No.
Set or Revise
Guest Phone
No.
10
BA
BA
B
B
A
A
A
9
BA
GUEST
GUEST
GUEST
U
U
U
U
U
U
U
U
ES
ES
ES
ES
ES
ES
ES
ES
ES
ES
ES
ES
ES
ES
ES
ES
ES
ES
T
T
T
T
T
T
T
T
T
T
T
T
8
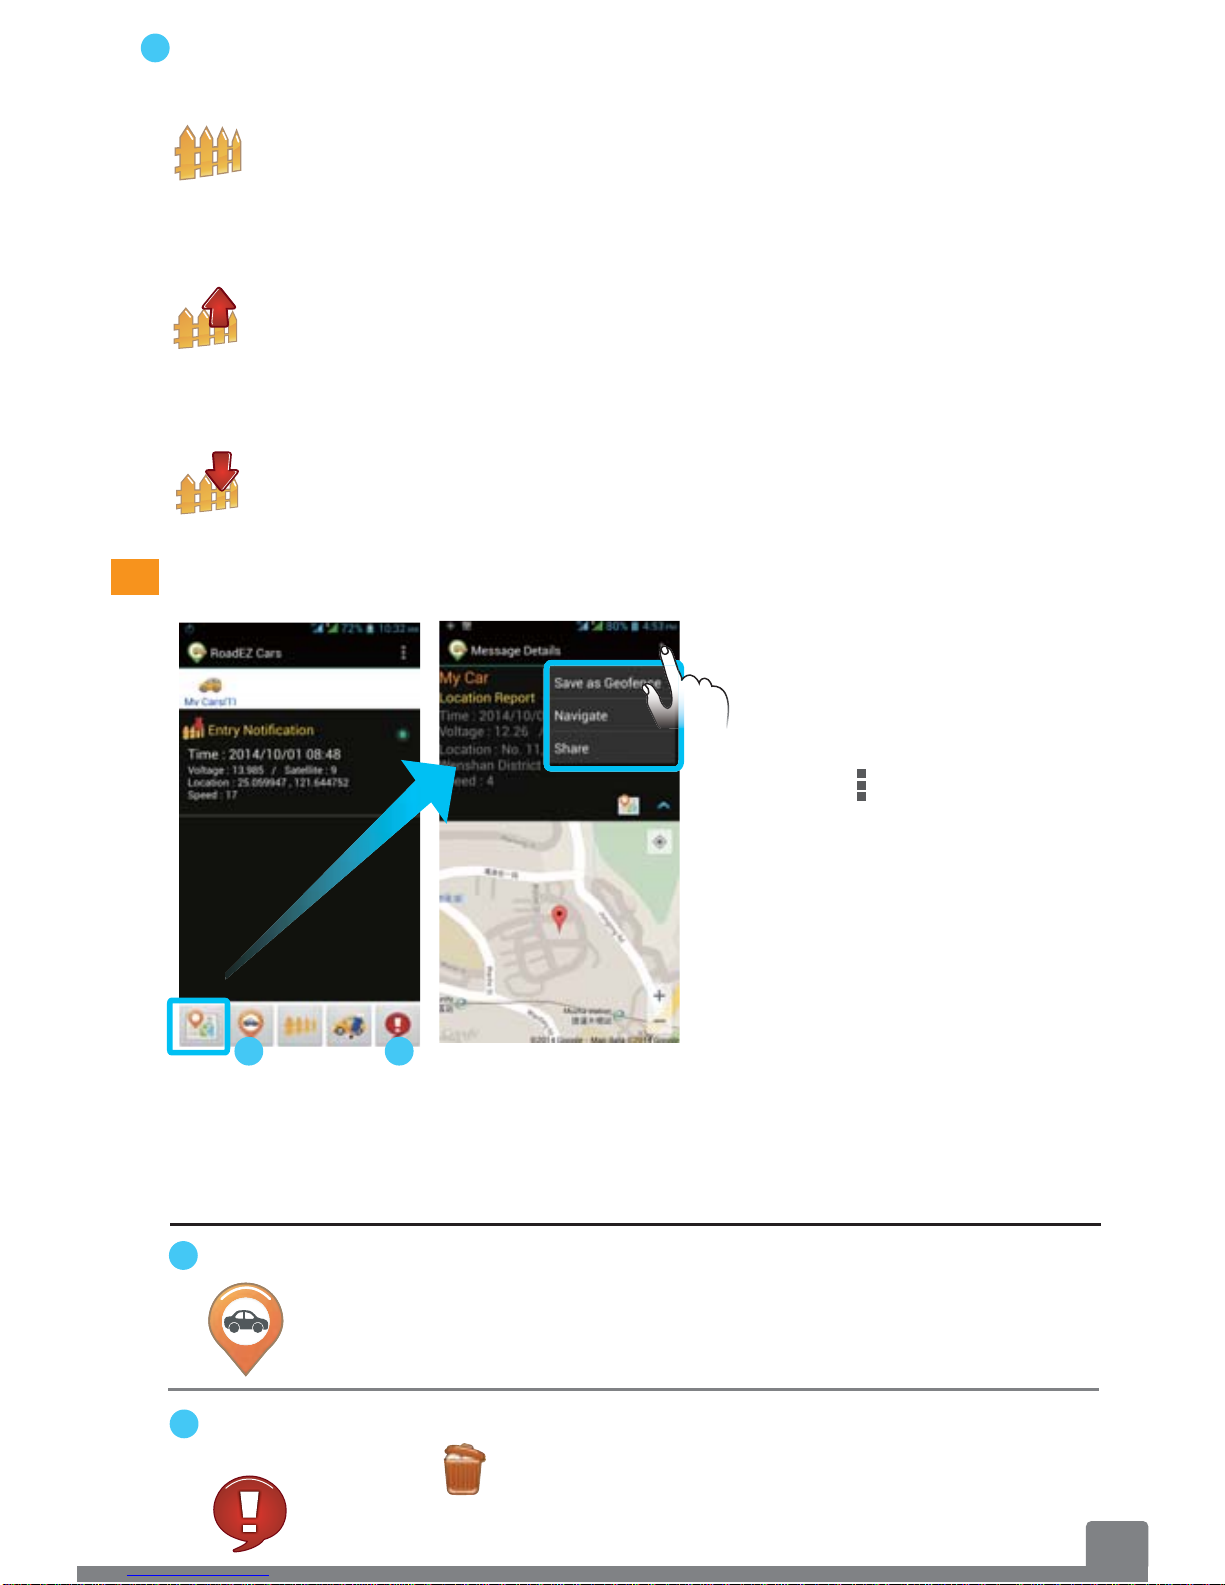
Tap the icon and select
Save as Geofence to save
this car location as the new
geofence address. Please
refer to Geofence Setting.
Tap Navigate to get route
guidance to the car
location.
You are able to share the
car location with others by
tapping Share.
Tap the icon and select messages. Tap the
icon to delete the selected messages.
DescriptionItem
Display the current geofence address setting.
Enable the entry notification for the chief and (or)
the subordinate.
Enable the exit notification for the chief and (or) the
subordinate.
Current
Geofence
Setting
11
Entry
Notification
Setting
Exit
Notification
Setting
Getting Locations & Messages
Get Location
Message
Management
2
1
1
2
Tap the icon to request the car location. When the
tracker is positioned, you will receive a message
with the map view.
Select a message and
tap the Map View button
to read the selected
message with a map.
9
Device Battery
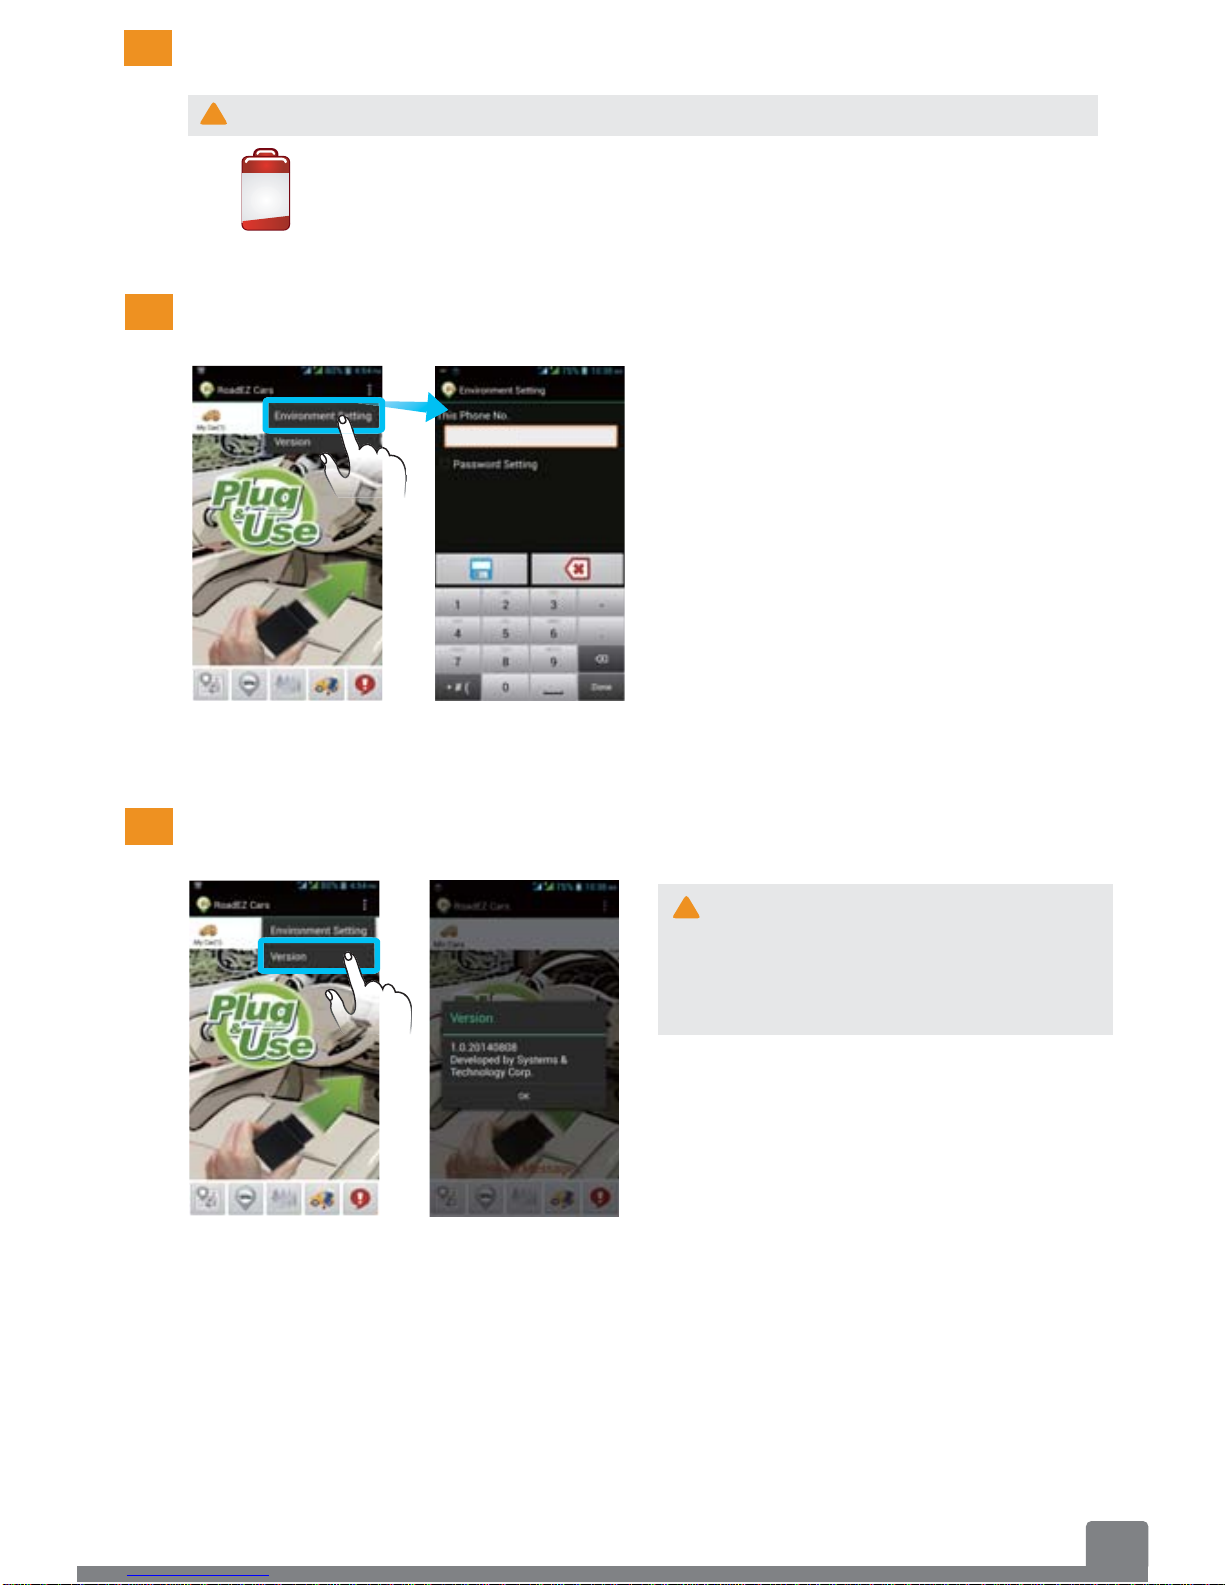
Environment Setting
App Update
!The device battery can be recharged during driving.
When the tracker’s battery power is low, you will
receivea battery low alert. .
!
Tap Environment Setting. You
can change the smartphone no.
and set a password for the app.
If you want to disable the
password setting, type in the
password and tap Password
Setting to disable this function.
The new versions of the
RoadEZ app are released
aperiodically. Please
frequently check Version.
Tap Version. If there is new
software version found, a
software update window will
appear. Tap Download Now or
Download Later.
0912345678

10
GPS devices work under open sky conditions in order to receive
satellite signals. GPS satellites are in constant motion, rising and
setting. Therefore, a location of the GPS positioning, was
obtainable in a specific location, may not be obtainable in the next
try. There is no fault with the device. Please wait a while and then
try to obtain a new location again.
The coverage isn’t available everywhere when using the device
outdoors under optimal conditions due to network problems,
software, signal strength, your wireless device structures,
buildings, weather, geography, topography, to name a few, and will
result in dropped and blocked connections, slower data speeds, or
otherwise impact the quality of services.
3
GPS Signals
Coverage Information
General Usage
Information

11
Specifications & Certifications
FCC:RLS-STAVL1212
NCC:CCAI12Z10150T2
CE
PTCRB
CTIA
E13
Certifications
Specifications
4
Dimensions 25mm x 65mm x 46mm (L x W x H)
Weight 55g
Communications GSM 850/900/1800/1900, SMS
Datum WGS-84
Battery 130mA Lithium-Ion Battery (The
emergency power for unplugged
device alert)
Power Consumption 145mA@12VDC (Operation Mode)
10mA@12VDC (Sleeping Mode)
Operating Temperature -20ºC ~ +70 ºC
Humidity 5% ~ 90%

12
5
Limited Warranty
Warranty Information
What the warranty covers
How long the warranty is effective
Who the warranty protects
Who the warranty protects
S&T warrants its products to be free from defects during the
warranty period. If a product proves to be defective during the
warranty period, S&T will, at its sole option, repair or replace the
product. Replacement the product or parts may include
remanufactured or refurbished parts or components.
S&T products are warranted for one year from the date of receiving
products and 90 days limited accessory warranty. All accessories
purchased separately are warranted for 90 days. You may be
required to ship/transport your covered product to a designated
repair center.
This warranty is valid only for the first consumer purchaser.
(1) Any product on which the serial number has been defaced,
modified or removed.
(2) Damage, deterioration or malfunction resulting from:
i. Accident, misuse, neglect, fire, water, lightning, or other acts
of nature.
ii. Unauthorized product modification, or failure to follow
instructions. Supplied with the product.
iii. Repair or attempted repair by anyone not authorized by S&T.
iv. Damage to or loss of any programs, data or removable
storage media.
v. Software or data loss occurring during repair or replacement.
vi. Any damage of the product due to shipment.

13
How to get service
How long to process a RMA
Limitation of implied warranties
(1) To obtain warranty service, please contact S&T by email
number (RMA No.). You will be required to provide
i. Your name (Full name).
ii. Your ship-to address, email address and phone number.
iii. The S/N and IMEI numbers of the product. (You can find the
S/N and IMEI numbers on the device and this user guide.)
iv. A description of the problem.
(2) Bring or ship the product according to the shipping information
provided by S&T, with the associated accessories, to the S&T
service center.
(3) S&T is not responsible for any returned product without an
assigned RMA.
Any returned product with an assigned RMA will be repaired or
replaced within 10 days from receiving the returned product.
There are no warranties, which extend beyond the description
contained herein including the implied warranty of merchantability
and fitness for a particular purpose.
vii. Causes external to the product, such as electric power
fluctuations or failure, human negligence or natural disasters.
viii. Use of supplies or parts not meeting S&T's specifications.
ix. Any other cause which does not relate to a product defect.

14
Exclusion of damages
S&T's liability is limited to the cost of repair or replacement of the
product. S&T shall not be liable for:
(1) Damage to other property caused by any defects in the product,
damages based upon inconvenience, loss of profits, loss of business
opportunity, loss of goodwill, interference with business relationship,
or other commercial loss, even if advised of the possibility of such
damages.
(2) Any other damages, whether incidental, consequential or otherwise.
(3) Any claim against the customer by any other party.
Table of contents
Other S&T GPS manuals


 User manual")


Popular GPS manuals by other brands

Flexcom
Flexcom TKSTAR TK905B Installation and operating instructions

Garmin
Garmin iQue 3600a Specifications

TRANSLAND
TRANSLAND Satloc Falcon installation guide

Garmin
Garmin Nuvi 1300 - GPS Navigation 4.3 Declaration of conformity

Mio
Mio MOOV V Series user manual

Racelogic
Racelogic LabSat 3 quick start guide


i Luv Wireless
i Luv Wireless KidsConnect KC2 user manual

Magellan
Magellan eXploristPro 10 quick start guide

Garmin
Garmin MSN Direct Receiver Owner's manual supplement

Langmatz
Langmatz basicguide EK 524 operating instructions

Garmin
Garmin GPSMAP 67 Quick start manual

Garmin
Garmin Zumo 200 Series owner's manual