Sangean UCR-1000FM User manual


1
2
3
4
5
6
7
8
9
10
11
12 13 14
MONOMONO
STEREOSTEREO
FMFM
11
22
MM
MHZMHZ
2

Notes on safety
Please observe the following instructions:
The radio should only be connected to 230v / 50HzA.C..
We recommend that you disconnect the power cord from the
mains during extended absences.
Theambient temperature should not exeed 35 C. Avoid
locations close to radiators and do not expose direct sunlight.
Ensure that the system is sufficiently ventilated.
Protect system from dust, condenstion and water.
Avoid strong magnetic fields, i.e. do not locate unit close to
Tvs and loudspeakers of other units.
Do not use strong chemical detergents whencleaning the unit
and do not grease or lubricate any machine parts.
For service, consult your authorised dealer
3

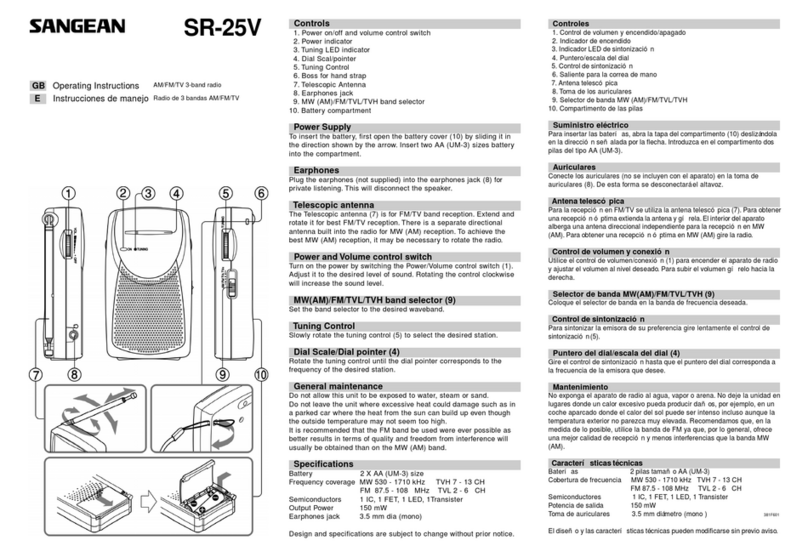
=On/off switch
=Automatic Tuning System
=Display for: Power on/Stereo
=Switch for FM reception Mono/Stereo
=Antenna adjustment for the satellite clock
=Setting frequencies/station search
to higher frequencies
=Display
=Short-term alarm
=Entering beeper alarm-time
=Switching on and selecting the alarm
functions
=Keys for entering station numbers
and time
0=Switching from time to frequency
display
=Volume dial
=Setting frequencies/station search
to lower frequencies
=Entering the alarm time for radio
Elements of operation - summary
2.1 Radio
1
2
3
4
5
6
7
8
9
10
11
12
13
14
ATS
/ST
FM MONO STEREO
1/2
TUNING
TUNING
1 - 0
0...99
4

Installing the appliance
The installation diagram can be found on the rear fold-outpage.
Your clock radio is designed to be installed under borders, kitchen
cupboards or shelves etc. The front of the loudspeakers must be
mounted pointing downwards and be free of obstructions to ensure
the best possible sound quality.
Toavoid the appliance being damaged by rising steam please do
not install the appliance above or next to a stove.
The clock radio is to be affixed in the desired place using bracket .
Tosimplify the mounting procedure the bracket can be removed
from the appliance by unscrewing retaining screws and .
Please use the enclosed drilling stencil for attaching the bracket
without measuring:
1.Attach the drilling stencil to the underside of the cupboard or
shelf with adhesive tape.
2.Mark the 4 drilling holes, remove the stencil and pre-drill at
the places marked.
3.Unscrew the 4 retaining screws and and carefully separate
bracket from the radio.
4.Now you can mount the bracket with the 4 short screws.
If necessary you can increase the distance between the bracket
and the underside of the shelf (thus also the distance between
the radio and the shelf ) with the spacers. Please use the longer
screws when employing the spacers.
5.Slide the radio onto the mounted bracket and tighten retaining
screws and in the desired position. Use a coin or suitable
screwdriver to tighten screws and .
6.Completely unwind the FM antenna. Using a good quality adhesive
tape, stick the antenna to the underside of the shelf or cupboard.
Installation material (enclosed):
4 screws short
4 screws long
4 spacers
5

Initial connection
4.1 Setting the satellite controlled time
Plug the mains plug into a 230V / 50Hz AC socket.
As soon as the appliance is plugged into the power supply the entire
frequency range of the radio is searched for stations.
A maximum of 20 stations will be programmed into the station keys
1-10 in accordance with their reception quality.
After the programming is completed these stations can be played
by pressing the appropriate buttons 1-0.
For two-digit numbers, enter the tens number and then the ones
number via keys 1-0.
Every press of a button is confirmed by a signal tone.
Note
Although you can select a station immediately after the search
procedure, we recommend to wait until the satellite controlled
time has been set. Otherwise the automatic setting of the time
can take longer than necessary.
After the programming procedure for the stations is finished,
appears in the display with the colon flashing to show you that
the satellite signal for the time setting of the appliance is being
searched for.
Once the signal has been received, the symbol blinks in the display
and the seconds :00 to :59 are displayed in a one minute cycle.
After a few minutes the display shows the correct time.
The symbol now appears uninterrupted in the display.
This means that the connection has been made to the time transmitter.
At regular intervals the appliance compares the set time with the radar
signal from the time transmitter and ensures that the clock always
shows the exact time.
The changeover from summer to winter time is also controlled
automatically by the time transmitter.
Note
If the radio cannot receive the time transmitter (the colon is not
blinking and the symbol is not in the display), slide switch
to 2
6
If the clock radio does not receive the time signal with the switch at
2 you can also set the time manually.
First press key and enter the correct time using the number
keys 1-0 while holding this key down.
E.g.:12:08 pm = number keys 1, 2, 0, 8.
Release key The colon between the hour and the minute
display blinks and the time which you have entered appears in
the display.
Note
Whenever the radio is turned off at the on/off switch the radio
will attempt to receive the time transmitter.
If the signal is received (symbol blinks), the appliance automatically
sets the clock at the correct time. In the display the symbol is
shown in addition to the time .
You can call up stations from the pre-programmed station memories
or using the station search.
You can turn the radio on either with the on /off switch or
directly by entering the station number with keys 1-0 .
The display /ST servers as switch on control. It lights up red
(mono reception) or green (stereo reception )when the appliance is
turned on. The volume can be adjusted using the volume dial
.
Switch the radio on directly by pressing one of the station keys 1-0 .
In the display the frequency and the memory number of the selected
station appears.
Keys and are for tuning to stations which have not been
Stored by the automatic tuning system (ATS)
Innitial connection / Radio play
4.2 Setting the time manually
5 Radio reception
5.1 Calling up stations from the station memory
5.2 Station search
7

.
Press the keys briefly and the appliance moves 100kHz higher
( key )or lower frequencies ( key )
Holding key or pressed for a short time, starts the station
search which stops at the next station received.
If a station is received which is already in the memory, M appears
in the display followed by the applicable station number
If the automatic tuning system (ATS) is to be restarted press
the ATS key for more than 2 seconds.
The automatic station search with the programming of the station
keys starts just as when initially connecting the radio.
Due to changes in the reception quality other stations can also be
stored
Tune in to your desired station. To store the station at a particular
station number you must:
a)for the single digit station numbers 1-9 press and hold the
desired
station-key for more than two seconds;
b)and for the double digit station numbers 10-20 press the tens
digit of the station number (i.e,1 or 2) briefly then press and hold
the ones digit of the station number (1-0) for more than two
seconds.
The storing of the station is confirmed by the signal tone.
In the display you will see the frequency and followed by
the station number which you have just entered.
Example: Storing a station at station number 19:
Tune in to the station you wish to store. Press the station key
briefly. Press and hold station key until the storing is confirmed
by the signal tone. The station is now stored, in the display you will
see the frequency you are tuned to and M 19
Note
The station previously at this station number is erased by the new
station.
Radio play
5.3 ATS
5.4 Storing stations manually
8

.
For example, to play the first station with station key 1 and to receive
the second station with station key 2, the order of the stations from
the automatic programming can be changed.
Example:
The first program is at station key 16 and should be played at
Station key 1.
First press station keys 1 + 6
Then press and hold station key 1 for approx. 2 seconds.
The successful reprogramming is confirmed by the signal tone.
The first station is now at station key 1 and the station previously
stored at station key 1 is now stored at station key 16.
When switching on the appliance at the on/off switch the last
station heard is played again.
The last frequency heard appears briefly in the display.
After a few seconds the time is displayed.
To receive stereo stations, the switch FM must be at STEREO.
If a stereo station is being received the display /ST lights up
green.
If the reception signal is weak or disturbed by static, it is better to
switch to MONO.
When the appliance is turned on you can switch between the time
and frequency displays by briefly pressing station key 0 .
Radio play
5.5 Interchanging two pre-programmed stations
5.6 Last Station Memory
5.7 Stereo reception
5.8 Switching between frequency and time displays
9

6.1 Automaticswitch-on-alarm
Your appliance has two independent alarm memories; one for
the alarm with radio and one for the alarm with the beeper.
Switch the alarm function on with key . By repeatedly pressing
key you can choose between radio alarm (display ), beeper
alarm (display ) and the alarm with both beeper and radio (display + ).
Beeper alarm
1.Selecting the beeper alarm
Press key / until the symbol appears in the display.
2.Setting the alarm time
To set the alarm time press and hold key SET and enter
the desired time using the number keys .
Example: Alarm time 9:30 am keys 0, 9, 3, 0
After releasing key SET the alarm time is active
The symbol and the alarm time are displayed to show that
the automatic function is on.
The beeper sounds at the programmed time.
3.Switching the alarm off
To turn the appliance off press key .
The beeper switches off automatically after one hour if key
is not pressed.
The appliance switches on automatically at this time every day
as long as the symbol is lit in the display.
Alarm with radio
Tune in to the desired radio station and set the volume.
1.Selecting the radio alarm
Press key / until the symbol appears in the display.
Timer
10

Timer
2.Setting the alarm time
Checking the alarm time
To set the alarm time, press and hold key SET and enter
the desired time using the number keys .
After releasing key the alarm time is active (the symbol
is displayed followed by the programmed alarm time).
At the pre-programmed time the appliance switches the last
station heard The alarm time blinks.
To turn the appliance off press key .
The appliance switches on automatically at the same time every day
as long as the symbol is shown in the display.
To switch off the alarm press key repeatedly until neither
nor is shown in the display.
If you wish to check the alarm time for the beeper alarm press key
SET . The programmed alarm-time appears next to the symbol
To check the radio alarm press key SET
The programmed alarm-time is displayed next to the symbol .
If you wish to listen to the radio for more than one hour, either
Switch the appliance off and on again or switch the alarm function
off with key / (neither nor is displayed).
The alarm will not function during a power cut. However, the pro-
grammed alarm times remained stored and do not have to be re-
programmed.
If you activate both alarm times, both symbols ( and ) are displayed.
However, only the alarm time which will be active next is displayed.
Alarm 06:20, alarm 07:20, current time 23:30
Display
3.Switching the alarm off
Notes
Example:
MHZ
11

Time
6.2 Sleep function
6.3 Setting the short-term alarm
With the radio turned on press key for a few seconds.
In the display the minutes still to be played from 60:00 10:00 are
displayed along with the symbol .
Upon reaching the desired remaining playing time, release key.
The symbol and the remaining time are displayed to show that
the sleep function is active.
The appliance switches off automatically after the programmed
time.
1. Setting the short-term alarm
To set the short term alarm press and hold key 0...99 and
enter the the desired time using the number keys .
Any alarm time between 1 and 0...99 minutes can be set.
Example: Alarm in 22 minutes- keys 2, 2
After releasing key 0...99 the alarm time is active.
In the display , and the time selected is shown in the form
minutes: seconds and the time runs down every second.
The alarm tone sounds when the programmed time is reached.
2.Switching the short-term alarm off
To switch the alarm off press key or key 0...99 briefly.
The alarm switches off automatically after one minute.
12
Other Sangean Radio manuals

Sangean
Sangean DT-180V User manual

Sangean
Sangean MS-112 User manual

Sangean
Sangean DPR-69+ User manual

Sangean
Sangean DDR-31+ User manual

Sangean
Sangean DPR-99 Plus User manual

Sangean
Sangean ATS-303 User manual

Sangean
Sangean PR-D18 User manual

Sangean
Sangean DPR-2 User manual

Sangean
Sangean DDR-75BT User manual

Sangean
Sangean WFR-1 - DATASHEET 3 User manual

Sangean
Sangean RCR-22 User manual

Sangean
Sangean ATS-803A User manual

Sangean
Sangean PR-D3 User manual

Sangean
Sangean WR-2 User manual

Sangean
Sangean WR-2 User manual

Sangean
Sangean WR-15WL User manual

Sangean
Sangean ATS-909 User manual

Sangean
Sangean HD Radio HDR-14 User manual

Sangean
Sangean WR-1 User manual

Sangean
Sangean DT-180 User guide