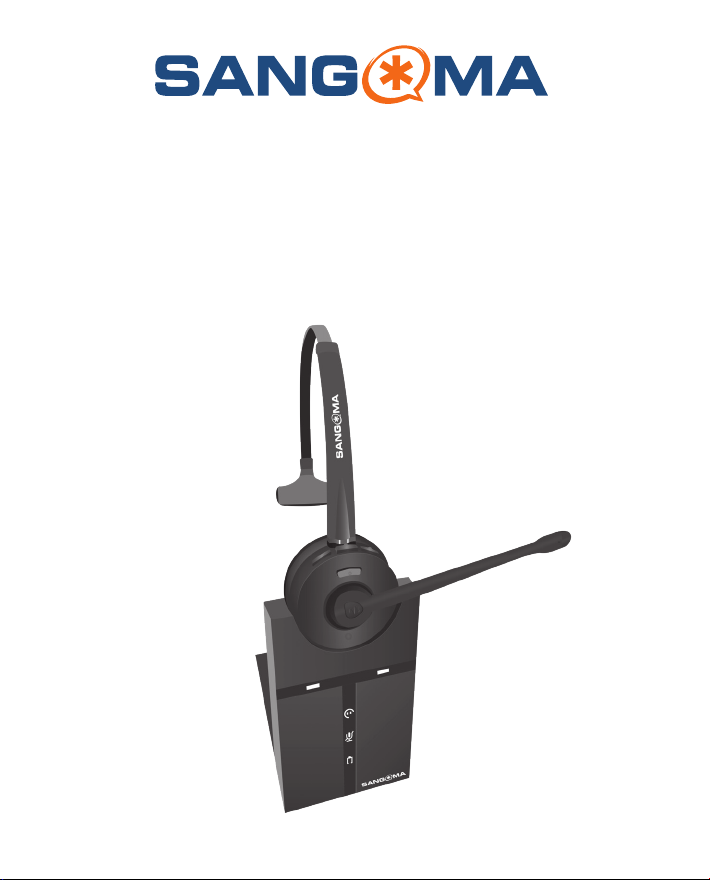
Sangoma H10 User manual

H10
Wireless DECT Headset
and Base for Desk Phones
User Manual

H10 User Manual
2
H10 User Manual
1. Welcome............................................................................................................. 3
2. Product Overview............................................................................................... 4
2.1 Package Contents.........................................................................................4
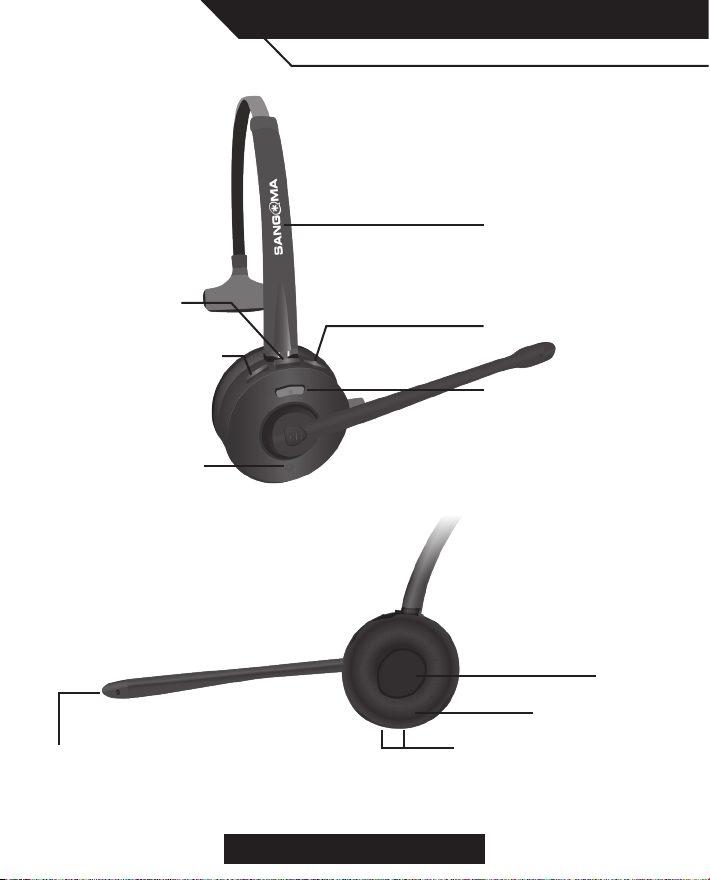
2.2 Headset Overview .........................................................................................5
2.3 Base Overview...............................................................................................6
3. Connecting to Desk Phones...............................................................................7
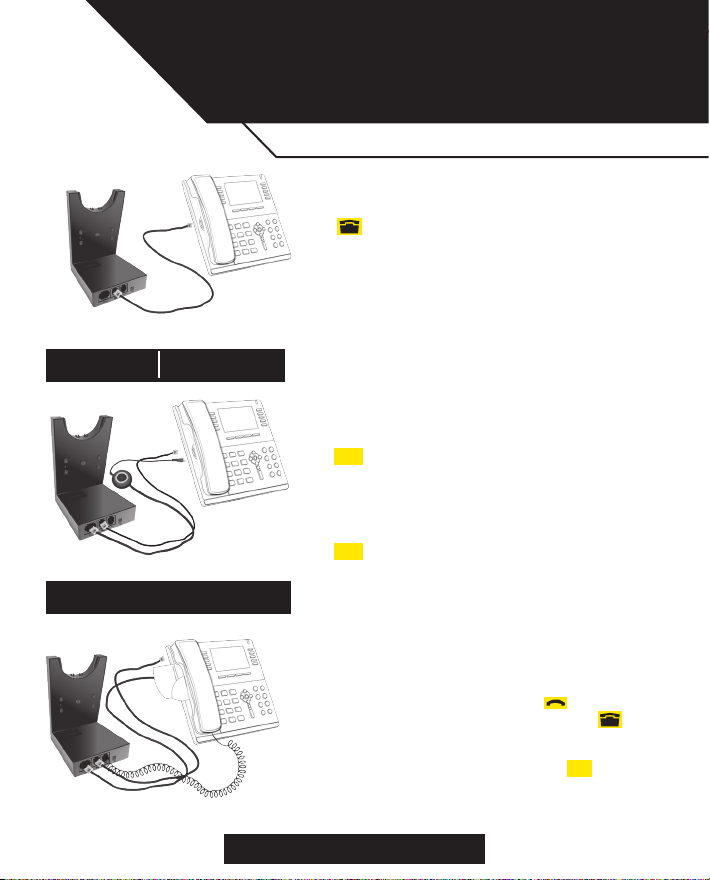
3.1 Connecting to Desk Phones..........................................................................7
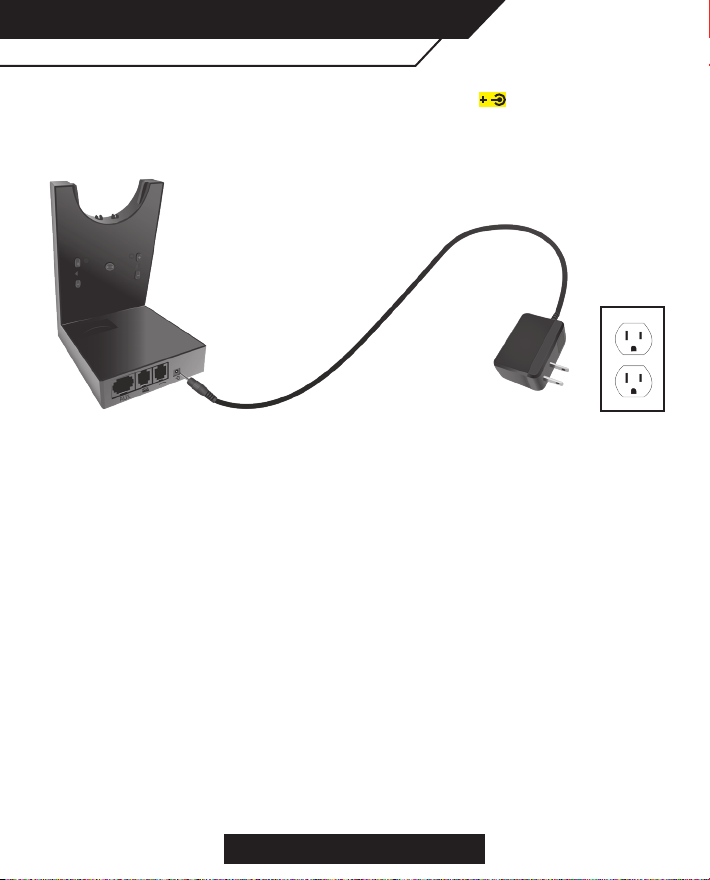
3.2 Connecting Power.........................................................................................8
3.3 Dock the Headset.......................................................................................... 9
4. Unpairing and Re-pairing ................................................................................. 10
5. Conguration of Dialtone..................................................................................10
6. Microphone Gain and Speaker Volume............................................................11
7. Headset Features ............................................................................................. 12
7.1 Headset Multi-Function Button ...................................................................12
7.2 Headset Speaker Volume Buttons .............................................................. 12
7.3 Headset Mute Button .................................................................................. 13
7.4 Headset LED Indicator ................................................................................ 13
8. Call Management .............................................................................................14
8.1 Making, Answering, and Ending Calls.........................................................14
9. Technical Specications...................................................................................15
9.1 H10 DECT Headset ..................................................................................... 15
9.2 Headset Battery ..........................................................................................16
9.3 H10 DECT Base ..........................................................................................17
9.4 Product Disposal.........................................................................................17
9.5 FCC Note to Users ......................................................................................18
9.6 IC Notice to Users .......................................................................................19

H10 User Manual 3
1. Welcome
Congratulations on your purchase of a Sangoma Headset.
We are sure you will enjoy its wide range of features, that you will nd
it comfortable to wear, and easy to use.
Sangoma Headset Features:
• Wideband audio for exceptional sound quality
• Volume and Mute controls
• Multi-function button for call handling
• LED & Audio indications
• Noise-cancelling microphone
Sangoma Headset Base Features:
• Headset charging cradle
• Call Status and Mute LED indicators
• Battery indicator
• Volume adjustment
• AUX port for Desk phone EHS adapters

H10 User Manual
4
2. Product Overview
2.1 Package Contents
Headset
Base
Telephone Cable
SOLD SEPERATELY
EHS Cable for D-Series Phones
HC01 (1TELHC01LF)
User Manual
H10
Wireless DECT Headset
and Base for Desk Phones
User Manual
Power Adapter

H10 User Manual 5
2.2 Headset Overview
Headband
Speaker Volume Up
Multi-Function Button
Microphone Mute
Speaker Volume Down
Noise-Cancelling Microphone
Handset Status LED
Handset Charger Contacts
Speaker
Leather Cushion

H10 User Manual
6
2.3 Base Overview
Headset Cradle
Microphone Volume Adjustment
Charger Contacts
Pair Button
Headset in Use Lights
Speaker Volume Adjustment
Microphone Mute LED
Dialtone Adjustment
Battery Status LED Icon Status
Indicates when headset
is o-hook
Active audio linked between
headset and base
Searching for headset
Microphone muted
Battery charging
Full battery
Medium battery
Low battery
Unknown battery status
Power Input
Headset Indicator LED
Desk Phone Port
Handset Port (Lifter Conguration Option)
AUX/EHS Cable

H10 User Manual 7
S-Series Phone with remote Handset Lifter
A handset lifter manually lifts the desk phone handset to answer or
place a call. For mounting instructions, please refer to the
documentation supplied with your handset lifter.
1. On the S-Series phone, unplug the handset cable from the desk phone.
2. Connect the handset cable to the port marked on the base.
3. Connect the supplied telephone cable to the port marked
on the base.
4. Connect the telephone cable to the handset port on the desk phone.
5. Connect the handset lifter cable to the port marked AUX on the base.
*D-Series phones are not compatible with handset lifters.
3. Connecting to
Desk Phones
3.1 Connecting to Desk Phones
EHS Option EHS Adapters
sold separately
Remote Handset Lifter Option
S-Series Phones* via EHS30 Adapter
1. Connect the EHS30 adapter’s RJ12 port to the Ext. port of
the S-Series phone.
2. Connect the EHS30 adapter’s RJ45 port to the port marked
AUX on the base. *Except s205, s206, s300, s305
D-Series phones via D-Series EHS Adapter
1. Connect the D-Series EHS Adapter cable’s 5-pin header to the
EHS port of the D-Series phone.
2. Connect the D-Series EHS Adapter cable’s RJ45 header to the
AUX port on the base.
1. Connect the supplied telephone cable to the port marked
on the base.
2. Connect the telephone cable to the headset port on the
desk phone.

H10 User Manual
8
3.2 Connecting Power
1. Plug the power adapter into the power input port marked on the base.
2. Connect the power adapter to the mains power socket.

H10 User Manual 9
3.3 Dock the Headset
WARNING: Before proceeding, the headset
must charge on the base for at least
ONE MINUTE.
First, press the Multi-function button. Its LED
indicator will turn on, and it will power on after
2 seconds. Next, press the multi-function
button again, or dock the headset with the
base. Next, lift the headset, and the Headset
Paired LED indicator will illuminate.
When properly docked, the headset battery
will, if needed, begin charging. When charging,
the Battery Charging Status LED will
illuminate. Charge the headset for 20 minutes
or until the battery indicator is steady green.

H10 User Manual
10
4. Re-Pairing and Unpairing
5. Conguration of Dialtone
Re-Pairing
To re-pair, hold the Pair Button for 5 seconds. The Pairing Indicator LED will ash while
it is searching. Hold the Mute button on the headset. Pairing will be
accomplished, and the Headset’s Status LED will ash. To conrm pairing, the Pairing
Indicator LED and the Headset LED will both dim at the same time.
NOTE: Headset may need to be re-paired if the Pairing Indicator LED on the base is
blinking continuously.
Unpairing
To unpair, unplug the power adapter from mains power. Then, while holding the
Microphone + indicator on the base, plug in mains power. The Battery Charging Status
LED will ash 3 times, and the headset and the base will be unpaired. Once this is
completed, the base will begin searching for a new headset with which to pair, and a
Pairing Indicator LED will illuminate.
By default, Headsets used with Sangoma phones,
should not need adjustment and the Dialtone
Adjustment Switch can stay in the Mode A
position. When using the headset with
non-Sangoma phones, if the dialtone is not clear,
the sliding Dialtone Adjustment Switch is available.
CLICK

H10 User Manual 11
In order to account for environments with dierent near-end and far-end settings, the
base oers microphone gain and speaker volume adjustment buttons. To use them:
1. Put on the headset
2. Press the headset button on the desk phone
or the multi-function button on the headset if
using EHS.
3. Make a test call
4. Adjust the microphone gain using the
microphone volume buttons,
as illustrated, if your speaking volume is too
loud or too quiet.
5. Adjust the speaker volume using the speaker
volume buttons, as illustrated, if the far
end is too loud or quiet
6. End the call
6. Microphone Gain and
Speaker Volume
MICROPHONE
ADJUSTMENT
SPEAKER
ADJUSTMENT

H10 User Manual
12
7.1 Headset Multi-Function Button
7.2 Headset Speaker Volume Buttons
7. Headset Features
Pressing the multi-function button will answer incoming calls and end current calls.
When not on an active call, the multi-function button can be held down to turn the
headset o and pressed once to turn it on.
The speaker volume buttons adjust the headset speaker volume.
Multi-Function Button
Speaker Volume Button “-” Speaker Volume Button “+”
Function Press Press
Hold
Answer incoming call √
End current call √
Power on √
Power o √

H10 User Manual 13
7.3 Headset Mute Button
The mute button mutes or un-mutes the headset microphone.
Mute Button
LED Indicator
Function Press Press
Hold
Microphone muting √
Unmute microphone √
Pair √
Headset State LED Indicator
Power on Light hold for 2 seconds
Standby ON 250ms OFF 4 seconds FLASH
Incoming call ON 300ms OFF 700ms FLASH
Power o ON 100ms OFF 100ms FLASH 3 seconds
Connected Light on hold
Headset docked in base OFF
Pairing ON 250ms OFF 250 ms FLASH
Online Light on hold
Low battery alarming ON 300ms OFF 100ms + ON 30ms OFF 500ms FLASH
7.4 Headset LED Indicator

H10 User Manual
14
8.1 Making, Answering, and Ending Calls
8. Call Management
Phone without EHS Adapter Phone with EHS Adapter
1. Life the headset from docking cradle or
press the multi-function button.
2. Press the headset button on the desk
phone.
3. Dial numbers through desk phone.
1. Life the headset from docking cradle or
press the multi-function button.
2. Press the headset button on the desk
phone.
1. Press the headset button on the desk
phone.
2. Dock the headset or press the
multi-function button.
Make a
Call
1. Life the headset from docking cradle or
press the multi-function button.
2. Dial the numbers through the desk
phone.
Life the headset from docking cradle or
press the multi-function button.
Dock the headset or press the
multi-function button.
Answer
a Call
End a
Call

H10 User Manual 15
9.1 H10 Headset
9. Technical Specications
Operating Environment:
0 ˚C to + 40 ˚C; Up to 95% Rh non-condensing.
Call Control:
Multi-function button support for answer call, end call, reject call, docking operations
also answer and end calls.
Volume Control and Microphone Mute:
Button controls on headset.
Visual Indicator:
LED indicates call status, pairing status and other events.
Audio Indicator:
Tones indicate incoming calls, low battery, volume level, microphone muting and other events.
Sound Quality:
DSP noise reduction; echo cancellation; tone control; wideband and narrowband audio.
Recharge:
While docked in the H10 DECT Headset Base.
Sound Quality:
(CAT - IQ) European DECT and U.S. DECT.
Range:
For European DECT, up to 120 meters from H10 DECT Headset base to headset.
For U.S. DECT, up to 350 feet from H10 DECT Headset base to headset.
Frequencies:
U.S. DECT: 1.92 - 1.93 GHz. EU DECT: 1.88 - 1.90 GHz.
Wearing Style:
Headband and ear hook.
Microphone Boom Arm Style:
Long boom arm.
Speaker(s):
Wideband speaker.
Microphone:
Noise-cancelling microphone.

H10 User Manual
16
Battery Type:
Lithium Ion-polymer.
Battery Capacity:
300 mAh, typical.
Battery Talk Time:
Up to eight hours.
Battery Lifetime:
Minimum 1000 charge cycles.
Battery Standby Time:
At least 36 hours.
Operating Temperature Range:
-20 ˚C to + 60 ˚C.
Battery Charge Time:
20% charge in less than 20 minutes.
50% charge in less than 45 minutes.
Full charge in less than three hours.
Battery Shelf Life:
Headset battery holds charge for six months in the o state before recharge is required.
9.2 Headset Battery

H10 User Manual 17
H10 DECT Base meets the following specications.
Dimensions:
97 mm x 75 mm x 120 mm.
Wireless Standard:
(CAT - IQ) European DECT and U.S. DECT.
Operating Environment:
-0˚C to +40˚C; Up to 95% Rh non-condensing.
Recharge Base:
Fits supplied H10 DECT series headset.
Desk Phone Connections:
RJ-11 for handset, RJ-11 for phone body (or headset port), RJ-45 for AUX (for Link).
Dialtone Adjustment Switch and Microphone Volume Switch:
Electromechanical switches. Dialtone adjustment switch and microphone volume level
set manually.
Please dispose of the headset according to local regulations and recycle when possible.
Do not dispose as household waste. Do not dispose of the headset in a re as the
battery may explode. Batteries may also explode if damaged.
9.3 H10 DECT Base
9.4 Product Disposal

H10 User Manual
18
This device complies with part 15 of the FCC Rules. Operation is subject to the following
two conditions: (1) This device may not cause harmful interference, and (2) this device
must accept any interference received, including interference that may cause
undesired operation.
Note: This equipment has been tested and found to comply with the limits for a Class B
digital device, pursuant to part 15 of the FCC Rules. These limits are designed to pro-
vide reasonable protection against harmful interference in a residential installation. This
equipment generates, uses and can radiate radio frequency energy and, if not installed
and used in accordance with the instructions, may cause harmful interference to radio
communications. However, there is no guarantee that interference will not occur in a
particular installation. If this equipment does cause harmful interference to radio or
television reception, which can be determined by turning the equipment o and on, the
user is encouraged to try to correct the interference by one or more of the
following measures:
—Reorient or relocate the receiving antenna.
—Increase the separation between the equipment and receiver.
—Connect the equipment into an outlet on a circuit dierent from that to which the
receiver is connected.
—Consult the dealer or an experienced radio/TV technician for help.
Specic Absorption Rate (SAR) information
SAR tests are conducted using standard operating positions accepted by the FCC with
the device transmitting at its highest certied power level in all tested frequency bands,
although the SAR is determined at the highest certied power level, the actual SAR
level of the device while operating can be well below the maximum value. Before a new
product is a available for sale to the public, it must be tested and certied to the FCC
that it does not exceed the exposure limit established by the FCC, tests for each phone
are performed in positions and locations as required by the FCC.
For headset, this part has been tested and meets the FCC RF exposure guidelines when
used with an accessory designated for this product or when used with an accessory
that contains no metal.
For baseband, this equipment complies with FCC radiation exposure limits set forth
for an uncontrolled environment. This equipment should be installed and operated with
minimum distance 20cm between the radiator and your body.
9.5 FCC Note to Users

H10 User Manual 19
This equipment complies with ISEDC RF radiation exposure limits set forth for an
uncontrolled environment. This transmitter must not be co-located or operating in
conjunction with any other antenna or transmitter.
Après examen de ce matériel aux conformité ou aux limites d’intensité de champ RF, les
utilisateurs peuvent sur l’exposition aux radiofréquences et la conformité and
compliance d’acquérirles informations correspondantes.
7.6 IC Notice to Users

For compliance information please visit
www.sangoma.com/compliance Rev: V1.021820
Table of contents
Other Sangoma Headset manuals