Sanipex AQUAECO AQA-ECO-703 Series User manual
AQA-ECO-703-XX
AQUAECO TOUCHLESS SOAP/SANITIZER DISPENSER 700ML
www.sanipexgroup.com
AQUAECO
WASHROOM AND PLUMBING SOLUTIONS
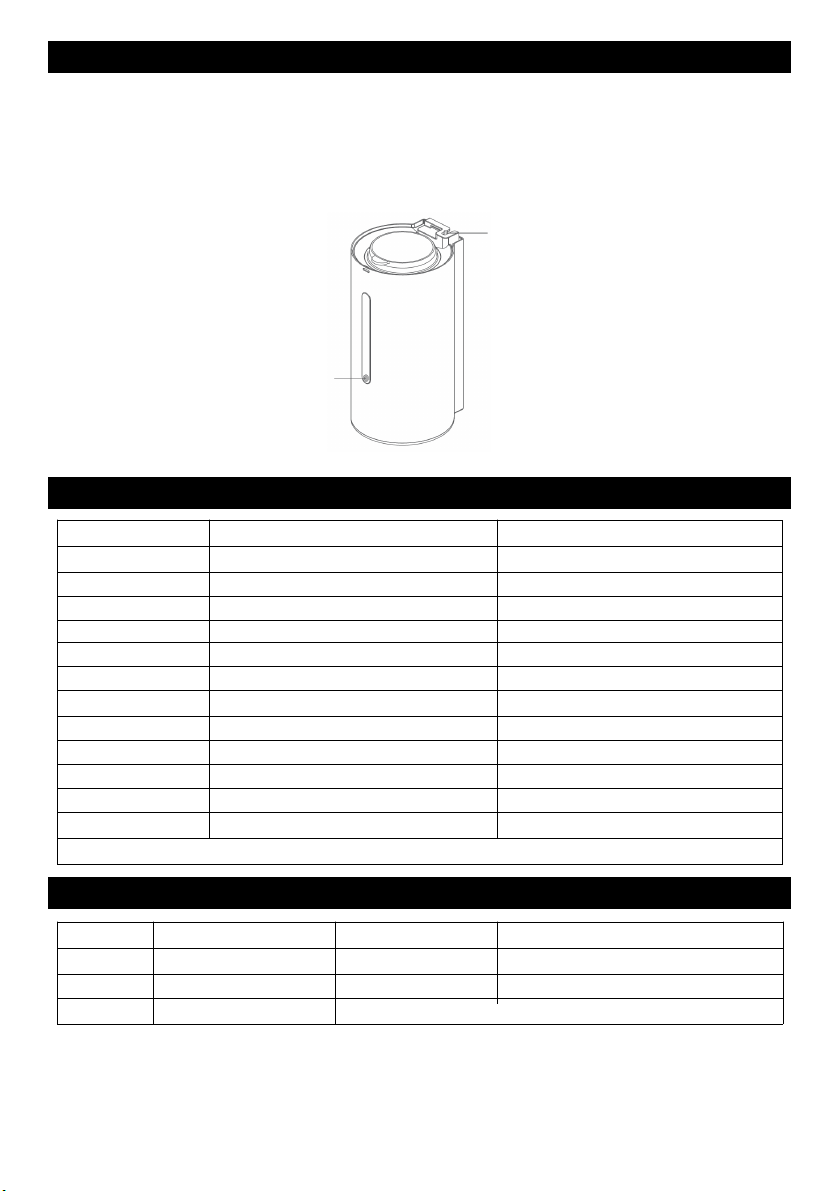
Introduction
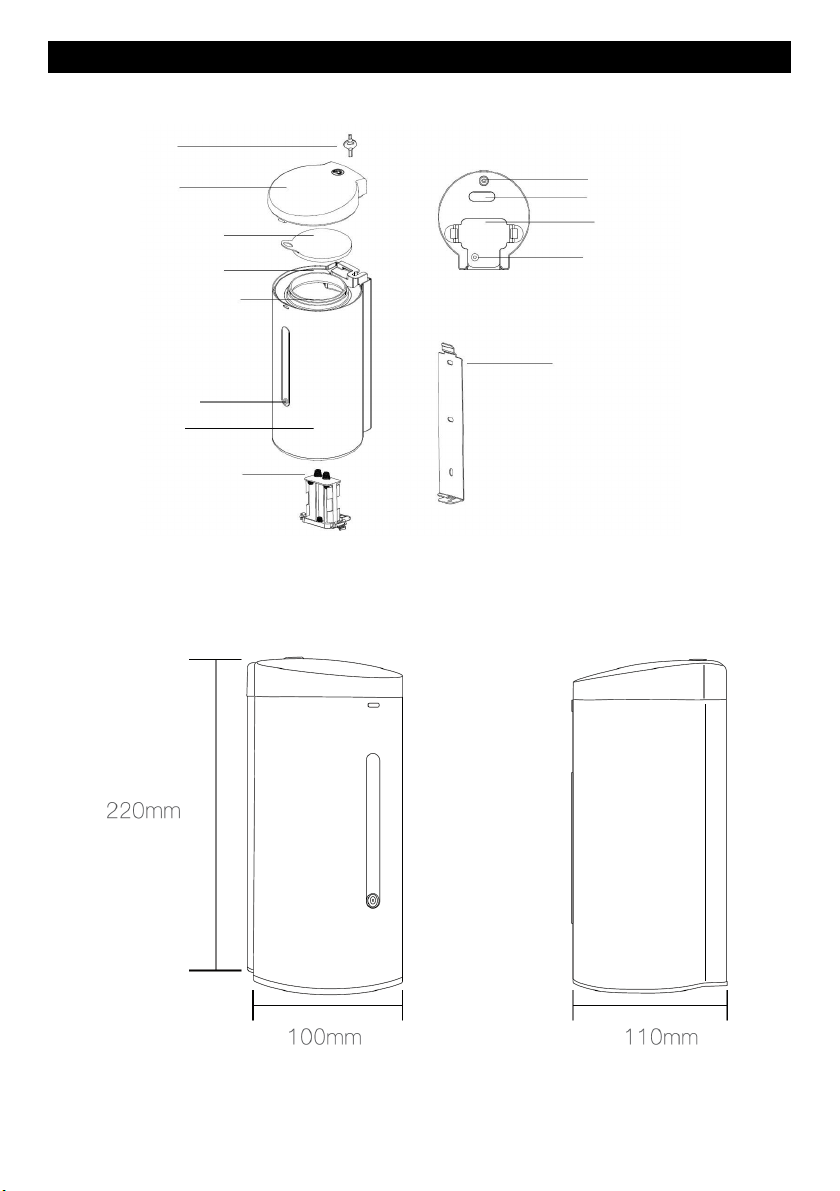
Bottom
Liquid outlet
Sensor window
Battery box
Anti removal screw
Installation Panel
Note: Reference the product
key
Cap
Sealing Cap
Fixed Bracket
Inner Container
Shell
Indicator
Battery Container
Dimension

Important Safety Instruction
To make sure the unit dose work and extend its lifespan under the good condition, please notice that:
Packing list
1. Please read user manual and instructions very carefully before installing the unit.
2. Please using the same AA battery (6 pcs) of well — known brand. Old and new batteries cannot
be mixed. If counterfeit or low—grade batteries are used, it may do harm to the unit lifetime.
3. Please check the wall is flat or not and clean the surface of wall before installing the unit.
4. Distance (more than 25cm) will be needed from the bottom of unit to tables or other objects.
5. The instructions of installing will be given to the user or manager by qualified person.
6. Reflective objects must not be put in the sensing distance under the unit.
7. Please do not cover with reflective objects (such as mirror or stainless steel) on the table
against the bottom of the unit, to avoid wrongly placed.
8. Indoor use only, to avoid wrongly placed.
1. Please make sure if any items are missing or problems before installing, contact your dealer or
manufacturer.
2. Specification of part items changed might be not informed in time, please contact your dealer or
manufacturer when problems cannot be solved during installing.
3. Main objects are sealed by special bag. Do not hit or drag too heavy when you move or open the
bags.
Installation
Floor
Tips: Ensure the distance between
sensing window and counter top is
above 35cm When installing on
stainless steel counter top.
1. Unit x 1
2. Installation Panel x 1
3. ST4X25 Screw x 3
4. Installation Manual x 1
5. Expansion Screw x 3
6. Certification x 1
7. key x 1
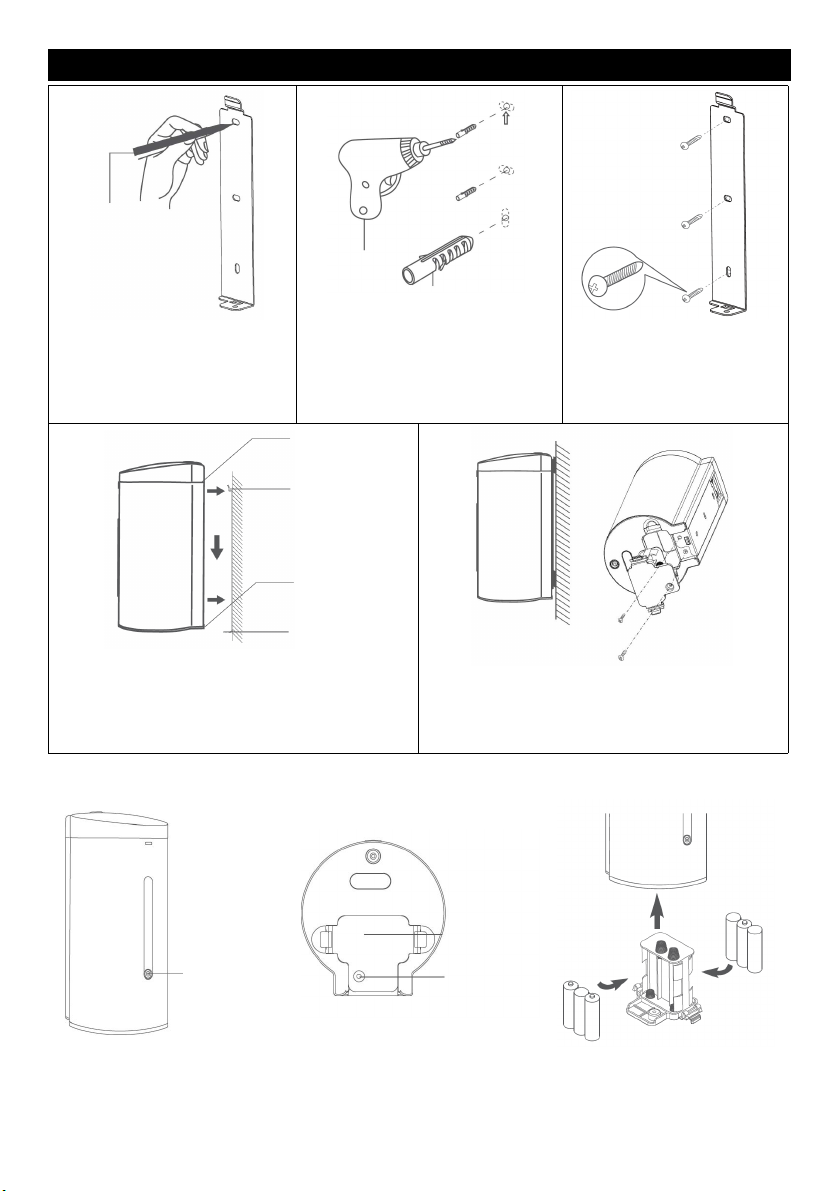
Installation
1. Refer to step:5, remove
mounting plate from the machine.
Attach the mounting plate to the
wall and draw the positions of
three mounting holes with pencil.
2. Use a drill to bore three holes ($6)
according to the marks, put
expansion screw head into the
corresponding holes.
3. Screws will be matched with
plastic nail heads in the wall, lix
them together with mounting
plate.
4. Align the upper slot of the machine with the
mounting plate clip, then make the machine fit with
the mounting plate, and then slide the machine
downward to make the upper and lower clips all
snap in.
Upper Slot
Upper Clip
Lower Slot
Lower Clip Anti Theft Screw
Anti Removal Screw
Battery Installing and Replacement
5.Screw in the anti-theft screw, then install the
battery box and screw in the anti-removal screw.
3. Put in or replace all standard
batteries {(DC 9V/AA batteries
(6 Pcs)}. Put it back and
tighten the screws.
2. Unscrew the screw and remove
the battery box.
2. Keep the body straight up when
the LED light is flashing.
Indicator
Battery box
Screw
Drill
Pencil
Expansion Screw
1. The unit includes electronic devices and solenoid valve, please do not knock.
2. Caution for connecting line when disassembling the unit.
3. Please wipe it using soft cloth with neutral detergent when cleaning the product.
Next wipe detergent and dirt by the wrung—out soft cloth, then using dried soft
cloth to dry.
4. Please do not washing with watering or using some detergent with particle such
as scouring powder and laundry detergent, also do not using diluent, detergent
with high acid or Nylon brush to clean this product, lest to damage surface or
erode internal electronic components, especially be careful not to damage
transparent cover which placed induction window to avoid decrease the
effectiveness of reaction. Tips: Ensure the distance between sensing window and
counter top is above 35cm When installing on stainless steel counter top.
Installation.
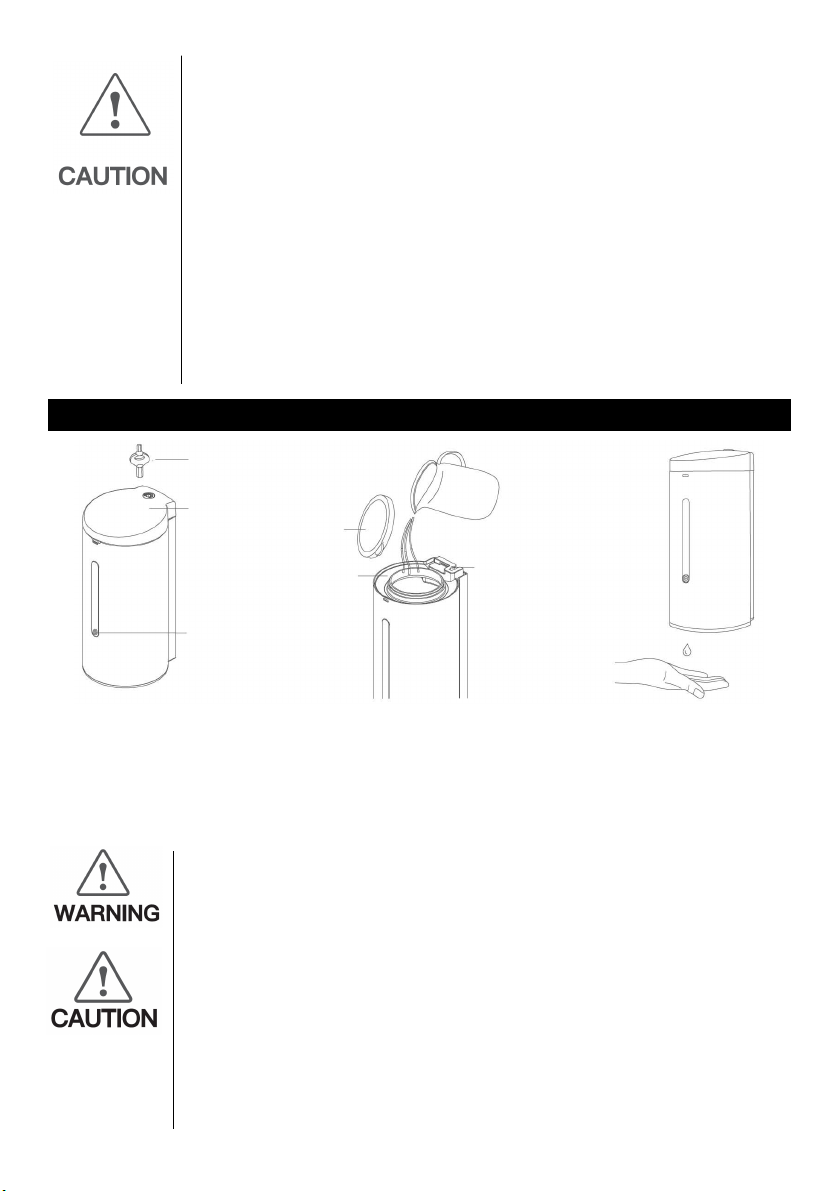
How To Use
Put your hand under the sensor
until the liquid sprayed out.
Open the sealing cap and pour the
liquid soap, remove the extra over
wing, and recover it.
Insert the key into the lock to
open the top cover after install
the battery Long press the setting
button for about 3 seconds, then
the LED light on with flashing 3
times.
Children should be used under adult supervision to prevent accidentally eating! Please
don’t throw away discarded batteries, recycling used batteries by correct way!
The unit has been designed with microcomputers & electronic circuit etc. Do not splash
water.
1. After installing the batteries, long press the setting button for about 3 seconds, then
the LED light on with a flashing, after 3 times flashing will the unit stay in standby,
long press the setting button to switch between turning the machine standby Status
and dormant status.
2. The unit is suggested to install batteries even if you don’t use it, so that the unit will
run automatically every 72 hours to avoid the catheter pressure adhesion.
3. Some of unit had installed batteries and in dormant status before delivery. Keep
press setting buttons for more than 3 seconds, the indicator will flash 3 times turning
into standby status. Whereas if the unit turn to dormant status after keeping press
the setting button.
Liquid Button
Indicator
Fixed Bracket
Sealing Cap
Cap
Key
1
Material 304 stainless steel Power DC9V(6AA Batteries
Volume 700ml Sensing Distance 5-9cm
Dimension 100 x 110 x 220mm Liquid Supply 0.5ml-2.5ml (5 step adjustment)
Net Weight 1.1kg Ambient temperature 0-45 °C
Liquid Adjustment
At the standby status, you can adjust liquid by pressing the liquid adjustment button. The default
liquid volume output is around 1.0ml before delivery, it will increase around 0.5ml output for per
press. Totally 5 levels adjustment with the range of liquid soap supply 0.5—2. Smt. Different liquid
may have a slight deviation.
Liquid Adjustment Button
Indicator
Troubleshooting
Problem Reason Potential Solution
LED indicator off Control system trouble Replace the controller
Power supply problem Check the Circuits and batteries
Batteries poor contract or out of power Re—install or replace e the batteries
Circuit problem or poor contact Check the Circuits
Block sight of indicator Clean the indicator window
LED light flash Not enough power Replace the batteries
Indicator on Sensor continue working Remove the sensing object
without liquid Out of sensing distance Contact the the dealer
supply Unit fault Contact the the dealer
Insufficient liquid Short liquid supply time Adjust the liquid output
supply Too viscous liquid Reduce liquid viscosity
Liquid Coagulation or obstruction Try sometimes or contact the dealer
Tips: Please prevent debris from entering the container to avoid blocking.
Specification

Note:

INA-ECO-703-XX-08-21
www.sanipexgroup.com
AQUAECO
WASHROOM AND PLUMBING SOLUTIONS
Table of contents
Other Sanipex Dispenser manuals


Popular Dispenser manuals by other brands

Silver King
Silver King Majestic SK12MAJ Technical manual and replacement parts list

Franke
Franke F3Dn Twin Service manual

STIEBEL ELTRON
STIEBEL ELTRON UltraHot Plus Operation and installation instructions

DAN DRYER
DAN DRYER 282 installation guide

Essity
Essity Tork 473208 manual

CBS
CBS SD300BU-88 COMPONENT MAINTENANCE MANUAL WITH ILLUSTRATED PARTS LIST


