Sanitaire RS72 User manual

Document No. 98-1181A2 • Revised June 2007 • ©2005-2007 Atlantic Ultraviolet Corporation
ultraviolet.com
375 Marcus Boulevard •Hauppauge, NY 11788 •USA
631.273.0500 •Fax: 631.273.0771
e-mail: [email protected]
Extensive Product Information Available at:

2
TABLE OF CONTENTS
SAFETY WARNINGS.....................................................................................................................................................3
SAFETY INSTRUCTIONS............................................................................................................................................3
PRODUCT APPLICATION...........................................................................................................................................4
PRINCIPLE OF OPERATION.............................................................................................................................................4
CONSTRUCTION ............................................................................................................................................................5
LIMITATIONS.................................................................................................................................................................5
UNPACKING...................................................................................................................................................................6
INSTALLATION .............................................................................................................................................................6
UNIT PLACEMENT.........................................................................................................................................................6
DIMENSIONAL DATA .....................................................................................................................................................7
REQUIRED TOOLS .........................................................................................................................................................7
SET UPINSTRUCTIONS..................................................................................................................................................8
STANDARD..............................................................................................................................................................8
STANDARD WALL MOUNTING ...............................................................................................................................8-9
TECHNICAL ASSISTANCE .............................................................................................................................................10
OPTIONAL ACCESSORIES.............................................................................................................................................10
MAINTENANCE...........................................................................................................................................................10
REQUIRED SUPPLIES ...................................................................................................................................................10
AIR INTAKE FILTER CLEANING ...................................................................................................................................11
CLEANING AIR INTAKE FILTER(S)..........................................................................................................................11
GERMICIDAL LAMP CLEANING OR REPLACEMENT.......................................................................................................12
BREAKAGE .................................................................................................................................................................12
DISPOSAL OF MERCURY ADDED LAMPS......................................................................................................................12
LAMP-OUT PROTECTION .............................................................................................................................................12
TROUBLESHOOTING................................................................................................................................................13
TECHNICAL SPECIFICATIONS...............................................................................................................................14
REPLACEMENT PARTS.......................................................................................................................................14-15
USER ASSISTANCE.....................................................................................................................................................16
WARRANTY..................................................................................................................................................................16
PATENT NOTICE...........................................................................................................................................................16

3
SAFETY WARNINGS
• All personnel should be alerted to the potential hazards indicated by the product safety labeling on this unit.
• The following conventions are used to indicate and classify precautions in this manual and on product safety
labeling. Failure to observe precautions could result in injury to people or damage to property.
SAFETY INSTRUCTIONS
WARNING: To guard against injury, basic safety precautions should be observed, including the following:
1. Read and follow ALL safety instructions.
2. WARNING: Avoid exposure to direct or strongly reflected germicidal ultraviolet rays.
Germicidal ultraviolet rays are harmful to the eyes and skin.
3. Intended for indoor use only.
4. Do not alter the construction or design.
5. Do not override safety interlock.
6. Do not remove safety labels or devices.
7. Do not operate the equipment if the power cord and/or plug are damaged. Replace damaged power cables
immediately.
8. CAUTION:Do not operate without proper electrical ground.
9. Keep inlet and outlet, of the blowers, clean and clear of debris.
10. Do not operate without access cover secured.
11. Stay clear of blowers, or other moving parts that can cause injuries.
12. Utility power supplied, to the unit, MUST match power requirements listed on the System label.
13. Always disconnect utility power, to the sanitizer, before performing any maintenance to prevent unexpected
application of power.
14. Read and follow all notices and warnings on the sanitizer.
15. SAVE THESE INSTRUCTIONS.
!
!
!
This is the safety alert symbol. It is used to
alert you to potential personal injury hazards.
Obey all safety messages that follow this
symbol to avoid possible injury or death.
Danger indicates an IMMINENTLY
hazardous situation, which, if not avoided,
WILL result in death or serious injury.
Warning indicates a POTENTIALLY
hazardous situation, which, if not avoided,
COULD result in death or serious injury.
Caution indicates a POTENTIALLY
hazardous situation, which, if not avoided,
MAY result in minor or moderate injury.
Caution used without the safety alert
symbol indicates a potentially hazardous
situation, which, if not avoided, may result
in property damage.
This symbol/pictorial is used to identify
an ELECTRICAL SHOCK or
ELECTROCUTION hazard.
• Product safety labels should be periodically inspected and cleaned, as necessary, to maintain good legibility.
Always replace illegible safety labels. Contact factory to obtain replacement safety labels.
This symbol/pictorial is used to identify
an ULTRAVIOLET LIGHT hazard.
This symbol/pictorial is used to identify
the need to wear approved ultraviolet
resistant face shield.
This symbol/pictorial is used to identify
the need to wear protective gloves.
!

4
PRODUCT APPLICATION
PRINCIPLE OF OPERATION
The Sanitaire®design has been carefully conceived to provide germicidal ultraviolet exposure for air disinfec-
tion. The dosage, as it applies to ultraviolet disinfection, is a function of time, and the intensity, of ultraviolet radiation,
to which the air is exposed. The exposure time, in seconds, is the total time it takes the air to move through the ultravi-
olet field, produced by the germicidal lamp(s). Exposure time is related to the airflow rate; the higher the airflow, the
lower the exposure time or the lower the airflow, the higher the exposure time.
The operation of the Sanitaire®is as follows:
1. Air is drawn into the sanitizer through the electrostatic filter(s).
2. The air is forced into the exposure chamber, where it is irradiated by the germicidal ultraviolet lamps.
3. Sight glass provides positive indication of germicidal lamp operation.
4. The purified air exits the sanitizer, through the louvered exhaust panel, located at the opposite end of the
sanitizer. In the case of the Sanitaire®Model RSA760, once through the louvered exhaust panel, air is
forced through a .3 micron HEPA filter and finally through an electrostatic particulate filter before exiting
the sanitizer.
Figure 1 - Sanitaire®Room Air Sanitizer Operation (RS435 Shown)
STAINLESS
STEEL
ENCLOSURE
ULTRAVIOLET R AYS
BLOWER
SIGHT GLASS
ELECTROSTATIC
FILTER(2)
One on either side of
Exposure Chamber
LOUVERED
EXHAUST
PANEL
ELECTROSTATIC
FILTER
3
AIR FLOW
2
AIR
OUT
4
AIR
DRAWN
IN
1
AIR
DRAWN
IN
1
INTERLOCKED ACCESS PANEL
GERMICIDAL LAMP
SPECULAR ULTRAVIOLET REFLECTOR
LAMP HOLDERS
EXPOSURE CHAMBER

5
CONSTRUCTION
The Sanitaire®Room Air Sanitizers consists of:
• Germicidal ultraviolet lamps, which deliver ultraviolet energy in the specific wavelength of 254 nanometers (nm),
which is highly effective against airborne microbes including: virus, bacteria, and mold spores.
• 120-volt 60Hz electronic ballast(s).
• A polished reflector, whose design and specular aluminum construction, maximizes ultraviolet intensity within the
exposure chamber.
• A standard, NEMA 5-15, three-prong plug, and operates on 120VAC 60Hz single-phase standard household
current. The Sanitaire®is also available for operation on 230VAC 50Hz.
• Permanent, washable, electrostatic intake filter(s), capable of removing airborne particles as small as 5 microns.
• A louvered exhaust, which restricts ultraviolet radiation from passing into the room, protecting the room's
occupants from ultraviolet exposure.
• A sight glass assembly, which provides visual indication of germicidal lamp operation without the risk of
ultraviolet exposure.
• An enclosure and access cover constructed of stainless steel, type 304. Stainless steel construction provides
strength, durability and lasting value.
• An interlock safety switch. The interlock switch interrupts power to the sanitizer, when the access cover is
removed from the lamp/exposure chamber.
• Molded rubber feet, for use on tabletops, shelves, etc. and standard wall mounting brackets (Models RS72, RS140
and RS435 only). These brackets allow the Sanitaire®to be mounted to a wall, or other vertical surface, in
either the vertical or horizontal position. Optional mounting kits are available; consult our application specialists
for specific details.
• A .3-micron, 99.97% minimum efficiency, HEPA type, absolute filter (Model RSA760 only).
LIMITATIONS
Overexposure to germicidal ultraviolet rays will result in the irritation of the eyes and reddening of the skin. For that
reason, it is of the utmost importance that your ultraviolet application be carefully planned and implemented so as to
avoid exposure, of personnel, to direct or reflected ultraviolet rays.
The American Conference of Governmental Industrial Hygienists (ACGIH) has established that the ultraviolet
radiant exposure incident for unprotected eyes or skin should not exceed 0.2 microwatts per square centimeter
(µW/cm2) at 254 nanometers (nm) for an eight (8) hour period. ("2004 TLVs®and BEIs®")

66
INSTALLATION
UNIT PLACEMENT
For maximum efficiency the Sanitaire®should be located as centrally as possible, preferably not close to the floor or
the corners of the area to be treated.
Access to the room does not need to be controlled while the sanitizer is operating. The louvered exhaust panel, of the
Sanitaire®Room Air Sanitizer, restricts ultraviolet radiation from passing into the room, protecting the room's occu-
pants from ultraviolet exposure.
To ensure safe and proper use, make sure the area:
• Has a properly grounded, electrical outlet within 6-feet of the unit.
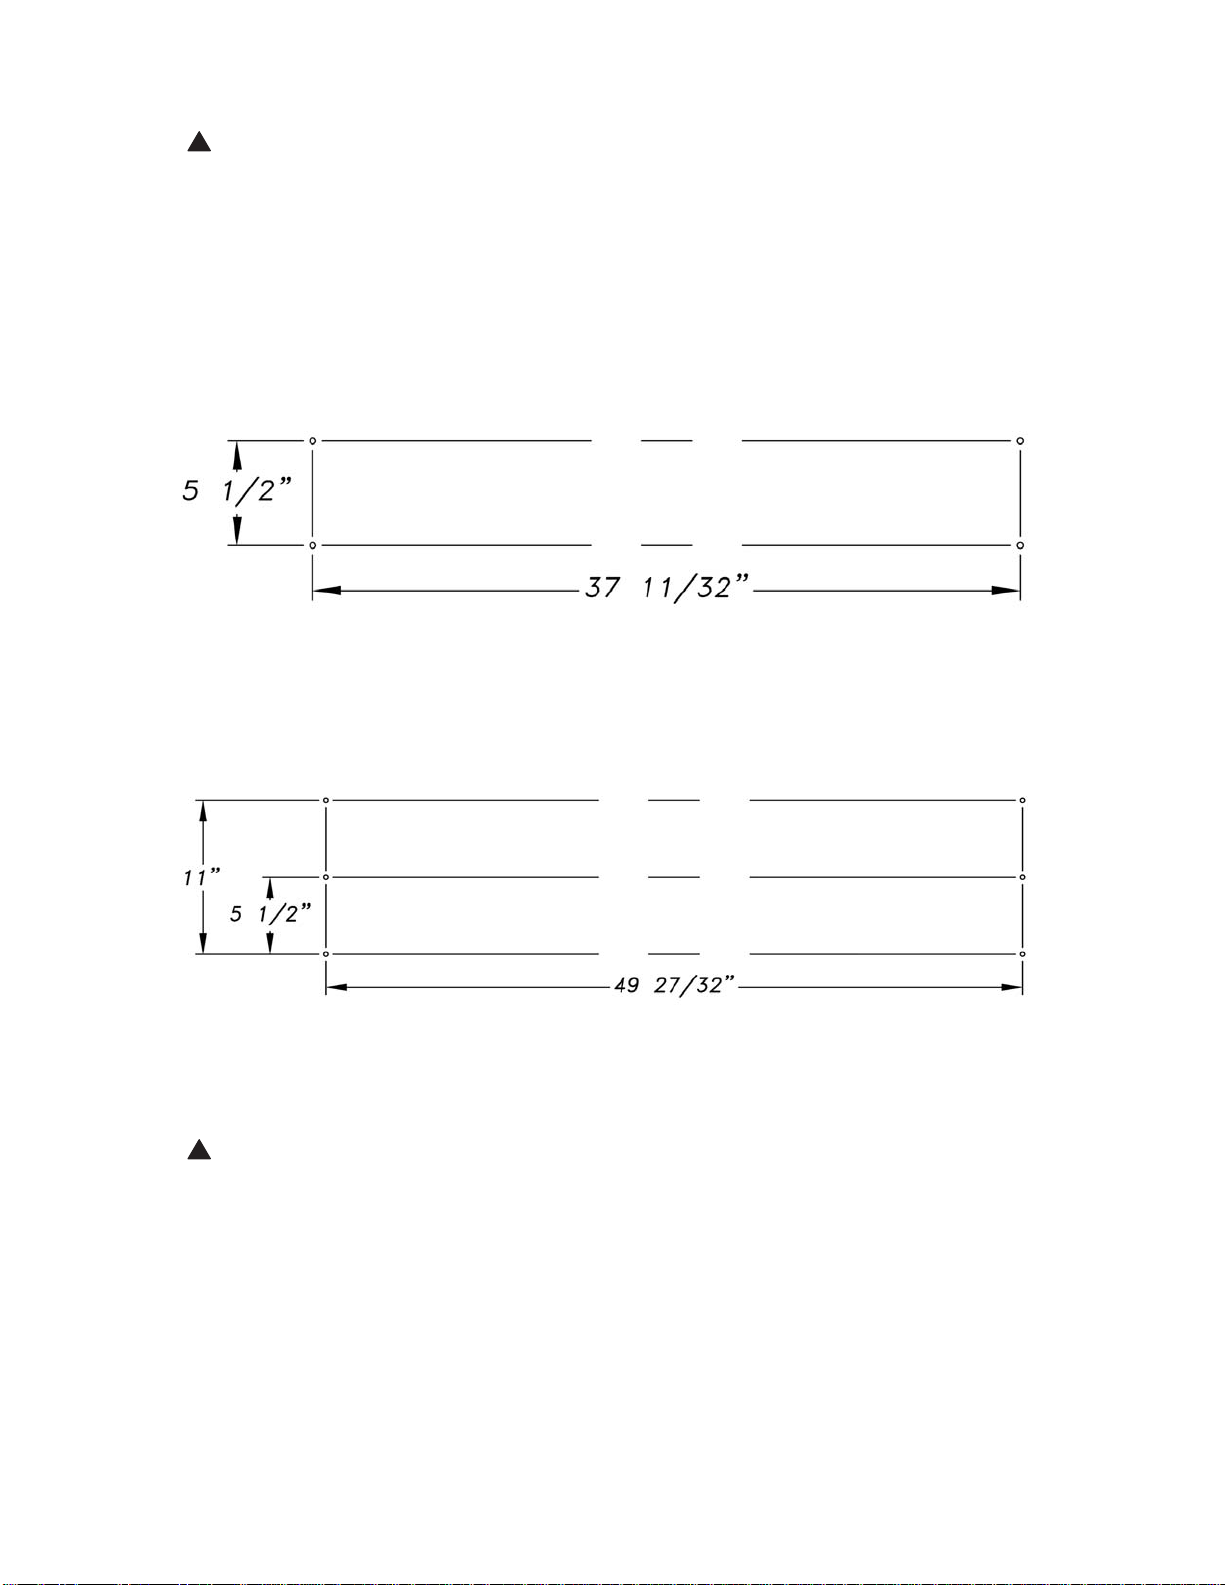
• Has a plumb, secure wall, for standard wall mounting.
UNPACKING
Remove the Sanitaire®Room Air Sanitizer from its shipping carton. Atlantic Ultraviolet Corporation takes all possible
precautions when packaging this unit to prevent damage. Carefully inspect the sanitizer, power cord and plug for damage,
report all damage immediately. Do not assemble or operate if there is any damage, visible or suspected.
Germicidal lamps are packed separately, to ensure maximum protection for the lamps. Keep the lamps aside until ready for
installation. When installing lamps into the sanitizer, avoid touching glass with bare hands. Oils deposited, from fingers, on
the glass could effect ultraviolet transmission.
Carefully inspect all packing materials to prevent the loss of accessories, mounting hardware, spare parts or instructions.
Do not discard packing materials until sanitizer is assembled and check out is complete.
The Sanitaire®Model RS72 includes:
• 1 - 72 CFM displacement/1-lamp unit
with 6-foot line cord
• 1 - Germicidal Ultraviolet Lamp
• 1 - Standard Wall Mounting Kit
• 1 - Operating Instructions
• 1 - Warranty Card
The Sanitaire®Model RS435 includes:
• 1 - 435 CFM displacement/4-lamp unit
with 6-foot line cord
• 4 - Germicidal Ultraviolet Lamps
• 1 - Standard Wall Mounting Kit
• 1 - Operating Instructions
• 1 - Warranty Card
The Sanitaire®Model RS140 includes:
• 1 - 140 CFM displacement/2-lamp unit
with 6-foot line cord
• 2 - Germicidal Ultraviolet Lamps
• 1 - Standard Wall Mounting Kit
• 1 - Operating Instructions
• 1 - Warranty Card
The Sanitaire®Model RSA760 includes:
• 1 - 760 CFM displacement/4-lamp unit
with 6-foot line cord
• 1 - HEPA/Particulate Absolute Filter Assembly
• 4 - Germicidal Ultraviolet Lamps
• 1 - Operating Instructions
• 1 - Warranty Card

7
DIMENSIONAL DATA
Figure 2 - Dimensional Data
REQUIRED TOOLS
• Pencil
• Tape measure
• Spirit level
• Power drill with drill bits and drivers
• If wall mounting, support hardware appropriate for the
wall construction
• Soft, clean, lint-free cloth
• Alcohol, or suitable glass cleaner

8
SETUP INSTRUCTIONS
STANDARD
The Sanitaire®Model Room Air Sanitizers are portable, and require no professional installation.
1 . Place unit in selected location.
2. Unlatch and remove access cover.
3. Install lamp(s). Align lamp contact/pin with recess in the spring-loaded lamp holder. Push the lamp to compress the
lamp holder. Align the other lamp contact/pin with stationary end lamp holder. Release pressure on the lamp until
fully seated in the stationary end lamp holder.
4. Verify that both ends of the lamp are correctly inserted and that the lamp is properly seated in the lamp holders.
5. Repeat until all lamps have been properly installed.
6. Moisten a clean, lint-free cloth with alcohol, or suitable glass cleaner and wipe the outer surface of lamp(s) to
remove any visible fingerprints, smears, etc which may have accumulated during installation.
7. Replace and re-latch access cover.
8. On Sanitaire®Model RSA760, the HEPA/particulate exhaust filter assembly is packed separately and must be
installed onto the main sanitizer. To install: line up the latches on the unit with the catches on the filter housing and
draw tight.
9. Plug power cord into the electrical outlet.
10. Verify operation by viewing lamps through sight glass. If the Sanitaire®is not operating properly, go to
“Troubleshooting” section
STANDARD WALL MOUNTING
The Sanitaire®Model Room Air Sanitizer, Models RS72, RS140, and RS435 include a set of standard wall mounting
brackets. The brackets allow the Sanitaire®to be mounted to a wall, or other vertical surface, in either the vertical or
horizontal position. Once installed onto the air sanitizer, the wall mounting brackets provide four (4) 5/16" mounting
holes, on Models RS72, and RS140, or six (6) 5/16" mounting holes on the Model RS435.
Figure 3 - Typical Mounting using Standard Wall Mounting Brackets

9
CAUTION: Proper installation is important. Special fasteners are required. If in doubt, installation
should be done by a qualified professional.
1. Select a plumb, secure wall which is capable of supporting the weight of the sanitizer, with a properly grounded,
120VAC electrical outlet within 6-feet of the desired placement area.
2. Locate and mark the centers of mounting holes in accordance with the appropriate Figure.
Figure 4 - RS72 & RS140 Bolt Hole Location
Figure 5 - RS435 Bolt Hole Location
3. Following manufacturer's instructions, prepare wall for mounting hardware installation.
4. Locate and remove the molded rubber feet and ¼"-20 x ¾" long screws. Attach wall-mounting brackets re-using
the ¼"-20 x ¾" long screws.
CAUTION: Assistance is required when attempting to wall mount Sanitaire®Room Air
Sanitizers; they are bulky and better handled by 2 people.
5. Lift air sanitizer into position; align bracket-mounting holes. Insert mounting hardware into each of the
mounting holes.
6. Avoid over tightening! Over tightening may damage or weaken the mounting surface or the mounting hardware.
7. See “Standard Setup Instructions” for lamp(s) installation.
!
!

10
MAINTENANCE
• The Sanitaire®is designed to operate with a minimal amount of maintenance. Besides occasional ultraviolet
measurements to insure that ultraviolet intensity in the treated areas remain within the allowable exposure limits,
a regular cleaning cycle of the germicidal lamps, interior reflector, sight glass and intake filter(s) should be
established, and carefully maintained, based on visual inspection and experience. The frequency of cleaning will
vary with the conditions surrounding each installation. It is recommend that the germicidal lamps, interior reflector,
sight glass and intake filter(s) be cleaned whenever dust deposits are observed.
• The germicidal ultraviolet lamps used in the Sanitaire®have a manufacturer's rated average effective life of
10,000 hours. Lamps may operate longer than their rated effective life, but the reduction in ultraviolet output will
make it impractical to use past the manufacturer's rated life. For maximum efficiency lamp replacement is recom-
mended every one year of continuous operation.
• Unless lamp replacement is due to failure or breakage, it is recommended that all lamps be replaced at the same time.
REQUIRED SUPPLIES
• Vacuum cleaner
• Detergent
• Water
• Soft, clean, lint-free cloth
• Alcohol, or suitable glass cleaner
CAUTION: Do not override the safety interlock switch. Operation of the sanitizer with the interlock
switch disabled and the access cover removed will expose personnel to direct and/or strongly reflected germicid-
al ultraviolet rays. Germicidal ultraviolet rays are harmful to the eyes and skin.
WARNING: Always disconnect power, to the sanitizer and unplug, before performing any service or
maintenance.
!
!
TECHNICAL ASSISTANCE
Atlantic Ultraviolet Corporation maintains a qualified team of application specialists that can provide technical assis-
tance, which may be required during the use of this equipment. For any questions, concerns, or technical assistance,
regarding this unit or any of our other products, contact our application specialists. Contact options can be found in the
“User Assistance” section at the front of this manual.
OPTIONAL ACCESSORIES
1. ArmorLite™ Safety Shield
Protective coating applied to Ster-L-Ray™ Lamps
Insures protection by eliminating the dangers associated with fragments of broken quartz and mercury contamination.
2. SentinelTM Lamp Operation Indicator: Monitors individual lamp operation, in any location up to 25 feet from the
Sanitaire®Room Air Sanitizer. Extension cables are also available.
3. Elapsed Time Indicator: A non-resettable display of the operating hours. Useful for scheduling and recording
maintenance and lamp replacement.
4. Integral Key Lock Switch: Ensures tamperproof operation, in either the “ON” or “OFF” position.
5. Disposable Filters: Cardboard frame filters, for use when frequent filter changes are necessary.
6. Wall Mounting Kit: Designed to allow unit to mount to a vertical wall in a horizontal position.
7. Ceiling Mount Kit: Kit includes four (4) eyebolts to suspend sanitizer from the ceiling.
8. ZenithTM Ultraviolet Meter: A sensitive, hand-held, ultraviolet meter; used to check the intensity of aging
ultraviolet lamps and survey rooms utilizing an ultraviolet air sanitizer to ensure that the ultraviolet radiant
exposure of personnel within the treated area is within acceptable limits.

11
AIR INTAKE FILTER CLEANING
The Sanitaire®Sanitizers are fitted with permanent, washable, electrostatic air filter(s), which function dry; DO
NOT apply oil, or adhesive sprays to the filter(s).
In most applications, regular vacuuming will maintain peak performance; periodically flushing filter(s) with clean
water is recommended whenever vacuuming fails to restore a clean appearance.
Filter(s) may be cleaned repeatedly without loss of efficiency.
The frequency of cleaning will vary with the conditions surrounding each installation.
CLEANING AIR INTAKE FILTER(S)
1. Disconnect power to the unit and unplug from the electrical outlet.
2. Unlatch and remove access cover.
3. Remove filter(s) from the housing, noting airflow direction. The label on the filter frame shows the direction of air
flow through the filter.
4. Vacuum the upstream side first, and repeat on the discharge side. Skip to step 7.
CAUTION: Do not use a high velocity water stream to clean the filter. A high velocity stream may
destroy the filter's internal fibers.
5. To wash filter(s), flush thoroughly with clean water, either by immersing or with a fine spray in the direction
opposite to the airflow. If the filter(s) is contaminated with heavy grease concentrations, wash filter(s) with a
detergent solution. NOTE: Follow all manufacturer's instructions and precautions for handling detergents. The
filter(s) should be rinsed thoroughly with clean water.
6. Shake off any excess water from filter(s).
7. Replace filter into the housing, with airflow direction label pointing into the electrical enclosure.
8. Replace and re-latch access cover.
9. Plug unit into the electrical outlet to restore power.
10. Verify operation by viewing lamps through sight glass. If the sanitizer is not operating properly, go to
“Troubleshooting” section.
!

12
GERMICIDAL LAMP CLEANING OR REPLACEMENT
CAUTION: Germicidal lamps are easily damaged. Exercise care when removing or replacing lamps.
1. Disconnect power to the unit and unplug from the electrical outlet.
2. Unlatch and remove access cover.
3. To remove lamp, push the lamp to compress the spring-loaded lamp holder. When the lamp contact/pin clears the
lamp holder, angle the lamp away from unit and pull out.
4. Moisten a clean, lint-free cloth with alcohol, or suitable glass cleaner and wipe down the outer surface of the lamp.
When clean, carefully set lamp aside where it will be safe and protected from damage. Repeat until all lamps have
been cleaned.
5. When all lamps have been removed, cleaned and safely set aside, remove any loose dust or dirt from the interior of
the sanitizer with a soft dry cloth, or vacuum.
The reflector of the Sanitaire®is constructed from specular aluminum, a highly reflective mirror like material,
used to maximize ultraviolet intensity.
6. To remove any dust, dirt, fingerprints, smears, etc, from the outer surfaces of the reflector, moisten a clean, lint-
free cloth with alcohol, or suitable glass cleaner and wipe down the reflector. Buff out any streaks, left from the
cleaning, using a soft dry cloth.
7. See “Standard Setup Instructions” for lamp(s) installation instructions.
BREAKAGE
CAUTION: Broken Quartz is SHARP. Wear protective gloves when handling broken ultraviolet lamps.
In the event of breakage, DO NOT use a household vacuum cleaner to pick up fragments of the lamp. Sweep up
debris into a plastic bag and dispose of properly.
DISPOSAL OF MERCURY ADDED LAMPS
Germicidal ultraviolet lamps, like standard fluorescent lamps contain small amounts of mercury. Mercury added
lamps should not be placed in the trash. Dispose of properly.
For further information regarding the disposal and recycling of lamps containing mercury, along with Federal and State
requirements visit http://www.lamprecycle.org. Product Data Sheets for germicidal ultraviolet lamps can be found in the
“PDF Library for Ster-L-RayTM Germicidal Ultraviolet Lamps” section of http://www.ultraviolet.com.
LAMP-OUT PROTECTION
If power is applied to the Sanitaire®without a lamp connected or if the lamp fails, the sanitizer ballast's lamp-out
protection will prevent the sanitizer from operating.
To reset: disconnect the Sanitaire®from power and install/replace the lamp. The sanitizer must remain discon-
nected from power for two (2) minutes to reset. After 2 minutes restore power, fixture should resume proper operation.
!
!

13
TROUBLESHOOTING
CAUTION: Always disconnect power to the unit, before performing any service.
•IMPORTANT: This unit is to be serviced ONLY by qualified, and appropriately licensed, personnel.
Table 1 - Troubleshooting
!
Use personal protection equipment, such as gloves; long sleeves with no gaps between cuffs
and gloves, and ultraviolet resistant face shield, if troubleshooting Sanitaire®.
Problem Possible Cause Corrective Action
No electrical power… Verify that the unit is connected to a live power source.
Power connections, Verify power connections are fully engaged.
loose or disconnected…
Ballast Disconnect the unit from utility power. Replace lamp.
Lamp-out Protection The unit must remain disconnected from power for
two (2) minutes to reset.
Internal blower not Loose power connection… Confirm connection to blowers; connections are tight
functioning. and making full contact.
Faulty blower motor… Replace blower motor.
Germicidal lamp not Swap suspect lamp, with known good lamp. If suspect
Single germicidal lamp operating… lamp still does not operate, replace lamp.
not operating. Germicidal lamp not Confirm contact of lamp and lamp socket, contacts are
properly seated… tight and lamp socket is making full contact with lamp.
All germicidal Lamps not installed… Install lamps.
lamps not operating. Interlock switch open… Confirm access cover is on and latched.
Interlock switch faulty… Replace interlock switch.
Unit not operating.
If the above measures fail to correct the problem(s), contact our application specialists. Contact options can be found
in the “User Assistance” section of this manual.

ITEM RS72 RS140 RS435 RSA760
NO. DESCRIPTION QTY PART NO. QTY PART NO. QTY PART NO. QTY PART NO.
1 Germicidal Ultraviolet Lamp 1 05-1348 2 05-1348 4 05-1352 4 05-1352
2 Ballast: 120v 60Hz 1 10-1036 2 10-1036 4 10-1036 4 10-1036
3 Filter: Electrostatic 1 40-7058A 1 40-7058A 2 40-1266B 2 40-1266B
4 Filter: Absolute HEPA - - - - - - 1 40-0021A
5 Filter: Electrostatic - - - - - - 1 40-0034B
6 Blower: 1 40-0104A 1 40-1079B 1 40-1078B 1 40-0020A
7 Lampholder Set 1 05-1320A 2 05-1320A 4 05-1320A 4 05-1320A
8 Interlock Switch 1 40-4040A 1 40-4040A 1 40-4040A 1 40-4040A
9 Switch: DPDT 15A - - - - 1 35-0014 1 35-0014
10 Molded Rubber Bumpers 4 00-1351A 4 00-1351A 6 00-1351A 6 00-1351A
11 Wall Mounting Bracket c2 40 1309A 2 40 1309A 2 40 4210A 2 40 4210A
12 Line Cord c1 35-1100 1 35-1100 1 35-1100 1 35-1100
13 Sight Glass 2 40 1044A1 2 40 1044A1 2 40 1040A1 2 40 1040A1
14
TECHNICAL SPECIFICATIONS
Table 2 - Technical Specifications
Model No: RS72 RS140 RS435 RSA760
Blower Capacity: (Cubic Feet per Minute) 72 140 435 760
Nominal Unit Capacityc: (Cubic Feet per Minute) 54 105 326 380
Max Treatment Capacity: (Cubic Feet per Hour) 3,240 6,300 19,575 22,800
Max Room Size @ 3 Air Changes/Hour: (Cubic Feet) 1,080 2,100 6,525 7,600
Max Room Size @ 4 Air Changes/Hour: (Cubic Feet) 810 1,575 4,894 5,700
Max Room Size @ 5 Air Changes/Hour: (Cubic Feet) 648 1,260 3,915 4,560
Max Room Size @ 6 Air Changes/Hour: (Cubic Feet) 540 1,050 3,263 3,800
Dimensions: Length: (Inches) 34-1/2 34-1/2 47-5/16 61
Width: (Inches) 7-3/4 7-3/4 14 14
Height: (Inches) 7-3/4 7-3/4 12 12
Electrical: Volts: (Volts) 120 120 120 120
Amps: (Amps) 1.25 2.30 4.52 5.65
Line Frequency: (Hertz) 50/60 50/60 50/60 50/60
Lamp Data: Lamp Model: G24T6L G24T6L G30T6L G30T6L
Power Consumptiond: (Watts/Lamp) 25 25 32 32
Ultraviolet Outpute: (Watts/Lamp) 8.5 8.5 11.2 11.2
cUnit capacity incorporates an estimated allowance for airflow friction loss across filter and sanitizer.
dWattage is lamp watts only and does not include ballast loss.
eUltraviolet output at 254nm at 100 hours and 808 F (approximate).
Other replacement parts are available. Consult the factory with specific requirements.
cItem not shown, for clarity.
REPLACEMENT PARTS
Table 3- Replacement Parts List for Sanitaire®Room Air Sanitizer

15
REPLACEMENT PARTS
Figure 6- Replacement Parts List for Sanitaire®Model RS72 & RS140
Figure 7- Replacement Parts List for Sanitaire®Model RS435 & RSA760

16
WARRANTY
We warrant that this product will be free from defects in material and workmanship for a period of one year
from the date of shipment thereof or the product’s total rated life, whichever first occurs. Within the warranty
period we shall repair or replace such products, which are returned to us with shipping charges prepaid, and
which are determined by us to be defective. This warranty will not apply to any product, which has been sub-
jected to misuse, negligence, or accident; or misapplied; or modified; or repaired by unauthorized persons; or
improperly installed.
The Buyer shall inspect the product promptly after receipt and shall notify us at our main office in writing of
claims, including claims of breach of warranty, within thirty (30) days after the Buyer discovers or should have
discovered the facts upon which the claim is based. Failure of the Buyer to give written notice of a claim within
the time period shall be deemed to be a waiver of such claim.
The provisions of the above warranty are our sole obligation and exclude all other remedies or warranties,
expressed or implied, including warranties of merchantability and fitness for a particular purpose, whether or not
purposes or specifications are described herein. We further disclaim any responsibility whatsoever to the cus-
tomer, or to any person, for injury to person, damage to, or loss of property or value caused by any product
which has been subjected to misuse, negligence, accident; or modified or repaired by unauthorized persons; or
improperly installed.
Under no circumstances shall the Company be liable for any incidental, consequential or special damages,
losses or expenses arising from the contract for this product, or in connection with the use of, or inability to use,
our product for any purpose whatsoever.
PATENT NOTICE
No attempt has been made to determine the patent status of applications illustrated or described in this publi-
cation. Inclusion in this publication of any design or method of use, which may be patented, is not to be con-
strued as promoting or sanctioning unauthorized use.
USER ASSISTANCE
Purchased From: Date:
Model: Serial No.:
Atlantic Ultraviolet Corporation
makes every effort to ensure that
the Sanitaire® Room Air
Sanitizers are products of superior
quality and workmanship. This
manual describes the installation,
operation and maintenance of the
Sanitaire®Room Air Sanitizers.
Please read and become familiar
with the contents of this manual
before installing or using this unit.
If after reading the manual you still
have questions, or concerns,
regarding the installation or use of
this unit, contact our offices, week-
days between 8:30 am and 5:00 pm
Eastern time, at:
Atlantic Ultraviolet Corporation
375 Marcus Boulevard
Hauppauge, New York, 11788
Tel: 631.273.0500
Fax: 631.273.0771
E-mail: [email protected]
Website: www.ultraviolet.com
Please fill out and return the Owner Registration card immediately. If the card is missing from this manual,
please contact any of our application specialists to obtain one.
Atlantic Ultraviolet Corporation takes all possible precautions when packaging equipment to prevent damage.
Carefully inspect and report all damage. Do not install damaged equipment. Follow all instructions on any labels
or tags. Carefully inspect all packing materials before discarding to prevent the loss of accessories, mounting
hardware, spare parts or instructions.
For your convenience, record the following information below. The model and serial number can be found on
a label located on the Sanitaire®Room Air Sanitizers. Keep this manual, along with proof of purchase, handy
when contacting our offices.
Other manuals for RS72
1
This manual suits for next models
3
Table of contents