Sansui GQTVOMV03 User manual

.
The terms HDMI and HDMI High-Definition Multimedia
Interface, and the HDMI Logo are trademarks or registered
trademarks of HDMI Licensing LLC in the United States and
other countries.
Manufactured under license from Dolby Laboratories.Dolby,Dolby Audio,Pro logic,
and the double-D symbol are trademarks of Dolby Laboratories.
Enabling certain features and functionality in this product (e.g.
Picture Mode, Volume) may increase its energy consumption,
possibly beyond the limits required for ENERGY STAR
qualification.
This product has earned the ENERGY STAR qualification
meeting US Federal Energy Efficiency guidelines as
established by the Department of Energy and Environmental
Protection Agency. The ENERGY STAR program exists to
provide energy saving guidelines and help promote energy
efficient products and practices.
Power Saving Mode is the mode in which the product qualifies
for ENERGY STAR .
GQTVOMV03

17
18
19
TABLE OF CONTENTS
9
9
TV Feet Installation Instructions
10
OPERATING INSTRUCTIONS
Install and Connect TV
Preparations Guide
11
HOME PAGE
HOME PAGE
TV
USB
Instructions
11
Main Menu
12
Picture
12
Sound
13
Setting
13
Lock
14
Program
14
Network
15
About
16
USB
NOTE: Spanish and French language user manuals are available for review
or download at WWW.sansuiproducts.com; under the "sopport" tab.

2

Instructions
a tip-ov er and/or injury.
3

EXAMPLE OF ANTENNA GROUNDING AS PER THE NATIONAL ELECTRICAL CODE
ANTENNALEADIN WIRE
ANTENNA
DIS CHAGRE UNIT
(NEC SECTION 810-20)
GROUNDING CONDUCTORS
(NEC SECTION 810-21)
GROUND CLAMPS
POWER SERVICE GROUNDING
ELECTRODE SYSTEM
(NEC ART 250,RARTH)
GROUND
CLAMP
ELEC TRIC SERVICE
EQUIPMENT
NEC-NATIONAL ELECTRICAL CODE
S2898A
26)
designed in such a way that it does not require a safety connection to electrical earth.
27) Correct disposal of this product. This marking indicates that this product should not
be disposed with other household waste. To prevent possible harm to the environment or
human health from uncontrolled waste disposal, recycle it responsibly to promote the
sustainable reuse of material resources.
This equipment is a Class II or double insulated electrical appliance. It has been
Instructions
4

Warning: batteries(pack or batteries installed) should not be exposed to excessive heat
such as sunshine, fire or other heat sources.
Instructions
5

Instructions
have bright spots/pixels.
6

10cm
10cm
below
Instructions
Note: Drawing is a representative example only
operat e
To avoid damage to the TV, place the TV on a table, face down on a soft surface.
the
7

TV Buttons
Turn ON/OFF Power.
External Signal Input Selection.
SOURCE
Display Main MENU And Confirm MENU Item Selection.
MENU
Selecting Channel.
CH+/-
Adjusting Volume.
VOL+/-
TV Buttons and Connections
8
AV input
External AV Signal Input and
Right/Left Audio Inputs.
VIDEO R L
INPUT
OPTICAL
Digital Audio Output.
OPTICAL
USB Input
Connect to your USB device.
ANT 75/RF Connection
Connect to the antenna/cable TV
output of your device or wall plate.
HDMI Input(HDMI1,2,3)
Connect to a HDMI output
connection on your external device.
HDMI
HEADPHONE JACK
Plug earphones into jack for private
listening. Overrides speakers.
HEADPHONE
RJ45
Connect to the Internet.
RJ 45
RJ45 connection
RJ 45
Note:The position and arrangement of buttons and connections for different
models may vary.

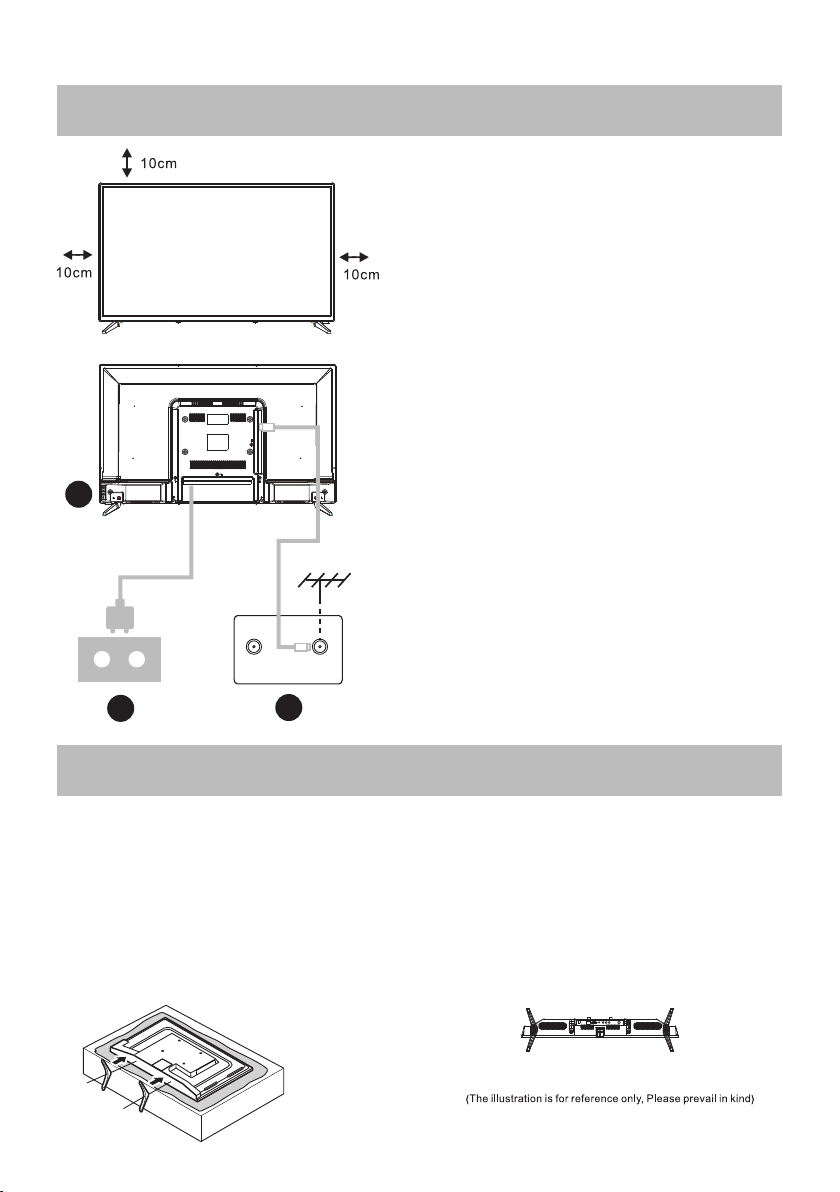
The bottom view of the TV
(Front cabinet faces down)
TV ANT
FM ANT
TV signal output
1
3
2
Install and Connect TV
Setup your TV
1.Put your TV in a place that can support the
weight of the TV.
To avoid danger, please do not assemble
the TV near water or extreme heat(such
as a furnace, light source,or candle.)
Do not block the ventilation on the back
of the TV.
Connect signal source and power
2. Connect the antenna cable to the RF
connection on the back or side of the TV,
and/or the signal source HDMI cable to the
HDMI input(s) on the rear or side of TV. Plug
the TV into the wall power outlet (AC120 ~ 60Hz).
Turn on the TV
3.While in standby mode the power indication
light will be red.Press the power button on
the TV or remote control.The light will change
to green.
Note:
Picture for reference purposes only.
TV Feet Installation Instructions
9
1.Open the carton and remove the TV,accessories,and the feet.
2.To avoid damage to the TV,place on a table,face down on a
soft surface. The feet are attached to the TV with provided
screws,or are attached by snapping into the cabinet till you
hear the click.
3.Ensure the feet are tightened/snapped-in securely. Do not
overtighten. Please take note of the base direction:

OPERATING INSTRUCTIONS
10
Press button to select the language.【▼】 /【▲】
Press button to continue.【OK】
The User Interface defaults to the “Skip” option.
Press the【OK】button to skip the DTV channel tuning
then enter the ATV channel tuning.
Press button to select the i .【▼】 /【▲】nput source
Press button to continue.【OK】

HOME PAGE
Main Menu
11
Press button to enter homepage.
Press button to select Apps,NETFLIX,Input source,and
Settings options,Press button to select the corresponding
sub-option and press the [OK] button to confirm.
【▼】 /【▲】
【◄】/【►】
Press button to enter main menu.
Press 【▼】 /【▲】 button to select Picture / Sound / Setting / Lock /
PVR Option / Program / Network / About menus. Press 【►】 button
to continue to sub menu.

Picture
Sound
12
1.Press button to enter main menu .
Press【►】 button to select Picture menu.
2.Press 【▼】 /【▲】 button to select Picture Mode / Contrast /
Brightness / Color /Sharpness / Tint / Backlight / Color Temperature /
Aspect Ratio / Noise Reduction.
3.Press【◄】/【►】button to adjust or select
1.Press button to enter main menu .
Press【►】 button to select Sound menu.
2.Press 【▼】 /【▲】 /button to select Sound Mode / Equalizer /
Balance / Auto Volume Limit / Surround Sound / Digital output
type / Audio Delay / Video Description / Audio Languages.
3.Press【◄】/【►】button to adjust or select.

Setting
Lock
13

Program
Network
14

About
15
--By USB: Enables you to install a new version software from a USB stick,
if available.Insert the USB stick containing a new version of the software into
Follow the on-screen instructions to complete the process.
a USB socket of the set. Select USB and press OK to enter.

USB
16
Insert a USB flash drive and press the [OK] button in the USB menu to
enter the Media menu.
Press the【◄】/【►】button Select the inserted USB flash device,
then press the [OK] button to access the started media on the USB device.
Press the【◄】/ 【►】 buttons to select ALL, Photo, Music, Video options.
Press the button to select the file type. 【OK】
Select the “Return” icon and press to return to the USB directory to【OK】
make your selection. Select a file press the button to enter the video file. 【OK】

at the back of the unit
from
- A double image or ghost could be caused by obstructions of
the external antenna. Consult the antenna instruction manual
to change the direction of the external antenna.
- Perhaps the location of the antenna is not good. Use of a
taller antenna can improve the quality of the images.
- If you use an antenna, reception may be difficult in some
situations. You can attempt to adjust the antenna to improve
the image.
17
CUSTOMER SERVICE 618-392-3456
OPERATING HOURS 8 am-5 pm cst

Specifications
24” 3W+3W
40” 8W+8W
50” 8W+8W
55” 8W+8W
58” 8W+8W
43” 8W+8W
NTSC:AIR 2-69 CABLE 1-135
32” 8W+8W
NTSC:AIR 2-69 CABLE 1-135
Operation Frequency Transmitting Power
WiFi 2400~2483.5 Less Than 100mW
18
65” 8W+8W
NTSC:AIR 2-69 CABLE 1-135
24” 31W
32” 32W/40W
50” 108W
40” 60W
55” 100W
58” 135W
43” 65W
65” 159W

1. :Turn on the TV or enter standby mode.
2. :Turn on/off the sound by pressing this button.
3.0~9: Figures “0-9” are used to directly input channel number.
4.EPG:Press to display Electronic Program Guide and select
your favorite channel.
5.-/--:Press to change the channel which name contains “.”.
6. : Input source selection button.
7. :Press to enter the Home Page.
8.V+: Increase the volume.
9.V-:Decrease the volume.
10.P :Channel up.
11.P :Channel down.
12. :Start system menu.
13. :Press to display the source and channel's display.
14.OK:To confirm the choice of a highlighted menu item.
15. / :Press these buttons to move within the menu.
16. / :Press these buttons to move .within the menu
17.BACK:Go back to the previous step.
18.EXIT:Press to exit the OSD menu.
19. :Press to launch Netflix.
20. :Press to launch YouTube.
21. :Press to launch NetRange app store.
22. :Press to launch VUDU.
23.GREEN/RED/YELLOW/CYAN buttons: Press these buttons according the different prompts.
24. :Press to fast reverse in USB mode.
25. :Press to fast forward in USB mode.
26. :Press to play the video and press again to pause the video.
27.CC:Press to display the close caption.
28. :Hold on or off for current page display/Press to stop in the USB mode.
29.AUDIO:Press to change the language when paly the stream which contains multi-language.
19
Table of contents
Other Sansui LED TV manuals

Sansui
Sansui SLED2282 User manual

Sansui
Sansui SLED2280 User manual

Sansui
Sansui SMX4019SM User manual

Sansui
Sansui SLED2480 User manual

Sansui
Sansui LEDTVSKQ48FH User manual

Sansui
Sansui SJC24FH-ZMA User manual

Sansui
Sansui SLED5015 User manual

Sansui
Sansui SLEDVD198 User manual

Sansui
Sansui SLED2228 User manual

Sansui
Sansui SLED3228 User manual