Sansui HDLCDVD320A User manual

32” TFT LCD DIGITAL TV WITH DVD PLAYER
HDLCDVD320A
OWNER’S MANUAL
Before operating the unit, please read this manual thoroughly.
TV/CABLE MODE SELECTION
When shipped from the factory, the TV/CABLE menu option is set to the “CABLE” (Cable Television) mode.
If not using CABLE, set this menu option to the “TV” position.
IF CONTACT WITH CUSTOMER SERVICE IS REQUIRED
PLEASE HAVE THE MODEL NUMBER READY PRIOR TO THE CALL
CUSTOMER SERVICE – 1-800-289-0980
ORION WEBSITE
FOR INFORMATION ON OUR OTHER PRODUCTS, PLEASE VISIT OUR WEBSITE AT
www.orionsalesinc.com
R
ATTENTION
If you purchase a universal remote control from your local retailer, please contact the remote
manufacturer for the required programming code.
5Z80501A_EN_Cover 7/3/07, 3:46 PM1

2
CAUTION:
THIS DIGITAL VIDEO PLAYER EMPLOYS A LASER SYSTEM.
TO ENSURE PROPER USE OF THIS PRODUCT, PLEASE
READ THIS OWNER'S MANUAL CAREFULLY AND RETAIN
FOR FUTURE REFERENCE. SHOULD THE UNIT REQUIRE
MAINTENANCE, CONTACT AN AUTHORIZED SERVICE LO-
CATION-SEE SERVICE PROCEDURE.
USE OF CONTROLS, ADJUSTMENTS OR THE PERFORM-
ANCE OF PROCEDURES OTHER THAN THOSE SPECIFIED
HEREIN MAY RESULT IN HAZARDOUS RADIATION EXPO-
SURE.
TO PREVENT DIRECT EXPOSURE TO THE LASER BEAM,
DO NOT TRY TO OPEN THE ENCLOSURE. RADIATION MANY
BE PRESENT WHEN THE ENCLOSURE IS OPENED. DO NOT
STARE INTO THE BEAM.
Location of the required Marking
The rating sheet and the safety caution
are on the rear of the unit.
The lightning flash with arrowhead
symbol, within an equilateral triangle
is intended to alert the user to the
presence of uninsulated dangerous
voltage within the product's enclosure
that may be of sufficient magnitude to
constitute a risk of electric shock.
The exclamation point within an
equilateral triangle is intended to alert
the user to the presence of important
operating and maintenance (servic-
ing) instructions in the literature
accompanying the appliance.
CAUTION: TO REDUCE THE RISK OF ELECTRIC
SHOCK, DO NOT REMOVE COVER
(OR BACK). NO USER-SERVICEABLE
PARTS INSIDE. REFER SERVICING TO
QUALIFIED SERVICE PERSONNEL.
WARNING: TO PREVENT FIRE OR SHOCK HAZARD, DO NOT EXPOSE THIS APPLIANCE TO
RAIN OR MOISTURE.
CAUTION: TO PREVENT ELECTRIC SHOCK DO NOT USE THIS POLARIZED PLUG WITH AN
EXTENSION CORD, RECEPTACLE OR OTHER OUTLET UNLESS THE BLADES CAN BE
FULLY INSERTED TO PREVENT BLADE EXPOSURE.
WARNING: This equipment has been tested and found to comply with the limits for a Class B digital
device, pursuant to Part 15 of the FCC Rules. These limits are designed to provide reasonable
protection against harmful interference in a residential installation. This equipment generates,
uses and can radiate radio frequency energy and, if not installed and used in accordance with
the instructions, may cause harmful interference to radio communications.
However, there is no guarantee that interference will not occur in a particular installation. If this
equipment does cause harmful interference to radio or television reception, which can be
determined by turning the equipment off and on, the user is encouraged to try to correct the
interference by one or more of the following measures:
-Reorient or relocate the receiving antenna.
-Increase the separation between the equipment and receiver.
-
Connect the equipment into an outlet on a circuit different from that to which the receiver is connected.
-Consult the dealer or an experienced radio/TV technician for help.
CAUTION: Changes or modifications not expressly approved by the party responsible for compliance with
the FCC Rules could void the user's authority to operate this equipment.
CERTIFICATION: COMPLIES WITH FDA
RADIATION PERFORMANCE STANDARDS,
21 CFR SUBCHAPTER J.
The lamp(s) within this product contain mercury.
Disposal should be in compliance with local, state or federal laws.
5Z80501A_EN_P02-05 7/3/07, 3:46 PM2

3
IMPORTANT SAFETY INSTRUCTIONS
1) Read these instructions.
2) Keep these instructions.
3) Heed all warnings.
4) Follow all instructions.
5) Do not use this apparatus near water.
6) Clean only with a clean dry cloth.
7) Do not block any ventilation openings. Install in accordance with the manufacturer's instructions.
8) Do not install near any heat sources such as radiators, heat registers, stoves, or other apparatus (including
amplifiers) that produce heat.
9) Do not defeat the safety purpose of the polarized or grounding-type plug. A polarized plug has two blades
with one wider than the other. A grounding type plug has two blades and a third grounding prong. The wide
blade and the third prong are provided for your safety. If the provided plug does not fit into your outlet,
consult an electrician to replace the obsolete receptacle.
10) Protect the power cord from being walked on or pinched particularly at plug, and the point where it exits
from the apparatus.
11) Only use attachments/accessories specified by the manufacturer.
12) Use only with the cart, stand, tripod, bracket, or table specified by the manu-
facturer, or sold with the apparatus. When a cart is used, use caution when
moving the cart/apparatus combination to avoid injury from tip-over.
13) Unplug this apparatus during lightning storms or when unused for long
periods of time.
14) Refer all servicing to qualified service personnel. Servicing is required when
the apparatus has been damaged in any way, such as power-supply cord or
plug damage, liquid has been spilled or objects have fallen into the apparatus, the apparatus has been
exposed to rain or moisture, does not operate normally, or has been dropped.
15) Apparatus should not be exposed to dripping or splashing, and objects filled with liquids, such a vases,
should not be placed on the apparatus.
16) An outside antenna system should not be located in the vicinity of overhead power lines or other electric
light or power circuits, or where it can fall into such power lines or circuits. When installing an outside
antenna system, extreme care should be taken to keep from touching such power lines or circuits, as
contact with them might be fatal.
17) Do not overload wall outlets and extension cords, as this can result in a risk of fire or electric shock.
18) Do not push objects through any openings in this unit, as they may touch dangerous voltage points or short
out parts that could result in fire or electric shock. Never spill or spray any type of liquid into the unit.
19) If an outside antenna or cable system is connected to the unit, be sure the antenna or cable system is
grounded to provide some protection against voltage surges and built-up static charges, Section 810 of the
National Electrical Code, ANSI/NFPA 70, provides information with respect to proper grounding of the mast
and supporting structure, grounding of the lead-in wire to an antenna discharge unit, size of grounding
conductors, location of antenna discharge unit, connection to grounding electrodes, and requirements for
the grounding electrode.
S3126A
PORTABLE CART WARNING
(symbol provided by RETAC)
5Z80501A_EN_P02-05 7/3/07, 3:46 PM3

4
IMPORTANT SAFETY INSTRUCTIONS (continued)
20) When replacement parts are required, be sure the service technician uses replacement parts specified by
the manufacturer or those that have the same characteristics as the original part.
Unauthorized substitutions may result in fire, electric shock or other hazards.
21) Upon completion of any service or repairs to this unit, ask the service technician to perform safety checks to
determine that the unit is in proper operating condition.
22) Keep your fingers clear of the disc slot as it is closing. It may cause injury.
23) When you connect the product to other equipment, turn off the power and unplug all of the equipment from
the wall outlet. Failure to do so may cause an electric shock and serious personal injury. Read the owner's
manual of the other equipment carefully and follow the instructions when making any connections.
24) Reduce the volume to the minimum level before you turn on the product. Otherwise, sudden high volume
sound may cause hearing or speaker damage.
25) Do not allow the product to output distorted sound for an extended period of time. It may cause speaker
overheating and fire.
26) When you use the headphones, keep the volume at a moderate level. If you use the headphones continu-
ously with high volume sound, it may cause hearing damage.
27) Do not look into the opening of the disc slot or ventilation opening of the product to see the source of the
laser beam. It may cause eye damage.
28) Do not use a cracked, deformed, or repaired disc. These discs are easily broken and may cause serious
personal injury and product malfunction.
29) This reminder is provided to call the cable TV system installer’s attention to Article 820-40 of the NEC that
provides guidelines for proper grounding and, in particular, specifies that the cable ground shall be con-
nected to the grounding system of the building, as close to the point of cable entry as practical.
EXAMPLE OF ANTENNA GROUNDING AS PER THE
NATIONAL ELECTRICAL CODE
ANTENNA
DISCHARGE UNIT
(NEC SECTION 810-20)
ANTENNA LEAD
IN WIRE
GROUNDING CONDUCTORS
(NEC SECTION 810-21)
GROUND CLAMPS
POWER SERVICE GROUNDING
ELECTRODE SYSTEM
(NEC ART 250, PART H)
GROUND
CLAMP
ELECTRIC SERVICE
EQUIPMENT
NEC-NATIONAL ELECTRICAL CODE
S2898A
5Z80501A_EN_P02-05 7/3/07, 3:46 PM4

5
IMPORTANT SAFETY INSTRUCTIONS (continued)
HOW TO HANDLE THE LCD PANEL
•Do not press hard or jolt the LCD panel. It may cause the LCD panel glass to break and injury may occur.
• If the LCD panel is broken, make absolutely sure that you do not touch the liquid in the panel. This may cause
skin inflammation.
If the liquid gets in your mouth, immediately gargle and consult with your doctor. Also, if the liquid gets in
your eyes or touches your skin, consult with your doctor after rinsing for at least 15 minutes or longer in clean
water.
CONDENSATION
Moisture will form in the operating section of the player if the player is brought from cool surroundings into a
warm room or if the temperature of the room rises suddenly. When this happens, player's performance will
be impaired.
To prevent this, let the player stand in its new surroundings for about an hour before switching it on, or
make sure that the room temperature rises gradually.
Condensation may also form during the summer if the player is exposed to the breeze from an air condi-
tioner. In such cases, change the location of the player.
5Z80501A_EN_P02-05 7/3/07, 3:46 PM5

6
The unit emits heat when in operation. Do not place any covers or blankets on the unit, this may cause
overheating. Do not block ventilation holes, or set up near radiators. Do not place in direct sunshine. When
placing on a shelf leave 10 cm (4 inches) free space around the entire unit.
Notes when mounting the LCD TV/DVD on a wall
•When installing the unit on a wall, allow at least 6 cm (2 1/2 inches) clearance between the rear of the LCD
TV/DVD and the wall. Clearance of less than 6 cm (2 1/2 inches) will obstruct the vents and may cause the
interior of the unit to overheat, resulting in damage to the unit.
•If the unit is to be mounted on the wall, contact the retailer where you purchased the LCD TV/DVD for advice,
and have the equipment professionally installed. Incomplete or improper installation may cause injury to you,
and/or damage to the LCD TV/DVD.
IMPORTANT NOTICE
Possible Adverse Effects on LCD Panel: If a fixed (non-moving) pattern remains on the LCD Panel for long
periods of time, the image can become permanently engrained in the LCD Panel and cause subtle but perma-
nent ghost images. This type of damage is NOT COVERED BY YOUR WARRANTY. Never leave your LCD
Panel on for long periods of time while it is displaying the following formats or images:
•Fixed Images, such as stock tickers, video game patterns, TV station logos, and websites.
•Special Formats that do not use the entire screen. For example, viewing letterbox style (16:9) media on a
normal (4:3) display (black bars at top and bottom of screen); or viewing normal style (4:3) media on a
widescreen (16:9) display (black bars on left and right sides of screen).
The following symptoms are not signs of malfunction but technical limitation. Therefore we disclaim
any responsibility for these symptoms.
•LCD Panels are manufactured using an extremely high level of precision technology, however sometimes
parts of the screen may be missing picture elements or have luminous spots.
This is not a sign of a malfunction.
•Do not install the LCD Panel near electronic equipment that is susceptible to electromagnetic waves. Some
equipment placed too near this unit may cause interference.
•Effect on infrared devices – There may be interference while using infrared devices such as infrared cordless
headphones.
SAFETY PRECAUTIONS
10cm
5Z80501A_EN_P06-15 7/3/07, 3:46 PM6

7
Features
LCD color TV With DVD/CD player
Unique space saving design combines a 32” LCD color TV and a DVD/CD player.
A DVD disc has much more capacity, but is the same size as an audio CD disc. The Picture/Audio quality of a
DVD exceeds other software. The picture quality is higher than Super VHS video cassettes. The audio quality is
higher than an audio CD. The DVD also has special options; audio language selection, subtitle language selec-
tion, or multi-angle, etc.
The DVD PLAYER can play back both audio CDs and MP3/WMA/JPEG CDs.
Compatible with a wide range of DVD audio outputs
Digital Audio Jack (Coaxial)
•When a component with a built-in Dolby Digital decoder is connected, Dolby Digital sound can produce the
effect of being in a movie theater or a concert hall.
•Surround standard is different from Dolby Digital. This format is already in use in many theaters. By connecting
this unit to a DTS decoder or an AV amplifier with a built-in DTS decoder, the DTS audio of DVD discs recorded
in this format can be enjoyed. However, audio will not be output from the analog audio output jacks.
•By connecting this unit to an AV amplifier with a built-in MPEG decoder, the MPEG audio of DVD discs re-
corded in this format can be enjoyed.
•The Linear PCM sound of a 48 kHz/24 bit through 96 kHz/24 bit exceeds audio CD sound.
Convenience Features
Direct selection of your desired scenes using Title/Chapter/Time/Track - You can play back from the desired
scene.
Recalling Up to 3 Scenes (DVD only) -You can program up to 3 scenes in memory and recall the marked scenes.
Frame Advance -The PAUSE/STILL moves one frame at a time.
Slow Motion -The SLOW moves you back and forth through the program by 4 steps of 1/7-1/2 times.
Repeat Playback -You can repeat chapter, track, title, sides or material between two selected points.
Program Playback (Audio CD/MP3/WMA CD) -You can play back tracks in programmed sequences.
Zoom (DVD only) -You can zoom in the selected subject on the screen during playback.
NOTE:
• Make sure that discs are suitable for the following functions.
Multi-Language -Maximum 32 language subtitles and maximum 8 language soundtracks can be played back
for movies or programs.
Multi-Angle -Pictures of Sports or a Live Concert are recorded with many cameras. When you play such a disc,
you can change the angles during playback.
Parental Control - You can limit the play back of scenes or sounds of DVD discs that have a rating level encoded
on the disc.
Video Aspect Ratio - You can change the aspect ratio of the screen for your monitor.
TV Features
Integrated Digital Tuner - You can view digital broadcasts without using a Digital TV Set-Top Box.
Closed Caption Decoder With Full Text Mode - Displays text captions or full screen text on the screen for
hearing impaired viewers.
Picture Adjustments Using The Remote Control - The On-Screen display allows precise remote control ad-
justment of BRIGHTNESS, CONTRAST, COLOR, TINT and SHARPNESS.
Programmable TV Sleep Timer - Operable from the remote control, the TV can be programmed for up to 120
minutes to turn off automatically.
On-Screen 3 Language Display - You can select one of 3 languages, English, Spanish or French for on-
screen programming.
V-Chip - The V-Chip function can read the rating of a TV program or movie content if the program is encoded
with this information. V-chip will allow you to set a restriction level.
*This product incorporates copyright protection technology that is protected by U.S. patents and other intel-
lectual property rights. Use of this copyright protection technology must be authorized by Macrovision, and
is intended for home and other limited viewing uses only unless otherwise authorized by Macrovision.
Reverse engineering or disassembly is prohibited.
*is a trademark of DVD Format/Logo Licensing Corporation.
*Manufactured under license from Dolby Laboratories. “Dolby” and the double-D symbol are trademarks of
Dolby Laboratories.
*“DTS” and “DTS Digital Out” are registered trademarks of DTS, Inc.
5Z80501A_EN_P06-15 7/3/07, 3:46 PM7

8
Advanced function
Additional information
Program playback (CD).................................. 31
Repeat playback (CD) .................................... 32
Random playback (CD) .................................. 32
Zooming ......................................................... 32
Locating desired scene .................................. 32
Repeat playback ............................................ 33
Marking desired scenes ................................. 33
Changing soundtrack language ..................... 34
Subtitles ......................................................... 34
Changing angles ............................................ 34
Title selection ................................................. 35
DVD menu...................................................... 35
Setting the language ...................................... 35
Setting the aspect ratio of TV screen ............. 35
Setting on screen display ............................... 36
Setting the picture mode ................................ 36
Night Mode ..................................................... 36
Digital out ....................................................... 36
Parental control setting .................................. 37
Setting the new password .............................. 37
Temporary disabling of rating level by
DVD disc ........................................................ 38
Language code list ......................................... 39
Connections to other equipment .................... 40
Reception disturbances.................................. 43
Problems and troubleshooting ....................... 44
Specifications ................................................. 46
Limited WARRANTY ...................................... 47
Contents
IMPORTANT SAFETY INSTRUCTIONS ......... 3
SAFETY PRECAUTIONS ................................ 6
IMPORTANT NOTICE ..................................... 6
Features ........................................................... 7
Contents ........................................................... 8
Disc ..................................................................9
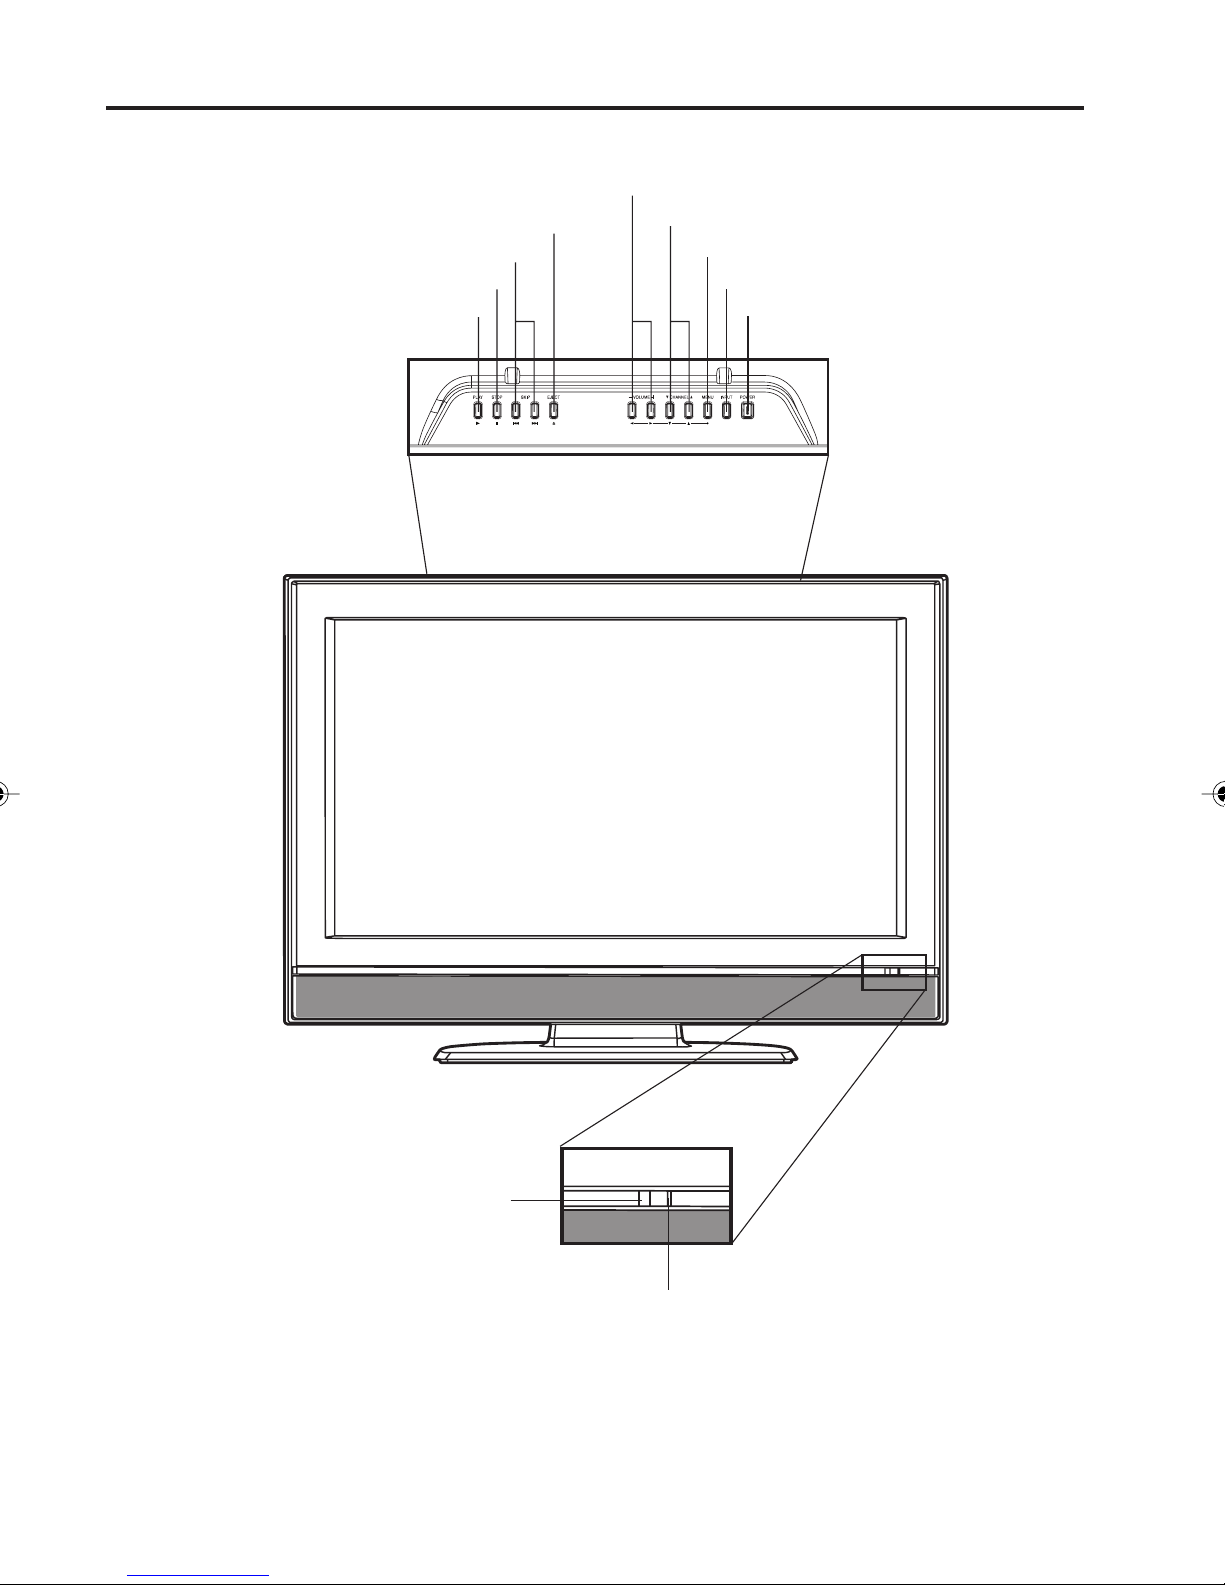
Location of controls ........................................ 10
Remote control ............................................... 12
Power source ................................................. 13
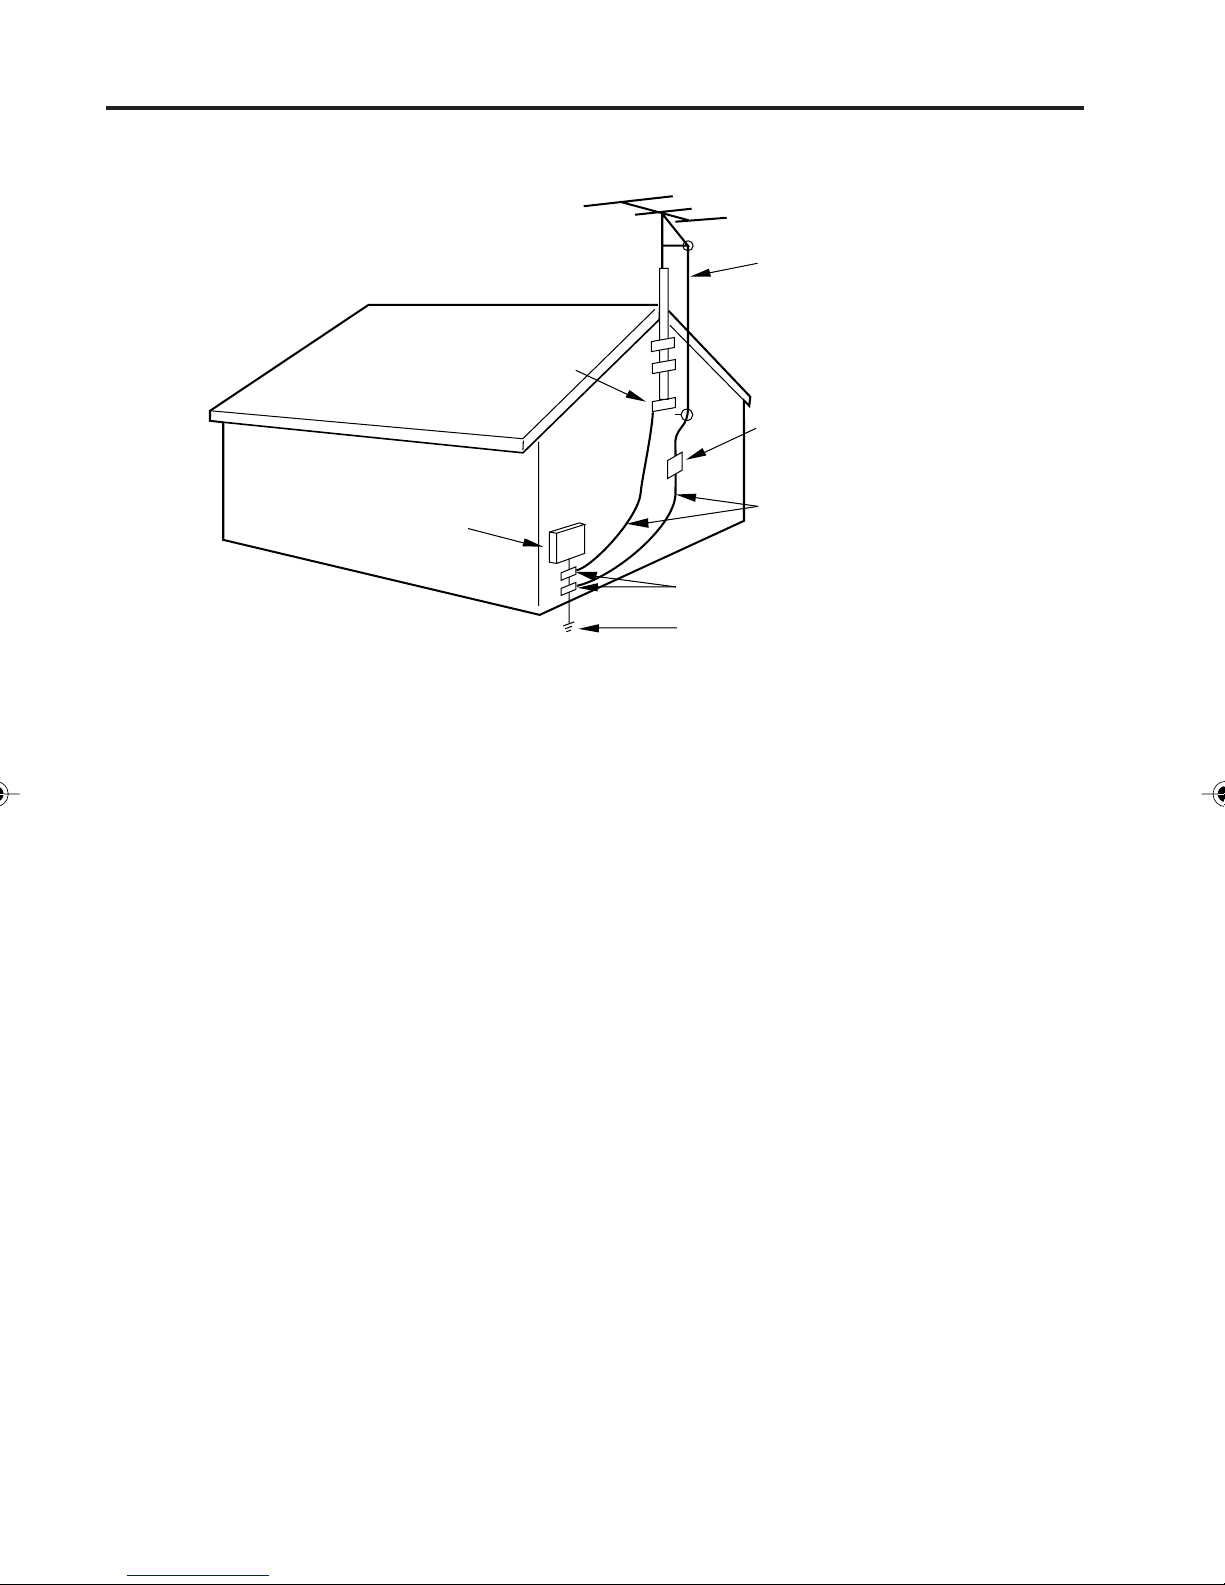
Antenna connections......................................14
Cable TV connections .................................... 15
Before using your unit
Setting the on-screen display language ......... 16
TV operation................................................... 16
Memorizing channels ..................................... 17
Setting the V-Chip ..........................................18
Labeling channels ..........................................20
Selecting the video input source .................... 20
Labeling the video input source ..................... 21
Setting the picture size ................................... 21
Setting the picture scroll .................................22
Selecting the cinema mode ............................22
Using the aspect feature ................................23
Adjusting the picture preference .................... 23
Picture control adjustment.............................. 23
Selecting the color temperature ..................... 24
Adjusting the back lighting feature ................. 24
Resetting your picture adjustments ................ 24
Closed Caption...............................................24
CC advanced .................................................25
Selecting Stereo/Second Audio Program
(SAP)..............................................................25
Sound control adjustment .............................. 26
Selecting the HDMI audio input source .......... 26
Selecting the audio language .........................26
Selecting the digital output ............................. 26
Resetting your audio adjustments ..................27
Checking the Digital-signal strength............... 27
Setting the auto shut off .................................27
Picture/Audio control adjustment in the
PC mode ........................................................ 27
TV operation
Preparation..................................................... 28
Status display of disc ..................................... 28
Playback procedure ....................................... 29
Special playback ............................................ 29
MP3/WMA/JPEG and Audio CD playback ..... 30
Setting the JPEG interval ............................... 31
Playback operation
5Z80501A_EN_P06-15 7/3/07, 3:46 PM8

9
Playable discs
CAUTION:
•Only the left types of discs can be played on this unit.
DVD-ROM, CD-ROM, SVCD, CVD, VCD, etc. cannot be
played.
•8cm discs can be played directly. If an 8cm disc adapter is
used it will cause errors.
•If you insert an irregular shaped disc, it may get stuck and
cause a malfunction.
•The use of a ring protector or other disc accessories will
cause errors.
•This unit is to be used exclusively with the NTSC color
system. PAL and SECAM system discs cannot be used
with this unit.
•Some CD-R/RWs and DVD-R/RW can not be played
back depending on the recording conditions.
Region Number
Region number (Regional restriction code) is built-in to the unit and DVD video discs.
Region number “1” or “ALL” of DVD video discs can be used on this unit.
Title
When two or more movies are recorded on a disc,
the disc is divided into two or more sections.
Each section is called a “TITLE”.
Chapter
The titles can be subdivided into many sections.
Each section is called a “CHAPTER”.
Track
An Audio CD can contain several items.
These are assigned to the tracks.
Removing Disc from Case
Be sure to hold the edge of disc. Do not touch the surface of the disc.
Pick up the disc gently from the case.
• Do not scratch the disc.
• Do not get dirt on the surface of the disc.
• Do not stick a label or adhesive tape on the disc.
• Do not drop or bend the disc.
Storing Disc
• Store the disc in the case to avoid risk of scratches, dirt or damage.
• Do not leave disc exposed to direct sunlight or in hot or humid places.
Cleaning Disc
Wipe the disc with a clean, dry cloth from center to edge.
• Do not wipe the disc in a circular motion.
• Do not use liquid or aerosol cleaners.
Disc
TRACK 1 TRACK 2 TRACK 3 TRACK 4 TRACK 5
Audio - CD
CHAPTER 1
TITLE 1 TITLE 2
DVD DISC
CHAPTER 2 CHAPTER 2 CHAPTER 3CHAPTER 1
1ALL
DVD Video
CD-DA
content
Audio
+
Video
(moving
pictures)
Audio
Disc type and logo mark
The following discs are also available.
•DVD-R/RW discs of DVD video format.
•CD-R/RW discs of MP3/WMA/JPEG.
5Z80501A_EN_P06-15 7/3/07, 3:46 PM9

10
POWER
Location of controls
POWER button
INPUT button
VOLUME +/– buttons
CHANNEL ▲/▼ buttons
MENU button
Remote sensor
POWER indicator
Top
Front
POWER
STOP button
SKIP button
EJECT button
PLAY button
To display the menu screen.
Press MENU button to display the menu screen.
CHANNEL ▲/▼buttons and VOLUME +/– buttons can be used to select the desired setting during the menu
screen operations.
5Z80501A_EN_P06-15 7/3/07, 3:46 PM10

11
Location of controls (continued)
PC/HDMI AUDIO IN jack
PC IN jack
HDMI1 IN jack
AV2 IN jacks
COMPONENT IN jacks
Left side
RF (ANT) IN jack
COAXIAL DIGITAL
AUDIO OUT jack
AV1 IN jacks
Rear
DISC slot
•Bundle cables with a cable clip.
HDMI2 IN jack
5Z80501A_EN_P06-15 7/3/07, 3:47 PM11

12
Remote control
Page
POWER Power On/Off 16,28,29
DISPLAY/– Call TV information 17,19
Call DVD information 28
Input “–” for digital channels 16
TV/DVD Switch between TV/AV and DVD 16,28,29
5(EJECT) Eject a disc 29,38
0-9 Direct channel selection of TV 16
Input setting 20,21,30,33
Enter a password 18~20,37~38
VOL +/– Adjust volume of TV 16,17
MUTE Switch off the sound 17,19
SLEEP Sleep timer 17
SETUP/TV MENU TV mode - Display menu of TV 16,17~21,23~28
DVD mode - Call up initial setup mode
31,35~37
DVD MENU Display DVD menu 35
CH /Select channel of TV 17
Cursor buttons 16~28,30~37
ENTER Enter information in the menu
18~20,21,25,26,29,30~38
EXIT Exit from On-Screen menu 16~27
CANCEL Reset information in the menu 32,33,37,38
TOP MENU Select title 35
SEARCH Fast Forward/Review playback 29
PLAY Playback 29~31,32,33,35
SKIP Skip chapter to forward or reverse direction 29,32
SUBTITLE Set subtitle 34
STOP Stop 29,30
SLOW Forward/Reverse- slow motion 29
PAUSE/STILL Pause CD sound
Still picture of DVD 29
PLAY MODE Select playback mode 33
AUDIO Display AUDIO menu 25
Switch the sound of TV
Change sound track language 34
RETURN Remove DVD setup menu 31,35~37
REPEAT A-B Repeat playback between A and B 33
ANGLE Change playback angle 34
SCREEN SIZE Display PICTURE SIZE menu 21
MARKER Index 33
JUMP Locating desired scene 32
QUICK VIEW Switch between present/last channel 17
ZOOM Zoom 32
INPUT SELECT Display SOURCE SELECTION menu 20,27
5Z80501A_EN_P06-15 7/3/07, 3:47 PM12

13
Approximately 15 feet
Inserting Batteries
123
Operation
•Aim the remote control at the remote sensor and press control
buttons to operate.
•Operate the remote control within a 30° angle on either side of
the remote sensor, up to a distance of approximately 15 feet.
Do not leave the remote control unit exposed to direct sunlight or in hot or humid places.
The remote control unit uses infrared beams to transmit signals, so sunlight or fluorescent light on the remote
sensor may shorten operating distance.
Incorrect use of batteries may cause them to leak or burst. Read the battery warnings and use the batteries
properly.
Do not mix old and new batteries.
Remove batteries if the remote control will not be operated for an extended period of time.
Remote control (continued)
NOTE:
•
•
•
•
•
Replace the compartment
cover.
Install two “AAA” batteries
,
paying attention
to the polarity
diagram in the battery
compartment.
Open the battery compart-
ment cover in the direction of
the arrow.
Power source
NOTE:
•Please make sure to insert the cord securely at both the LCD TV/DVD and the wall outlet.
•The AC Cord has a grounding-type AC line plug. If the supplied AC cord does not match your AC outlet,
contact a qualified electrician, do not defeat the purpose of a grounding plug.
WARNING:
•DO NOT CONNECT THIS UNIT TO THE POWER USING ANY DEVICE OTHER THAN THE SUPPLIED AC
CORD. THIS COULD CAUSE FIRE, ELECTRICAL SHOCK, OR DAMAGE.
• DO NOT USE WITH A VOLTAGE OTHER THAN THE POWER VOLTAGE DISPLAYED. THIS COULD
CAUSE FIRE, ELECTRICAL SHOCK, OR DAMAGE.
CAUTION:
•WHEN THIS UNIT IS NOT USED FOR A LONG TIME, (E.G., AWAY ON A TRIP) IN THE INTEREST OF
SAFETY, BE SURE TO UNPLUG IT FROM THE AC OUTLET.
•DO NOT PLUG/UNPLUG THE PLUG WHEN YOUR HANDS ARE WET. THIS MAY CAUSE ELECTRICAL
SHOCK.
•IF YOU NEED TO REPLACE THE SUPPLIED AC ADAPTER OR AC CORD, THE SPECIFIED ONE IS
RECOMMENDED. CONTACT CUSTOMER SERVICE AT 1-800-289-0980.
TO USE AC POWER
1. Connect the AC cord plug into this unit's AC IN jack.
2. Connect the AC cord into an AC outlet.
AC cord (supplied)
AC 120V, 60Hz
Wider Hole
and Blade
AC Outlet
5Z80501A_EN_P06-15 7/3/07, 3:47 PM13

14
ANT
ANT
ANT
ANT
If you are using an indoor or outdoor antenna, follow the instructions below that correspond to your antenna
system. If you are using a Cable TV service, see page 15 for Cable TV connections.
Combination VHF/UHF Antenna (Separate VHF and UHF 300 ohm twin-lead wires)
Combination VHF/UHF Antenna (Single 75 ohm cable or 300 ohm twin-lead wire)
Antenna connections
Separate VHF/UHF Antennas (75 ohm VHF cable and 300 ohm UHF twin-lead wires)
Connect the 75 ohm cable from the combination
VHF/UHF antenna to the antenna jack.
If your combination VHF/UHF antenna has a 300
ohm twin-lead wire, the use of the 300-75 ohm
matching transformer may be necessary.
Connect the UHF 300 ohm twin-lead wire to the
Combiner (not supplied). Connect the VHF 300
ohm twin-lead wire to the 300-75 ohm Matching
Transformer. Attach the Transformer to the Com-
biner, then attach the Combiner to the Antenna
Jack.
Connect the VHF 75 ohm cable and UHF 300 ohm
twin-lead wire to the Combiner (not supplied).
Attach the Combiner to the Antenna Jack.
75 ohm
Coaxial
Cable
300-75 ohm
Matching
Transformer
VHF 75 ohm
Antenna
Jack
Antenna
Jack
300-75 ohm Matching Transformer
UHF 300 ohm VHF 300 ohm
Antenna
Jack
Combiner
Antenna
Jack
Combiner
UHF 300 ohm
5Z80501A_EN_P06-15 7/3/07, 3:47 PM14

15
ANT
FOR SUBSCRIBERS TO BASIC CABLE TV SERVICE
For basic Cable TV service not requiring a Converter/
Descrambler box, connect the 75 ohm Coaxial Cable directly to
the Antenna Jack on the back of the TV/DVD.
Cable TV connections
FOR SUBSCRIBERS TO SCRAMBLED CABLE TV SERVICE
If you subscribe to a Cable TV service in which basic channels are unscrambled and premium channels require the
use of a Converter/Descrambler box, you may wish to use a signal Splitter and an A/B Switch box (available from
the Cable TV company or an electronics supply store). Follow the connections shown below. With the switch in the
“B” position, you can directly tune any nonscrambled channels on your TV/DVD. With the switch in the “A” position,
tune your TV/DVD to the output of the Converter/Descrambler box (usually channel 3 or 4) and use the Converter/
Descrambler box to tune scrambled channels.
FOR SUBSCRIBERS TO UNSCRAMBLED BASIC CABLE TV SERVICE WITH
SCRAMBLED PREMIUM CHANNELS
Splitter B
A
Incoming
75 ohm
Cable TV
Cable A/B Switch
75 ohm Cable
to TV/DVD
Incoming
75 ohm
Cable TV
Cable
75 ohm Cable
to TV/DVD
Converter/
Descrambler
Antenna
Jack
Antenna
Jack
Converter/
Descrambler
This TV/DVD has an extended tuning range and can tune most cable channels without using a Cable
TV Converter box. Some cable companies offer “premium pay channels” where the signal is
scrambled. Descrambling these signals for normal viewing requires the use of a descrambler device
which is generally provided by the Cable TV company.
If you subscribe to a Cable TV service which requires the use of a Converter/Descrambler box, connect the
incoming 75 ohm Coaxial Cable to the Converter/Descrambler box. Using another 75 ohm Coaxial Cable,
connect the output jack of the Converter/Descrambler box to the Antenna Jack on the TV/DVD. Follow the
connections shown below. Set the TV/DVD to the output channel of the Converter/Descrambler box (usually
channel 3 or 4) and use the Converter/Descrambler box to select channels.
75 ohm
Coaxial Cable
Antenna
Jack
5Z80501A_EN_P06-15 7/3/07, 3:47 PM15

16
Setting the on-screen
display language
You can choose from three different languages
(English, French and Spanish) for the on-screen
displays.
On-screen language selecion (step 5) will auto-
matically appear on the screen when you press
SETUP/MENU initially. Select the language you
prefer first, then proceed with the other menu
options.
1Press POWER to turn on the unit.
2Press TV/DVD to select the TV mode.
3Press SETUP/TV MENU. The TV menu screen
will appear.
4Press or to select (SETUP) menu.
5Press ▲or ▼to select “LANGUAGE”.
6Press or to select the desired language:
English (ENGLISH), French (FRANÇAIS) or
Spanish (ESPAÑOL).
7Press EXIT to return to the normal screen.
NOTE:
•If the unit does not operate properly (by the
buttons on the unit and/or the remote control)
disconnect the AC cord, wait a few minutes and
plug it back in. Static electricity, etc., may have
affected the player's operation.
•If no buttons are pressed for more than 60 seconds,
the MENU screen will return to normal TV-operation
automatically.
TV operation
1To turn on the unit, press POWER.
2Adjust the volume level by pressing VOL + or – .
The volume level will be indicated on the screen
by white bars. As the volume level increases, so
do the number of bars. If the volume decreases,
the number of white bars also decreases.
3Set the TV/CABLE menu option to the appropri-
ate position (see page 17).
TV - VHF/UHF channels
CABLE - CABLE TV channels
4Press the Direct Channel Selection (0-9,–)
buttons to select the channel.
To select analog channels
When the TV/CABLE menu option is in the TV
position, all channels can be instantly selected by
using two buttons.
(For example, to select channel 2, press “0”, then
“2”. If you press only “2”, channel selection will be
delayed for a few seconds.)
For channels 10 and above, press the 2 digits in
order.
When the TV/CABLE menu option is in the
CABLE position, channels can be selected as
follows:
1-9: Press 0twice, then 1-9 as needed.
Example, to select channel 2, press
002.
10-12: Press 0, then remaining 2 digits.
Example, to select channel 12, press
012.
13-99: Press the 2 digits in order.
Example, to select channel 36, press
36.
100-125: Press the 3 digits in order.
Example, to select channel 120, press
120.
To select digital channels
Press the channel number in order.
When “–” is contained in the channel number,
Press the first 3 digits, then press “–/DISPLAY”,
followed by the remaining 3 digits.
(Example, to select channel 015-001, press 015 –
001.)
•If a channel is selected with only audio content,
“AUDIO ONLY” will be displayed on the screen.
•If a channel is selected with a weak digital
signal, “DIGITAL CHANNEL SIGNAL
STRENGTH IS LOW” will be displayed on the
screen.
If the digital channel has the same analog
channel, you may be able to watch the same
channel with analog.
•If a channel is selected to which you have not
subscribed, “DIGITAL CHANNEL IS
ENCRIPTED” will be displayed on the screen.
VHF/UHF/CABLE CHANNELS
TV CABLE
VHF VHF
2-13 2-13
UHF STD/HRC/IRC
14-69 14-36 (A) (W)
37-59 (AA) (WW)
60-85 (AAA) (ZZZ)
86-94 (86) (94)
95-99 (A-5) (A-1)
100-125 (100) (125)
01 (5A)
NOTE:
•If a channel with no broadcast is selected, the
sound will automatically be muted.
•It may take a few seconds for a digital channel
picture to appear on screen after being selected.
5Z80501A_EN_P16-23 7/3/07, 3:47 PM16

17
CH /
Press and release CH or . The channel auto-
matically stops at the next channel set into memory.
For proper operation, before selecting channels, they
should be set into the memory. See pages 17 and 18
“Memorizing channels”.
DISPLAY
Press DISPLAY to display the current information on
the screen.
When the TV receives a digital signal, the digital
information will appear.
•Channel number
•Broadcast program name
•Station name • Remaining time
•Audio language • Program guide
•V-CHIP RATING • V-Chip mark
•Sleep time • Picture size
When the TV receives a analog signal, the analog
information will appear.
•Channel number or VIDEO mode selected
•Channel label (if preset)
•Stereo or SAP (second audio program) audio status
•Content rating
•Sleep time
•Picture size
Press DISPLAY again to clear the call display.TV
QUICK VIEW
This button allows you to go back to the last channel
selected by pressing QUICK VIEW. Press QUICK
VIEW again to return to the last channel you were
watching.
MUTE
Press MUTE to switch off the sound. The unit’s sound
will be silenced and “MUTE” will briefly appear on the
screen. The sound can be switched back on by
pressing this button again or the VOL + or –.
SLEEP
To set the unit to turn off after a preset amount of
time, press SLEEP on the remote control. The clock
will count up 10 minutes for each press of the SLEEP
button (OFF, 0h10m, ..., 1h50m, 2h00m). After the
sleep time is programmed, the display will appear
briefly every ten minutes to remind you that the sleep
timer is operating. To confirm the sleep timer setting,
press SLEEP and the remaining time will be dis-
played for a few seconds. To cancel the sleep timer,
press SLEEP repeatedly until the display turns to
OFF.
NOTE:
•The unit is capable of holding a still video image or
On screen display image on your television screen
indefinitely. If you leave the still video image or On
screen display image displayed on your unit for an
extended period of time, you risk permanent
damage to your television screen.
•When the TV receives an analog signal, DISPLAY
shows only analog information.
•After 10 seconds, DISPLAY screen will return to
normal TV-operation automatically, when a Digital
signal is received.
After 4 seconds, DISPLAY screen will return to
normal TV-operation automatically, when a Analog
signal is received.
Memorizing channels
This TV/DVD is equipped with a channel memory
feature which allows channels to skip up or down
to the next channel set into memory, skipping
over unwanted channels. Before selecting chan-
nels, they must be programmed into the TV/DVD’s
memory. To use this TV/DVD with an antenna, set
the TV/CABLE menu option to the TV mode. When
shipped from the factory, this menu option is in
the CABLE mode.
TV/CABLE selection
1Press SETUP/TV MENU in the TV mode.
The TV menu screen will appear.
2Press or to select (SETUP) menu.
3Press ▲or ▼to select “TV/CABLE”.
4Press or to select “TV” or “CABLE”.
TV - VHF/UHF channels
CABLE - CABLE TV channels
SETUP
LANGUAGE ENGLISH
TV/CABLE TV/CABLE
AUTO CH MEMORY
ADD/DELETE
:SELECT :ADJUST
5Press EXIT to return to the normal screen.
5Z80501A_EN_P16-23 7/3/07, 3:47 PM17

18
CABLE CHART
The chart below is typical of many cable system
channel allocations.
NOTE:
•It may take a few seconds for a digital channel
picture to appear on screen after being selected.
Automatic memory tuning
1Press SETUP/TV MENU in the TV mode.
The TV menu screen will appear.
2Press or to select (SETUP) menu, then
press ▲or ▼to select “AUTO CH MEMORY”.
3Press or . The unit will begin memorizing all
the channels available in your area.
•It may take from 15 minutes to 30 minutes to
complete memorizing digital cable channels.
Depending on the reception condition, a BAR
display may not advance for several minutes,
please be patient.
CABLE
AUTO CH MEMORY
PROGRAMMING NOW
PLEASE WAIT
EXIT : CANCEL
To ADD/DELETE channels
1Press SETUP/TV MENU. The menu screen will
appear.
2Press or to select (SETUP) menu, then
press ▲or ▼to select “ADD/DELETE”.
Press or . The ADD/DELETE menu will
appear.
3Press ▲or ▼to select “ADD/DELETE”, then
press or .
4Select the desired channel to be memorized or
deleted using ▲or ▼.
Press or to select “ADD” or “DELETE”,
whichever function you want to perform.
:SELECT :ADJUST
ADD / DELETE
ADDING CHANNEL
ADD / DELETE
CH SIGNAL
1 ANALOG ADD/DELETE
2 ANALOG ADD
3 ANALOG DELETE
4 ANALOG DELETE
5 ANALOG ADD
5-001 DIGITAL ADD
CLEAR ALL
RETURN
5Repeat step 4 for other channels you want to add
or delete, then press ENTER.
6Press EXIT to return to the normal screen.
To add a digital channel
Select the channel you wish to add.
Press ▲or ▼to select “ADDING CHANNEL” as in
step 3 above, then press or .
CLEAR ALL
All channels are deleted from the channel memory.
Press ▲or ▼to select “CLEAR ALL” in step 3 above,
then press or .
NOTE:
•Memorizing channels is best accomplished during
evening “PRIMETIME” hours, as more stations are
broadcasting digital signals. Memorizing channels
can only be accomplished while a station is broad-
casting a digital signal to set that channel into
memory.
•If you are unsure of the digital channels available in
your area you may visit www.antennaweb.org
to receive a list based on your address or zip code.
Should you require further assistance you may call
our toll-free customer service line at 1-800-289-
0980.
•New digital channels may be added to your area
periodically, it is recommended to perform the
“AUTO CH MEMORY” procedure regularly.
•To return from ADD/DELETE menu to SETUP
menu, select “RETURN”, then press or .
Setting the V-Chip
An age limitation can be set to restrict children
from viewing or hearing violent scenes or
pictures that you may choose to exclude. The
restriction applies to “TV RATING” and “MOVIE
RATING” if this data is transmitted. You may set
this restriction separately. To use the V-Chip
function, you must register a password.
To register password
1Press SETUP/TV MENU in the TV mode.
The TV menu screen will appear.
2Press or to select (LOCKS) menu.
3Press ▲or ▼to display the password entering
mode.
5Z80501A_EN_P16-23 7/3/07, 3:47 PM18

19
4Select and enter a password (4 digits) using
Number buttons (0-9), then press ENTER.
LOCKS
NEW PASSWORD
[0-9] : SELECT ENTER : SET
EXIT : END
“” appears instead of the number.
5Enter the same password again to confirm, then
press ENTER.
The password is now registered and the LOCKS
menu will appear on the screen.
NOTE:
•If you forget the password, contact Customer
Service at 1-800-289-0980 for assistance. Your
original remote control will be required.
•To avoid forgetting the password, write it down and
keep in the safe place.
To set the V-Chip
1Press SETUP/TV MENU in the TV mode.
Then press or to select (LOCKS) menu.
2Press ▲or ▼to display the password entering
mode. Use Number buttons (0-9) to enter your
password, then press ENTER. The LOCKS menu
appears.
3Press ▲or ▼to select “V-CHIP SET”, then press
or . The V-CHIP SET menu appears.
4Press s or t to select “TV RATING”. Then press
or to display the desired rating.
V-CHIP SET
TV RATING OFF
OFF/TV-Y/TV-Y7/TV-G
TV-PG/TV-14/ TV-MA
MOVIE RATING
:SELECT :ADJUST
OFF : TV RATING is not set
TV-Y : All children
TV-Y7 : 7 years old and above
TV-G : General audience
TV-PG : Parental guidance
TV-14 : 14 years old and above
TV-MA : 17 years old and above
•When you select TV-Y7, TV-PG, TV-14 or TV-
MA, press DISPLAY to explain the rating.
Press ▲or ▼to select the desired rating you
want. Press or to select the setting “ON” or
“OFF”.
5Press ▲or ▼to select “MOVIE RATING”, then
press or . The RATING SET menu appears.
:ADJUST
:SELECT
RATING SET
GON/OFF
PG OFF
PG-13 OFF
ROFF
NC-17 OFF
XOFF
6Press ▲or ▼to select a rating, then press or
to select ON or OFF for each rating.
G:All ages
PG : Parental guidance
PG-13 : Parental guidance less than 13 years old
R:Under 17 years old Parental guidance
suggested
NC-17 : 17 years old and above
X:Adult only
7Press SETUP/TV MENU twice to return to the
LOCKS menu, then press ▲or ▼to select “V-
CHIP”.
8Press or to select “ON”.
Your settings are now set into memory.
LOCKS
V-CHIP ON/OFF
V-CHIP SET
V-CHIP SET (DTV)
NEW PASSWORD
:SELECT :ADJUST
9Press EXIT to return to the normal screen.
To use the TV after the TV is protected.
When a program is received that is blocked by the V-
Chip, press MUTE and enter the password, then
press ENTER. When the password is entered
correctly the protection will be temporarily overridden.
If the unit is turned off, or the channel is changed the
V-Chip restriction will be reactivated.
NOTE:
•The V-Chip function is activated only on programs
and input sources that include a rating signal.
•The V-CHIP SET (DTV) will only be selectable
when the unit receives a digital broadcast using the
new rating system. It may take several minutes for
the initial V-Chip Set-up to complete. At this time
some stations are still developing this signal, in
those cases the V-CHIP SET (DTV) will not func-
tion.
5Z80501A_EN_P16-23 7/3/07, 3:47 PM19

20
To change the password
1Press SETUP/TV MENU in the TV mode.
The TV menu screen will appear.
2Press or to select (LOCKS) menu.
3Press ▲or ▼to display the password entering
mode. Use Number buttons (0-9) to enter your
password, then press ENTER. The LOCKS menu
appears.
4Press ▲or ▼to select “NEW PASSWORD”, then
press or .
5Enter a new password using Number buttons
(0-9), then press ENTER.
6Enter the same password again to confirm, then
press ENTER.
7Press EXIT to return to the normal screen.
Labeling channels
Channel labels appear over the channel number
display each time you turn on the TV, select a
channel, or press DISPLAY.
You can choose any four characters to identify a
channel.
To create channel labels
1Select a channel you want to label.
2Press SETUP/TV MENU in the TV mode, then
press or to select (OPTION) menu.
Press ▲or ▼to select “CH LABEL”, then press
or . The CH LABEL menu will appear.
3Press ▲or ▼to select “SET/CLEAR”. Press or
to select “SET”.
4Press ENTER to select “LABEL”.
Then press or to enter a character in the first
space. Press the button repeatedly until the
character you want appears on the screen.
CH LABEL : CH1111123
SET
LABEL _ _ _ _
RETURN
:SELECT :ADJUST
The characters rotation as follows:
SPACE
-
+
If the character which you desire appears, press
ENTER.
Repeat this step to enter the rest of the characters.
If you would like a blank space in the label name,
you must choose the empty space from the list of
characters; otherwise, a dash will appear in that
space.
When you finish inputting the label name, press
ENTER.
5Press EXIT to return to the normal screen.
6Repeat steps 1-5 for other channel. You can
assign a label to each channel.
To erase channel labels
1Select a channel with a label which you want
remove.
2Press SETUP/TV MENU, then press or to
select (OPTION) menu.
Press ▲or ▼to select “CH LABEL”, then press
or to display the CH LABEL menu.
3Press ▲or ▼to select “SET/CLEAR”. Press or
to select “CLEAR”, then press ENTER.
4Press EXIT to return to the normal screen.
5Repeat steps 1 - 4 to erase other channel labels.
NOTE:
•Select “RETURN” and press or to return from
CH LABEL menu to OPTION menu.
Selecting the video input
source
Press INPUT SELECT to view a signal from another
device connected to your TV, such as a VCR or DVD
player. You can select ANT, VIDEO1, VIDEO2,
COMPONENT, HDMI1, HDMI2 or PC depending on
which input jacks you used to connect your devices.
SOURCE SELECTION
0:ANT
1:VIDEO1
2:VIDEO2
3:COMPONENT
4:HDMI1
5:HDMI2
6:PC
[0
-
6] : SELECT
Pressing INPUT SELECT on the remote control
displays the current signal source. To change the
video input source, press INPUT SELECT again or 0-
6.
5Z80501A_EN_P16-23 7/3/07, 3:47 PM20
Table of contents
Other Sansui TV DVD Combo manuals

Sansui
Sansui HDLCDVD320 User manual

Sansui
Sansui HDLCDVD320 User manual

Sansui
Sansui HDLCDVD265 User manual

Sansui
Sansui HDLCDVD195 User manual

Sansui
Sansui HDLCD4212 User manual

Sansui
Sansui SLEDVD197 User manual

Sansui
Sansui HDLCDVD260B User manual

Sansui
Sansui HDLCDVD265 User manual

Sansui
Sansui HDLCD4212 User manual

Sansui
Sansui HDLCDVD265 User manual

Sansui
Sansui LCDWDVD320 User manual

Sansui
Sansui SLEDVD329A User manual

Sansui
Sansui SLEDVD249 User manual

Sansui
Sansui SLEDVD198 User manual

Sansui
Sansui HDLCDVD260 User manual

Sansui
Sansui LCDVD200 User manual

Sansui
Sansui HDLCDVD225 User manual

Sansui
Sansui HDLCDVD325 User manual

Sansui
Sansui HDLCDVD325A User manual

Sansui
Sansui LCDVD150 User manual