Santos 66 Owner's manual

OPERATING AND SERVICING MANUAL
IMPORTANT: documents included in this manual which must be
kept:
•"CE" DECLARATION OF CONFORMITY
•WARRANTY CERTIFICATE
TRANSLATION OF THE ORIGINAL VERSION
Read the user manual before unpacking the appliance.
Coffee grinders - Fruit juicers - Mixers - Blenders - Drinks dispensers - Planetary mixers
Cheese graters - Ice crushers - Mincers - Vegetable slicers - Dough mixer
Moulins à café - Presse-fruits - Mixers - Blenders - Distributeurs de boissons - Batteurs mélangeurs - Pétrin -
Râpes à fromage - Broyeurs à glaçons - Hache-viande - Coupe-légumes
INTERNATIONALLY PATENTED MODELS
SANTOS SAS:
140-150 AVENUE ROGER SALENGRO
69120 VAULX-EN-VELIN (LYON) - FRANCE
TEL. 33 (0) 472 37 35 29 - FAX 33 (0) 478 26 58 21
MANUEL D'UTILISATION ET D'ENTRETIEN
OPERATING AND SERVICING MANUAL
BENUTZUNGS- UND WARTUNGSANLEITUNG
MANUAL DE UTILIZACION Y DE MANTENIMIENTO
GEBRUIKS-EN-ONDERHOUDSHANDLEIDING
COMPACT BRUSHLESS BLENDER no.66
!

SANTOS: Operating & Servicing Manual
98166 EN 1.0 –05 2021 2 / 18 www.santos.fr
TABLE OF CONTENTS
"CE" DECLARATION OF CONFORMITY ....................................................................................................... 3
SAFETY RULES ..................................................................................................................................................... 4
CONTRAINDICATIONS: ................................................................................................................4
ELECTRICAL CONNECTION:.......................................................................................................5
1st USE:............................................................................................................................................5
END-OF-LIFE PRODUCT RECYCLING:......................................................................................5
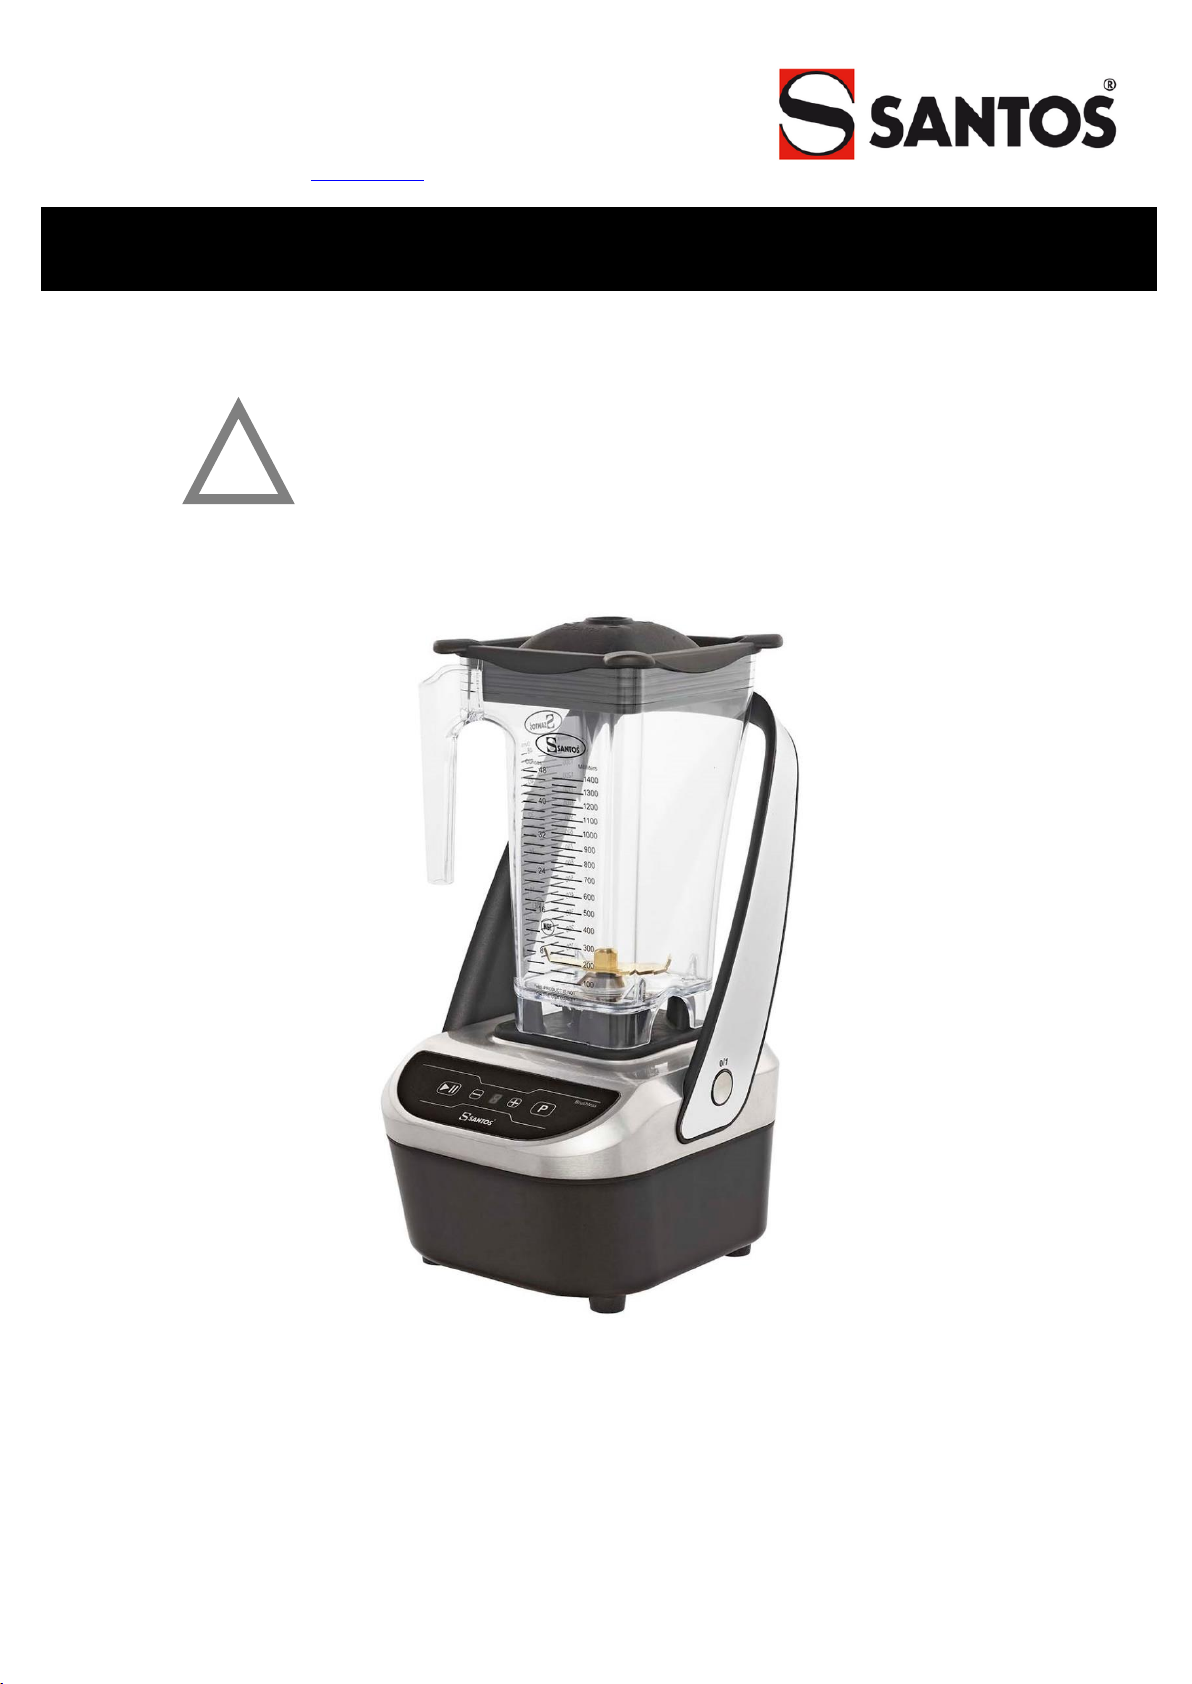
DESCRIPTION OF THE APPLIANCE................................................................................................................ 6
INSTALLATION AND HANDLING: ...............................................................................................6
Counter top installation................................................................................................................6
Recessed installation in the counter.............................................................................................6
USE OF THE APPLIANCE ................................................................................................................................... 7
DESCRIPTION OF THE CONTROL PANEL:................................................................................7
USE:.................................................................................................................................................7
Switching on................................................................................................................................7
Switching off the appliance .........................................................................................................8
RECIPES: ........................................................................................................................................8
STANDBY MODE:...........................................................................................................................8
CLEANING:.....................................................................................................................................8
Cleaning the bowl:.......................................................................................................................8
Disinfecting the bowl:..................................................................................................................9
LID SAFETY FEATURE:.................................................................................................................9
Modification of the lid safety feature ..........................................................................................9
SERVICING:..................................................................................................................................10
Spare parts: ................................................................................................................................10
Prolonged non-use: ....................................................................................................................11
Replacing the blade:...................................................................................................................11
TROUBLESHOOTING GUIDE ..........................................................................................................................12
The appliance will not start:.......................................................................................................12
The blade does not turn:.............................................................................................................12
Noise, vibrations, leaks around the blade of the bowl:..............................................................12
Problem with the recipes: ..........................................................................................................13
TECHNICAL FEATURES OF THE APPLIANCE ...........................................................................................14
TECHNICAL SPECIFICATIONS (1) ............................................................................................14
Electrical diagram 220-240 V 50/60 Hz........................................................................................15
Correlation table............................................................................................................................16
CERTIFICAT DE GARANTIE ...........................................................................................................................18
PLAQUE SIGNALETIQUE DE L’APPAREIL..................................................................................................18

SANTOS: Operating & Servicing Manual
98166 EN 1.0 –05 2021 3 / 18 www.santos.fr
"CE" DECLARATION OF CONFORMITY
THE MANUFACTURER:
SANTOS SAS - 140-150, Av. Roger SALENGRO 69120 VAULX-EN-VELIN (LYON)
FRANCE
Declares that the appliance to be launched on the professional market, hereinafter:
Name: COMPACT BRUSHLESS BLENDER
Type number: 66
complies with:
•the regulations defined by appendix 1 of the EU "Machinery" Directive No.
2006/42/EC and with national implementing legislation.
•the regulations of the following European directives and regulations:
oNo. 2014/35/UE (Low Voltage Directive)
oNo. 2014/30/EU (EMC Directive)
oNo. 2011/65/EU (RoHS Directive)
oNo. 2012/19/EU (WEEE Directive)
oNo. 1935/2004/EC (Regulation) on materials and objects intended to come into
contact with food
oNo. 10/2011/EC (Regulation) relating to plastic materials intended for food contact
Harmonised European standards used to give presumption of conformity with the essential
requirements of the directives mentioned above:
•NF EN 12852+A1: 2010, Food processing machinery –Food processors and blenders –
Requirements for safety and hygiene.
This European Standard is a type C standard, as defined in EN ISO 12100. When provisions of this
type C standard are different from those stated in type A or B standards, the provisions of the
standard C types take precedence over the provisions of other standards. This standard provides
the means to comply with the requirements of the "Machinery" Directive no. 2006/42/EC (see
appendix ZA)
•NF EN ISO 12100: 2010, Safety of Machinery –General Principles for Design
•NF EN 60204-1+A1: 2009, Safety of machinery –Electrical equipment of machines –
General requirements
•NF EN 1672-2: 2020, Food processing machinery –Basic concepts –Hygiene and
cleanability requirements.
•NF EN 60335-1: 2013, Safety of household and similar electrical appliances
•NF EN 60335-2-64: 2004, Particular requirements for commercial electric kitchen
machines.
Place: VAULX-EN-VELIN Date: 01/05/2021
Signatory title: CHAIRMAN AND CEO
Name of signatory: Aurélien FOUQUET
Signature:

SANTOS: Operating & Servicing Manual
98166 EN 1.0 –05 2021 4 / 18 www.santos.fr
SAFETY RULES
When using, servicing or disposing of the appliance, always take care to follow these basic
precautions.
Read the entire explanatory instructions
Keep this operating manual
CONTRAINDICATIONS:
1. Do not use this appliance to process anything other than food.
2. Remove stones from fruit before placing them in the machine (e.g.: mangoes,
apricots, peaches). Do not process fruit stones in the machine.
3. Do not use the appliance without properly positioning the bowl (1) with its lid
(2) on the motor base (3).
4. Do not use the appliance without food in the bowl.
5. Do not fill the bowl beyond its maximum capacity corresponding to the value
indicated on the side: 1.4 litres. Reduce the maximum capacity for thick
mixtures.
6. The base (6) must not be immersed in water.
7. To protect against the risk of electrocution, do not immerse the base in water
or any other liquid.
8. Do not use the appliance with a damaged power cord. It must be replaced
either by an approved SANTOS dealer or the SANTOS company or by
similarly qualified persons to avoid any hazards.
9. Unplug the appliance before any intervention on it: cleaning, servicing,
maintenance.
10.Cleaning with a hose or pressure cleaner is not allowed.
11.Do not use an abrasive sponge to clean the bowl (1).
12.Do not insert or store kitchen utensils in the bowl.
13.Do not operate the appliance with a chipped, cracked or broken bowl or blade.
Do not use a bowl with a loose blade.
14.It is prohibited to operate the appliance on a work surface with a slope greater
than 10° to the horizontal plane. The 4 feet of the machine must always be
supported on this work surface. The motor axis of the machine must always
be vertical to the work surface.
15.It is forbidden to use replacement parts or accessories other than certified
SANTOS original parts.
16.Press the On/Off switch (4) when the appliance is not in operation.
17.Do not connect multiple appliances on the same power outlet.
18.Do not use this appliance outdoors.
19.Do not place the appliance close to a heat source.
20.This appliance is a professional device, intended exclusively for professional
use. It is not intended for domestic use.
Note: To facilitate understanding of the following paragraphs, please refer to the
diagrams at the end of the manual
!

SANTOS: Operating & Servicing Manual
98166 EN 1.0 –05 2021 5 / 18 www.santos.fr
21.This appliance is not intended for use by persons (including children) with
reduced physical, sensory or mental capabilities, or persons with a lack of
experience or knowledge, unless under the supervision or with prior
instruction concerning use of the appliance by a person responsible for their
safety.
Children should be supervised to ensure that they do not play with the
appliance.
22.This appliance is intended for collective use, e.g. in restaurant kitchens,
canteens, hospitals and small commercial businesses such as bakeries,
butchers, etc., but not for the continuous mass production of food.
ELECTRICAL CONNECTION:
•Single-phase electrical power connection:
-220-240 V 50/60 Hz
Note: This appliance can operate in both 50 Hz and 60 Hz without any adjustment
needed.
Line protection: the appliance must be plugged into a standard electrical outlet: 2 poles +
earth. The installation must be fitted with an RCD and a fuse rated at 16 A. Earthing the
installation is mandatory.
PLEASE NOTE:
Before connecting the appliance, check the correlation between the mains voltage
and that of your appliance. Its value is shown:
➢either on the identification plate under the appliance.
➢or on the identification plate on the last page of this manual.
1st USE:
Properly clean the parts in contact with food: bowl (1) lid (2).
See the “cleaning” chapter
END-OF-LIFE PRODUCT RECYCLING:
This appliance is marked by the selective sorting symbol relating to electric
and electronic waste. This means that this product should be supported by a
selective collection system in accordance with Directive 2012/19/EU (WEEE)
–Professional Equipment section –so it can either be recycled or dismantled
to minimise any environmental impact.
For more information, please contact your dealer or the SANTOS company.
To dispose of or recycle the appliance components, please contact a specialised company
or the SANTOS company.
Electronic products that are not sorted are potentially dangerous for the environment.
Packaging materials must be disposed of or recycled in accordance with current regulations.
Allocation table of materials comprising the appliance (% of mass)
!

SANTOS: Operating & Servicing Manual
98166 EN 1.0 –05 2021 6 / 18 www.santos.fr
Steel mass
Plastic mass
Aluminium
mass
Zinc mass
Copper mass
Misc.
mass*
39.1%
25.2%
12.6%
11.1%
4.9%
7.1%
* Misc. mass, e.g. switches, circuit boards, capacitors, electrical cords, etc.
DESCRIPTION OF THE APPLIANCE
•The appliance is a professional device, intended exclusively for professional use. It is
not intended for domestic use.
•The appliance is intended for the preparation of cocktails, smoothies and all
preparations containing crushed ice and blended fruit to be made in bars, cafés, hotels,
restaurants.
•The appliance consists of a blender bowl, a motor base with an On/Off switch, an
electronic module and control panel.
•It comes with nine recipes to prepare the required preparations.
INSTALLATION AND HANDLING:
Check that the power plug is always accessible regardless of the installation mode
(counter top version or recessed version).
Counter top installation
Only one person is required for handling the appliance. For ease of use, it is advisable to
place the appliance on a table or work surface, so as to have the control panel in front of
you (recommended height: 90 cm).
Recessed installation in the counter
This installation requires a cut in the worktop (fig.3).
Before making this cut, make sure the appliance is perfectly usable once recessed.
The cut-out of the work surface corresponds to a rectangle: 154 mm (wide) x 164 mm
(deep).
•Make sure you have a minimum clearance of 90 mm under the worktop.
•Heightwise, the free zone must be 400 mm
•The minimum lateral clearance must be 100 mm
Cut-out and installation plans are available for download on our website in the directory of
blender No. 66.
Multiple recessed: It is advisable to leave a gap of 100 mm between two cut-outs.
Transformation of the appliance to fit the recessed installation.
•Unplug the appliance from the mains.

SANTOS: Operating & Servicing Manual
98166 EN 1.0 –05 2021 7 / 18 www.santos.fr
•Remove the bowl (1).
•Tip the appliance onto its back.
•Using a Torx screwdriver, remove the 4 screws inside the feet.
•Remove the motor casing (6).
You can position the appliance as such into the cut-out in the worktop.
USE OF THE APPLIANCE
DESCRIPTION OF THE CONTROL PANEL:
The control panel (5) comprises a display indicating the recipe number and four control
buttons:
USE:
Note: The appliance can only be started if the lid (2) is properly positioned on the bowl.
Switching on
1. Switch the appliance on by pressing on the On/Off switch (4).
2. In the bowl (1), place soft food first, followed by harder ingredients and finish with
ice cubes. Evenly sized food makes it easier to blend the recipe.
3. Place the lid (2) on the bowl, ensuring it is properly positioned.
4. When the motor is completely stopped, place the bowl correctly on the bowl
mat (7).
The display stops flashing.
5. Select the recipe using the and buttons.
6. Press the “Cycle start” button .
7. The recipe number flashes during the course of the cycle.
8. Wait for the end of the cycle.
9. At any time, it is possible to switch to maximum speed by pressing the Pulse button
.
+ button
- button
Pulse button
Display
Cycle start button

SANTOS: Operating & Servicing Manual
98166 EN 1.0 –05 2021 8 / 18 www.santos.fr
Switching off the appliance
The appliance is switched off:
•either automatically, at the end of the cycle
•or manually, by pressing the Cycle start button , by pressing the On/Off switch
(4), by lifting the lid of the bowl or by lifting the bowl.
Note: it is not advisable to remove the bowl when the motor is rotating.
RECIPES:
There are 9 saved recipes: they consist of several sequences of different speeds.
They are detailed in the "Recipe List" booklet supplied with the appliance.
STANDBY MODE:
The brightness of the digital display automatically dims when the appliance has not been
used for 10 minutes.
Press any key on the control panel to return to the normal brightness.
The appliance turns off automatically when it has not been used for 30 minutes.
This time can be increased up to 10 hours: see the procedure in the "Searchable and
modifiable settings" paragraph.
CLEANING:
IMPORTANT:
•In all cases, stop the appliance and unplug its power cord (8).
•Cleaning with a hose or pressure cleaner is not allowed.
•The motor base (3) must not be immersed in water.
•Do not use an abrasive sponge to clean the bowl (1), lid (2) and the control
panel (5).
•Do not close the bowl shut when the appliance is stored (remove the lid (2))
•Handle the blade carefully, due to the risk of cutting.
•Do not knock the bowl against a surface to loosen the ingredients, use a flexible
spatula.
It is recommended to clean the appliance once the work is completed.
Cleaning will be easier if you do not wait until the pulp has dried.
The motor casing (6) can be cleaned with a soft damp sponge.
Cleaning the bowl:
Note: Although the bowl and lid can be washed in the dishwasher, it is advisable not to do
!

SANTOS: Operating & Servicing Manual
98166 EN 1.0 –05 2021 9 / 18 www.santos.fr
so to increase their lifespan.
1. Empty the contents of the bowl and rinse under running water to remove the
maximum amount of solid residue.
2. Fill the bowl with 600 ml of warm water (40-45 °C), add 2 drops of household
washing up liquid, close the bowl with its lid and start the cleaning cycle (30
seconds): see the procedure in the "Searchable and modifiable settings"
paragraph.
3. Rinse thoroughly with clean water.
Disinfecting the bowl:
Use the following procedure to disinfect perfectly.
1. Clean the bowl and lid (see previous section).
2. Fill the bowl with 1 litre of a disinfectant solution (8 ml of bleach to 2.6% active
chlorine and fill with 1 litre of cold water (20-30 °C)).
3. Close the bowl with its lid and start the cleaning cycle (30 seconds), see the
procedure in the "Searchable and modifiable settings" paragraph
4. At the end of the cycle, leave the solution to act for 2 minutes.
5. Rinse thoroughly with clean water.
LID SAFETY FEATURE:
Note: The appliance can only be started if the lid (2) is properly positioned on the bowl.
Modification of the lid safety feature
"Pause" mode (Default)
During the course of a cycle, lifting the bowl (1) or the lid (2) causes the motor to stop but
does not deselect the chosen recipe. When the bowl is replaced with the lid or when the lid
is replaced on the bowl, the cycle resumes.
Note:
It is possible to disable the automatic restart or pause time.
Refer to the "Searchable and modifiable settings"paragraph.
SEARCHABLE AND MODIFIABLE SETTINGS:
Some information on the appliance can be viewed or modified in a specific menu
accessed by pressing simultaneously on the and buttons for 5 seconds: a flashing
letter "C" appears.
By using the or buttons, scroll through the letters that correspond to the following
functions:
▪ʺCʺ: cleaning cycle.
Push the button to start the cycle.
▪ʺcʺ: display of the number of recipes produced since the appliance was
manufactured.

SANTOS: Operating & Servicing Manual
98166 EN 1.0 –05 2021 10 / 18 www.santos.fr
Push the button to launch the display.
92 recipes appear: 0-0-0-0-9-2.
Press the Pulse button to exit the menu.
▪ʺbʺ: adjustment of the display brightness.
Press the button to adjust the brightness.
Push the button to dim the brightness or the button to increase it.
Push the button to complete the setting and exit the menu.
▪ʺtʺ: setting of the appliance’s standby time delay.
Push the button to set the standby time.
Using the or buttons, select a number between 1 and 9:
1 = 30 mins; 2 = 40 mins; 3 = 1 hour; 4 = 1.5 hours; 5 = 2 hours; 6 = 3 hours;
7 = 4 hours; 8 = 6 hours; 9 = 10 hours
Push the button to confirm the time chosen and exit the menu.
▪“P”: setting of the pause time.
Press the button to modify.
Using the or buttons, select a number between 0 and 9.
0: Pause function disabled: the motor stops and the recipe is reset when the
lid is opened or bowl removed.
1: 1-second pause: the user has 1 second to replace the lid or bowl in
position so that the selected recipe continues to run to the end, otherwise it
is cancelled.
2: 2-second pause.
The maximum time that may be set for the pause is 9 s.
Push the button to complete the setting and exit the menu.
▪"F": display of the version of the computer program used to operate the
appliance.
Push the button to launch the display.
For example, a 1.02 program will appear: 1 - . - 0 - 2.
Press the button to exit the menu.
SERVICING:
Before working on the appliance, it is essential to unplug the sector.
Spare parts:
This machine requires no special servicing. The roller bearings are lubricated for life.
If work is required to replace worn parts such as the bearing, the blade, the electrical and
other components, refer to the list of components (see the exploded diagram at the end of
the manual).
For ordering spare parts (See references in the exploded diagram at the end of manual),
state:
➢the type,
➢the appliance’s serial number and
➢the electrical characteristics
recorded under the appliance.
!

SANTOS: Operating & Servicing Manual
98166 EN 1.0 –05 2021 11 / 18 www.santos.fr
Prolonged non-use:
This appliance presents no contraindications to prolonged inactivity.
We simply recommend cleaning it before use and checking the condition of the components
of the appliance (e.g. power cord, seals and other parts).
Replacement of the drive system:
Motor driving side (female):
Loosen the 3 screws (23). Remove the coupling plate (21) and remove the coupling seal
(2) using a tip or a blade (fig.3 and fig.4)
Hold down the motor’s drive body (20) using multigrip pliers, and unscrew the fastening
screw (19) using a TORX spanner (anticlockwise) (fig.5).
Blade driving side (male):
The blade drive is integrated into the bearing (10) of the bowl. Everything (drive - bearing
- roller bearings) needs to be replaced
•Turn the bowl over.
•Using a large flat screwdriver, loosen the bearing fastening ring (14)
(anticlockwise) (fig.6 and fig.7).
•Remove the bearing fitted with the blender’s blade from the bowl.
(See the next section on how to dismantle the blade)
Replacing the blade:
Dismantling the complete bearing (See previous section)
Dismantling the blade
Hold the blade coupling (25) using multigrip pliers and unscrew the fastening bolt (11)
using a 13 hexagonal spanner (anticlockwise) (fig.8).
Mounting the blade
Be sure to observe the order of assembly of the different components (fig.7):
1. Lip seal (12) (correctly position the lip downwards),
2. Blade (9) (holes facing upwards),
3. Tightening nut (11) (screw the nut by hand, ensuring that the blade is correctly
positioned on the square of the axis).
4. Tighten the nut.
Bearing assembly on the bowl

SANTOS: Operating & Servicing Manual
98166 EN 1.0 –05 2021 12 / 18 www.santos.fr
•Place the bearing seal (13) on the bearing (10)
•Place the clamping ring seal (15) on the fastening ring (14).
•Place the bearing (10) in the bowl (1)
•Screw the tightening ring, being careful not to pull the ring seal from its housing
•Tighten firmly by hand.
TROUBLESHOOTING GUIDE
It is necessary to identify what has caused the appliance to stop working.
In any case, if the problem persists, switch off (unplug the power cord (8) and call in the
maintenance service or contact an approved SANTOS dealer.
The appliance will not start:
The display is off:
•Check: the mains supply, the condition of the power cord (8).
•Press the On/Off switch (4).
•Disconnect and reconnect the power supply cord.
•It may be that after prolonged use of the appliance, the engine has reached its
maximum temperature: in this case, wait for the motor to cool (30 to 50 minutes) and
restart the appliance.
•An excessively hard body or excessive load in the bowl may cause motor overload:
in this case, switch off the appliance (unplug the power supply cord (8).
Under the appliance (fig.10), push the button (26) to reset the overcurrent protector. If
the button does not remain in the "reset" position, allow the appliance to cool before
renewing the operation.
The display flashes:
•This message indicates that the lid is not in place: reposition the lid on the bowl
properly.
•Remove all foreign bodies that could activate the buttons, clean the control panel.
Note: The appliance cannot start if the bowl is not positioned on the appliance.
The letter "E" appears:
•The supply voltage is not appropriate: check the voltage of your power supply.
•The temperature of the appliance’s electronic board is too high: wait a few minutes
for it to cool.
The blade does not turn:
•Check that there are no foreign bodies stuck in the bowl.
•Check the status of the drive system (motor and blade).
Noise, vibrations, leaks around the blade of the bowl:
•Check the tightness of the blade (first dismantle the blade bearing)
•Replace the bearing seals
See "replacing the blade" chapter.

SANTOS: Operating & Servicing Manual
98166 EN 1.0 –05 2021 13 / 18 www.santos.fr
If the problem persists, switch off (unplug the power cord (8) and call in the maintenance
service or contact an approved SANTOS dealer.
Problem with the recipes:
A few rules to better understand the functioning of a blender and to adapt recipe cycles
to the products used.
Note: Do not overload the appliance: it is better to do a recipe in two small batches
rather than double the quantities and cycle time: prolonged operation heats the
ingredients by friction and distorts the desired texture of the recipe.
The final mixture is too hot. Once the smooth mixture is obtained, continuing to blend
warms the mixture: reduce speed or time of the recipe.
The final mixture is not smooth:
•The recipe is not appropriate for the quantity and products used. Reduce the
amount of food in the bowl, increase the cycle, reduce the size of food (evenly
sized food makes blending easier).
•Liquid is required to convey solid food to the blade. Increase the amount of liquid.
Pour the liquid into the bowl before any solid food.
Ice-cubes stick to the walls of the bowl:
•Use the special program for ice-cubes No. 6.
•Reduce the amount of ice-cubes when they are processed without liquid
•It is better to add liquid to ice-cubes, always starting with the liquid.
The mixture "bounces" in the bowl at high speed:
•Reduce and adapt the speed to the amount processed so that the blade is
permanently in the mixture. The recipe will be faster to make and smoother.
High speeds are not suitable for recipes in small quantities.
•Increase the amount of product to be processed.

SANTOS: Operating & Servicing Manual
98166 EN 1.0 –05 2021 14 / 18 www.santos.fr
TECHNICAL FEATURES OF THE APPLIANCE
TECHNICAL SPECIFICATIONS (1)
Model 66
Single-phase
Power Voltage
(V)
220-240
Frequency
(Hz)
50/60
Power consumption
(W)
1,005
Maximum intensity
(A)
5
Speed:
(rpm)
1,200-13,000
Effective capacity of the bowl
(L)
1.4
Number of recipes
9
Pulse
Yes
Touch control panel
Yes
Adjustable brightness display
Yes
Cycle counter
Yes
Adjustable standby mode
Yes
Lid safety feature
Yes
Motor overheating safety feature
Yes
Surge safety feature
Yes
Intermittent operation (3)
60 seconds ON and
60 seconds OFF
Dimensions: Height
(mm)
393
Width
(mm)
197
Depth
(mm)
233
Weight: Net weight
(kg)
6.2
Packaged weight
(kg)
7.3
Noise: (2) LpA
uncertainty KpA = 2.5 dB
Maximum speed & load
(dBA)
70
(1) These values are given for information purposes. The exact electrical characteristics of your
appliance are noted on the identification plate.
(2) Noise level measured as the acoustic pressure of the activated appliance according to standards
NF EN 12852: 2010, ISO 11201: 1995 and ISO 4871: 1996.
Appliance positioned on a worktop 75 cm from the ground. Microphone turned towards the
appliance 1.6 m above the ground and 1 m from the appliance.
(3) 1 min / 1 min cycle:
The professional appliance is intended for intermittent use in a cycle of 1 minute ON and 1
minute OFF. This cycle corresponds to the running time to achieve the function and downtime
to prepare and serve products processed in accordance with the requirements of the standard:
EN 60335-2-64+A1: 2004 Part 2-64: Particular requirements for commercial electric kitchen
machines.

SANTOS: Operating & Servicing Manual
98166 EN 1.0 –05 2021 15 / 18 www.santos.fr
Electrical diagram 220-240 V 50/60 Hz
Overcurrent protector
M
Lid detection
sensor
On/Off
Electronic board
Control panel
Black
White
Black
White
White
White
Black
Brown
Blue
Black
Black
Green / Yellow
Blue
Brown
~
Brown

SANTOS: Operating & Servicing Manual
98166 EN 1.0 –05 2021 16 / 18 www.santos.fr
Correlation table
REP
Name
1
Bowl
2
Bowl lid
3
Motor base
4
On/Off switch
5
Control panel
6
Motor casing
7
Bowl mat
8
Power outlet
9
Blade
10
Blade bearing
11
Blade tightening nut
12
Blade axis seal
13
Bearing seal
14
Bearing tightening ring
15
Bearing tightening ring seal
19
Tightening screw of the motor drive
20
Motor drive body
21
Motor drive plate
22
Motor drive seal
23
Motor drive plate screw
24
Table top seal
25
Blade drive
26
Overcurrent protector

SANTOS: Operating & Servicing Manual
98166 EN 1.0 –05 2021 17 / 18 www.santos.fr
Figures
Fig.1
7
4
3
2
1
5
6
11
Fig.7
9
15
12
14
10
13
Fig.4
20
22
21
23
Fig.5
19
20
Fig.3
23
3
22
2
Fig.8
Fig.2
24
Fig. 9
8
Fig.6
25
Fig.10
26

SANTOS: Operating & Servicing Manual
98166 EN 1.0 –05 2021 18 / 18 www.santos.fr
CERTIFICAT DE GARANTIE
GARANTIE
Depuis le 01.01.95, tous nos appareils sont conformes CE et revêtus du label CE. Notre garantie
est de vingt-quatre mois à partir de la date de fabrication figurant sur la plaque signalétique, sauf
en ce qui concerne les moteurs asynchrones (composé d’un rotor et d’un stator) qui sont garantis
pour une durée de 5 ans à compter de leur date de fabrication. La garantie est strictement limitée
au remplacement gratuit de toute pièce d'origine reconnue par nous défectueuse à la suite d'un
défaut ou d'un vice de construction et identifiée comme appartenant à l'appareil considéré. Elle ne
s'applique pas aux avaries résultant d'une installation ou d'une utilisation non-conforme aux
prescriptions accompagnant chaque appareil (manuel d'utilisation) ou dans le cas d'un manque
évident d'entretien ou de non observation des règles élémentaires de sécurité électriques. La
garantie ne s’applique pas en cas d’usure naturelle. Tout remplacement de pièce sous garantie est
effectué après renvoi de la pièce défectueuse en nos ateliers en port payé, accompagnée d'une
copie de la Déclaration de conformité sur laquelle figure le numéro de série de l'appareil. Tout
appareil est muni d'une plaque signalétique conforme CE et dont un double figure dans la
Déclaration de conformité (N° de série, date de fabrication, caractéristiques électriques…). En cas
d'avarie grave jugée réparable uniquement dans nos ateliers, et après accord préalable de nos
services, tout appareil sous garantie est expédié par le Distributeur en port payé. En cas de
réparation ou reconditionnement d'appareil hors garantie, le transport aller-retour est à la charge du
Distributeur. Les pièces et main-d’œuvre sont facturées aux tarifs en vigueur (tarif pièces détachées
–tarif horaire –main-d’œuvre). Il peut être fourni un devis préalable.
Les moulins à café non munis de meules originales SANTOS ne sont pas pris sous garantie. Les
conditions de garantie, réparation, reconditionnement, des moulins à café espresso font l’objet d’une
notice spécifique. Notre garantie ne s’étend pas au paiement de pénalités, à la réparation des
préjudices directs ou indirects et notamment à tout manque à gagner résultant de la non-conformité
ou défectuosité des produits, la responsabilité globale de SANTOS étant limitée au prix de vente du
produit livré et à l’éventuelle réparation des produits défectueux.
En cas de révélation d'une défectuosité pendant la période de garantie, le Distributeur doit, sauf
accord contraire écrit de SANTOS, indiquer à son client, de cesser toute utilisation du produit
défectueux. Une telle utilisation dégagerait SANTOS de toute responsabilité.
PLAQUE SIGNALETIQUE DE L’APPAREIL
Table of contents
Other Santos Blender manuals