manuals.online logo
Brands
  1. Home
  2. •
  3. Brands
  4. •
  5. Bianco di Puro
  6. •
  7. Blender
  8. •
  9. Bianco di Puro Gusto Alpha User manual

Bianco di Puro Gusto Alpha User manual

1
[14] ON/OFF
bianco di pruo Servicecenter
Garantiebestimmungen
Der Garantieanspruch beinhaltet nicht
Um den Garantiefall bearbeiten zu können,
werden folgende Informationen benötigt: WICHTIG
bianco di puro GmbH & Co. KG Telefon +49 221 50 80 80-20
Maarweg 255 Fax +49 221 50 80 80-10
50825 Köln Mail kundenservice@biancodipuro.com
Deutschland Internet www.biancodipuro.com
Bitte halten Sie das Kaufdatum und die Seriennummer des Gerätes bereit. Die Seriennummer ist unterhalb des Gerätes angebracht.
ACHTUNG
• Vor Gebrauch unbedingt die Anleitung lesen
• Gerät nicht ins Wasser tauchen
• Wenn nicht in Betrieb, Stecker ziehen!
• Achtung: Gerät nicht önen, Gefahr eines Stromschlages
Wir geben folgende Herstellergarantien auf unseren Hochleistungsmixer von Typ Gusto :
• 5 Jahre Herstellergarantie auf den Motorblock
• 2 Jahre Herstellergarantie auf den Mixbehälter
• 2 Jahre Herstellergarantie auf die Stampfer
Die Garantie umfasst Material-, Konstruktions- und Fertigungsfehler auf alle Teile.
Wenn bei Ihrem Gusto trotz sachgemäßer Benutzung innerhalb der Garantiezeit ein Fehler auftritt, wird nach Wahl des Herstellers entweder repariert oder
defekte Teile kostenlos ersetzt oder im Austausch ein gleichwertiges Gerät geliefert.
Dazu muss das ganze Gerät inklusive aller Zubehörteile gründlich gereinigt und gut verpackt an unsere bianco di puro Kudnenserviceadresse gesandt
werden. Bitte beachten Sie: Wenn die Einzelteile oder das Gerät nicht gereinigt wurden, berechnet unser Servicedienst unabhängig vom Garantieanspruch
Reinigungskosten. Bewahren Sie für den Fall einer Rücksendung am besten die Originalverpackung auf.
Bitte rufen Sie stets beim Kundenservice an, bevor Sie das Gerät zurücksenden. Denn oft genügt ein Telefonat mit unserem Servicedienst um das Problem zu
beheben und das Einpacken und Versenden erübrigt sich. Auf jeden Fall wird das Serviceteam das Problem schnellstmöglich beheben.
Falls dennoch eine Einsendung des Gerätes erforderlich ist, sprechen Sie bitte vorher mit unserem Kundenservice über den Versand. So können die
Versandkosten minimiert werden.
1. Ursachen, die nicht in der Verarbeitung und Herstellung des Gerätes begründet sind, wie z.B. leichtfertige Beschädigung oder Fall des Gerätes.
2. Nutzung und Gebrauch abweichend von der Bedienungsanleitung, unsorgfältige Behandlung, technische Veränderung durch den Kunden.
3. Beschädigung, die durch fremde Ersatzteile oder Reparaturen von nicht autorisierten Betrieben verursacht wurden.
1. Ihr Name, Adresse, Telefonnummer
2. Serien-Nr. und Modellbezeichnung
3. Problembeschreibung
4. Kaufdatum
5. Verkäufer
6. Bei Beschädigungen durch den Transport:
Name des Paketdienstes und die Paketnummer
Heben Sie die Verpackung während der Garantiezeit auf, um im
Garantiefall das Gerät ordnungsgemäß verpacken zu können.
Wenn Sie Ihren bianco di puro Hochleistungsmixer einsenden, verpacken
Sie alle Teile in der Originalverpackung und vergewissern Sie sich, dass
Sie alle Teile eingepackt haben. Vergessen Sie nicht Ihre Adresse auf der
Außenseite anzubringen.
Exploded view
Measuring cup [1]
Lid [2]
Seal ring [3]
Container [4]
Blade [5]
Damping mat [9]
Sensor for container [10]
Motor block [13]
Mixer container stand [8]
[7] Motor coupler
[6] Blade holder
[11] START/STOP Operating element [12]
Overview on page 11
2 3
Contents
EXPLOSION VIEW .................................................................................................................................................... 1
GREETING .............................................................................................................................................................. 4
SAFETY FUNCTIONS ................................................................................................................................................ 5
SAFETY PRECAUTIONS............................................................................................................................................ 6
UNPACKING, CONTENTS AND START-UP ................................................................................................................. 9
CONTROL PANEL................................................................................................................................................... 11
OPERATION .......................................................................................................................................................... 13
OPERATING NOTES ................................................................................................................................................ 14
OPERATING THE TAMPER ...................................................................................................................................... 16
MEASURING CUP, LID AND SEAL RING.................................................................................................................... 16
CLEANING ..............................................................................................................................................................17
TROUBLE SHOOTING.............................................................................................................................................. 18
Contents
TECHNICAL DATA .................................................................................................................................................. 19
DISPOSAL NOTE .................................................................................................................................................... 20
DISPOSAL OF USED BATTERIES............................................................................................................................. 20
CONTACT AND CUSTOMER SERVICE ..................................................................................................................... 20
INDEX .................................................................................................................................................................... 21
WARRANTY ........................................................................................................................................................... 22
4 5
Dear Customer,
We are pleased that you have decided to care for your health, with the aid of volto! You have bought an acknowledged
quality product, and we thank you for your purchase.
Green smoothies are the perfect way for healthy nutrition. They deliver highly concentrated intrinsic in their most natural
form. These are many times higher than in conventionally prepared food. With the volto they are prepared in no time, taste
deliciously and supply you with essential nutrients to master the daily challenges.
The volto can be used for preparation of soups, sauces, ice cream, and more. See the recipes on page 22 and be inspired!
True to the motto: “You are what you eat!“
We hope you enjoy your new path to healthy nutrition.
Introduction Information about these operating instructions
Safety Functions
These operating instructions are part of your Gusto and contain important information about the commissioning, the
safety, the intended use and the care of your device. The operating instructions must always be available on the device and
must be read by everyone who uses the device.
Your device has safety functions in order to protect against impending damages.
Cooling System
If the motor heats up due to heavy load, the active cooling is switched on. This prevents overheating of the motor. In
exceptional cases, overheating protection can still occur.
Overheating Protection
If the motor or the blade turns too slowly due to too solid foods or too little fluid, there is a danger of overheating. If the
motor should switch off for that reason, the overheating protection of your device is activated. Let your device cool off for
45 minutes in a well-ventilated area, afterwards you can use your device as usual.
Overload Protection
The motor coupling is provided with a predetermined breaking point. This protects the motor in case the blade in the
container is not able to rotate because of a blockage (forgotten items in the blender, such as spoons, etc.).
Sensor for Container
The sensor for the container detects when the container set up correctly. If the container is not placed correctly, you cannot
switch on your device.
6 7
Safety Precautions
Please observe the following safety precautions for the safe use of the device:
• Check the visible external damages of the housing, electrical connection, and power plug before the use. Please do
not operate a damaged device.
• If the wire or power plug is damaged, there is a danger of electric shock. Be sure to replace it through official customer
service center.
• Never place the power plug in water or other fluids, never wipe the power plug with a wet or moist cloth. Never touch
the power plug with wet or moist hands.
• If water and other fluids have entered the motor block, contact you’re customer service center as soon as possible.
Disconnect the power plug and do not operate the device anymore.
• Repairs within the warranty period must only be carried out by the customer service center. Incorrect repairs by
consumer can lead to considerable hazards for the user and its warranty claim will be void.
• Defective parts must only be replaced with its original parts, because only original parts ensure that the safety
requirements are fulfilled.
• Never put your hands in the container during operation. It will cause serious injuries.
• Only use the supplied tamper to remove air bubbles or blockages in the container..
• Operate the device only with the original container or the compatible one from bianco di puro commercial.
• Fill in container up to only maximum marking (Max).
Safety Precautions
• Not intended for the use by or near children or persons with reduced physical, sensory, or mental capabilities or lack
of experience and knowledge. Close supervision is necessary when any appliances is used by or near children or
incapacitated persons.
• Always store the device in a place where it is inaccessible to children.
• Children shall not play with the device.
• Always disconnect the power cord by pulling the plug from the power socket, not by pulling the power cord.
• Please take care that the power cord is not caught anywhere, causing the device to fall down and injure to people.
• Please use the container while mounted on the motor block.
• Do not operate the device in direct sunlight or near other heat sources.
• Please make sure during operation that the lid (incl. seal ring) and measuring cup correctly closes the container.
• Always disconnect the power cord when cleaning some parts of device. ex) Seal Ring and Lower Cover.
• Please pay attention to the blade during cleaning as the blade is a risk factor to cause injury.
• Do not disassemble the blade in the container for cleaning use. We recommend disassembling the blade only for
replacing damage parts purpose.
• Please never leave the device without supervision during operation.
8 9
Operating Notes
• If you want to prepare sauces, soups or nut milk, add the ingredients step-by-step order depending on their hardness.
The content should not be too little, but also not too much. Too many ingredients in one process may lead to
overheating and automatic shutdown of the motor. In that case, please wait until the device cools off as described.
(see page 4)
• Always keep the lid closed during the operation of your device. This avoids any scalding or splashes of hot food.
• Keep your hands away from the container during operation due to severe cause of injuries.
• Putting physical materials into container will lead to serious damages of the motor and blade. Only Using tamper is
acceptable during operation through the lid as it doesn’t come into contact with blade. (see page 16)
• When preparing hot drinks, soy milk or soups, please make sure that the lid is closed properly so device stands
securely. We recommend to blend it at low speed in the beginning of blending and increase the speed steadily.
• Always pour liquids and soft ingredients first into the container and afterwards the harder ingredients, such as ice
cubes, green leaves, etc.
• If the chosen program or the Manual mode is finished, please wait until the blades are fully stopped before pulling out
container. Otherwise the motor coupler can be damaged.
• If a singed smell exudes from the motor block, stop the device immediately and disconnect the power supply. The
smell can result from abrasion of the rubber bearing of the connection, if it was not mounted correctly. In this case
please contact your customer service center immediately.
• In case of putting ingredients without enough moisture, it may cause air bubbles between blades and ingredients. The
blade may results in idling. Stop the device and open the measuring cup. Then, remove air bubbles by putting tamper
inside container.
• Grinding nuts or small amounts of ingredients may lead to idling, because ingredients stick to container corners. Use
the tamper to collect the chunks toward the blade. Alternatively, you can add a liquid to move the chunks toward the
blade.
Unpacking
Contents
Start-up
Please proceed to unpack your device as follows:
• Remove the device and all accessories from the carton.
• Remove all packing material from the device and the accessories.
• Keep the packaging material during the warranty period. Packing material is obligated for warranty
Please note
• Do not remove any stickers due to safety and warranty inquiry reasons.
• Please do not remove the stickers on the tamper as it indicates safety instruction.
This gusto is delivered with the following components:
• Cube+ container with 1.5 Liter capacity
• Tamper TS
• Motor block
• This user manual
• Sound Cover
Attention: Incorrect use of the product may result in personal injury or property damage. Be sure to
read this manual thoroughly before use.
• Packing materials should never be used by children in case of danger or suffocation.
• Tamper must be used with correct containers. In any case of using improper tamper arbitrarily, the blade
may be damaged.
!
10 11
Requirements of the Installation Location
Electrical Connection
For the safe and faultless operation of your device, the installation location must fulfill the following conditions:
• The device must be placed on a level, flat, solid and nonslip surface that ensures the load capacity.
• Take care that the device doesn’t fall off.
• Make sure to place installation location carefully such that children won’t play or reach into the device. It is important
for children keep away from pulling power cord of the device.
• Do not place a cloth under the device.
• Do not install the product near fire or water supply.
• Place the device only inside and do not operate it outdoor.
For the safe and faultless operation of the device, the following points for electrical connection must be
observed:
• Before connecting the device, please aware of the voltage and frequency 220-240volts, 50/60HZ with your power
supply.
• This information must be aware so that device can operate correctly.
• The electrical safety can only be ensured if it is properly connected to correct voltage and frequency.
• Please make sure that the power cord doesn’t get damaged over hot surfaces or sharp edges.
• The power cord must not be pulled tight or under any tension.
• Please make sure that the power cord is properly inserted into the power socket, a loose plug can lead to
• overheating of the device or electric shock.
Control Panel
ON/OFF
START/STOP
BUTTON
TIME/SPEED
DISPLAY SETTING BUTTON
TIME SETTING BUTTONS
PROGRAMME BUTTON PULSE BUTTON
SPEED CONTROL KNOB
1
43
2
5
12 13
Control Panel
Start/Stop button
Connect power cord and container to the device. Press this button to be sure that the device is in Standby mode. If
you select a program and press this button, the operation of that program will start. Pressing this button will stop the
operation immediately when the device runs in Program mode or Manual mode.
Program button
This device contains five default programs. When pressing the button, the program sounds a short beep and starts
flashing. For more information about default program, please refer to the page 15. This button also can be used as
Selfsetting program. Please refer to page 13 for more detailed information about Self-setting program.
Time setting button
The operation time can be selected from Manual mode. Press the button increases or decreases the time in one second
for short press and ten seconds for long press. For more information about Manual mode, please refer to the page 14.
Speed control knob
The speed is adjustable by controlling Speed control knob in Manual mode. Turning the Speed control knob to the right
slowly increases the speed. Turning the Speed control knob to the left slowly decreases the speed. For more information
about Manual mode, please refer to the page 14.
Pulse button
In Standby mode, when you press the Pulse button, the product will run at full speed until the button is released again.
Or, if you press the Pulse button in Program mode or Manual mode, it will temporarily operate at the full speed. You can
return to the original speed by releasing the pulse button.
Setting button
You can save the desired programs to each of the five program buttons via Setting button. Press the Setting button for
two seconds to switch the device to Self-setting program saving mode. For more information about Self-setting program,
please refer to the page 14.
Operating your GUSTO
Connect the device to a power socket with correct electric specification. Make sure that the power of the device is
connected to the correct electric power socket. Make sure that the power plug is properly inserted into the power
socket. Switch the ON/OFF button to the ON position [14]
Start-up
In order to use the device, it is necessary to place the container on the motor block properly. Without the container the
device will not start. If you put the container on the motor block, you will hear a long beep and the display as well as the
buttons light up briefly. Now your device is in Standby mode.
Standby Mode
In Standby mode, all program icons will light up and the display shows“00:00”sign. When you see the sign it means
that the device is ready for operation. Now, you can use the Manual mode or the default programs or the Self-setting
programs of the device.
Energy Saving Mode
When the product is not used for 3 minutes, it automatically turns from Standby mode to Energy saving mode. The
display shows“OFF”and On/Off button lights up in red. To return the device for Standby mode, press the On/Off button
one time.
1Power consumption in standby mode less than 0.5 watts
14 15
Operating Device – Program Mode
Self -setting program
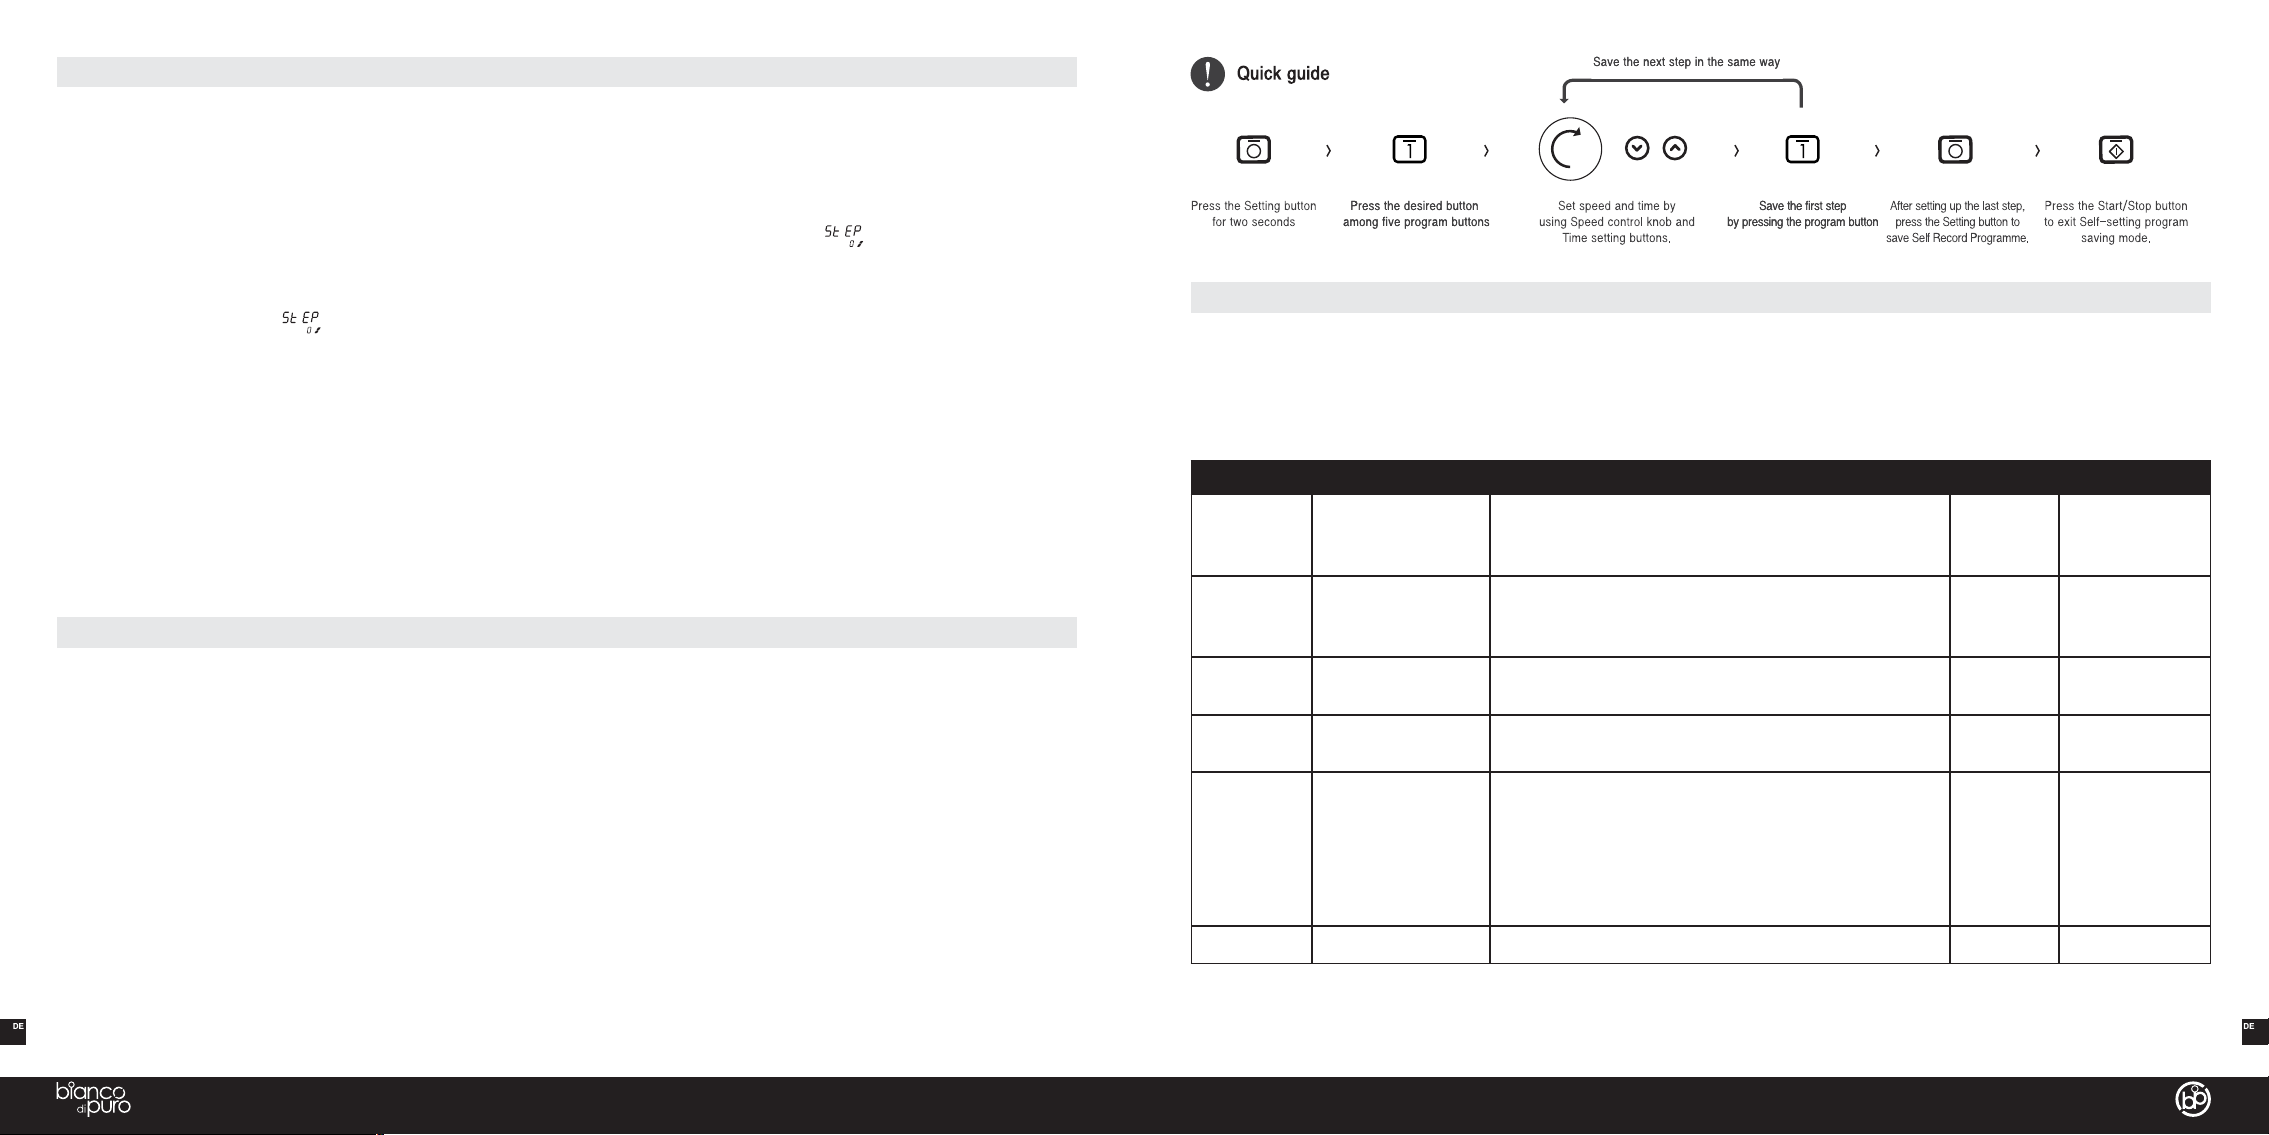
You can set desired program for each five different program buttons. Press the Setting button for two seconds to turn the
device into Self-setting program saving mode and the LEDs of the five default program buttons flash.
Press and select the program button which you need to write in the alternative program. After that this particular program
and the Setting button LED will be blinking together, and the Time/Speed display will show to indicate it is ready for
receiving the STEP 1 input. Use the Speed control knob and Time setting buttons +/- to set the desired speed and time,
and press the flashing program button to save the first step.
The display will then show to indicate it is ready for receiving the STEP 2 input. Save the following steps in the same
way you entered the first step. Up to 30 steps can be stored and total running time is up to 8 minutes.
After the final step is confirmed, press the Setting button to finished the Self-setting program saving mode of this particular
alternative program. Then all the 5 program LED will be blinking. You can press another program button to start the writing
of that next program, or press the Start/Stop button to exit the Self-setting program saving mode. The buttons saved in the
Self-setting program will have a red LED light .You can use the Self-setting program by pressing this button.
How to replace the default programs and Self-setting programs
In Standby mode, press the default program button or the Self-setting program button for 2 seconds to return default
program or return to the Self-setting program. The LED on the button changes between RED and WHITE. RED indicates it
is ready for the Self-setting program, while WHITE indicates it is ready for the default program.
Operating Device – Program Mode
Default program
There are five default programs indicated by white LED light. Select your desired program by pressing program button. The
chosen program is shown by the flashing white LED light. By pressing the Start/Stop button, the remaining time and the
speed level are shown at the display. Upon completion the program, the device stops automatically.
Symbol Program Program Description Time Display
1Normal Smoothies Speed 20 for 10 seconds,
Speed 30 for 15 seconds,
The speed increases gradually for running program.
00:25 Sec. Remaining time
2 Thick Smoothies
Speed 10 for 25 seconds,
Speed 30 for 10 seconds,
The speed increases gradually for running program.
00:35 Sec. Remaining time
3 Fruit Smoothies Speed 30 for 40 seconds,
The speed increases gradually for running program. 00:40 Sec Remaining time
4 Mixing Speed 9 for 40 seconds,
The speed increases gradually for running program. 00:40 Sec Remaining time
5 Cleaning
Speed 30 for 5 seconds,
Speed P for 2 seconds,
Speed 30 for 5 seconds,
Speed P for 2 seconds,
Speed 30 for 5 seconds,
The speed increases gradually for running program.
00:19 Sec Remaining time
Manual Mode Time and Speed setting Auto-stop after setting time. Running time
Operating Device – Manual Mode
You can set the desired runtime and speed level.
Only for speed setting
Directly turn the Speed control knob and tune the speed from 1 to 30. The device will act in Manual mode correspondingly
at the selected speed.
Turn the Speed control knob to the right, as you gradually increase the speed level. Turning the Speed control knob to the
left to reduce the speed gradually. The display will start counting upwards to show total running time. You can stop the
device by pressing the Start/Stop button. After 8 minutes of total running, the device will stop automatically.
Timer Function
You can preset the total operation time using the Time setting buttons (+ / -) Press the button increases or decreases the
time in one second for short press and ten seconds for long press. After the time is set, turn the Speed control knob to
start operating the device at the selected speed. The display shows the remaining time. When the preset time is over, the
operation stops automatically.
You can freely adjust the speed at any time during the preset operating time, and stop by pressing the Start/Stop button.
16 17
Measuring Cup, Lid and Seal Ring
• Place the measuring cup on the lid and twist it to the right tight. Now, position the lid rmly on the container.
• It is easier to open the lid by grabbing the handle with one hand and opening the edge of the lid by another hand.
• You can clean the lid simply by pulling out seal ring. Please position seal ring correctly after cleaning.
This chapter contains important information on cleaning and maintaining your Gusto .
Observe the following safety instructions before and during the cleaning of your Gusto :
• Pull the power plug from the power socket before cleaning!
• Do not open the housing of the device under any circumstances.
• Never place the power plug in water for cleaning.
• Never clean the power plug with a wet cloth.
• Never touch the power plug with wet hands.
Safety Instructions for Cleaning
Cleaning of the Container (incl. Lid) and Motor Base
Cleaning of the container and lid
Take caution when cleaning: The blades can cause injuries!
The container is not suitable for the dishwasher!
• The container and the lid can be cleaned with a brush or sponge under running water.
• Do not use aggressive or abrasive cleaning agents or solvents.
• Clean the container with a mild detergent or fill 2 cups of water into the container, add detergent, close the lid (incl.
• measuring cup and seal ring) and press the Pulse button repeatedly.
• Always clean the container directly after each use.
• Do not dismantle the blades from the container for cleaning.
When placing the container on the motor base, make sure that the contacts are completely dry.
Cleaning of the motor base
• Clean the motor block with a soft damp cloth.
• Do not use any aggressive cleaning agents or solvents.
• Never immerse the motor block in water or other fluids. (danger of short circuit)
• Never rinse the motor block under running water. (danger of short circuit)
If water has entered the motor block, disconnect the power plug
and contact yourcustomer service center immediately.
Cleaning the tamper
• Clean the tamper with soft sponge under running water.
!
Operating the Tamper
Run the tamper only through the lid opening of the measuring cup. Use only the provided tamper and NO OTHER objects to press the
mixing content towards the blades. The less water you use, the more you have to work with the tamper. If you use other objects, the
device can be damaged irreparably. With the aid of the tamper you can remove any air bubbles without touching the blades.
• Before using tamper, make sure to close the lid and remove the
measuring cup on the lid.
• Make sure to use only bianco di puro tamper and Please do not use
any other objects to mix the ingredients inside the container.
• If you replace other objects for bianco di puro tamper, the produt will
be damaged.
Correct useWrong use
18 19
Trouble Shooting
Please check the following contents before requesting customer service center. If you can not solve the problem even
after checking the following matters, please contact customer service center.
The blender does not start operating.
• Make sure the power cord is inserted in the wall socket.
• Check the light indicated on the control panel.
• Check earth leakage breaker of the indoor outlet is activated and the power is not supplied
• Check voltage is accurate.
• Make sure that container is properly positioned. If not, the device won’t operate.
Please contact customer service center when device is not running even after reviewing the above contents.
The blender automatically stops while running operation
• Make sure that the ingredients do not contain enough moisture. (It can stop operation if there is excessive driving
• caused
• by temporary overloads due to the safety function system. In this case, please wait until the safety function system is
• released.)
If it is still not operating after you confirm the contents above, please contact the customer service center.
The device smells of burning in operation
• Continuous operation for a long time or excessive use could cause a slightly burning smell.
If noted burning smell after you confirm the contents above, please contact the customer service center.
If noted burning smell after releasing overheating protection, please contact the customer service center.
If noted burning smell because of the cracked coupler, the coupler must be replaced. Please contact customer service
center.
Technical Data
Gusto
Voltage / Frequency 220–240 V / 50–60 Hz
Power 1,400 Watt
Motor AC Powerful Motor
Mixing container Cube+ 1.5 Liter volume, TRITAN plastic, BPA-free, 2 stainless steel blades
Max. temperature 125°C
Safety functions Overheating protection
Overload protection
Sensor for the Mixing Container,
Active cooling
Device dimensions 230 mm x 244.5 mm x 460 mm (L x W x H)
Packaging dimensions 540 mm x 300 mm x 355 mm (L x W x H)
Net weight 7.35 KGS
Gross weight 7.5 KGS
Certification / Standard CE, EMC, CB, LVD, CCC, PAH
Power consumption in energy Less than 0.5 Watt
Professional Use Yes
Tamper TS
Colour Black
Dimension (L) 300 mm x (W) 82 mm
Net weight 0.12 kg
Manufacturer’s warranty 2 Years
Max. temperature up to 125 °C
20 21
Copyright © bianco di puro GmbH & Co. KG, 2020
Index
PRESET PROGRAMMES ......................................................................................................................................... 12
STANDBY MODE .................................................................................................................................................... 11
ON / OFF BUTTON ................................................................................................................................................. 11
START-UP YOUR Gusto Pro ................................................................................................................................... 11
ENERGY SAVING MODE ......................................................................................................................................... 11
SPEED SETTING .................................................................................................................................................... 13
MANUAL MODE...................................................................................................................................................... 10
PROGRAMME BUTTONS ........................................................................................................................................ 10
PULSE MODE......................................................................................................................................................... 10
CLEANING OF MIXING CONTAINER AND LID ........................................................................................................... 17
CLEANING THE MOTOR BASE................................................................................................................................ 17
SENSOR FOR MIXING CONTAINER ...........................................................................................................................4
START / STOP BUTTON.......................................................................................................................................... 10
PULSE BUTTON ..................................................................................................................................................... 10
OVERHEATING PROTECTION....................................................................................................................................4
OVERLOAD PROTECTION.........................................................................................................................................4
Disposal Note
Contact and Customer Service
The packaging protects the device from damage during transportation. The packaging materials have been chosen with
consideration of the environment and the disposal and are therefore recyclable.
The return of the packaging to the material cycle reduces the generated waste and saves raw materials. Please dispose
of not needed packaging materials at the collection facilities of the collection system “Green Point”
If possible, store the packaging during the warranty period, to be able to properly package the device in a
warranty case.
Device and packaging must due of according to the local regulations for the disposal of electrical waste
and packaging materials. If necessary inform yourself at your local waste management company. Do not
dispose of electrical devices in household waste, please use the collection facilities of the community. Ask
your municipal administration for the sites of the collection facilities. When electrical devices are disposed
of without control, dangerous substances can reach the groundwater and also the food chain during
corrosion as well as poison plants and animals for years.
Contact Customer Service
bianco di puro GmbH & Co. KG bianco di puro GmbH & Co. KG
Maarweg 255 Maarweg 255
D-50825 Cologne D-50825 Cologne
Germany Germany
Phone +49 221 50 80 80-0 Phone +49 221 50 80 80-20
Fax +49 221 50 80 80-10 Fax +49 221 50 80 80-10
Mail [email protected] Mail [email protected]
Visit us on the internet at www.biancodipuro.com.
Service Centre
Warranty Conditions
This Warranty does not cover
To process your Warranty Claim,
the following information are necessary: IMPORTANT:
bianco di puro GmbH & Co. KG Phone +49 221 50 80 80-20
Maarweg 255 Fax +49 221 50 80 80-10
50825 Cologne Mail [email protected]
Germany Internet www.biancodipuro.com
Please keep the date of purchase and the serial number oft the appliance handy. This number is found on the bottom of the appliance.
ATTENTION
• Read instructions before using!
• Do not immerse in water!
• Unplug when not in use!
• Do not open device! Risk of electrocution!
The warranty is from date of purchase as follows:
• 5 years on Motor Base
• 2 years on Mixing Container
• 2 years on Tamper
The warranty includes defects in materials, construction and workmanship of all parts.
If your bianco di puro power blender exhibits defects during normal use within the warranty time, the manufacturer will decide if the appliance will either be
repaired, defective parts replaced free of charge, or exchanged for a replacement appliance.
To submit a warranty claim, you must thoroughly clean the entire appliance including all accessories, pack it well and send it to the bianco di puro Service Centre.
Please note: If individual parts or the appliance itself have not been cleaned, the Service Centre will charge you for cleaning them, irrespective of the warranty
claim. Please keep the original shipping box in case you need to send in your appliance.
Please always call the Service Centre before sending in an appliance. Often a phone call is enough to solve the problem and the packing and sending becomes
superfluous. In any case, your Bianco Service Centr e will solve your problem as quickly as possible.
If it is still necessary for you to send in your blender, please discuss the dispatch with your bianco di puro Service Centre. This will minimise your dispatch costs.
1. Defects that do not result from the workmanship and production of the appliance, such as careless damage, accidents, etc.
2. Use not in accordance with the user manual, careless handling, technical changes, accident
3. Damage caused by parts not provided by an authorised dealer or repairs carried out by non- authorised personnel
1. Your name, address, phone number
2. Serial number and model number
3. Problem
4. Date of purchase
5. Seller
6. If damaged during dispatch, name of the parcel service and the
package number.
When sending in your bianco di puro power blender, pack all parts in the
original packing and make sure that you have included all parts. Do not
forget to write your address on the outside of the packaging.
TIP
Keep the original packaging in case it is necessary to send in your
blender in to the Service Centre

Other Bianco di Puro Blender manuals

Bianco di Puro VERDE User manual

Bianco di Puro

Bianco di Puro VERDE User manual

Bianco di Puro gusto User manual

Bianco di Puro

Bianco di Puro gusto User manual

Bianco di Puro puro S User manual

Bianco di Puro

Bianco di Puro puro S User manual

Bianco di Puro Attivo User manual

Bianco di Puro

Bianco di Puro Attivo User manual

Bianco di Puro patto User manual

Bianco di Puro

Bianco di Puro patto User manual

Bianco di Puro FLOWER User manual

Bianco di Puro

Bianco di Puro FLOWER User manual

Bianco di Puro VOLTO User manual

Bianco di Puro

Bianco di Puro VOLTO User manual

Bianco di Puro PRIMO+ User manual

Bianco di Puro

Bianco di Puro PRIMO+ User manual

Bianco di Puro gusto User manual

Bianco di Puro

Bianco di Puro gusto User manual

Bianco di Puro forte User manual

Bianco di Puro

Bianco di Puro forte User manual

Bianco di Puro piano User manual

Bianco di Puro

Bianco di Puro piano User manual

Bianco di Puro Tamper T42L User manual

Bianco di Puro

Bianco di Puro Tamper T42L User manual

Bianco di Puro originale User manual

Bianco di Puro

Bianco di Puro originale User manual

Bianco di Puro diver User manual

Bianco di Puro

Bianco di Puro diver User manual

Bianco di Puro gusto pro User manual

Bianco di Puro

Bianco di Puro gusto pro User manual

Bianco di Puro Forte 2.0 User manual

Bianco di Puro

Bianco di Puro Forte 2.0 User manual

Bianco di Puro panda User manual

Bianco di Puro

Bianco di Puro panda User manual

Popular Blender manuals by other brands

Beper BC.300 use instructions

Beper

Beper BC.300 use instructions

Vitek VT-1454 Manual instruction

Vitek

Vitek VT-1454 Manual instruction

Braun Multiquick 5 Vario series manual

Braun

Braun Multiquick 5 Vario series manual

Hamilton Beach Blender user guide

Hamilton Beach

Hamilton Beach Blender user guide

Black & Decker CYCLONE BLC12600B Use and care book

Black & Decker

Black & Decker CYCLONE BLC12600B Use and care book

EL EL-BL100G instruction manual

EL

EL EL-BL100G instruction manual

Philips Cucina HR1741 Instructions for use

Philips

Philips Cucina HR1741 Instructions for use

Black & Decker Crush Master BLM10350MB Use and care book

Black & Decker

Black & Decker Crush Master BLM10350MB Use and care book

Jata electro INOX BT155 Instructions for use

Jata electro

Jata electro INOX BT155 Instructions for use

HURAKAN HKN-HBH850 PRO manual

HURAKAN

HURAKAN HKN-HBH850 PRO manual

KitchenAid KS8354 instructions

KitchenAid

KitchenAid KS8354 instructions

GE 681131689441 owner's manual

GE

GE 681131689441 owner's manual

Xantia 81135 instructions

Xantia

Xantia 81135 instructions

Oster Xpert BLSTVB-PMC instruction manual

Oster

Oster Xpert BLSTVB-PMC instruction manual

Braun Tribute JB 3060 manual

Braun

Braun Tribute JB 3060 manual

Vitamix The Quiet One On-counter Series use and care manual

Vitamix

Vitamix The Quiet One On-counter Series use and care manual

Bosch MSMP1 Series instruction manual

Bosch

Bosch MSMP1 Series instruction manual

Care Fusion Bird Sentry user guide

Care Fusion

Care Fusion Bird Sentry user guide

manuals.online logo
manuals.online logoBrands
  • About & Mission
  • Contact us
  • Privacy Policy
  • Terms and Conditions

Copyright 2025 Manuals.Online. All Rights Reserved.