Sanyo DAS-204 User manual

INSTRUCTION MANUAL
Model DAS-204
Digital Answering System with 3 Mailboxes
Please read this operation man al before sing yo r new digital
answering system and keep it for f rther reference
1
2
3
ANSWER
ANSWER
LANGUAGE
MAIL BOX
TIME/STOP2-WAY/MEMO
OGM
ERASE REPEAT
NEXT
40
-MINUTE
DIGITAL ANSWERING SYSTEM
All manuals and user guides at all-guides.com
all-guides.com

TABLE OF CONTENTS
LOCATION AND FUNCTION OF CONTROLS . . . . . . . . . . . . . . . . . . . . . . . .1
SAFETY INSTRUCTIONS AND INSTALLATION . . . . . . . . . . . . . . . . . . . . . .4
BATTERY INSTALLATION . . . . . . . . . . . . . . . . . . . . . . . . . . . . . . . . . . . . . . . 5
BEFORE OPERATION . . . . . . . . . . . . . . . . . . . . . . . . . . . . . . . . . . . . . . . . 6
OPERATING INSTRUCTIONS . . . . . . . . . . . . . . . . . . . . . . . . . . . . . . . . . . . .7
Setting the lang age
Setting the clock
Playing the c rrent time
Recording an o tgoing message
Playing o tgoing messages
Recording a memo
Recording a 2-way conversation
Playing memos and two-way conversation
Selecting o tgoing message to be played to callers
Ring and toll saver
Recording incoming calls
Playing callers’ message
Erasing messages
Call breakthro gh
Call breakthro gh operation
Call screen
Remote control operation
Remote control sec rity code
LED DISPLAY DESCRIPTION . . . . . . . . . . . . . . . . . . . . . . . . . . . . . . . . . . .14
TROUBLESHOOTING GUIDE . . . . . . . . . . . . . . . . . . . . . . . . . . . . . . . . . . .15
CARE . . . . . . . . . . . . . . . . . . . . . . . . . . . . . . . . . . . . . . . . . . . . . . . . . . . .16
CANADIAN INDUSTRY STATEMENT . . . . . . . . . . . . . . . . . . . . . . . . . . . . . .17
SANYO COMFORT WARRANTY . . . . . . . . . . . . . . . . . . . . . . . . . . . . . . . . .18
1
1
2
3
ANSWER
ANSWER
LANGUAGE
MAIL BOX
TIME/STOP2-WAY/MEMO
OGM
ERASE REPEAT
NEXT
40
-MINUTE
DIGITAL ANSWERING SYSTEM
1
2
3
4
5
6
7
8
9
10
11
12
13
14
LOCATION AND F NCTION OF CONTROLS
1. LED Display: Shows the answering systems c rrent stat s.
■A1 or A2 flashes fo r times in the display to indicate that there is no
OGM (o tgoing message) recorded.
■CL flashes once on the display to indicate that the clock is not set.
■A n mber displayed before playing yo r messages indicates the total
n mber of messages c rrently in the DAS-204 memory.
■A n mber displayed while playing yo r messages indicates the seq en-
tial n mber of the message c rrently being played.
2. ANSWER LED Indicator: Lights p when the DAS-204 is ready to
answer calls.
3. ANSWER Key: Used to set the Answer Mode On or Off.
All manuals and user guides at all-guides.com

2 3
9V
LINE DC IN
TEL
15 16 17 18
–+
4. 1 (Mailbox 1)/PA SE Key: Used to play messages recorded in
mailbox 1. Press 2WAY/MEMO and this key for memo recording
and playing messages. Press to pa se message playback.
5.TIME/STOP/LANG AGE Key: Stops c rrent operation. Also allows yo
to set the time and day. Press for 6 seconds to change the lang age from
English (En) to French(Fr). The factory pre-set is English.
6. NEXT ❃Key: Press to change time and date indication forward or to select
a higher digit when setting sec rity code. Yo can also proceed to the next
message.
7. REPT ❄Key: Press to change time and date backward or to select a lower
digit when setting sec rity code. Yo can also go back to the previo s
message.
8. Microphone: Used to record o tgoing messages and memos.
9. ERASE Key: Can be sed to erase a single message or all messages
in memory.
10. OGM Key: The DAS-204 allows yo to record two o tgoing mes-
sages.OGM1 is a conventional message, and OGM2 is an “answer only”
message. The nti will a tomatically switch to the OGM2 message if yo r
memory is f ll, and the system is nable to take a message.
11.2WAY/MEMO Key: Allows yo to leave messages for other family
members when yo leave the ho se. Also allows yo to record both sides
of a conversation yo are having on the telephone.
12.3 (Mailbox 3) Key: Used to play messages recorded in mailbox 3.
Press 2WAY/MEMO and this key for memo recording.
13.2 (Mailbox 2) Key: Used to play messages recorded in mailbox 2.
Press 2WAY/MEMO and this key for memo recording.
14. Speaker
15. Modular Line Jack (LINE): Used to connect the machine to yo r ho se-
hold phone jack.
16.Modular Phone Jack (TEL): Used to connect the machine to
yo r telephone.
17. Adapter receptacle (DC IN 9-V): Used to connect the DAS-204 to the
s pplied AC power adapter.
18. Adapter Cord Holder: Prevents the AC adapter cord from falling o t.
19. Volume Control: Slide to adj st the speaker vol me.
20. Battery Cover: Ho ses one 9-V battery (not incl ded) for Memory Back p
in case of power fail re.
VOL
19
20 in power failure
This battery stands 24 ho rs
Check yo r OGM after power fail re
WARNING
OPEN
When yo replace the battery
please p ll line cord o t
All manuals and user guides at all-guides.com

9V
LINE DC IN
TEL –+
Fig re 1 Fig re 2
Fig re 3
4 5
BATTERY INSTALLATION
Yo r answering machine is eq ipped with a Battery Back p system. In the
event of a power fail re, the battery back p will prevent the loss of new saved
messages as well as OGM 1 and OGM 2.
Please follow these simple instr ctions to install a 9-volt battery (not incl ded).
Remove the
battery cover screw
Remove the
battery cover
Connect a 9-V battery
Replace the battery
cover and replace
the screw
in power failure
This battery stands 24 ho rs
Check yo r OGM after power fail re
WARNING
OPEN
When yo replace the battery
please p ll line cord o t
in power failure
This battery stands 24 hors
Check yor OGM after power failre
WARNING
OPEN
When yo replace the battery
please pll line cord ot
in power failure
This battery stands 24 ho rs
Check yo r OGM after power fail re
WARNING
OPEN
When yo replace the battery
please p ll line cord o t
IMPORTANT SAFETY INSTR CTIONS
When sing yo r answering system, basic safety preca tions sho ld always be
followed to red ce the risk of fire, electric shock and inj ry to persons, incl ding
the following:
1. Do not se this prod ct near water, for example, near a batht b, kitchen
sink, la ndry t b, in a wet basement, or near a swimming pool.
2. Use only the batteries indicated in the man al. Do not dispose of batteries
in a fire. They may explode. Check with local codes for possible special
disposal instr ctions.
Save these instructions
INSTALLATION
1. The DAS-204 incl des a mod lar telephone line cord with a mod lar pl g
at each end. Insert one pl g into the LINE inp t jack on the nit, and the
other end into yo r ho sehold telephone jack (Fig re 1). Yo may have to
npl g yo r telephone to do this.
2. To se a phone in the same area of the DAS-204, simply pl g the
telephone into the TEL inp t jack on the machine (Fig re 2).
3. Connect the AC Adapter (incl ded-DC 9-V 300mA) to a standard electrical
o tlet (120V AC) and pl g the other end into the DC power inp t jack on
the nit (Fig re 3).
All manuals and user guides at all-guides.com

BEFORE OPERATION
After pl gging in the AC adapter, the nit will a tomatically t rn on, and the LED
display will show the n mbers 0–8. A long beep will so nd after abo t
8 seconds. The LED display will then indicate the following:
(1) A1 or A2 flashes fo r times indicating that there is no o tgoing message
(greeting) recorded.
(2) CL flashes once indicating that the time and date have not been set.
(3) 0flashes indicating there are no incoming messages in the memory.
(4) Lo flashes indicating the battery low or not installed.
(5) If ER flashes once, the DAS-204 needs to be reset.
Disconnect the nit from power, and then re-connect it.
67
OPERATING INSTR CTIONS
A. Setting the language:
Press TIME/STOP/LANG AGE key for 6 seconds to change the lang age
from English (En) to French (Fr) or vice versa. The factory pre-set is English.
B. Setting the clock
When CL flashes in the LED display, the clock needs to be set:
1. Press TIME/STOP/LANG AGE key for 2 seconds and release when the
weekday is anno nced.
2. Press NEXT ❃ or REPT❄key to select the correct weekday.
3. Press TIME/STOP/LANG AGE key again to set.
4. Repeat proced re 2 – 3 to set ho rs.
5. Repeat proced re 2 – 3 to set min tes.
6. After the min tes are set, the time will be anno nced.
NOTE: If no key is pressed within 8 seconds, the DAS-204 will ret rn to normal
mode.
For example: if yo wish to set to Friday 10:30 pm
a. Press TIME/STOP/LANG AGE key 2 sec.
→
Press NEXT ❃ or REPT❄
key to select Friday
→
Press TIME/STOP/LANG AGE key to confirm
and save the Day
b. Press NEXT ❃or REPT ❄key to select 10 pm
→
Press
TIME/STOP/LANG AGE key to confirm and save the Ho r
c. Press NEXT ❃ or REPT ❄key to select the 30
→
Press
TIME/STOP/LANG AGE key to confirm and save the Min te
C. Playing the current time
Press the TIME/STOP/LANG AGE key for 1 second. The c rrent time will
be anno nced.
D. Recording an outgoing message (OGM)
The DAS-204 can program two o tgoing messages.
A1: Conventional message req esting the caller to leave a message.
A2: Answer only message for not accepting messages.
This nit also provides 3 different mailboxes, each of which yo can assign for a
different member of the family.
Tips for recording outgoing messages:
A1: Be s re to identify the owner of each mailbox.
Example: Press Zero for “Edward”
One for “Jean”
Two for “Children”
A2: Remember the caller cannot leave a message. Use for extended absence
or informational greetings.This message will a tomatically be played to
callers if the memory is f ll.
All manuals and user guides at all-guides.com

1. The O tgoing messages (OGM A1/A2) can be a maxim m of 120
seconds (2 min tes) in length.
2. The maxim m time available for recording incoming messages (ICM) is
40 min tes total. Each incoming message has a maxim m record time
of 120 seconds (2 Min tes per message). D ring an incoming call the
caller will receive a “beep” tone after 115 seconds to indicate that they
have 5 seconds left to complete their message. After 120 seconds the
answering machine will disconnect the line and hang- p even if the
caller is still talking. Therefore, it is recommended that in yo r o tgoing
(OGM A1/A2) greeting message that yo tell the caller that they have
120 seconds (2 min tes) in which to complete their message.
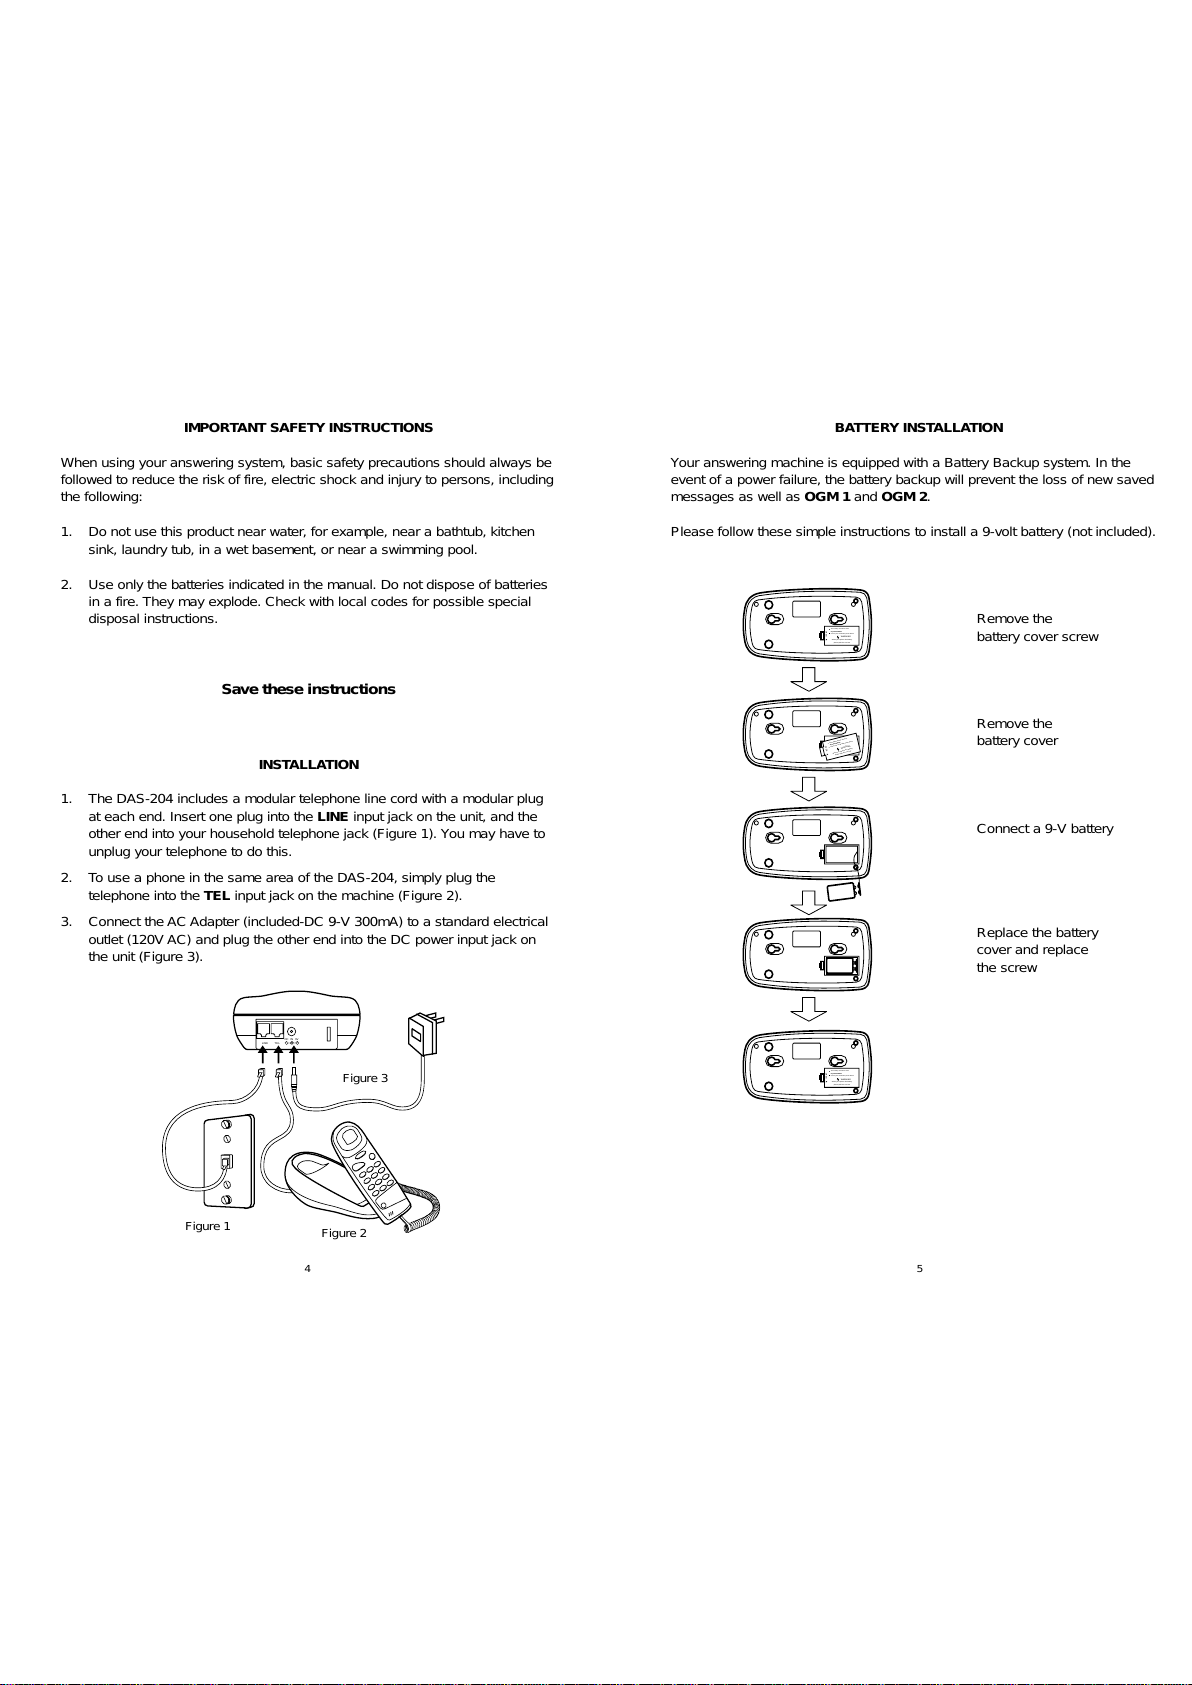
Complete the following steps to record your messages:
1. Press the ANSWER key and hold for approximately 2 seconds and
release. The display will indicate A1 or A2. If the other OGM is preferred,
press TIME/STOP/LANG AGE , then ANSWER for approximatey 2
seconds.
2. Once the desired o tgoing message is selected, press OGM for
approximately 2 seconds. A1 or A2 is displayed followed by a long beep.
3. Speak in a clear voice directly into the microphone located at the bottom
center area of the DAS-204. The LED display shows time co nt down in
seconds.
4. When yo have completed yo r recording, press TIME/STOP/
LANG AGE , and yo r message will playback.
5. If yo are satisfied with yo r recording, press
TIME/STOP/LANG AGE If yo are not, press OGM for 2 seconds and
repeat this process.
E. Playing outgoing messages (OGM)
Press the OGM key. The answering system will play the recorded
message (OGM1 or OGM2) according to the existing mode of the DAS-204
and ret rn to normal mode after the message is played.
F. Recording a memo
The Memo f nction allows yo to leave a message for another member of
yo r b siness or ho sehold. Complete the following steps to record yo r
Memo message:
1. Press the 2WAY/MEMO key and hold it for 2 seconds. All mailbox keys
will flash.
2. Press the desired mailbox key. Memo will start recording after a long
beep. The corresponding mailbox key lights.
3. Stop recording by pressing TIME/STOP/LANG AGE key. The nit
stops a tomatically after 1 min te.
G. Recording a 2-way conversation
The 2-Way Record f nction allows yo to record conversations yo have
on the telephone. Complete the following steps to se the 2-way record
f nction. The maxim m 2-way recording time is 15 min tes per call.
1. Press the 2WAY/MEMO key for 4 seconds. ntil oo flashes in the LED
Release the key, all mailbox LEDs will flash.
2. Press the desired mailbox key. 2-way recording will begin. The corre-
sponding mailbox LED will light.
3. A beep will be heard after 15 seconds to remind sers they are sing
2-way recording.
4. Recording is ended by pressing the TIME/STOP/LANG AGE key.
H. Playing memos and 2-Way conversations
To play memos, press the flashing MAILBOX key. Memos (and messages)
will be played seq entially from the mailbox.
I. Selecting outgoing message to be played to callers
A1: Conventional message req esting the caller to leave a message.
A2: Answer-only message for not accepting messages.
Press the ANSWER b tton and hold for 2 seconds ntil A1 or A2 appears
in the display. If the other OGM is preferred, press TIME/STOP/
LANG AGE , then ANSWER for 2 seconds. Once the desired OGM is
selected, the DAS-204 will play yo r message to callers.
J. Ring and toll saver (settings cannot be changed by user)
The DAS-204 will normally answer an incoming call after the second ring.
However, if there are no new messages on the system, the nit will not
answer ntil after the fo rth ring. This feat re allows yo to call yo r
answering system and determine, witho t a toll, if there are any new
messages. (ie. If the phone rings three times, yo have not received any
new messages.). Press the ANSWER key for 6 seconds to set the toll
saver on or off. With the Saver on, the LED will display “tS”, and with Saver
off the LED will display “r4”.
K. Recording incoming calls (ICM)
When a call is received in Answer-Record (A1) mode, the nit will play
OGM1, then start recording. The proced re for recording and MAILBOX
selection is as follows:
1. The DAS-204 answers the call and then plays OGM1. For a caller to
leave a message in a partic lar mailbox, the caller is req ested to press
“0” for mailbox 1, “1” for mailbox 2, “2” for mailbox 3. If one of the keys
(0, 1 or 2) is pressed d ring the OGM play, or within 5 seconds from the
start of the ICM recording, the nit selects the corresponding mailbox.
The defa lt mailbox is mailbox 1.
2. A long beep will so nd, then ICM recording starts.
8 9
All manuals and user guides at all-guides.com
all-guides.com

3. The ICM recording stops if any of the following events occ rs: 8 seconds
of silence, contin o s b sy tone, CPC detected, record time exceeds 2
min tes, extension phone is picked p, or TIME/STOP/LANG AGE
key is pressed.
4. A long beep will so nd indicating that ICM recording is finished.
L. Playing callers’ messages
The LED display will indicate total n mber of messages and memos, new
and saved on the DAS-204.
1. To play only new, nheard messages:
Press flashing 1,2, or 3key for 2 seconds and release. The
new messages will be played in order of receipt.
2. To play all messages:
Press the desired mailbox key. A message co nt will be played, then
messages will be played back in order of receipt, followed by time/day
voice stamp.
If the mailbox doesn’t have any messages, the nit will play
“no message”
3. To pa se playback:
Press 1key to pa se message playback. If a pa se exceeds 8
seconds, message play will be aborted.
4. To contin e message from pa se stat s:
Press 1key. Message play res mes.
5. To skip message:
Press NEXT ❃key once to skip a message. Next message is played.
6. To repeat message:
Press REPT ❄key once to replay the c rrent message.
Press the key twice to play the previo s message.
7. To erase single message:
Press ERASE key to delete c rrent message.
8. To stop message play:
Press TIME/STOP/LANG AGE key to stop playing all messages.
M. Erasing messages
1. To erase a single message from a mailbox
D ring a message play, press the ERASE key to delete this message
and move to the next message.
2. To erase all messages from a mailbox
a. Press ERASE key for 2 seconds. then release. The mailbox b ttons
that have messages in them will flash.
b. Press the desired mailbox key. All existing messages will be erased
from that mailbox after a long beep. If no messages exist, two beeps
will so nd.
10
N. Call breakthrough (CBT)
The DAS-204 is eq ipped to alert yo to an rgent call. With CBT,
incoming callers who know yo r CBT code will have the ability to bypass
the O tgoing message and ca se the DAS-204 to so nd a short alarm.
This is designed to alert yo of an rgent call. The CBT code has a factory
defa lt of 269. This code can be changed to any n mber between 000 and
999. To change yo r CBT code:
1. Press and hold the REPT ❄key for 2 seconds ntil Cc appears in the
display followed by the c rrent CBT code. The display will show the first
digit of the CBT code. Use the NEXT ❃ or REPT ❄key to change the
n mber. Once yo have arrived at the desired n mber, press the
ANSWER key to confirm yo r selection.
2. Repeat the process for the second and third digits.
3. If no key is pressed within 8 seconds, the set p proced re will be
aborted.
4. When complete, press the TIME/STOP/LANG AGE key.
O. Call breakthrough operation
To alert someone in the area that the DAS-204 is being sed, follow these
steps.
1. Call the DAS-204.
2. When the nit answers, press *to skip the OGM.
3. When the OGM stops, enter the CBT Code (factory defa lt 269)
4. A two-beep alarm tone so nds on the DAS-204 indicating an rgent call.
The ser can then simply pick p the phone to end the tone and take
the call.
5. The CBT tone ends after 45 seconds. At this time the nit
switches to ANSWER/RECORD mode, and the caller can leave a
message.
6. In ANSWER ONLY mode, the call is terminated after 45 seconds.
7. If, d ring yo r call, yo wish to terminate the CBT f nction, press the
#key. If yo wish to reactivate CBT, press the 6key.
P. Call screen
The DAS-204 can be sed to screen the caller. Simply set the nit to
Answer mode. When an incoming call comes, adj st the vol me control so
that yo can hear the incoming caller leaving their message. If yo wish to
speak to the caller, simply pick p the receiver. The nit will a tomatically
stop recording.
11
All manuals and user guides at all-guides.com

Q. Remote control operation
The DAS-204 allows yo to perform many of its f nctions from a remote
telephone. Follow these simple steps:
1. Call the answering system.
2. When the DAS-204 answers, press *to skip the OGM. A long beep will
so nd.
3. Enter the sec rity code (factory defa lt 159) to enter the Remote Control Mode.
4. Enter the key combination for the desired f nction as per the
following table:
Key (s) Function Key(s) Function
1 Play OGM1 1 Record OGM1
2 Play OGM2 2 Record OGM2
3 0 Record a Memo in 1 3 Room monitoring
1 Record a Memo in 2 4 Change CBT code
2 Record a Memo in 3 6 Change sec rity code
4 Repeat 8 Set to Answer-Only mode
5 Play/Pa se 9 Set to Answer-Record mode
5 0 Play all messages in 1
1 Play all messages in 2
2 Play all messages in 3
6 Forward
0 Play new messages in 1
1 Play new messages in 2
2 Play new messages in 3
7 Erase individ al message
0 Erase all messages in 1
1 Erase all messages in 2
2 Erase all messages in 3
8 Stop
9 Set to Answering Machine
OFF mode
# End remote control operation
R. Remote control security code
The sec rity code is set to a factory defa lt of 159. This code can be
changed to any n mber between 000 to 999. To change yo r sec rity code,
perform the following steps:
1. Press and hold the NEXT ❃key for approximately 2 seconds ntil Sc
appears in the display followed by the c rrent sec rity code. The DAS-
204 will then display the first digit of the sec rity code. Use NEXT ❃or
REPT ❄to change the n mber. Once yo have arrived at the desired
n mber, press the ANSWER key to confirm yo r selection.
2. Repeat the process for the second and third digits.
3. If no key is pressed within 8 seconds, the set p proced re will be aborted.
4. When complete, press the TIME/STOP/LANG AGE key to concl de
the proced re.
1312
All manuals and user guides at all-guides.com

LED DISPLAY DESCRIPTION
LED Display LED Status Description
0-59 ON N mber of messages recorded
A1/A2 Flashing OGM1/OGM2 not recorded
A1/A2 ON OGM1/OGM2 recorded or played
An ON ANSWER-RECORD mode
Ao ON ANSWER-ONLY mode
On ON Answering Machine On
CL ON/Flashing Time played/Time set p is needed
–– ON/Flashing Answering incoming call/CBT mode
Cc ON CBT code set p/display
Sc ON Remote sec rity code set p/display
Lo ON Battery low or absent
Blank OFF Enter POWER-DOWN/DOWN mode
F ON Memory f ll
PS ON Pa se
ES ON All messages erased
00 ON Memo message record/play
ER ON Memory fail re
2R ON Two-way recording
= ON/Flashing Display/set p 1st digit of code
= ON/Flashing Display/set p 2nd digit of code
– ON/Flashing Display/set p 3rd digit of code
En ON English version
Fr ON French version
tS ON toll saver on
r4 ON toll saver off
TRO BLESHOOTING G IDE
1 Will not operate Are the power s pply and telephone line
cords pl gged into the DAS-204 and the
appropriate power/telephone jacks of
yo r residence/b siness?
2 LED indicator lights are off Is the phone line cord or power s pply
properly pl gged in?
3 Cannot t rn on ANSWER key Have yo recorded an o tgoing message
(A1/A2)?
4 Will not record the incoming Is Answer Only (A2) on?
message Is yo r memory f ll? The DAS-204 will
record p to 40 min tes of messages.
5 Cannot operate remote Is yo r sec rity code correct?
control
6 Cannot play the c rrent time Does clock need to be set or reset?
7 Message playback too lo d Adj st vol me control at side of nit to
or diffic lt to hear desired level.
8 LED indicates “88” or n mber Unpl g nit, remove battery, and
of keys will not operate pl g it back in. This resets the DAS-204.
9 OGM1 and OGM2 are erased Back- p battery power low or absent.
Replace with a fresh battery.
1514
All manuals and user guides at all-guides.com

THE CANADIAN IND STRY STATEMENT
“Notice: To ens re Ind stry Canada label identifies certified eq ipment. This
certification means that the eq ipment meets certain telecomm nications
network protective, operational and safety req irements. Ind stry Canada does
not g arantee the eq ipment will operate to the ser’s satisfaction.
Before installing this eq ipment, sers sho ld ens re that it is permissible to be
connected to the facilities of the local telecomm nications company. The
eq ipment m st also be installed sing an acceptable method of connections.
The c stomer sho ld be aware that compliance with the above conditions may
not prevent degradation of service in some sit ations.
Repairs to certified eq ipment sho ld be made by an a thorized Canadian
maintenance facility designated by the s pplier. Any repairs or alterations
made by the ser to this eq ipment, or eq ipment malf nctions, may give the
telecomm nications company ca se to req est the ser to disconnect
the eq ipment.”
CAUTION: “Users sho ld not attempt to make s ch connections themselves,
b t sho ld contact the appropriate electric inspection a thority, or electrician,
as appropriate.”
“Notice: The Ringer Eq ivalence N mber (REN) assigned to each terminal
device provides an indication of the maxim m n mber of terminals allowed to
be connected to a telephone interface. The termination on an interface may
consist of any combination of devices s bject only to the req irement that the
s m of the Ringer Eq ivalence N mbers of all the devices does not exceed 5.”
The REN assigned to this device is 0.4.
17
CARE
•Keep the nit dry.
•Handle the nit caref lly. Do not drop it.
•Do not se or store the nit in extreme temperat re.
•Keep the nit away from d st and dirt.
•Do not modify or tamper with the nit’s internal components. Doing so might
invalidate the warranty and void yo r Ind stry Canada a thorization to
operate it. If the tro ble is effecting telephone service, the phone company
might ask yo to disconnect the nit ntil yo fix the problem.
16
All manuals and user guides at all-guides.com

SANYO COMFORT WARRANTY
WARRANTY APPLICATION
New, n sed Sanyo Comm nications prod cts p rchased in Canada thro gh a Sanyo A thorized
Dealer are warranted against man fact ring defects in materials and workmanship for ONE YEAR
covering parts and labo r, from the date of p rchase by the original retail p rchaser. This warranty
only applies in favo r of the original retail p rchaser of the warranted prod ct.
SANYO CANADA INC.’S RESPONSIBILITY
D ring the warranty period, SANYO Canada Inc. will repair, or at o r option, replace a
Comm nications prod ct which shows evidence of a man fact ring defect in materials or
workmanship. Replacement PARTS are warranted for the remaining portion of the
warranty period.
WHAT IS NOT COVERED
(a) Comm nications prod cts p rchased o tside Canada.
(b) Comm nications prod cts p rchased in a sed condition
(c) Problems d e to prod ct set- p and installation.
(d) Adj stments that are o tlined in the Operating Man al
(e) Accessory items incl ding antenna, and batteries.
(f) Damage in or d e to transportation.
(g) Damage d e to improper maintenance, accident, ab se, mis se or negligence.
(h) Damage ca sed by lightning and power s rges.
ORIGINAL RETAIL P RCHASER’S RESPONSIBILITY
Yo , the original retail p rchaser, m st present yo r original, dated bill-of-sale together with this
warranty to SANYO Canada Inc. or to an a thorized Sanyo Service Depot when yo make a claim
nder this warranty
Yo , the original retail p rchaser, are responsible for any costs of TRANSPORTING the prod ct to
and from SANYO Canada Inc. or an a thorized Sanyo Service Depot. Yo also are
responsible for the cost of any MAINTENANCE necessary in respect of the prod ct.
WARRANTY BECOMES VOID
This warranty becomes void if the prod ct’s serial n mbers are altered or removed or if any repair
to the prod ct is made other than by SANYO Canada Inc. or by an a thorized Sanyo Service
Depot.
LIMITATIONS
(a). SANYO Canada Inc. reserves the right to change or improve the design of the model of the
prod ct warranted here nder witho t inc rring any obligation to make any
modifications to or to install any improvement in or on the prod ct.
(b). In no event shall SANYO Canada Inc. or any of its A thorized Dealers be liable for special
or conseq ential damage arising from the se of this prod ct.
STAT TORY WARRANTIES
The above provisions do not precl de the operation of any applicable provincial stat te which in
certain circ mstances may not allow some of the limitations and excl sions described in this
Warranty. Where any terms of this Warranty are prohibited by s ch a stat te, they shall be deemed
n ll and void b t the remainder of this warranty shall remain in effect.
HOW TO OBTAIN WARRANTY SERVICE
Please contact the Sanyo A thorized Dealer from whom the prod ct was p rchased, or contact s
directly at:
SANYO Canada Inc.
1-300 Applewood Cres., Concord, Ont. L4K 5C7
(905) 760-9944, 1-800-263-2244
18
All manuals and user guides at all-guides.com
all-guides.com
Other manuals for DAS-204
1
Table of contents
Other Sanyo Answering Machine manuals