Introduction..........rareeaur
rer
narrar
rr
заана
ааа
enana
3
Сопіелі.............
ааа
анааан
ааа
аана
каккын
к
КККК
ar
rr
4
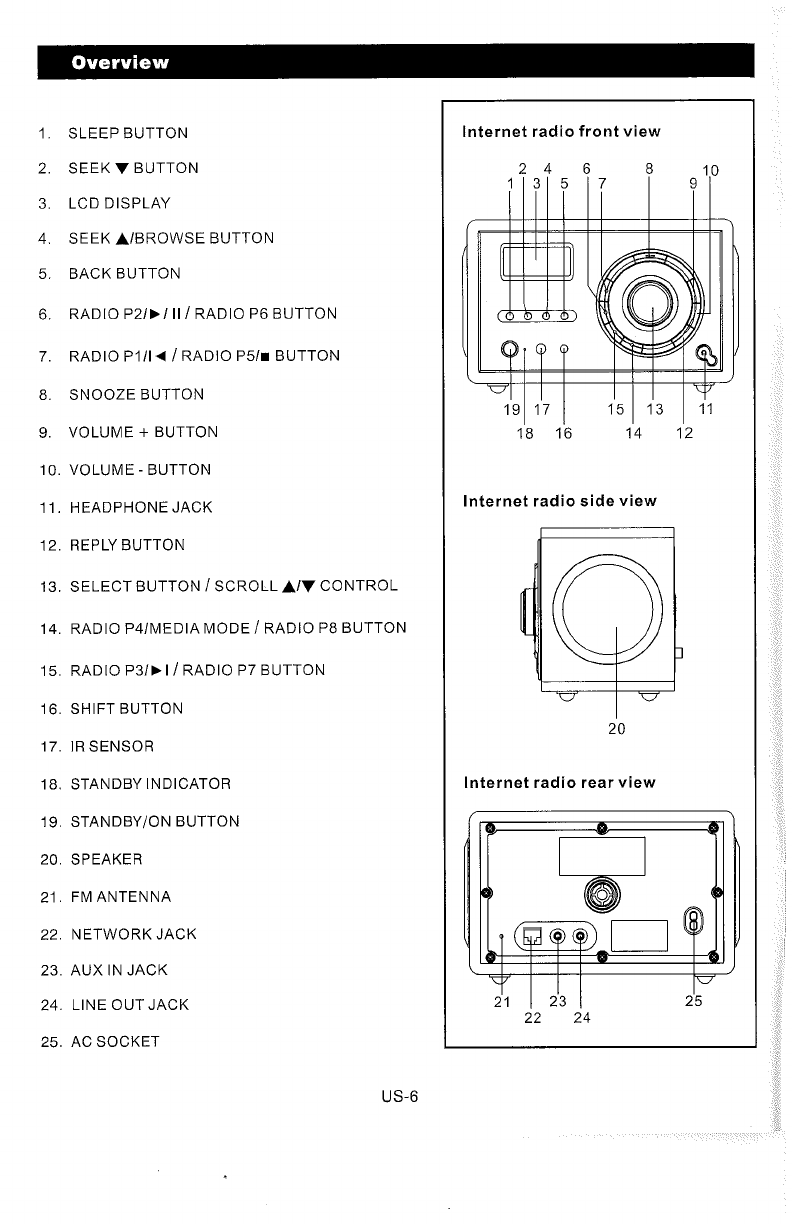
Overview
16
Internet
radio
front,
side
and
rear
мїе\мү/..................
у
ы
ы
ы
ы
ы
ыыы
dren
6
Remote
control
top
VIEW..
ины
rr
rurun
нк
КК
КККК
ККК
7
Summary
of
Соп{го\8........................,
enters
tte
etnies
7
DEJEN
инн
ннн
ынын
кынкы
К
КК
КККК
КККК,
8
INStALALION.
ec
ce
EEE
ек
ынкы
екы
ККК
ыкы
ыыы.
Remote
Control
Battery
Configure
тепи....................и.
уенны
rre
таана
ккк
Choosing
the
option
you
want
from
the
Configure
тепи.........................
ees
10
<Network
CONfIY>
ooo
ccc
cnc
rr
10
STAN
0
<Upgrade
Firmware?
ccoo
11
LANA
1
<Factory
Reset
cio
coco
rre
11
<RegİSter>,
cc
rr
11
<Clock
Set
UP.
cc
rr
11
SIT
AN
1
SWIFT
Strength?
occ
corrio
rr
ааа:
11
Internet
Radio
Connection
Requirements...,............
..
wee
1
What
you
need
before
you
can
use
your
Іпїегпеїгайіо.......................................
11
Steps
for
connecting
your
Internet
radio
to
your
wireless
пеёмогкК...............................
12
Step
1
-
Power
up
the
Internet
radio
Step
2
Scan
for
a
wireless
network
CONNECTION...
eer
eee
12
Step
3
Connect
to
the
wireless
Пеїүч/ОГК...........................
а
13
Choosinga
radio
station
to
listen
to
Changing
the
VOIUME.
2.0...
ааа
Presetting
your
favorite
internet
radio
Stations.
00...
cece
сие
е
een
ee
ered
15
Playing
a
preset
internet
radio
station
Requesting
a
internet
station
that
is
currently
илауаіаЫІе........................................
15
Internet
Station
which
enable
you
to
choose
what
you
listen
{0,..................................
15
TroubleshootinY.....ccooccooncconarncnnnnnnoncncnnonnnconenen
carr
nro
rra
reno
кнын
анын
нык
ыыы
ынкы
ыыы
ыы"
5
Media
Player
Operation
6
Set
up
your
Windows
PC
to
allow
the
radio
to
access
your
audio
files
via
Windows
Shares...16
6
7
Locating
audio
files
via
Windows
Эһагеѕ.........,............................
rr
nero
1
Listening
to
a
single
shared
track............
ccc
cece
ee
rre
1
Listening
to
а
complete
shared
аірит..........................,.....
а
7
Queuing
up
tracks
for
playback
|!аїет....................................
rara
rr
rr
rr
17
Queuing
up
albums
for
playback
later...
cece
rre
7
Controlling
р!аубаскК...........................
rr
rr
rr
17
US-4