Sanyo VA-EXH User manual

External Storage Unit
About this manual
Before installing and using this unit, please read
this manual carefully. Be sure to keep it handy for
later reference.
Instruction manual
English GB
Manuel D’instructions
F
Manual de Instrucciones
E
À propos de ce manuel
Avant d’installer et d’utiliser cet appareil, veuillez lire ce
manuel attentivement. Assurez-vous de le garder à
portée de la main pour référence ultérieure.
Acerca de este manual
Antes de instalar y usar este aparato, lea detenidamente
este manual. Asegúrese de guardarlo a mano para
futuras referencias.
VA-EXH
e00_l8hcb_us_7.book Page 1 Monday, March 7, 2005 3:54 PM

English 1
INTRODUCTION
Main features
Connect up to four 3.5-inch S-ATA hard disks
Accessories
Check that you have all the parts shown below.
Power cord
External storage unit cable
(x4)
Core clamp (round)
(x8)
For use with the external
storage unit cables
Core clamp (square)
(x1)
For use with the external
storage unit cables
Cord tie
(x9)
Cable securing
bracket (x2)
Screw (x8)
Instruction Manual
Copyright
zThis manual is copyrighted by Sanyo Electric Co., Ltd.
zBrand and product names used in this manual are the
trademarks or registered trademarks of their respective
companies.
Except for personal use, copyright law prohibits the use of
recorded copyrighted images without the permission of the
copyright holder.
Contents
1 BEFORE USE ................................................ 3
Notes on handling the internal hard disk ........ 3
Notes on installation locations ........................ 3
The hard disk and cooling fan are consumable
components.
................................................... 3
Important recordings ...................................... 3
Protection of the hard disk ............................. 3
Supported hard disks ..................................... 3
2 NAMES AND FUNCTIONS OF PARTS ........ 4
Front panel ..................................................... 4
Rear panel ...................................................... 4
1 HARD DISK INSTALLATION AND
CONNNECTION TO DVR .............................. 5
Installing the hard disk ................................... 5
Connecting the DVR ...................................... 8
Turning on the power ..................................... 9
2 INITIALIZING THE HARD DISK .................. 10
Initializing the hard disk ................................ 10
APPENDIX.................................................... 12
Specifications ................................................ 12
Dimensions ................................................... 12
INTRODUCTION
OPERATION
OTHER
e00_l8hcb_us_7.book Page 1 Monday, March 7, 2005 3:54 PM

2English
PRECAUTION
CAUTION: Changes or modifications not expressly
approved by the manufacturer may void the user’s authority
to operate this equipment.
This equipment has been tested and found to comply with
the limits for a Class B digital device, pursuant to part 15 of
the FCC Rules.
These limits are designed to provide reasonable protection
against harmful interference in a residential installation.
This equipment generated, uses and can radiate radio
frequency energy and, if not installed and used in
accordance with the instructions, may cause harmful
interference to radio communications. However, there is no
guarantee that interference will not occur in a particular
installation.
If this equipment does cause harmful interference radio or
television reception, which can be determined by turning
the equipment off and on, the user is encouraged to try to
correct the interference by one or more of the following
measures:
zReorient or relocate the receiving antenna.
zIncrease the separation between the equipment and
receiver.
zConnect the equipment into an outlet on a circuit
different from that to which the receiver is connected.
zConsult the dealer or an experienced radio/TV
technician for help.
For the customers in Canada
Location
For safe operation and satisfactory performance of your
unit, keep the following in mind when selecting a place for
its installation:
zShield it from direct sunlight and keep it away from
sources of intense heat.
zAvoid dusty or humid places.
zAvoid places with insufficient ventilation for proper heat
dissipation. Do not block the ventilation holes at the top
and bottom of the unit. Do not place the unit on a carpet
because this will block the ventilation holes.
zInstall the unit in a horizontal position only.
zAvoid locations subject to strong vibrations.
zAvoid moving the unit between cold and hot locations.
zDo not place the unit directly on top of a monitor TV, as
this may cause playback or recording problems.
Avoiding Electrical Shock and Fire
zDo not handle the power cord with wet hands.
zDo not pull on the power cord when disconnecting it
from an AC wall outlet. Grasp it by the plug.
zIf any liquid is spilled on the unit, unplug the power cord
immediately and have the unit inspected at a factory-
authorised service centre.
zDo not place anything directly on top of this unit.
SERVICE
This unit is a precision instruments and if treated with care,
will provide years of satisfactory performance.
However, in the event of a problem, the owner is advised
not to attempt to make repairs or open the cabinet.
Servicing should always be referred to your dealer or
Sanyo Authorized Service Centre.
CAUTION
RISK OF ELECTRIC SHOCK
DO NOT OPEN
CAUTION: TO REDUCE THE RISK OF ELECTRIC SHOCK, DO NOT
REMOVE COVER (OR BACK).
NO USER-SERVICEABLE PARTS INSIDE.
REFER SERVICING TO QUALIFIED SERVICE PERSONNEL.
WARNING: To reduce the risk of fire or electric shock, do
not expose this appliance to rain or moisture.
The lightning flash with arrowhead symbol, within an
equilateral triangle, is intended to alert the user to the
presence of uninsulated “dangerous voltage” within the
product’s enclosure that may be of sufficient magnitude to
constitute a risk of electric shock to persons.
The exclamation point within an equilateral triangle is
intended to alert the user to the presence of important
operating and maintenance (servicing) instructions in the
literature accompanying the product.
This class B digital apparatus complies with Canadian
ICES-003.
CAUTION
Danger of explosion if battery is incorrectly replaced.
Replace only with the same or equivalent type
recommended by the manufacturer.
Discard used batteries according to the manufacture’s
instructions.
Declaration of Conformity
Model Number : VA-EXH
Trade Name : SANYO
Responsible party : SANYO FISHER COMPANY
Address : 21605 Plummer Street,
Chatsworth, California 91311
Telephone No. : (818) 998-7322
zThis device complies with Part 15 of the FCC Rules.
Operation is subject to the following two conditions:
(1) this device may not cause harmful
interference,and
(2) this device must accept any interference received,
including interference that may cause undesired
operation.
e00_l8hcb_us_7.book Page 2 Monday, March 7, 2005 3:54 PM

English 3
1BEFORE USE
Notes on handling the internal hard disk
Be sure to observe the following points carefully when
operating, setting-up, or servicing the external storage unit.
Do not subject the external storage unit to
sudden impact or vibration.
If the external storage unit is subjected to sudden impact or
vibration, it may damage the hard disk or cause corruption of
the data stored within it.
zDo not move the external storage unit while the power is
turned on. Always ensure that the power is turned off
before removing the external storage unit from or placing it
in a rack.
zWhen transporting the external storage unit, pack it
securely using the specified materials. In addition, choose
a method of transportation that minimizes vibration.
zWhen placing the external storage unit on the floor or
another similar surface, attach the specified pads to its
base and place it down gently.
Do not move the external storage unit for 30
seconds after turning off the power.
After the power is turned off, the disk inside the hard disk
continues to spin for a brief period due to inertia and the
heads are in an unstable condition.
During this period, the external storage unit is even more
susceptible to damage from sudden impact and vibration than
when it is turned on. Make sure that the external storage unit
is not subjected to even gentle vibration for at least 30
seconds after turning off the power.
Do not operate the external storage unit when
condensation has formed on it.
If the external storage unit is operated in this type of condition,
there is a possibility that it may become permanently
damaged.
If the temperature around the external storage unit changes
suddenly, wait for it to stabilize before operating the external
storage unit.
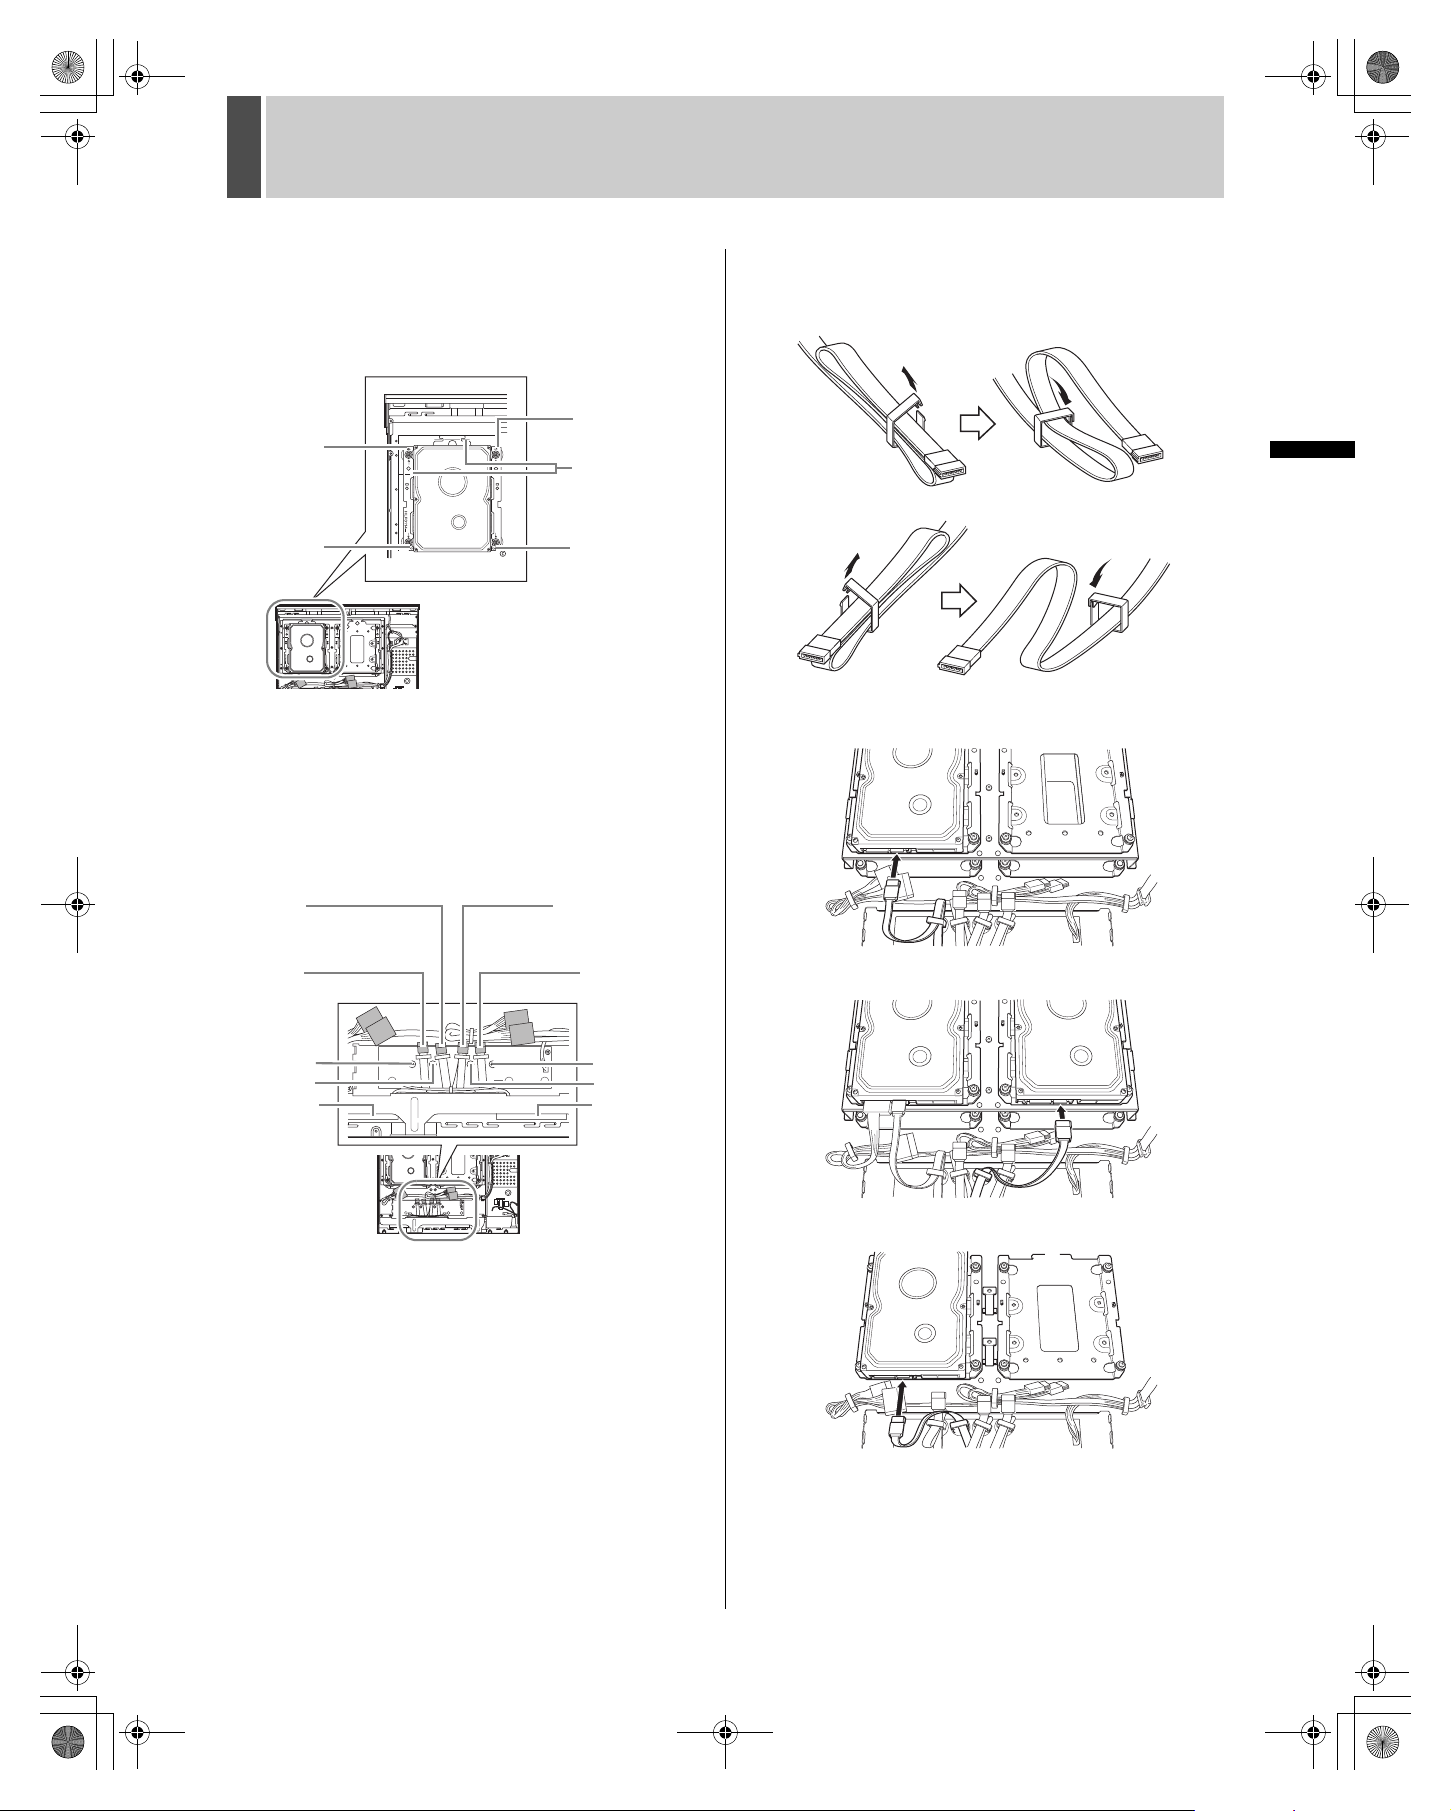
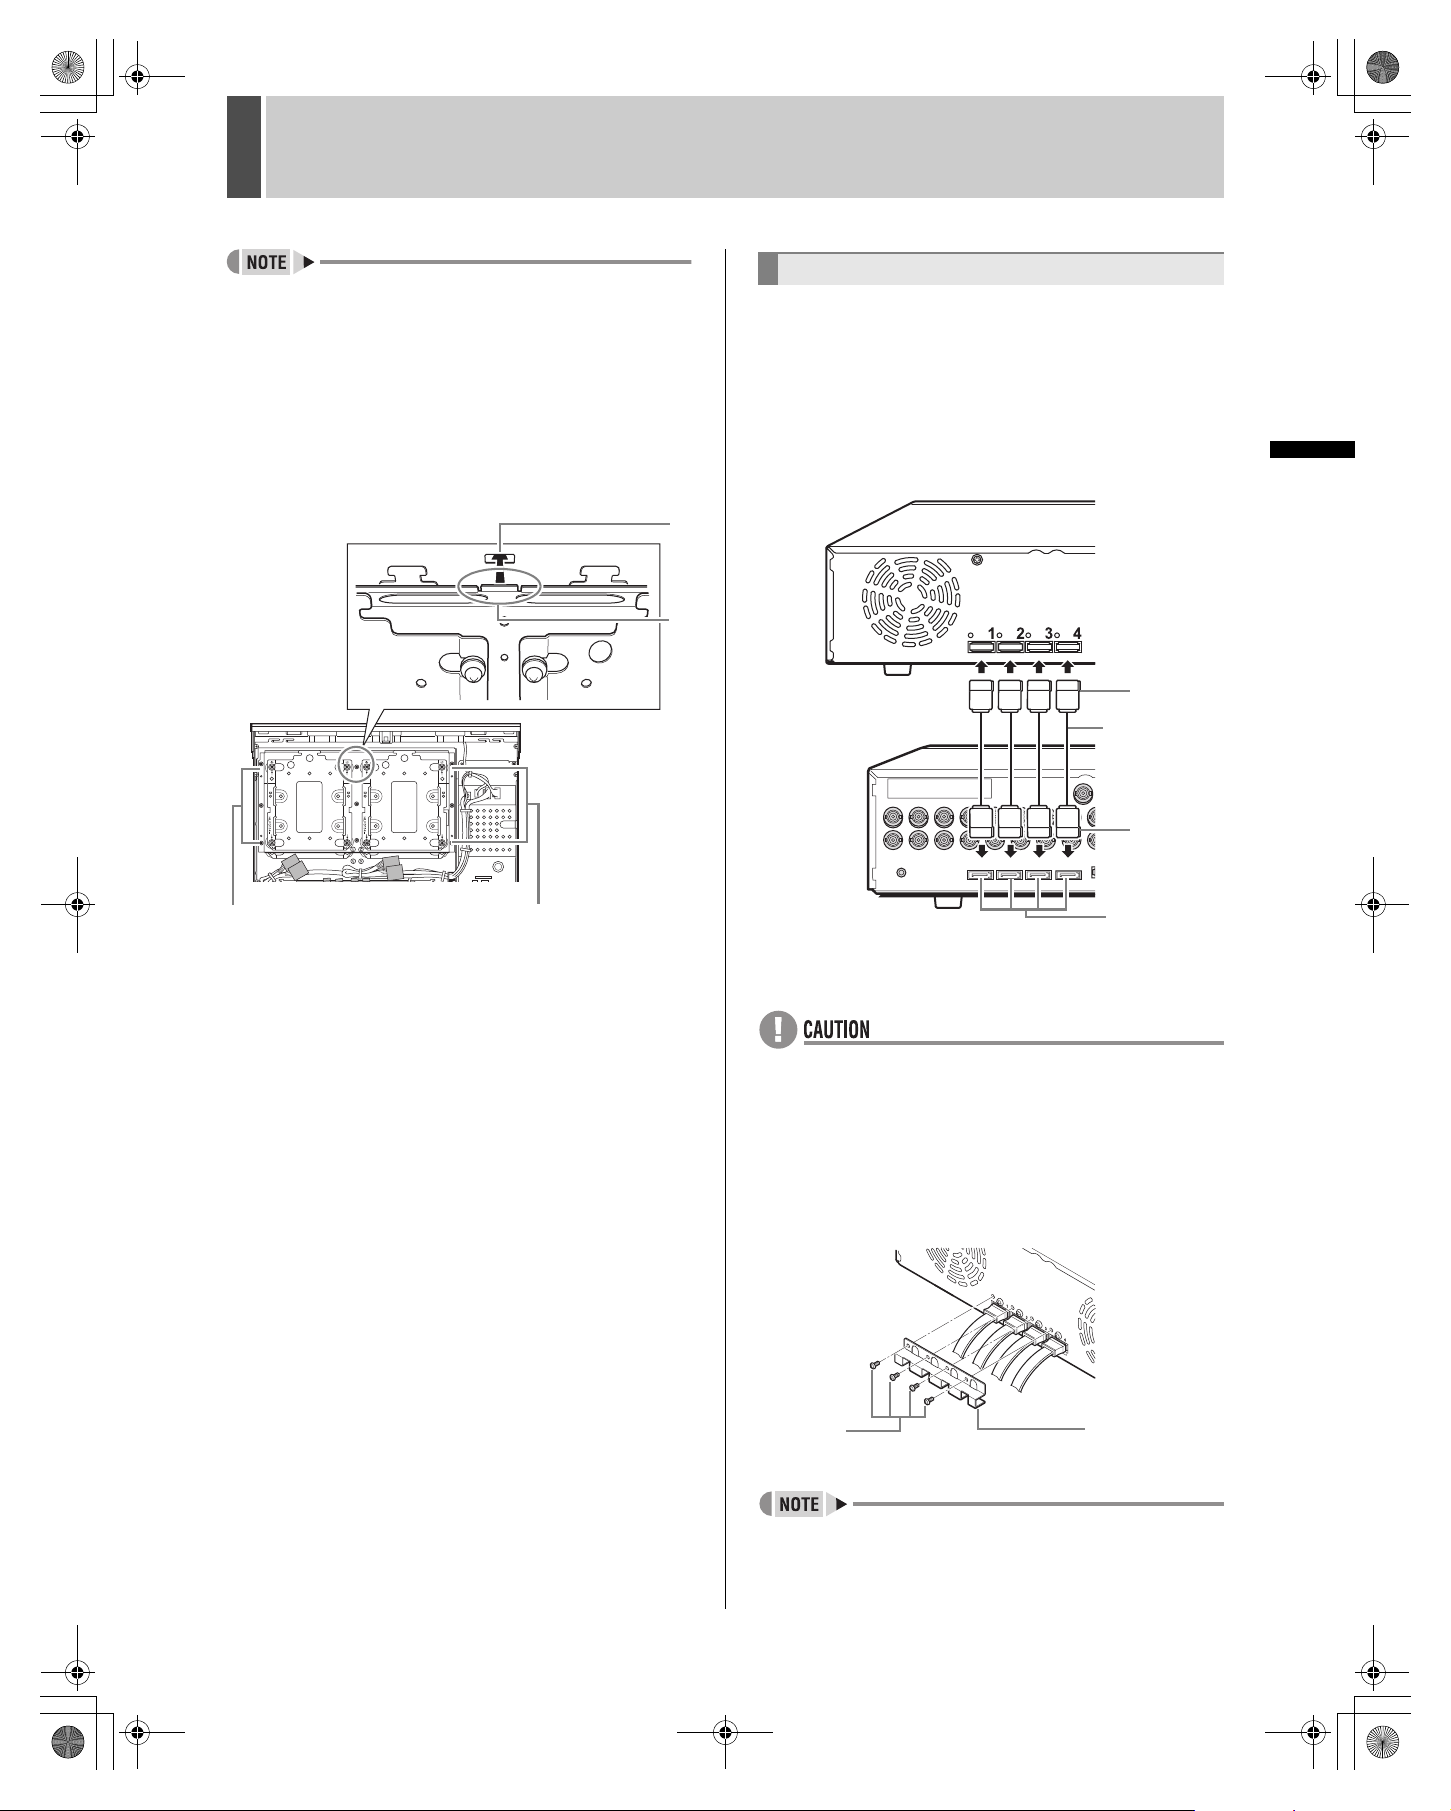
Notes on replacing the hard disk
Be sure to follow the correct procedure when replacing the
hard disk.
zHard disks that have been removed from their packing may
not operate correctly if they are subjected to sudden impact
or vibration. It is recommended that you place the hard disk
on a soft, level surface with the printed circuit board facing
upward after it has been unpacked.
zTake care to avoid subjecting the hard disk to sudden
impact or vibration when removing and tightening screws
as part of the hard disk replacement procedure.
Tighten all screws securely to ensure that they do not
loosen.
zThe hard disk is sensitive to static electricity; accordingly,
you should take the appropriate precautions to prevent the
buildup of static charges.
Handling a detached hard disk unit
If transporting or storing the hard disk unit in a detached
condition, be sure to first of all pack it using the specified
materials.
In addition, choose a method of transportation that minimizes
vibration.
Notes on installation locations
Avoid subjecting the hard disk to sudden impact or vibration.
In addition, avoid using it in dusty locations or near magnetic
objects. The following precautions should be observed in
order to prevent the loss of recorded data:
zDo not subject the external storage unit to sudden impact.
zDo not use the external storage unit on a vibrating or
unstable surface.
zDo not disconnect the power plug from the wall outlet
during recording or playback.
zDo not use the external storage unit in areas with extreme
temperature changes (i.e., 10ºC or more per hour).
zCondensation may occur if the external storage unit is
moved to an area with a significantly different temperature
or high humidity. If the external storage unit is used with
condensation inside, operating problems may occur.
zDo not install the external storage unit inside motor
vehicles, trains, or other areas with constant vibration.
zThe external storage unit has ventilation holes on its left,
rear, and bottom panels. Ensure that these holes are not
blocked after installation.
zDo not use the external storage unit in a bookshelf, box, or
any other area with poor ventilation.
zThis external storage unit is designed for use in a
horizontal orientation, and vertical setup may result in
malfunction.
zWhen installing the unit on a rack, ensure that a gap of at
least 5 cm at the sides and 1 cm at the top and bottom is
provided.
The hard disk and cooling fan are
consumable components.
If used in an ambient temperature of 25ºC, the hard disk
should generally be replaced after two years, and the cooling
fan after three years. These figures are intended as a general
guideline only and should not be taken as a guarantee of
component performance.
The FAN error indicator flashes if a problem occurs with the
fan.
Important recordings
Always perform test recording in advance to confirm whether
the playback of the external storage unit is normal.
Note that Sanyo accepts no responsibility for losses occurring
as a result of recording or playback problems caused by
malfunction of this external storage unit or any connected
devices.
As a precaution against malfunction or accidents, it is
advisable to periodically back up important recordings or to
perform mirroring.
Protection of the hard disk
The hard disk is checked automatically when the power is
turned on. If an abnormality is detected, the ERROR indicator
of the digital video recorder begins to flash. To initialize the
hard disk or to save images stored on it, contact the dealer
from whom this external storage unit was purchased.
Supported hard disks
Use hard disks recommended by Sanyo. Please contact the
dealer for details.
e00_l8hcb_us_7.book Page 3 Monday, March 7, 2005 3:54 PM

4English
INTRODUCTION SETTINGS OTHEROPERATION
2NAMES AND FUNCTIONS OF PARTS
Front panel
1. POWER indicator
Lights up when the power is on.
2. Fan abnormality indicator
Flashes if the fan begins to malfunction.
Rear panel
1. Fan
2. External storage unit terminal
Connection point for the external storage unit cable when
connecting the external storage unit to the digital video
recorder.
3. AC power socket
Insert the supplied power cord securely into this socket.
4. Cord tie
Secure the power card to the holder using the cord tie
(accessory) as shown in the illustration.
POWER FAN
12
DIGITAL VIDEO RECORDER
AC IN~
2
1
3
4
e04_l8hcb_us_7.fm Page 4 Tuesday, March 8, 2005 4:29 PM

English 5
1
HARD DISK INSTALLATION AND CONNNECTION TO DVR
Use the following procedures to install the hard disk in the
external storage unit.
zThe external storage unit must be off before commencing
the following procedures.
zUse only S-ATA hard disks from Sanyo. Operation by other
hard disks is not guaranteed. Contact the dealer for details.
1Remove the four screws (two on each
side) securing the cover, and remove
the cover.
2Remove the hard disk bay.
Remove the four screws (two on each side), and remove the
hard disk bay on top of the installation block.
zThe position of the hard disk differs according to the
number of units being installed. Numbers are marked near
the hard disk bay. Follow the chart below.
zThe positions are shown below.
zTo install the hard disk in positions 3and 4, remove the
installation block, and then the hard disk bay.
[Removing the installation block]
(1) Remove the nine screws.
(2) Slide the center of the front part toward the back panel
and remove the hard disk installation block.
For instructions on how to attach the installation block, see
[Attaching the installation block]. (JP.8)
3Attach the hard disk bay removed in
step 2 to the hard disk.
Secure the screws in the order (1-4) marked on the hard disk
bay.
* Tightening torque: 0.5 N•m - 0.6 N•m (5 - 6 kgf•cm)
Do not use a torque screwdriver.
Installing the hard disk
No. of units Position No. of units Position
1131, 2, 3
21, 24 1, 2, 3, 4
Screws
Hard disk bay
Screws
Front panel side
1
3
2
4
Screws
Screws
Position
markings
(1- 4)
Screws
Ensure the fittings exceed 10 mm in height.
If not, repair them.
Fitting
“1”
“3”
“2”
“4”
Bring the hard disk
connector to the side
with “CN.”
e00_l8hcb_us_7.book Page 5 Monday, March 7, 2005 3:54 PM

6English
HARD DISK INSTALLATION AND CONNNECTION TO DVR1
INTRODUCTION OTHER OTHEROPERATION
4Attach the hard disk bay with the hard
disk attached to it in step 3 to the
external storage unit.
Secure the screws in the order (1-4) marked on the hard disk
bay.
* Tightening torque: 0.6 N•m - 0.7 N•m (6 - 7 kgf•cm)
5Connect the cable to the hard disk.
(1) Select the cable with the same number as the hard disk
bay with the hard disk attached to it, and remove the
securing clamp.
* The cable number is printed near each cable.
* Use a screwdriver to remove the clamps.
(2) To prevent the cables coming in contact with the fan,
secure them with the clamps. The securing procedure
differs according to the cable number.
[Arranging the cables]
Connecting the cable to the first hard disk (1)
Connecting the cable to the second hard disk (2)
Connecting the cable to the third hard disk (3)
“2”
“1”
“4”
“3”
Match the
markings.
“2”
“4”
“3”
“1”
Hard disk
connector for
the 4th hard
disk
Hard disk
connector for the
2nd hard disk
Hard disk
connector for
the 1st hard
disk
Hard disk
connector for the
3rd hard disk
Fan Fan
1and 4
2and 3
4
2 1
3
4
2 1
3
4 3
e00_l8hcb_us_7.book Page 6 Monday, March 7, 2005 3:54 PM

HARD DISK INSTALLATION AND CONNNECTION TO DVR1
English 7
Connecting the cable to the fourth hard disk (4)
zArrange the cables so that they do not come in contact with
the fan.
(3) Connect the cable to the S-ATA terminal on the hard disk.
zConfirm the position of the rib before inserting the
connector.
6Connect the power cord.
(1) Select the power cord with the same number as the hard
disk in step 5, and remove the securing clamp with a
screwdriver.
* See the following diagram for cord numbers.
(2) To prevent the cords coming in contact with the fan,
secure them at two points with the clamps.
(3) Connect the cord to the hard disk power connector.
[Arranging the cables]
The first hard disk is installed in position 1.
The second hard disk is installed in position 2.
The third hard disk is installed in position 3.
The fourth hard disk is installed in position 4.
4 3
S-ATA terminal
Rib
3: Cord for the
third hard disk
2: Cord for the
second hard disk
4: Cord for the
fourth hard disk
1: Cord for the
first hard disk
Power connector
Rib
4
2 1
3
4
2 1
3
4 3
2 1
4 3
2 1
e00_l8hcb_us_7.book Page 7 Monday, March 7, 2005 3:54 PM

8English
HARD DISK INSTALLATION AND CONNNECTION TO DVR1
INTRODUCTION OTHER OTHEROPERATION
zIf expanding the number of hard disks to three or more,
install the first one to 3and the second one to 4,
reattach the installation block that was removed in step 2,
and then install the last two hard disks to 1and 2.
[Attaching the installation block]
Insert projection A into hole B by sliding the center of the front
part. Align the positioning points on both sides two at a time
and secure the nine points with screws.
* Insert projection A properly or else the hard disk installation
block cannot be attached correctly.
* Tightening torque: 0.6 N•m - 0.7 N•m (6 - 7 kgf•cm)
7After installing the hard disk, follow the
procedure shown in step 1 in reverse
order to close the cover.
Use the following procedures to connect the DVR to the
external storage unit.
1Use the four external storage unit
cables included with this product to
connect the external storage unit to the
DVR.
zEven if there are only one to three hard disks, connect all
four external storage unit cables.
zMake sure to connect correspondingly numbered terminals
on the external storage unit and DVR.
2Use the supplied bracket to secure the
external storage unit cables.
zUse another supplied bracket to secure the cables at the
DVR end as well.
Positioning points
B
Positioning points
A
Connecting the DVR
1234
External
storage unit
connection
terminals
External
storage
unit
DVR
Rib
External
storage unit
cable
Rib
Bracket
(supplied)
Screws
(supplied)
e00_l8hcb_us_7.book Page 8 Monday, March 7, 2005 3:54 PM

HARD DISK INSTALLATION AND CONNNECTION TO DVR1
English 9
3Attach a supplied core clamp to the
external storage unit cable.
: Core clamp (round)
Attach near each connector.
: Cord tie
Secure the core clamp with a cord tie so that it does
not slip.
: Core clamp (square)
Attach around bundle of external storage unit cables
at the mid point between the external storage unit and
the DVR.
zAttach the core clamps (round) to the cables at the DVR
end in the same way and secure with cord ties.
1When you have finished making all the
connections on the DVR and external
storage unit, make sure the voltage is
120 - 240V AC and then insert the power
plug of the external storage unit into the
wall outlet.
2Turn on the DVR.
zAs the external storage unit takes time to recognize the
hard disks, turn on the external storage unit before turning
on the DVR.
Turning on the power
120 - 240V AC
(50/60 Hz)
e05_l8hcb_us_7.fm Page 9 Tuesday, March 22, 2005 10:47 AM

10 English
INTRODUCTION OTHER OTHEROPERATION
2INITIALIZING THE HARD DISK
Use the setting screen on the digital video recorder to initialize
the hard disk.
The capacity of the built-in hard disks is displayed as DISK 1
and DISK 2. The hard disk capacity for the external storage
unit is displayed as EX-DISK 1 to 4.
zInitialization must always be performed after expanding the
hard disk.
zAll important recordings should be copied to CompactFlash
cards or other storage media before expanding the hard
disk.
1Turn on the DVR to display the <HDD
SET> screen.
To initialize a recently expanded hard disk, select “NEW DISK
INITIALIZE”.
To initialize all connected hard disks, select “ALL DISK
INITIALIZE”.
zMirroring commences if “MIRRORING” is set “ON.”
2Then turn the shuttle dial clockwise.
The <WARNING> screen is displayed. “NO” is flashing.
3Turn the jog dial to select “YES” and
then turn the shuttle dial clockwise.
The “HDD INITIALIZING !” screen is displayed and the hard
disk is initialized.
When initialization is complete, the live image is displayed.
1Press the [MENU] button.
The MENU indicator lights up and the <MAIN MENU> is
displayed.
2Turn the jog dial to select “3.GENERAL
SET” and then turn the shuttle dial
clockwise.
The <GENERAL SET> screen is displayed.
3Turn the jog dial to select “5.HDD SET”
and then turn the shuttle dial clockwise.
The <HDD SET> screen is displayed.
To initialize a recently expanded hard disk, select “NEW DISK
INITIALIZE”.
To initialize all connected hard disks, select “ALL DISK
INITIALIZE”.
Initializing the hard disk
Initializing the hard disk at power on
<HDD SET>
DISK 1 : 160GB NEW DISK 2 : 160GB NEW
EX-DISK 1 : 160GB NEW EX-DISK 2 : 160GB NEW
EX-DISK 3 : 160GB NEW EX-DISK 4 : 160GB NEW
NEW DISK INITIALIZE ->
PLEASE INITIALIZE THE NEW DISK
MIRRORING : OFF
PLAYBACK DRIVE : ***
CAUTION : RECORDING SPEED WILL BE
LIMITED BY MIRRORING !
ALL DISK INITIALIZE ->
“NEW” is displayed to
the right of the hard
disk capacity for new
hard disks.
<WARNING>
THIS CHANGE WILL INITIALIZE THE DISK.
ALL RECORDING WILL BE ERASED.
ARE YOU SURE ?
NO
CHANGE:JOG SET:SHUTTLE
Initializing the hard disk in use
MENU
<HDD SET>
DISK 1 : 160GB DISK 2 : 160GB
EX-DISK 1 : 160GB EX-DISK 2 : 160GB
EX-DISK 3 : 160GB EX-DISK 4 : 160GB
NEW DISK INITIALIZE ->
PLEASE INITIALIZE THE NEW DISK
MIRRORING : OFF
PLAYBACK DRIVE : ***
CAUTION : RECORDING SPEED WILL BE
LIMITED BY MIRRORING !
ALL DISK INITIALIZE ->
“NEW” is displayed to
the right of the hard
disk capacity for new
hard disks.
e00_l8hcb_us_7.book Page 10 Monday, March 7, 2005 3:54 PM

INITIALIZING THE HARD DISK2
English 11
4Then turn the shuttle dial clockwise.
The <WARNING> screen is displayed. “NO” is flashing.
5Turn the jog dial to select “YES” and
then turn the shuttle dial clockwise.
The “HDD INITIALIZING !” screen is displayed and the hard
disk is initialized.
When initialization is completed, the display returns to the
<HDD SET> screen.
6Press the [EXIT/OSD] button.
The setting is completed and the display returns to the normal
screen.
zMirroring commences if “MIRRORING” is set “ON” in step
3. Mirroring is performed in the following combinations:
• EX-DISK 1 and EX-DISK 2
• EX-DISK 3 and EX-DISK 4
<WARNING>
THIS CHANGE WILL INITIALIZE THE DISK.
ALL RECORDING WILL BE ERASED.
ARE YOU SURE ?
NO
CHANGE:JOG SET:SHUTTLE
HDD INITIALIZING !
EXIT/OSD
EXIT/OSD
e00_l8hcb_us_7.book Page 11 Monday, March 7, 2005 3:54 PM

12 English
INTRODUCTION OTHEROPERATION
APPENDIX
Note that product appearance and specifications are subject to change without prior notice.
Units: mm
Specifications
Product name External storage unit
Product number VA-EXH
EMC standard FCC, DOC
Safety standard UL, CSA
Mirroring Available
Hard disk bay 3.5-inch (x4)
Terminal 7-pin external storage unit connection terminal (x4)
Power supply voltage 120 - 240V AC, 50/60 Hz
Current consumption 680 mA
Allowable operating temperature 5 - 40ºC
Allowable operating humidity 10 - 80%
Dimensions 420 (W) x 86 (H) x 344 (D) mm (Not including protruding areas or rubber pads)
Weight 6 kg without hard disk, 6.6 kg with a HDD, 7.2 kg with 2 HDDs
Accessories
Power cord (x1), External storage unit cable (x4), Cable securing bracket (x2),
Bracket setscrew (x8), Cord tie (x9), Round core clamp (x8), Square core clamp (x1), Instruction
Manual (x1)
Dimensions
96
420 344
10
e06_l8hcb_us_7.fm Page 12 Tuesday, March 22, 2005 10:48 AM

OBLIGATIONS
In order to obtain warranty service, the product must be delivered to and picked up from an Authorized Sanyo Service Center at the user’s expense,
unless specifically stated otherwise in this warranty. The names and addresses of Authorized Sanyo Service Centers may be obtained by calling
the toll-free number listed below.
THIS WARRANTY IS VALID ONLY ON SANYO PRODUCTS PURCHASED OR RENTED IN THE UNITED STATES OF AMERICA, EXCLUDING
ALL U.S. TERRITORIES AND PROTECTORATES. THIS WARRANTY APPLIES ONLY TO THE ORIGINAL RETAIL PURCHASER OR END-
USER. THE ORIGINAL DATED BILL OF SALE, SALES SLIP OR RENTAL AGREEMENT MUST BE SUBMITTED TO THE AUTHORIZED SANYO
SERVICE CENTER AT THE TIME WARRANTY SERVICE IS REQUESTED.
Subject to the OBLIGATIONS above and EXCLUSIONS below, SANYO Fisher Company warrants this SANYO product against defects in
materials and workmanship for the periods specified below. SFC will repair or replace (at its option) the product and any of its parts which fail to
conform to this warranty. The warranty period commences on the date the product was first purchased or rented at retail.
EXCLUSIONS
This warranty does not cover (A) the adjustment of customer-operated controls as explained in the appropriate model’s instruction manual, or (B)
the repair of any product whose serial number has been altered, defaced or removed.
This warranty shall not apply to the cabinet or cosmetic parts, batteries or routine maintenance.
This warranty does not apply to uncrating, setup, installation, removal of the product for repair or reinstallation of the product after repair.
This warranty does not apply to repairs or replacements necessitated by any cause beyond the control of SFC including, but not limited to, any
malfunction, defect or failure caused by or resulting from the use of any products operated outside of the operating temperature ranges stated in
our product specification, (i.e., between 41 and 104 degrees Fahrenheit or between 5 and 40 degrees Celsius), unauthorized service or parts,
improper maintenance, operation contrary to furnished instructions, shipping or transit accidents, modification or repair by the user, abuse, misuse,
neglect, accident, incorrect power line voltage, fire, flood or other Acts of God, or normal wear and tear.
SFC does not guarantee that recorded pictures or information will be maintained on any product sent in for repair or replacement.
The foregoing is in lieu of all other expressed warranties and SFC does not assume or authorize any party to assume for it any other obligation or
liability.
SFC DISCLAIMS ALL OTHER WARRANTIES EXPRESS OR IMPLIED, WITH REGARD TO THIS PRODUCT (INCLUDING THE WARRANTIES
OF MERCHANTABILITY AND FITNESS). IN NO EVENT SHALL SFC BE LIABLE FOR ANY SPECIAL, INCIDENTAL OR CONSEQUENTIAL
DAMAGES ARISING FROM THE OWNERSHIP OR USE OF THIS PRODUCT OR FOR ANY DELAY IN THE PERFORMANCE OF ITS
OBLIGATIONS UNDER THIS WARRANTY DUE TO CAUSES BEYOND ITS CONTROL. SFC’S LIABILITY FOR ANY AND ALL LOSSES AND
DAMAGES RESULTING FROM ANY CAUSE WHATSOEVER, ARISING OUT OF OR IN CONNECTION WITH THE SALE, USE OR
OWNERSHIP OF THIS PRODUCT INCLUDING WARRANTOR’S NEGLIGENCE, ALLEGED DAMAGED OR DEFECTIIVE GOODS, WHETHER
SUCH DEFECTS ARE DISCOVERABLE OR LATENT, SHALL IN NO EVENT EXCEED THE PURCHASE PRICE OF THE PRODUCT.
ATTENTION
For your protection in the event of theft or loss of this product, please fill in the information below for you own personal records.
Model No. _________________________________________ Serial No. _________________________________________
__________________________________________________ (Located on back or bottom side of unit.)
Date of Purchase ___________________________________ Purchase Price _____________________________________
Where Purchased ___________________________________________________________________________________________________
SANYO INDUSTRIAL
VA-EXH EXTERNAL STORAGE UNIT WARRANTY
LABOR PARTS
3 YEARS 3 YEARS
For product operation, authorized service center referral, service assistance or problem resolution, call
CUSTOMER INFORMATION 1-800-421-5013
Weekdays 8:30 AM – 5:00 PM Pacific Time
For accessories and/or parts, call
PARTS ORDER INFORMATION 1-800-726-9662
Weekdays 8:30 AM – 5:00 PM Pacific Time
e00_l8hcb_us_7.book Page 13 Monday, March 7, 2005 3:54 PM

Unité de stockage externe
Manuel D’instructions
Français
F
VA-EXH
f00_l8hcb_us_7.book Page 1 Monday, March 7, 2005 3:18 PM

Français 1
INTRODUCTION
Caractéristiques principales
Connecte jusqu’à quatre disques durs S-ATA
3,5 pouces
Accessoires
Vérifiez que vous disposez des éléments illustrés ci-dessous.
Câble d’alimentation
Câble pour unité de
stockage externe
(x4)
Blocage central (rond)
(x8)
Destiné aux câbles pour
unité de stockage externe
Blocage central (carré)
(x1)
Destiné aux câbles pour
unité de stockage externe
Collier
(x9)
Support de fixation
du câble (x2)
Vis (x8)
Manuel d’instructions
Copyright
zCe manuel est protégé par des droits d’auteur par Sanyo
Electric Co., Ltd.
zLes noms de marques et de produits utilisés dans ce
manuel sont des marques commerciales ou des marques
déposées de leurs propriétaires respectifs.
À l’exception d’un usage personnel, les lois relatives aux
droits d’auteur interdisent l’utilisation d’images enregistrées
protégées par des droits d’auteur sans l’autorisation du
détenteur de ces droits.
Table des matières
1 AVANT D’UTILISER CET APPAREIL ........... 3
Remarques sur la manipulation du disque dur
interne ............................................................. 3
Remarques sur les emplacements
d’installation .................................................... 3
Le disque dur et le ventilateur de
refroidissement sont des consommables........ 3
Enregistrements importants ............................ 3
Protection du disque dur ................................. 3
Disques durs pris en charge ........................... 3
2 NOMS ET FONCTIONS DES ÉLÉMENTS..... 4
Panneau avant................................................ 4
Panneau arrière .............................................. 4
1 INSTALLATION DU DISQUE DUR ET
CONNEXION À L’ENREGISTREUR VIDÉO
NUMÉRIQUE .................................................. 5
Installation du disque dur ................................ 5
Connexion de l’enregistreur vidéo
numérique ....................................................... 8
Mise sous tension ........................................... 9
2 INITIALISATION DU DISQUE DUR ............. 10
Initialisation du disque dur............................. 10
ANNEXE ....................................................... 12
Spécifications................................................ 12
Dimensions ................................................... 12
INTRODUCTION
FONCTIONNEMENT
AUTRE
f00_l8hcb_us_7.book Page 1 Monday, March 7, 2005 3:18 PM

2Français
PRÉCAUTIONS
ATTENTION : Des changements ou des modifications qui
n’ont pas été expressément approuvées par le fabricant
peuvent annuler l’autorisation conférée à l’utilisateur de
manipuler cet équipement.
Cet équipement a été testé et a satisfait aux limites définies
pour un appareil numérique de classe B, conformément à
la partie 15 des normes FCC.
Ces limites sont conçues pour offrir une protection
raisonnable contre les interférences nuisibles dans une
installation résidentielle. Cet équipement génère, utilise et
peut émettre de l’énergie sous forme de fréquence radio et,
s’il n’est pas installé et utilisé conformément aux
instructions, peut provoquer des interférences nuisibles
aux communications radio. Il n’est toutefois pas garanti que
des interférences ne se produiront pas dans une
installation particulière.
Si cet équipement provoque des interférences nuisibles à la
réception de la radio ou de la télévision, ce qui peut être
déterminé en allumant et en éteignant l’équipement,
l’utilisateur est invité à essayer de corriger cette interférence
en appliquant une ou plusieurs des mesures suivantes :
zRéorienter ou repositionner l’antenne de réception.
zAugmenter la distance entre l’équipement et le
récepteur.
zConnecter l’équipement à une prise de courant d’un
circuit différent de celui auquel le récepteur est
connecté.
zConsulter le vendeur ou un technicien radio/TV
expérimenté pour obtenir de l’aide.
Pour les clients situés au Canada
Emplacement
Pour que cette unité fonctionne en toute sécurité et délivre
des performances satisfaisantes, tenez compte des
contraintes suivantes pour le choix de l’emplacement où
vous allez l’installer :
zProtégez-le de la lumière directe du soleil et tenez-le à
l’écart des sources de chaleur intense.
zÉvitez les endroits poussiéreux ou humides.
zÉvitez les endroits où la ventilation est insuffisante pour
dissiper correctement la chaleur. Ne bouchez pas les
ouvertures destinées à la ventilation et qui se trouvent
sur le dessus et à l’arrière de l’unité. Ne placez pas
l’unité sur un tapis car celui-ci peut boucher les
ouvertures destinées à la ventilation.
zInstallez l’unité exclusivement dans une position
horizontale.
zÉvitez les endroits soumis à des vibrations importantes.
zÉvitez de déplacer l’unité entre des endroits froids et
chauds.
zNe placez pas l’unité directement au dessus d’un écran
TV, parce que cela peut provoquer des problèmes de
lecture ou d’enregistrement.
Prévention des chocs électriques et des
incendies
zNe manipulez pas le câble d’alimentation avec les
mains humides.
zNe tirez pas sur le câble d’alimentation quand vous le
déconnectez d’une prise de courant murale. Saisissez-
le par la prise.
zSi un corps liquide est répandu accidentellement sur
l’unité, déconnectez immédiatement le câble
d’alimentation et faites vérifier l’unité par un centre de
dépannage agréé par le constructeur.
zNe placez rien directement au-dessus de cette unité.
DÉPANNAGE
Cette unité est un appareil de précision qui, s’il est traité
avec soin, donnera satisfaction pendant de nombreuses
années.
Cependant, en cas de problème, il est recommandé au
possesseur de cet appareil de ne pas essayer d’effectuer
des réparations ni d’ouvrir le boîtier.
Les dépannages doivent toujours être effectués par votre
revendeur ou par un centre de services agréé Sanyo.
ATTENTION
RISQUE DE CHOC ÉLECTRIQUE
NE PAS OUVRIR
ATTENTION : POUR RÉDUIRE LE RISQUE DE CHOC
ÉLECTRIQUE, N’ENLEVEZ PAS LE CAPOT (NI LA FACE ARRIÈRE).
IL N’Y A PAS D’ÉLÉMENTS RÉPARABLES PAR L’UTILISATEUR À L’INTÉRIEUR.
ADRESSEZ-VOUS POUR LES DÉPANNAGES À DU PERSONNEL QUALIFIÉ.
AVERTISSEMENT : Pour réduire les risques d’incendie
ou de choc électrique, n’exposez pas cet équipement à la
pluie ou à l’humidité.
L’éclair de lumière avec le symbole de flèche dans un
triangle équilatéral est destiné à avertir l’utilisateur de la
présence de “courant électrique dangereux” sans
isolation à l’intérieur du produit, et qui peut être d’une
puissance suffisante pour constituer un risque de choc
électrique pour des personnes humaines.
Le point d’exclamation dans un triangle équilatéral est
destiné à avertir l’utilisateur de l’existence d’instructions
importantes pour la manipulation et la maintenance
(dépannage) dans les documents accompagnant le produit.
Cet appareil numérique de classe B est conforme à la
norme canadienne ICES-003.
ATTENTION
Danger d’explosion si la pile est remplacée de façon
incorrecte.
Remplacez celle-ci seulement par une pile identique ou
d’un type équivalent à celui recommandé par le fabricant.
Retirez les piles usagées, conformément aux instructions
du fabricant.
Déclaration de conformité
Numéro du modèle : VA-EXH
Nom de la marque : SANYO
Partie responsable : SANYO FISHER COMPANY
Adresse : 21605 Plummer Street,
Chatsworth, Californie 91311,
États-Unis
Numéro de téléphone : (818) 998-7322
z
Cet appareil est conforme à la partie 15 des normes FCC.
Le fonctionnement est soumis aux deux conditions
suivantes :
(1) cet appareil ne peut pas produire d’interférences
nuisibles, et
(2) cet appareil doit tolérer toute interférence reçue, y
compris des interférences qui peuvent provoquer
un fonctionnement non souhaité.
f00_l8hcb_us_7.book Page 2 Monday, March 7, 2005 3:18 PM

Français 3
1AVANT D’UTILISER CET APPAREIL
Remarques sur la manipulation du
disque dur interne
Respectez scrupuleusement les instructions suivantes lors de
l’utilisation, de la configuration ou de la maintenance de l’unité
de stockage externe.
Ne soumettez pas l’unité de stockage externe
à des chocs ou à des vibrations.
Si l’unité de stockage externe est soumise à des chocs ou à
des vibrations, cela peut endommager le disque dur ou
provoquer l’altération des données stockées sur celui-ci.
zNe déplacez pas l’unité de stockage externe lorsqu’elle est
sous tension. Assurez-vous toujours que l’unité de
stockage externe est bien hors tension avant de l’enlever
ou de la poser sur son support.
zLors du transport de l’unité de stockage externe, emballez-
la soigneusement avec les matériaux d’emballage
spécifiés. Choisissez également un moyen de transport
dont les vibrations sont limitées.
zLorsque vous posez l’unité de stockage externe sur le sol
ou une autre surface similaire, fixez les patins spécifiés sur
sa base et posez-la délicatement sur le sol.
Ne déplacez pas l’unité de stockage externe
pendant les 30 secondes qui suivent sa mise
hors tension.
Après la mise hors tension, le disque qui se trouve dans le
disque dur continue de tourner pendant un bref moment, à
cause de la force d’inertie, et les têtes se trouvent dans un
état instable.
Pendant cette période, l’unité de stockage externe est encore
plus sensible aux chocs et aux vibrations que lorsqu’elle est
sous tension. Vérifiez que l’unité de stockage externe n’est
pas soumise à des vibrations, même légères, pendant les 30
secondes suivant sa mise hors tension.
N’utilisez pas l’unité de stockage externe
lorsque de la condensation s’est formée.
Si vous utilisez l’unité de stockage externe dans ce type de
condition, elle peut être irrémédiablement endommagée.
Si la température autour de l’unité de stockage externe
change brutalement, attendez qu’elle se stabilise avant de
l’utiliser.
Remarques sur le remplacement du disque dur
Respectez bien la procédure appropriée lors du
remplacement du disque dur.
zLes disques durs qui ont été retirés de leur emballage
peuvent ne pas fonctionner correctement s’ils sont soumis
à des chocs ou à des vibrations. Il est recommandé de
placer le disque dur une fois déballé sur une surface molle
et plane, la face de la carte du circuit imprimé tournée vers
le haut.
zPrenez garde de ne pas soumettre le disque dur à des
chocs ou à des vibrations lorsque vous desserrez et serrez
les vis pendant la procédure de remplacement du disque
dur.
Serrez soigneusement toutes les vis, de façon à ce
qu’elles ne se desserrent pas.
zLe disque dur étant sensible à l’électricité statique, il est
recommandé de prendre les précautions appropriées pour
éviter l’accumulation de charges électriques.
Manipulation d’une unité de disque dur retirée
Si vous devez transporter ou stocker une unité de disque dur
retirée, pensez à l’emballer préalablement dans l’emballage
spécifié.
Choisissez également un moyen de transport avec lequel les
vibrations sont limitées.
Remarques sur les emplacements
d’installation
Évitez de soumettre le disque dur à un choc ou une vibration.
Évitez également de l’utiliser dans des endroits poussiéreux ou
à proximité d’objets magnétiques. Respectez les précautions
suivantes pour éviter la perte des données enregistrées :
zNe soumettez pas l’unité de stockage externe à des chocs.
zN’utilisez pas l’unité de stockage externe sur une surface
vibrante ou instable.
zNe déconnectez pas la prise d’alimentation de la prise
murale pendant l’enregistrement ou la lecture.
zN’utilisez pas l’unité de stockage externe dans des zones
où des changements de température extrêmes se
produisent (10°C ou plus par heure).
zDe la condensation peut se produire si l’unité de stockage
externe est placée dans une zone présentant une
température très différente ou un degré d’humidité élevé.
Si l’unité de stockage externe est utilisée avec de la
condensation intérieure, des problèmes de fonctionnement
peuvent apparaître.
zN’installez pas l’unité de stockage externe dans des zones
où les vibrations sont constantes, comme des véhicules
motorisés ou des trains.
zL’unité de stockage externe présente des ouvertures de
ventilation sur ses panneaux gauche, arrière et inférieur.
Vérifiez que ces ouvertures ne sont pas obstruées après
l’installation.
z
N’utilisez pas l’unité de stockage externe dans des zones où
la ventilation est faible, comme une étagère ou une armoire.
zCette unité de stockage externe est conçue pour être
utilisée à l’horizontale. Une position verticale peut entraîner
un dysfonctionnement.
zLorsque vous installez l’unité dans un rack, laissez un
espacement d’au moins 5 cm sur les côtés et 1 cm au-
dessus et en-dessous.
Le disque dur et le ventilateur de
refroidissement sont des consommables.
Utilisés à une température ambiante de 25ºC, le disque dur
doit généralement être remplacé après deux ans et le
ventilateur de refroidissement après trois ans. Ces chiffres ne
sont qu’une estimation générale et ne présentent pas une
garantie de performance du composant.
L’indicateur d’erreur VENTILATEUR clignote lorsqu’un
problème se produit avec le ventilateur.
Enregistrements importants
Effectuez toujours un enregistrement de test préalable pour
vérifier que la fonction de lecture de l’unité de stockage
externe fonctionne correctement.
Notez que Sanyo décline toute responsabilité pour des pertes
dues à des problèmes d’enregistrement ou de lecture
provenant de dysfonctionnements de cette unité de stockage
externe ou de tout appareil qui y est connecté.
Pour éviter tout dysfonctionnement ou accident, il est
conseillé d’effectuer périodiquement des sauvegardes des
enregistrements importants ou une copie miroir.
Protection du disque dur
Le disque dur est vérifié automatiquement à la mise sous
tension. Si une anomalie est détectée, l’indicateur ERROR de
l’enregistreur vidéo numérique commence à clignoter. Pour
initialiser le disque dur ou enregistrer des images stockées
sur le disque, contactez le revendeur auprès duquel vous
avez acheté cette unité de stockage externe.
Disques durs pris en charge
Utilisez les disques durs recommandés par Sanyo. Contactez
votre distributeur pour plus d’informations.
f00_l8hcb_us_7.book Page 3 Monday, March 7, 2005 3:18 PM

4Français
INTRODUCTION PARAMÈTRES AUTREOPÉRATION
2NOMS ET FONCTIONS DES ÉLÉMENTS
Panneau avant
1. Indicateur POWER
S’allume à la mise sous tension.
2. Indicateur d’anomalie du ventilateur
Clignote si le ventilateur commence à fonctionner
incorrectement.
Panneau arrière
1. Ventilateur
2. Prise de l’unité de stockage externe
Point de connexion du câble de l’unité de stockage externe en
cas de connexion de l’unité de stockage externe à
l’enregistreur vidéo numérique.
3. Socket d’alimentation CA
Insérez soigneusement le câble d’alimentation fourni dans ce
socket.
4. Collier
Attachez le câble d’alimentation au dispositif de fixation à
l’aide du collier pour câble d’alimentation (accessoire), tel
qu’illustré.
POWER FAN
12
DIGITAL VIDEO RECORDER
AC IN~
2
1
3
4
f04_l8hcb_us_7.fm Page 4 Tuesday, March 8, 2005 4:24 PM

Français 5
1
INSTALLATION DU DISQUE DUR ET CONNEXION À L’ENREGISTREUR VIDÉO NUMÉRIQUE
Utilisez les procédures suivantes pour installer le disque dur
dans l’unité de stockage externe.
zL’unité de stockage externe doit être éteinte avant de
commencer les procédures suivantes.
zUtilisez exclusivement des disques durs S-ATA de marque
Sanyo. Le fonctionnement d’autres disques durs n’est pas
garanti. Contactez votre distributeur pour plus
d’informations.
1
Retirez les quatre vis (deux de chaque
côté) fixant le panneau, et retirez celui-ci.
2Retirez le compartiment du disque dur.
Retirez les quatre vis (deux de chaque côté), et extrayez le
compartiment du disque dur au-dessus du bloc d’installation.
zLa position du disque dur varie selon le nombre d’unités
installées. Les numéros sont marqués près du
compartiment du disque dur. Suivez le tableau ci-dessous.
zLes positions sont présentées ci-dessous.
zPour installer le disque dur aux positions 3et 4, retirez
le bloc d’installation, puis le compartiment du disque dur.
[Retrait du bloc d’installation]
(1) Retirez les neuf vis.
(2) Faites glisser le centre de la partie avant vers le
panneau arrière et retirez le bloc d’installation du
disque dur.
Pour des instructions sur la fixation du bloc d’installation,
reportez-vous au document [Fixation du bloc d’installation].
(JP.8)
3Fixez le compartiment du disque dur
retiré à l’étape 2 au disque dur.
Fixez les vis dans l’ordre (1-4) marqué sur le compartiment du
disque dur.
* Couple de serrage : 0,5 N•m - 0,6 N•m (5 - 6 kgf•cm)
N’utilisez pas de tournevis à cliquet.
Installation du disque dur
No. d’unités Position No. d’unités Position
1131, 2, 3
21, 24 1, 2, 3, 4
Vis
Compartiment du
disque dur
Vis
Panneau latéral avant
1
3
2
4
Vis Vis
Repères
(1- 4)
Vis
Vérifiez que les pièces de fixation dépassent
10 mm de hauteur.
Si ce n’est pas le cas, réparez-les.
Pièce de fixation
“1”
“3”
“2”
“4”
Positionnez le
connecteur du disque
dur sur le côté
comportant “CN.”
f00_l8hcb_us_7.book Page 5 Monday, March 7, 2005 3:18 PM
Other manuals for VA-EXH
1
Table of contents
Languages:
Other Sanyo Storage manuals
Popular Storage manuals by other brands

Apacer Technology
Apacer Technology AS2280Q4 quick guide

Solarico
Solarico UniQube Installation and operation manual

Seagate
Seagate ironwolf PRO ST8000NE0021 product manual

Buffalo
Buffalo HJ328 Assembly instructions

Copernicus
Copernicus Tech Tub 2 FTT2032 Assembly guide

Hitachi
Hitachi HUS VM Hardware user's guide