Sanyo C21LB25S User manual

SERVICE MANUAL Colour Television
Product Code: 1 113 549 04 (C21LB25S)
1 113 550 04 (C29LK35)
Original Version
Chassis Series: LA4-A
C4BE/C4BES/C4CE
FILE NO.
Model No. C21LB25S
C29LK35
Service Ref. No. C21LB25S-00
C21LB25S-01
C29LK35-00
(Argentina)
Give complete “SERVICE REF. NO.” for parts
order or servicing. It is shown on the rating
plate at the cabinet back of the unit.
This T.V. receiver will not work properly in
foreign countries where the television trans-
mission system and power source differ from
the design specifications.Refer to the specifi-
cation table.
VIDEO
MODE AUDIO
MODE
POWER
0
7
1
4
8
5
23
6
9
▲CH▼
+VOL
RECALL
MENU IMAGE
SLEEP
DISPLAY
MUTE
FXMR
VOL-
Specifications
Power Source . . . . . . . . .AC110V-240V, 50Hz / 60Hz
Receiving System . . . . . .PAL (M/M, N/N), NTSC (M/M)
Channel Coverage
Antenna mode VHF: CH02-CH13, UHF: CH14-CH69
CATV mode VHF band: CH01-CH13, Mid band: CH14-CH22
Super band: CH23-CH36, Hyper band: CH37-CH64
Ultra band: CH65-CH94 and CH100-CH125
Low mid band: CH95-CH99
Video IF . . . . . . . . . . . . .45.75MHz
Aerial Input Impedance . .75Ω
Ext.Terminals
Video inputs: Phono jack ✕2 (1Vp - p, 75Ω)
Audio inputs: Phono jack (R/L) ✕2 (436mVrms, more than 40KΩ)
Headphone Jack: Mini stereo jack ✕1
Sound Output (RMS) . . . .3W + 3W
Speakers . . . . . . . . . . .5cm x 9cm x 2
Dimensions . . . . . . . . .C21LB25S: 606(W) ✕479(H) ✕483(D)mm
C29LK35: 656(W) ✕600(H) ✕496(D)mm
Weight . . . . . . . . . . . . .C21LB25S: approx. 21.0 Kg
C29LK35: approx. 32.0 Kg
Specifications subject to change without notice.
MENU ▼ CH ▲
-
VOLUME
+
VIDEO
L-AUDIO-R
MENU ▼ CH ▲
-
VOLUME
+
VIDEO
L-AUDIO-R
REFERENCE NO. SM5110159

Contents
-2-
Safety Notice . . . . . . . . . . . . . . . . . . . . . . . . . . . . . . . . . . . . . . . . . . . . . . . . . . . . . . . . . . . . . . . . . . . . . . . . 2
Chassis Block Diagram . . . . . . . . . . . . . . . . . . . . . . . . . . . . . . . . . . . . . . . . . . . . . . . . . . . . . . . . . . . . . . 3-4
IC Block Diagrams . . . . . . . . . . . . . . . . . . . . . . . . . . . . . . . . . . . . . . . . . . . . . . . . . . . . . . . . . . . . . . . . . . 5-7
Service Adjustments with replacing Memory IC (IC802) . . . . . . . . . . . . . . . . . . . . . . . . . . . . . . . . . . . . . 8-17
Service Adjustments . . . . . . . . . . . . . . . . . . . . . . . . . . . . . . . . . . . . . . . . . . . . . . . . . . . . . . . . . . . . . . . . . 18
Purity and Convergence Adjustment . . . . . . . . . . . . . . . . . . . . . . . . . . . . . . . . . . . . . . . . . . . . . . . . . . . . . 19
Cabinet Parts List . . . . . . . . . . . . . . . . . . . . . . . . . . . . . . . . . . . . . . . . . . . . . . . . . . . . . . . . . . . . . . . . . 20-21
Chassis Electrical Parts List . . . . . . . . . . . . . . . . . . . . . . . . . . . . . . . . . . . . . . . . . . . . . . . . . . . . . . . . . 22-35
Safety Notice
SAFETY PRECAUTIONS
1: An isolation transformer should be connected in the
power line between the receiver and the AC line
when a service is performed on the primary of the
converter transformer of the set.
2: Comply with all caution and safety-related notes pro-
vided on the cabinet back, inside the cabinet, on the
chassis or the picture tube.
3: When replacing a chassis in the cabinet, always be
certain that all the protective devices are installed
properly, such as, control knobs, adjustment covers
or shields, barriers, isolation resistor-capacitor net-
works etc.. Before returning any television to the
customer, the service technician must be sure that
it is completely safe to operate without danger of
electrical shock.
X-RADIATION PRECAUTION
The primary source of X-RADIATION in television receiver is the picture tube.The picture tube is specially con-
structed to limit X-RADIATION emissions.For continued X-RADIATION protection, the replacement tube must be
the same type as the original including suffix letter. Excessive high voltage may produce potentially hazardous X
- RADIATION.To avoid such hazards, the high voltage must be maintained within specified limit.Refer to this ser-
vice manual, high voltage adjustment for specific high voltage limit. If high voltage exceeds specified limits, take
necessary corrective action. Carefully follow the instructions for + B1 volt power supply adjustment, and high volt-
age check to maintain the high voltage within the specified limits.
PRODUCT SAFETY NOTICE
Product safety should be considered when a component replacement is made in any area of a receiver.
Components indicated by mark in the parts list and the schematic diagram designate components in which
safety can be of special significance. It is particularly recommended that only parts designated on the parts list
in this manual be used for component replacement designated by mark . No deviations from resistance
wattage or voltage ratings may be made for replacement items designated by mark .

Chassis Block Diagrams
-3-
IC802
MEMORY
24LC04B/P
X' TAL-SW1 (PAL-M)
TUNER
(WITH PLL)
ANT
AC POWER
CIRCUIT
T611
CONVERTER
TRANS.
B1:130V (MAIN HIGH)
B2: 15-18V (AUDIO)
B4: 25V (VERT.)
B5: 12V (MAIN LOW)
FROM IC801(CPU) PIN-37 PAL-M
PAL-N
NTSC
SAW
Filter
IIC BUS CONTROL
OSD
A-L A-R
REAR AV IN
SIF
FILTER
4.5MHz
B6:9V
B7:5V
B8:5V
REG.IC
VERT. -OUT
AUDIO-OUT
SIF IN
VIF/SIF OUT
INT.VIDEO-IN
EXT.VIDEO-IN
SOUND
CARRIER
TRAP
4.5MHz
R
G
BQ901
CRT
HV
T401 F.B.T
DEFLECTION
YOKE
Q432
HORIZ.-OUT
HEADPHONE
JACK
SP901
SP902
AUDIO RIGHT
AUDIO LEFT
FRONT AV IN
VIDEO
SDA
SCL
27 28
IC801
CPU
QXXAVB338
X' TAL-SW2 (PAL-N)
37
38
R
G
B
BLK
22
23
24
25
29
30
SDA
SCL
A101
X131
SDA
SCL
10 14
6/7
IF IN IC201 QXXAVB488M
IF/VIDEO/CHROMA/DEFLECTION ( 1-CHIP IC )
R
G
B
BLK
272328
30 3436
52
3
45
12
21
VERT. OUT
HORIZ. OUT
18
19
20
IC501
LA7841
40
32
FROM IC801(CPU) PIN-38
IC651
IC3401
UPC1851BCU
MTS DECODER/AUDIO CONTROL & SW
7
22
23
39 38
25
26 IC001
LA4600
AUDIO AMP. 3
1
10
8
K1101
VIDEO
A-RA-L
K1001 K1111
MAIN SIGNAL PROCESSING CIRCUIT

Chassis Block Diagrams
-4-
SYSTEM CONTROL
13 KEY SWITCH IN KEY
SWITCH
SCL
30
29
8
15
SDA
POWER ON/OFF PHOTO COUPLE
(ON=HIGH, OFF=LOW)
IC201
VIDEO / CHROMA
SLAVE ADDRESS
IC801
CPU
QXXAVB338
25
22
23
24
21
20
33
2728
11
10
7
34 ADJUSTMENT DATA IN
OSD BLK OUT
OSD RED OUT
OSD GREEN OUT
OSD BLUE OUT
DEFLECTION
CIRCUIT
HORIZ. SYNC IN (ACTIVE=LOW)
VERT. SYNC IN (ACTIVE=LOW)
POWER PROTECT IN
(POWER ERROR=LOW) POWER CIRCUIT
etc.
SCL
SDA
IC802
MEMORY
OSC
32.768KHZ CPU OSC OUT
CPU OSC IN
LED ON-TIMER LED OUT (ON=LOW)
RC SIGNAL IN
(ACTIVE=LOW)
RC PRE-AMP.
5
SOUND MUTE OUT
(ACTIVE=HIGH)
IC001
AUDIO AMP.
A101
TUNER
RESET IN (RESET=LOW) 17
X'TAL-SW1(PAL-M) ON=HIGH
37
X'TAL-SW2(PAL-N) ON=HIGH
38
19 VIDEO SIGNAL IN
RELAY OUT FOR DEGAUSSING
(ON=HIGH) 6
1
2
STEREO/MONO OPTION
HIGH(OPEN)=MONO, LOW=STEREO
PIP OPTION HIGH(OPEN)=NON, LOW=PIP
IC3401
MTS DECODER

IC Block Diagrams
-5-
IC201 < IF/Video/Chroma/Def. > QXXAVB488
VIF IN
IFAGC OUT AFT
TV IN
EXT IN
AUDIO
OUT
33
29
35
26
37
40
32
13
44
43
11
15
16
12
2725242122412819201830239101445
QXXAVB488
SYNC IN
KILLER FILTER
IDENT FILTER
COLOURAPC
AFAMP
AFAMP
4.5/6.0
SIF IOADJ BUS
I/F
FM
DET
LIMITTER
B EXIT
INPUT
R EXIT
INPUT
G EXIT
INPUT
V SYNC
TRIG
SYNC
SEP.
SYSTEM
ID
EQ
ELIMINATE
BGP
GENE.
PHASE
CONT
KILLER
DET
LOCK
DET
ID
DET
CHROMA
APC
DET
PAL
SW
SECAM
FF
SELF
ADJ
V.RAMP
AFC
AFC
1H DL
VCXO
ACC
DET
F/F
2NDAMP
CHROMA
BPF
1STAMP
(ACC)
HPF
AFT
AFT OUT
VIDEO
MUTE
H STOP
H.PHASE
AUDIO MUTE SW SDA
SCL
FAST BLK
B IN
R IN
B-OUT
R- OUT
G-OUT
G-IN
H-VCC
SECAM REF
V.SIZESERVICE
SW
H-OSC
SELFADJ.
CLAMP
50/60 OUT
R
TINT
B
R
DRIVE
BG
ABCL
ABCL
ID CUT BLUEBACK
WHITE
BACK
COLOR
CONTRAST
SERVICE BRIGHT
STATION DET STATION
SYSTEM SET
SYSTEM
IFAGC
DELAYADJ
DEFEAT
DLTIME
DLFINE
VIDEO
VCC
VIDEO
GND
DEFLECTION
GND
TRAP
SW
D.TRAP
F.TRAP
BLACK STRECH OFF
FAGC
VIDEO
DET
VIF
AMP
APC
DET
ADJ
DET
BLACK
STRECH
VIDEO
TONE
CHROMA
TRAP
VIDEO
MUTE
CLAMP
SHARPNESS
CONTRAST
DELAY
FEF
FILTER
AGC
R-Y IN
B-Y IN
H OUTPUT
SYSTEM
DECODE
BRIGHT
CHROMA
DEMODULATOR
DR/VE
AMP
AFC GAIN
RGB MATRIX
CONTRAST
32 FH
VCO
MUTE
DET
HV
BLK
VERTICAL
COUNTDOWN
HORIZONTAL
COUNTDOWN
EXITAUDIO
IN
GND
VCC
VIF
SIF
SIF IN
47
48
46
1
8
3
42
52
51
50
49
5
4 6 7 2 9 31 38
36
34
39
V-OUT
V-FB
V RAMP
BLK
AUDIO
DIRECT
OUT
AF DC
FB
HI VCC
IF OUT
IFAPC
IF VCO
IF VCO
BLACK
PEAK ACL/CLK Y-SW
OUT
X TAL 4.43
X TAL 3.58
BLACK PEAK

IC Block Diagrams
-6-
IC501 < Vertical Output > LA7841
THERMAL
PROTECTION PUMP
UP
AMP
-
+
GND
Ver. Output
Output
Stage Vcc
Non Inv. Input
Inverting
Input
Vcc
Pump Up
Output
LA7841
123 4 567
IC001 < Audio AMP. > LA4600
10
7
Standby SW
Ch1
Input
amplifier
Rf1
Ch1 input
9
Small signal
GND
8
Ch2 Input
6
P.P
REF
amplifier
Rf2
RNf1
RNf2
Ch2
Input
amplifier
Pop noise prevention block
Pre-
drive
amplifier
Pre-
drive
amplifier
4
1
Output
amplifier
TSD protector 2
Ch1 output
Large signal
GND
3
Output
amplifier
Ripple filter
5
Filter
Standby Vcc
Ch2 output
IC611 < Switching Regulators > QXXAVB325
START O.V.P LATCH
REG.
T.S.D
Iconst
Rconst+ Rconst-
R2
O.S.C
-
+
Comp.2
Vth(2)
C1 R1
DRIVE
-
+
Comp.1
Vth(1)
R4
R3
5
1
2
3Drain
Terminal
Source
Terminal
Over current/
Feed Back
Terminal
GND
4Power Supply
O.V.P: Overvoltage protection circuit
T.S.D:Thermal shutdown circuit

IC Block Diagrams
-7-
7
12
8
910 11 15 18 14 13 17 16 20
Noise BPF
Noise
Detector I2C Bus
Interface
SAP Demodulation Block
Composite
Signal Input
2.2µF
0.1µF
0.047µF
SAP Signal
Detector
SAP Offset
Absorption
0.47µF0.1 µF
68KΩ
5.1
KΩ
16.6
KΩ
Noise
Detector
+
+
+
23 22
24 46 3
5
4.7µF
1µF
0.1µF
+
1KΩ
2
22µF
+
1/2Vcc
42
1µF
+
34 35 38 36 39 37 41 40
Filter
Control
Stereo
Demodulation
Block fH
LPF fH
Trap
Switch
75µS
De-emphasis Offset
Absorption
dbx Noise
Reduction
Block
Matrix Selector
Block
Surround
Block
Tone Control Block
Volume Control Block
33 32 31
26
25
21
28
29
302719
1
2.2µF
+
0.1µF 2200pF
+Vcc
+
+
10 µF
10 µF
D/A
2.2µF
+
0.1µF
+
2200pF
0.022µF
4.7µF
+
1 µF
+
10 µF
+
3.3 µF
+
1 µF
+
1 µF
+
3
KΩ
1 µF
+
D/A
Input
Attenuator
I2C Bus
Interface D/A
Filter
Power Supply
Reference Voltage
Pilot Detector 1
Pilot Detector 2
Phase
Detector 1
Phase
Detector 2
SAP Signal Output
SAP Signal Input
Spectral Timing Setting
VCA Offset Absorption
Wide-band Timing Setting
Wide-band RMS Setting
Spectral RMS Setting
Variable Emphasis Input
Offset Absorption
Variable Emphasis
Offset Absorption
Analog Ground
Timing Current Setting
SDA
SCL
GND(I2Cbus)
R-channel
Output
L-channel
Output
Surround Timing Setting
R-channel Offset
Absorption
R-channel Capacity of
High Frequency Band Width
R-channel Capacity of
Low Frequency
Band Width
L-channel Offset
Absorption
L-channel Capacity of
High Frequency
Band Width
L-channel Capacity of
Low Frequency
Band Width
External R-channel Input 3
External L-channel Input 3
External R-channel Input 1
External R-channel Input 2
External L-channel Input 1
External L-channel Input 2
L-channel Fixed Output
Monaural Offset Absorption
R-channel Fixed Output
IC3401 < MTS Decoder, Audio Control & Switch> UPC1851BCU

-8-
Service Adjustments with Replacing Memory IC(IC802)
MENU
0
78
RECALL
Note:The CPU (IC801) and memory IC (IC802) store the service adjustments data and controls data for each circuit.
When the Memory IC(IC802) is replaced, some of the service adjustments should be readjusted to obtain the
best performance. The necessary service adjustments are carried out by using the RC handset. Please set
up the TV set with following steps [1] to [4].
[1] Initializing Procedure
1. Put a new memory IC.
2.Turn on the TV set.
3. Press and hold the MENU button on the TV set, then press 0 button on the remote control transmitter.
The following picture appears on the screen.
This completes the initialization of memory IC.
02
Following shows the initialized contents of memory data by this procedure.
1.TV/AV mode :TV mode
2. Antenna or cable setting : Antenna
3. Colour system : AUTO
4. Channel Memory : Clear
5. Receiving Channel : Ch02
6. Sound Volume : 11/63 steps
7. Color : 30/63 steps
8. Contrast : 63/63 steps
9. Brightness : 32/63 steps
10. Sharpness : 31/63 steps
11.Tint : 31/63 steps
12. Language : Spanish
13. Password : Clear
14. Channel Block : Clear
15. Sleep Timer : Clear
16. Clock, ON/OFF Timer : Clear
17. Picture Mode : MANUAL
18. Stereo/Mono Setting : Stereo
19. Bass : 31/63 steps
20.Treble : 31/63 steps
21. Balance : 31/63 steps
22.Video status (Picture mode data)
Item NORMAL STRONG SOFT MANUAL
Colour 28 34 22 28
Contrast 63 63 63 63
Brightness 35 15 40 35

-9-
Service Adjustments with Replacing Memory IC(IC802)
Readjust the following service adjustments.
Adjustments Service Mode No. & Item
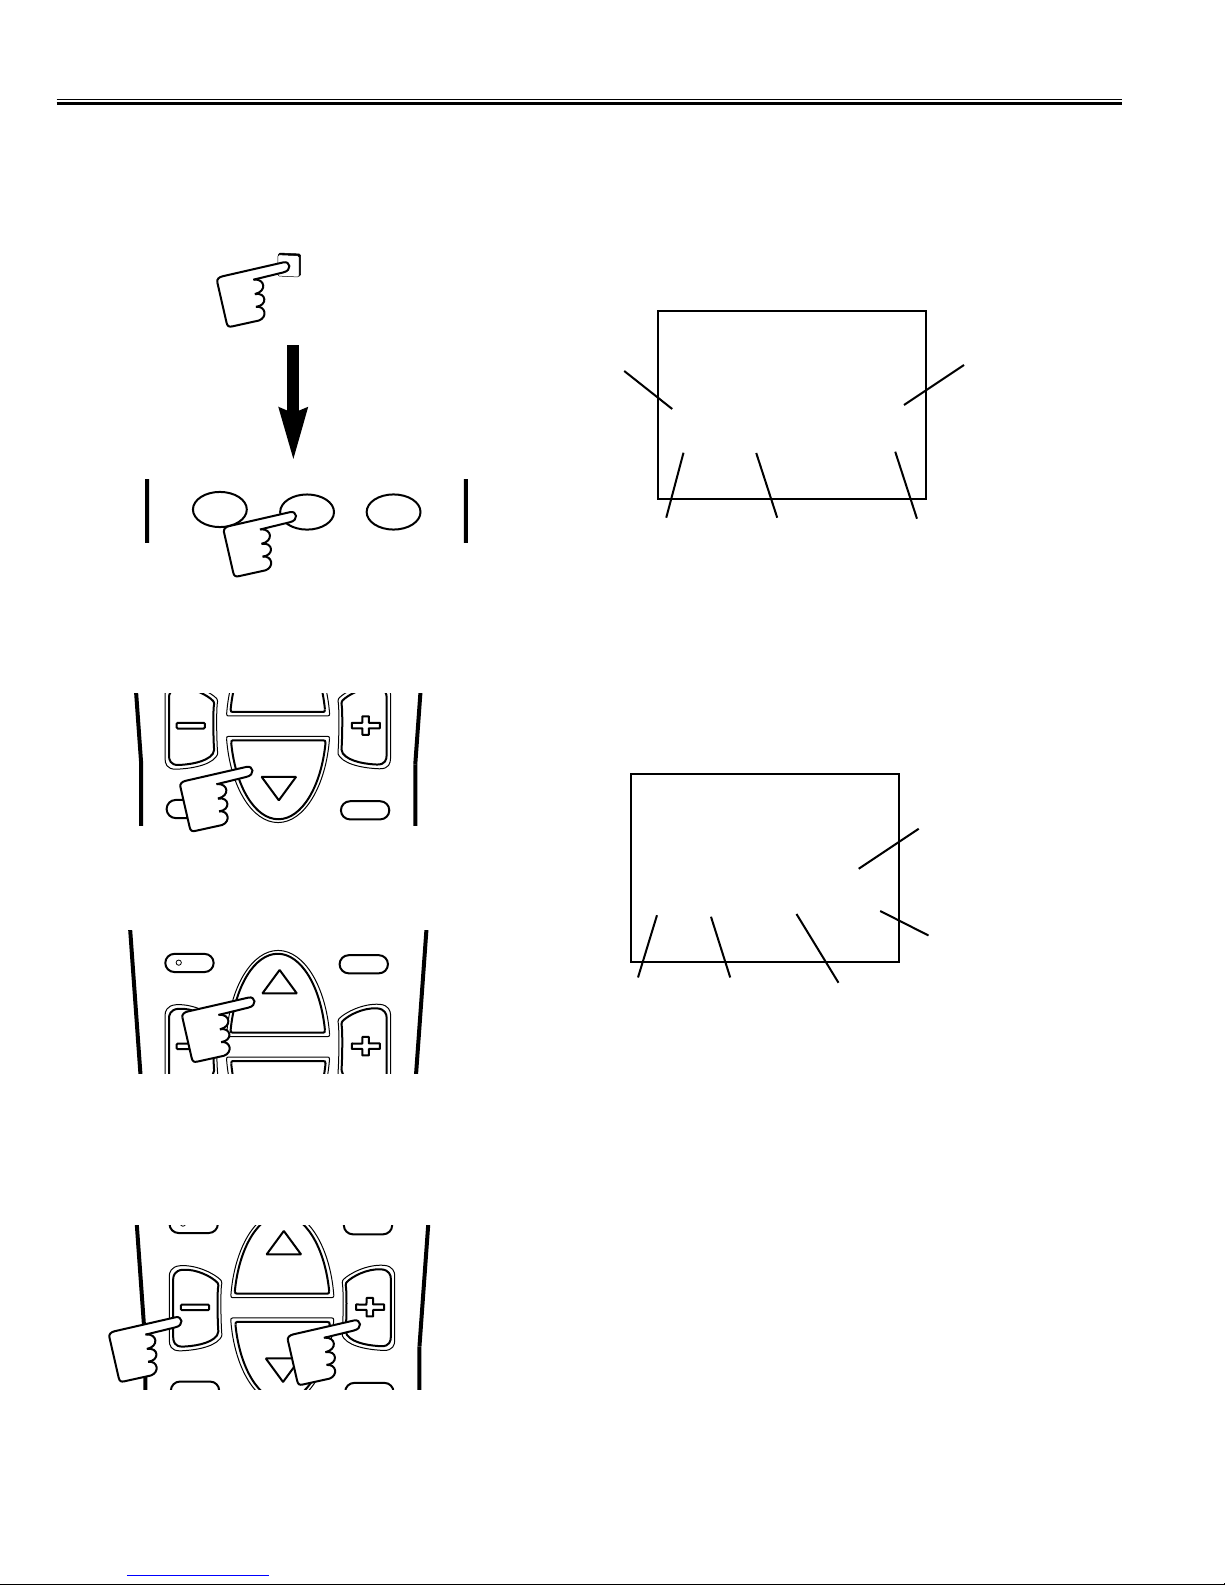
Horizontal centre adjustment Item 01, H-P
Vertical centre adjustment Item 02, V-P
Vertical size adjustment Item 03, V-S
OSD position adjustment Item 04, OSD
RF AGC adjustment Item 05, AGC
AFT adjustment Item 06, VCO
Grey scale adjustment Item 18-24
Further adjustment please refer to page 11 and 12.
No. Item Initial value Range Description
01 H-P 08 00~15 Horizontal centre adjustment
02 V-P 04 00~07 Vertical centre adjustment
03 V-S 64 00~127 Vertical size adjustment
04 OSD 20 01~63 OSD position adjustment
05 AGC 64 00~127 RF AGC adjustment
06 VCO 128 00~255 VCO (AFT) adjustment
07 SIF 00 00 SIF VCO adjustment
08 SELF 00 00~15 SELF-adjusting
09 DLT 02 00~03 DL-time adjustment
10 DL F 00 00, 01 DL-fine adjustment
11 B
-
ST 00 00, 01 Black stretch on/off setting
12 ABCL 01 00, 01 ABCL adjustment
13 AB-G 00 00, 01 ABCL gain adjustment
14 TRAP 03 00~03 Trap frequency adjustment
15 WBK 00 00, 01 White back setting
16 BBK 00 00, 01 Blue back setting
17 AFCG 02 00~02 AFC gain adjustment
18 RBI 00 00~255 Red bias adjustment
19 GBI 00 00~255 Green bias adjustment
20 BBI 00 00~255 Blue bias adjustment
21 RD 64 00~127 Red drive adjustment
22 BD 64 00~127 Blue drive adjustment
23 DRV -- -- White balance adjustment
24 -- -- -- Y-cut setting
25 OPT1 -- -- Option
26 OPT2 -- -- Option
27 CCD 20 01~255 Closed Caption position adjustment
Service mode adjustments table in CPU ROM
Grey scale adjustment
Notes:
The initial value that the CPU writes down the CPU ROM data to the memory when replaced the memory IC.TV set
may not operate correctly with this initial value. It is required to set up the fine adjustment for service adjustments
described below.
[2] Service Adjustments-1
Following table shows the initial values which have been stored in the CPU ROM, and items for the service
adjustments.

MENU
00010011 00100100
23 DRV R 64 B 64
-10-
Service Adjustments with Replacing Memory IC(IC802)
[Entering to Service Mode]
1. Press and hold the MENU button on the TV set and press the 2 button on the remote control handset. Following
setting items appears on the screen.
Display for [H-P] Horizontal centre adjustment
00010011 00100100
01 H-P 08
Read Status
Item No. Item Data value
Data value for Red
Display for [DRV] White balance adjustment
Read Status
Item No. Item
Data value for Blue
To return to normal TV mode, press the MENU button on the TV set or remote control handset.
2. Select item by pressing the CHANNEL DOWN (Item No. UP) or CHANNEL UP (Item No. DOWN) button on the
remote control handset.
3. Adjust data value by pressing the VOLUME + or VOLUME
-
button on the remote control handset.
Example
123
▲CH▼
DISPLAY
MUTE
▲CH▼
+VOL
MENU IMAGE
VOL-
01➔02➔03➔04➔05......27
27➔26➔25➔24➔23......01
▲CH▼
+VOL
DISPLAY
MUTE
VOL-
Read Status of
STEREO IC

-11-
Service Adjustments with Replacing Memory IC(IC802)
(1)Receive the monochrome circular pattern.
(2)Set the brightness and contrast to normal.
(3) Select [H-P] in the service mode.
(4)Change value to be optimum horizontal centre position.
(5)Exit from the service mode.
(1)Receive the monochrome circular pattern.
(2)Set the brightness and contrast to maximum.
(3) Select [V-P] in the service mode.
(4)Change value to be optimum vertical centre position.
(5)Exit from the service mode.
(1)Receive the monochrome circular pattern.
(2)Set the brightness and contrast to maximum.
(3) Select [V-S] in the service mode.
(4)Change value to be optimum vertical size.
(5)Exit from the service mode.
(1)Receive the monochrome circular pattern.
(2)Set the brightness and contrast to normal.
(3) Select [OSD] in the service mode.
(4)Change value to be proper OSD position.
(5)Exit from the service mode.
NOTE: Do not attempt this adjustment with weak signal.
(1)Tune the receiver to most clearest (or strongest) VHF
station in your area. Set the brightness and contrast
controls to maximum. Set the colour control to mini-
mum.
(2)Select [AGC] in the service mode.
(3)Change value until the snow noise just disappears.
(4)Exit from the service mode.
(1) Connect DC meter to TP-D and the ground.
(2) Tune the receiver to the clearest station.
(3) Disconnect RF input. (Disconnect antenna plug from
the antenna socket.)
(4)Select same channel. (If you have selected channel 03
in step 2, press “0” button next “3” button on the
remote control to select channel 03.)
(5)Connect antenna plug to the antenna socket.
(6)Select [VCO] in the service mode.
(7) Change value until the voltage (on TP-D) to be
4.5±0.2V at OK point.
(8) Exit from the service mode.
(1) Switch on the TV.
(2) Select [AFCG] in service mode.
(3) Change data value to “01”.
(4) Exit from the service mode.
±Item 17 [AFCG] AFC GAIN
NG OK
4.5V ±0.2V
0255
VCO DATA
TP-D VOLTAGE
Item 06 [VCO] AFT
Item 05 [AGC] AGC
Item 04 [OSD] OSD POSITION
Item 03 [V-S] VERTICAL SIZE
Item 02 [V-P] VERTICAL CENTRE
Item 01 [H-P] HORIZONTAL CENTRE
IC201
IF /VIDEO/CHROMA/DEF.
IC802
MEMORY
MAIN BOARD
TP-D (J146)
Horizontal centre
Vertical centre
Vertical size

VIDEO
MODE AUDIO
MODE
POWER
0
7
1
4
8
5
23
6
9
▲CH▼
+VOL
RECALL
MENU IMAGE
SLEEP
DISPLAY
MUTE
VOL-
-12-
(1)Receive the monochrome circular pattern.
(2)Set the brightness and colour to normal, contrast to maximum.
(3)Enter to the service mode.
(4)Set each value of Item-18 RBI, 19 GBI, 20 BBI mode to 00. Set each value of Item-21 RD, 22 BD mode to 64.
(5)Select Item-24 mode to be one horizontal scanning line and turn the screen volume on the FBT to obtain just visible
one coloured line.
(6)Press the 1 (Red Bias +), 4 (Red Bias
-
), 2 (Green Bias +), 5 (Green Bias
-
), 3 (Blue Bias +) or 6 (Blue Bias
-
)
button to adjust the brightness of each colour until a dim white line produced. Please see the control button alloca-
tions in this mode.
(7)Select Item-23 DRV mode to enter the white balance adjusting mode.
(8)Press the 7 (Red Drive +), RECALL (Red Drive
-
), 8 (Blue Drive +) or 0 (Blue Drive
-
) button
alternately to produce normal black and white picture.
(9)Exit from the service mode.
(10) Check for proper grey scale tracking at all brightness levels.
NOTE: If the grey scale adjustment is made after picture tube replacement, check the high voltage.
Items 18-24 GREY SCALE
Service Adjustments with Replacing Memory IC(IC802)
Red Bias
-
Red Bias +
Green Bias
-
Blue Bias +
Red Drive +
Blue Drive
-
Blue Drive +
Green Bias +
Blue Bias
-
Press the MENU
button to exit from
service mode
Red Drive
-
T401
FBT
MAIN BOARD
SCREEN VR
(Under side)
F.B.T.

MENU
Service Adjustments with Replacing Memory IC(IC802)
-13-
No. Item Initial value Range
01 INPUT LEVEL 25 00~63
02 STEREO VCO 23 00~63
03 FILTER 32 00~63
04 LOW SEPARATION 29 00~63
05 HIGH SEPARATION 26 00~63
06 SAP VCO 27 00~63
[3] Service Adjustments-2
Following table shows the initial values of MTS Adjustment which have been stored in the CPU ROM.
[Entering to MTS Adjustment Service Mode]
1. Press and hold the MENU button on the TV set and press the 3 button on the remote control handset. Following
setting items appears on the screen.
MTS Adjustment Mode
To return to normal TV mode, press the MENU button on the TV set or remote control handset.
2. Select item by pressing the CHANNEL DOWN (Item No. UP) or CHANNEL UP (Item No. DOWN) button on the
remote control handset.
3. Adjust data value by pressing the VOLUME + or VOLUME
-
button on the remote control handset.
123
▲CH▼
+VOL
MENU IMAGE
DISPLAY
MUTE
VOL-
▲CH▼
+VOL
DISPLAY
MUTE
VOL-
INPUT LEVEL 25
STEREO VCO 23
FILTER 32
LOW SEPARATION 29
HI SEPARATION 26
SAP VCO 27
ADJUST: - /+
CHOOSE: ▲▼
EXIT : MENU

Service Adjustments with Replacing Memory IC(IC802)
-14-
1. Connect a signal generator to TP-301(
-
side of C3407)
on the Main Board and the ground. Signal output=300Hz,
150mVrms.
2. Connect a DC Volt-Meter to TP-317( + side of C3437) and
the ground.
3. Ground TP-20(pin-45 of IC201) with the jumper lead.
4. Switch the TV set on.
Press and hold the MENU button on the TV set, and press
“3” button on the remote control transmitter to enter to the
service mode.
SOUND LEVEL ADJUSTMENT
(Service Mode)
5. Adjust voltage to become DC 500mVrms±10mVrms by
pressing the VOLUME(+/-) button on the remote control or
TV set.
6.To exit from the service mode, press the MENU button.
1. Connect a frequency counter to TP-317( + side of C3437)
and the ground.
2. Ground TP-20(pin-45 of IC201) with the jumper lead.
3. Switch the TV set on.
Press and hold the MENU button on the TV set, and press
“3” button on the remote control transmitter to enter the
service mode.
4. Select “STEREO VCO” by pressing the CHANNEL
UP/DOWN button on the remote control or TV set.
STEREO VCO ADJUSTMENT
5. Adjust the frequency to become 15.625KHz ± 0.1KHz by
pressing the VOLUME (+/-) button on the remote control or
TV set.
6.To exit from the service mode, press the MENU button.
(Service Mode)
IC3401
MTS
INPUT LEVEL 25
STEREO VCO 23
FILTER 32
LOW SEPARATION 29
HI SEPARATION 26
SAP VCO 27
ADJUST: - /+
CHOOSE: ▲▼
EXIT : MENU
TP-301
TP-317
IC201
IF /VIDEO/CHROMA/DEF.
TP-20
pin-45
INPUT LEVEL 25
STEREO VCO 23
FILTER 32
LOW SEPARATION 29
HI SEPARATION 26
SAP VCO 27
ADJUST: - /+
CHOOSE: ▲▼
EXIT : MENU
IC3401
MTS
TP-317
IC201
IF /VIDEO/CHROMA/DEF.
TP-20
pin-45
MAIN BOARD
MAIN BOARD

Service Adjustments with Replacing Memory IC(IC802)
-15-
6. Adjust voltage to become minimum reading by pressing
the VOLUME(+ -) button on the remote control or TV set.
7.To exit from the service mode, press the MENU button.
1. Connect a signal generator to TP-301(
-
side of C3407)
and the ground.
Signal output=15.734KHz, 100mVrms.
2. Connect a DC Volt-Meter to TP-317( + side of C3437) and
the ground.
3. Ground TP-20(pin-45 of IC201) with the jumper lead.
4. Switch the TV set on.
Press and hold the MENU button on the TV set, and press
“3” button on the remote control transmitter to enter the
service mode.
5. Select “FILTER” by pressing the CHANNEL UP/DOWN
button on the remote control or TV set.
MTS FILTER ADJUSTMENT
IC3401
MTS
TP-301
TP-317
IC201
IF /VIDEO/CHROMA/DEF.
TP-20
pin-45
(Service Mode)
INPUT LEVEL 25
STEREO VCO 23
FILTER 32
LOW SEPARATION 29
HI SEPARATION 26
SAP VCO 27
ADJUST: - /+
CHOOSE: ▲▼
EXIT : MENU
MAIN BOARD
1. Connect an oscilloscope:
Probe-A to TP-317(+ side of C3437) and the ground.
Probe-B to TP-318 (+ side of C3438) and the ground.
2. Switch the TV set on, and receive the multi sound program.
3. Press and hold the MENU button on the TV set, and press
“3” button on the remote control transmitter to enter to the
service mode.
4. Select “LOW SEPARATION” by pressing the CHANNEL
UP/DOWN button on the remote control or TV set.
STEREO SEPARATION ADJUSTMENT
(Service Mode)
INPUT LEVEL 25
STEREO VCO 23
FILTER 32
LOW SEPARATION 29
HI SEPARATION 26
SAP VCO 27
ADJUST: - /+
CHOOSE: ▲▼
EXIT : MENU
IC3401
MTS
TP-317
MAIN BOARD
TP-318

Service Adjustments with Replacing Memory IC(IC802)
-16-
5. Adjust level of 300Hz at TP-317 (+ side of C3437) to
become minimum level by pressing the VOLUME(+/ -)
button on the remote control or TV set.
Minimum leakage
TP-317(R)
300Hz
6. Select “HI SEPARATION” by pressing the CHANNEL
UP/DOWN button on the remote control or TV set.
7. Adjust level of 4KHz at TP-318 (+ side of C3438) to
become minimum level by pressing the VOLUME (+/-)
button on the remote control or TV set.
8.To exit from the service mode, press the MENU button.
7. Adjust frequency of the counter to become 78.125KHz
±0.5KHz by pressing the VOLUME (+/-) button on the
remote control or TV set.
8.To exit from the service mode, press the MENU button.
TP-318 (L)
(Service Mode)
INPUT LEVEL 25
STEREO VCO 23
FILTER 32
LOW SEPARATION 29
HI SEPARATION 26
SAP VCO 27
ADJUST: - /+
CHOOSE: ▲▼
EXIT : MENU
1. Connect a frequency counter to TP-317(+ side of C3437)
and the ground.
2. Ground TP-20 (pin-45 of IC201) with the jumper lead.
3. Ground TP-316(+ side of C3411) with the jumper lead
through 1M Ωresistor.
4. Switch the TV set on.
5. Press and hold the MENU button on the TV set, and
press “3” button on the remote control transmitter to enter
to the service mode.
6. Select “SAP VCO” by pressing the CHANNEL UP/DOWN
button on the remote control or TV set.
SAP VCO ADJUSTMENT
(Service Mode)
INPUT LEVEL 25
STEREO VCO 23
FILTER 32
LOW SEPARATION 29
HI SEPARATION 26
SAP VCO 27
ADJUST: - /+
CHOOSE: ▲▼
EXIT : MENU
IC3401
MTS
TP-317
MAIN BOARD TP-316
IC201
IF /VIDEO/CHROMA/DEF.
TP-20
pin-45
Minimum leakage
4KHz

MENU
-17-
Service Adjustments with Replacing Memory IC(IC802)
[4] Service Adjustment-3
1. Press and hold the MENU button on the TV set and press the 4 or MENU button on the remote control handset to
enter to the service mode.
FINE TUNING
-
+
To return to normal TV mode, press the MENU button on the TV set or remote control handset. (Or will automatically
return to normal TV mode after 5 seconds.)
2. Press and hold the VOLUME + or VOLUME
-
button on the remote control handset or TV set to make fine tuning
adjustment. Press and hold the VOLUME + button for higher frequency tuning, and press and hold the VOLUME
-
or lower frequency tuning.
0
+VOL
RECALL
MENU IMAGE
SLEEP
▲CH▼
+VOL
DISPLAY
MUTE
VOL-
This adjustment is used to do a fine tuning of the channels with poor reception after they have been stored by the auto-
matic tuning.
This function is available for one channel only and the fine-tuned channel is memorized into IC802 (EEPROM).
FINE TUNING
Fine tuning service mode
Fine tuning data value will be automatically stored in memory.

-18-
TUNER
UNIT
IC501
VERT. DEF.
Q432
HORIZ. OUT
T401
FBT
Service Adjustments
MAIN BOARD
Following adjustments are not required to readjust when replacing the memory IC.
(1)Receive the monochrome circular pattern.
(2)Set the brightness and contrast to maximum.
(3)If the picture is too wide, or narrow, cut or short the “AJ1” on the main unit.When AJ1 is shorted, the horizontal width
increase.When AJ1 is cut, the horizontal width decrease.
Important note: If the AJ1 is cut, it’s gap must be more than 5mm to prevent sparks.
HORIZ.WIDTH AND HIGH VOLTAGE CHECK
(1)Receive the monochrome circular pattern.
(2)Set the brightness to normal and contrast to maximum.
(3)Adjust the focus control on the F.B.T. for the best focus on the screen centre.
FOCUS ADJUSTMENT
F.B.T.
AJ1
(4)Connect a high voltage probe to anode lead of the picture tube.
(5)The high voltage must be 14”=21KV ± 1KV / 20”,21”=25KV ± 1KV /29”=26.5KV ± 1KV and less than
14”=25KV / 20”,21”=27.5KV / 29”=29.5KV at 0 beam current (Brightness and contrast minimum setting).
Note: If the picture tube is replaced, check the high voltage.The horiz. width adjustment affects the high voltage.
Therefore, re-check the high voltage.
FOCUS VR
(Upper side)
more than 5mm
AJ1
This TV set has a built-in power supply protection circuit.
It is provided to protect the TV set in case of a power supply circuit malfunctions. When something abnormality
occurs during TV reception, the TV set goes to the stand-by mode.
When an abnormality occurs during TV reception, it causes pin 33 of the CPU to go continually Low(less than
0.75V) for about one second. The CPU detects that this has occurred and outputs the signal from pin 8 to
switch off the power supply lines.
Releasing the protective circuit and restoring power supply
To release the protective circuit and restore power supply, turn the power to theTV set OFF and then ON again
via either the main power switch or the ON-OFF button on the remote control.This will work only if the power
supply trouble was temporary. If there is permanent trouble such as a damaged circuit, power cannot be
restored and the circuit will have to be repaired.
■Protection Circuit

-19-
Purity and Convergence Adjustment
CAUTION:The Convergence and Purity adjustments have been made at the factory. Readjustment
should be made only after picture tube or deflection yoke replacement, following the steps below:
PURITY ADJUSTMENT
1. Demagnetize the picture tube and receiver using an
external degaussing coil.When replacing picture tube or
deflection yoke, mount deflection yoke and purity-con-
vergence magnets assembly properly, see figures 1 and
4.
2. Turn Red and Blue guns off and provide only Green
raster. Rotate Screen control to fully counterclockwise.
Rotate Red and Blue Bias controls fully counterclock-
wise. Slowly rotate Green Bias control clockwise to pro-
duce Green raster.
3. Loosen the screw holding the Deflection Yoke and
remove the 3 Rubber Wedges, and slide the Deflection
Yoke fully forward.
4. Rotate and spread the Tabs of the two Purity Magnets
to centre the vertical green belt in the picture screen.
The Purity Magnets are also adjusted to obtain vertical
centring of the raster.
5. Slowly slide the Deflection Yoke backward until a uni-
form green screen is obtained.
6. Check the purity of the red and blue screens for unifor-
mity, turn off other colours to check this (use bias con-
trols). Readjust the yoke position if necessary until all
screens are pure.
7. Adjust each Bias control and screen control to obtain
white raster. Refer to Gray Scale Adjustment. If part of
the picture screen is coloured, adjust the Deflection
Yoke position forward or backward slightly.
8. Tighten the mounting screw of the Deflection Yoke.
Adjust Convergence next.
CENTRE CONVERGENCE ADJUSTMENT
1. Use a dot crosshatch pattern signal.
2. Turn Red and Blue guns on and turn off Green gun.
Adjust the angle between the Tabs of the Four Pole
Magnet 1 and 2, and superimpose the Red and Blue
vertical lines in the centre area of the picture screen.
Refer to figure 2.
3. Keeping the mutual angle of the Tabs of the Four Pole
Magnet turn them together to superimpose the Blue and
Red horizontal lines in the centre area of the picture
screen. Refer to figure 2.
4. Turn Green gun on and adjust Six Pole Magnet 3 and 4
that the Green line superimposed on the Red/Blue lines.
This is the same procedure used in steps 2 and 3.
Refer to figure 3.
OUTER AREA CONVERGENCE ADJUSTMENT
Slightly loosen the screw holding the Deflection Yoke.
Adjust the Deflection Yoke to converge the detail in the
outer area (left side and right side) of the picture screen by
orbital movement of the front of the Yoke, then secure the
Deflection Yoke in appropriate position by putting the
wedges as illustrated.Tighten screw holding the Deflection
Yoke.
RED
BLUE
Adjust tabs together to
superimpose red and
blue horizontal line.
Figure- 2 BLUE AND RED LINE MOVEMENT Figure- 3 BLUE/RED AND GREEN MOVEMENT
Adjust tabs together to
superimpose red/blue
and green horizontal
line.
Adjust tabs angle to superimpose
blue and red vertical line. Adjust tabs angle to superimpose
red/blue and green vertical line.
GREEN
BLUE / RED

-20-
C4BE/C4BES
Cabinet Parts List
1 610 288 9147 BUTTON POWER
610 210 7302 COIL SPRING
2 610 288 9253 DEC IND
3 610 288 9154 BUTTON UNITED
4 610 288 9192 CABINET FRONT
5 645 040 1107 BADGE,SANYO
6 610 273 5185 CABINET BACK
7 610 288 9505 LABEL RATING
(Service Ref. No. C21LB25S-00)
610 288 9833 LABEL RATING
(Service Ref. No. C21LB25S-01)
8 645 029 2590 ASSY,REMOCON FXMR
9 610 273 0173 RC-BATTERY LID
10 645 004 5493 ANT MATCHING BOX
610 288 9093 INSTRUCTIONS MANUAL
Key No. Part No. Description Key No. Part No. Description
Note: Parts order must contain Service Ref. No., Part No., and descriptions.
MENU ▼ CH ▲
-
VOLUME
+
VIDEO
L-AUDIO-R
Model C21LB25S
VIDEO
MODE AUDIO
MODE
POWER
0
7
1
4
8
5
23
6
9
▲CH▼
+VOL
RECALL
MENU IMAGE
SLEEP
DISPLAY
MUTE
FXMR
VOL-
1
2
3
5
4
6
7
8
9
10
Other manuals for C21LB25S
1
This manual suits for next models
1
Table of contents
Other Sanyo TV manuals

Sanyo
Sanyo CE32LD81-B User manual

Sanyo
Sanyo C20LB98M User manual

Sanyo
Sanyo 28H1 User manual

Sanyo
Sanyo DP42142 User manual

Sanyo
Sanyo CP21MF2 User manual

Sanyo
Sanyo CE28DWN1-B User manual

Sanyo
Sanyo CP29EF1 User manual

Sanyo
Sanyo CZP3012 User manual

Sanyo
Sanyo CZP2515V User manual

Sanyo
Sanyo 21DN2F User manual

Sanyo
Sanyo CZP3024 User manual

Sanyo
Sanyo CM21KX8S User manual

Sanyo
Sanyo CE21B2-C User manual

Sanyo
Sanyo CM29AF8XA User manual

Sanyo
Sanyo CP21YS2 User manual

Sanyo
Sanyo CE25B5-C User manual

Sanyo
Sanyo CE14A2-C User manual

Sanyo
Sanyo DP26746 - 26" LCD TV Product information sheet

Sanyo
Sanyo CP20SR1Z User manual

Sanyo
Sanyo CP25AF3T User manual