Satelco MOH Professional 60 User manual

Satelco AG | Seestrasse 241 | CH-8804 Au/Wädenswil
Tel. +41 (0) 44 787 06 07 | Fax +41 (0) 44 787 06 08 | e-mail: satelco@satelco.ch | www.satelco.ch Seite 2
Contents
1 Installation Page 3
2 Configuring Page 4
2.1 Standard Configuration (DHCP / non-static) Page 4/5
2.2 Configuration for IP (static) Page 6/7
2.3 Restoring Page 7
3 Instruction codes/Functions Page 8
3.1 Replace files Page 8
3.2 Add files Page 9
3.3 Delete files Page 9
3.4 Change the volume Page 10
3.5 To set a schedule Page 10/11
3.6 To clear a schedule Page 11
3.7 To check the status Page 11/12
Please check the package before installation.
Scope of delivery:
1 USB Drive Configure + MP3 Files
1 USB Drive Restore
1 Power supply 12 V
1 Internet cable
1 RCA Audio Output Cable
1 Mounting Kit (Screws + Plugs)
4 Non-marring feets

Satelco AG | Seestrasse 241 | CH-8804 Au/Wädenswil
Tel. +41 (0) 44 787 06 07 | Fax +41 (0) 44 787 06 08 | e-mail: satelco@satelco.ch | www.satelco.ch Seite 3
1 Installation
Wall Mounting: Mount the MOH Professional 60 on a clean, dry surface using the screws
supplied with your player.
Shelf Mounting: Mount the non-marring feet on the bottom of the player
Connect the Internet cable to the Front Panel Network Port on your MOH Professional 60
and a free port on your router.
Using the supplied RCA Audio Output Cable, connect one end to the digital player in the
600 ohm audio output on the Rear Panel. Then connect the other end of the RCA Audio
Output Cable to the music-on-hold (MOH) port of your telephone system.
Connect the AC adapter to your Digital On-Hold System unit and plug into the wall outlet.
You can tell the unit is powered by the solid red Power and Audio Indicator LED
The audio will start playing in about 90 seconds. You can tell audio is playing when the
light is flashing on the front panel Power and Audio Indicator LED.
The audio may be previewed by pressing the speaker ON/OFF button on the front panel.
Always turn the Speaker off for normal use.
Use the volume control on the rear panel of the MOH Professional 60 to adjust the volume
to the desired level

Satelco AG | Seestrasse 241 | CH-8804 Au/Wädenswil
Tel. +41 (0) 44 787 06 07 | Fax +41 (0) 44 787 06 08 | e-mail: satelco@satelco.ch | www.satelco.ch Seite 4
2. Configuring your MOH Professional 60
Now that you have been introduced to the player, let’s start getting it ready for you to use.
In this process you will need to have:
1. The USB stick labelled CONFIGURE provided with your new dealer configuration
2. The player itself, hooked to a network connection.
Manufacturer’s Note:
It is recommended that you use your current web hosting provider to set up your email
addresses for your MOH Professional 60 units. We do not recommend using Yahoo Mail,
Gmail, AOL or others services like these to set up email addresses as they may change
email parameters from time to time without any input from the user. If this happens, you
will not be able to communicate with your MOH Professional 60 unit until you reset it and
carry out a RESTORE procedure.
2.1 Standard Configuration (Non Static)
2.1.1 Please insert the USB configure stick into your laptop or desktop computer, save
both the Config.txt file and the Static.txt file to your computer for backup copies you will
need in the future. After saving the files, please delete the Static.txt file from the USB
drive.
2.1.2 Open the Config.txt file on the stick with WordPad. Always save the Config.txt file in
plain text format.
There will be 9 lines and you will need to fill in the proper information.
1. Unit Nickname –This "nick name" will designate to you who this player. The nickname
may only contain numbers, letters and spaces but no special characters.
2. Email Account –This is the email address for the player. You will send the instructions
to this address to make the changes you need to your player. It must be created as a
POP3 account.
3. Account Username –User name for the email account you set up for this player.
4. Email Password –This is the password for your email account.
5. Mail Server –This is the address of your incoming email webserver.
6. SMTP Server –This is the address of your outgoing email webserver.
7. Security Key –This is the security code six to nine characters in length that will be
entered with every email you send to your MOH Professional 60. If it is not, the MOH
Professional will not accept any instructions and will vaporize the email.

Satelco AG | Seestrasse 241 | CH-8804 Au/Wädenswil
Tel. +41 (0) 44 787 06 07 | Fax +41 (0) 44 787 06 08 | e-mail: satelco@satelco.ch | www.satelco.ch Seite 5
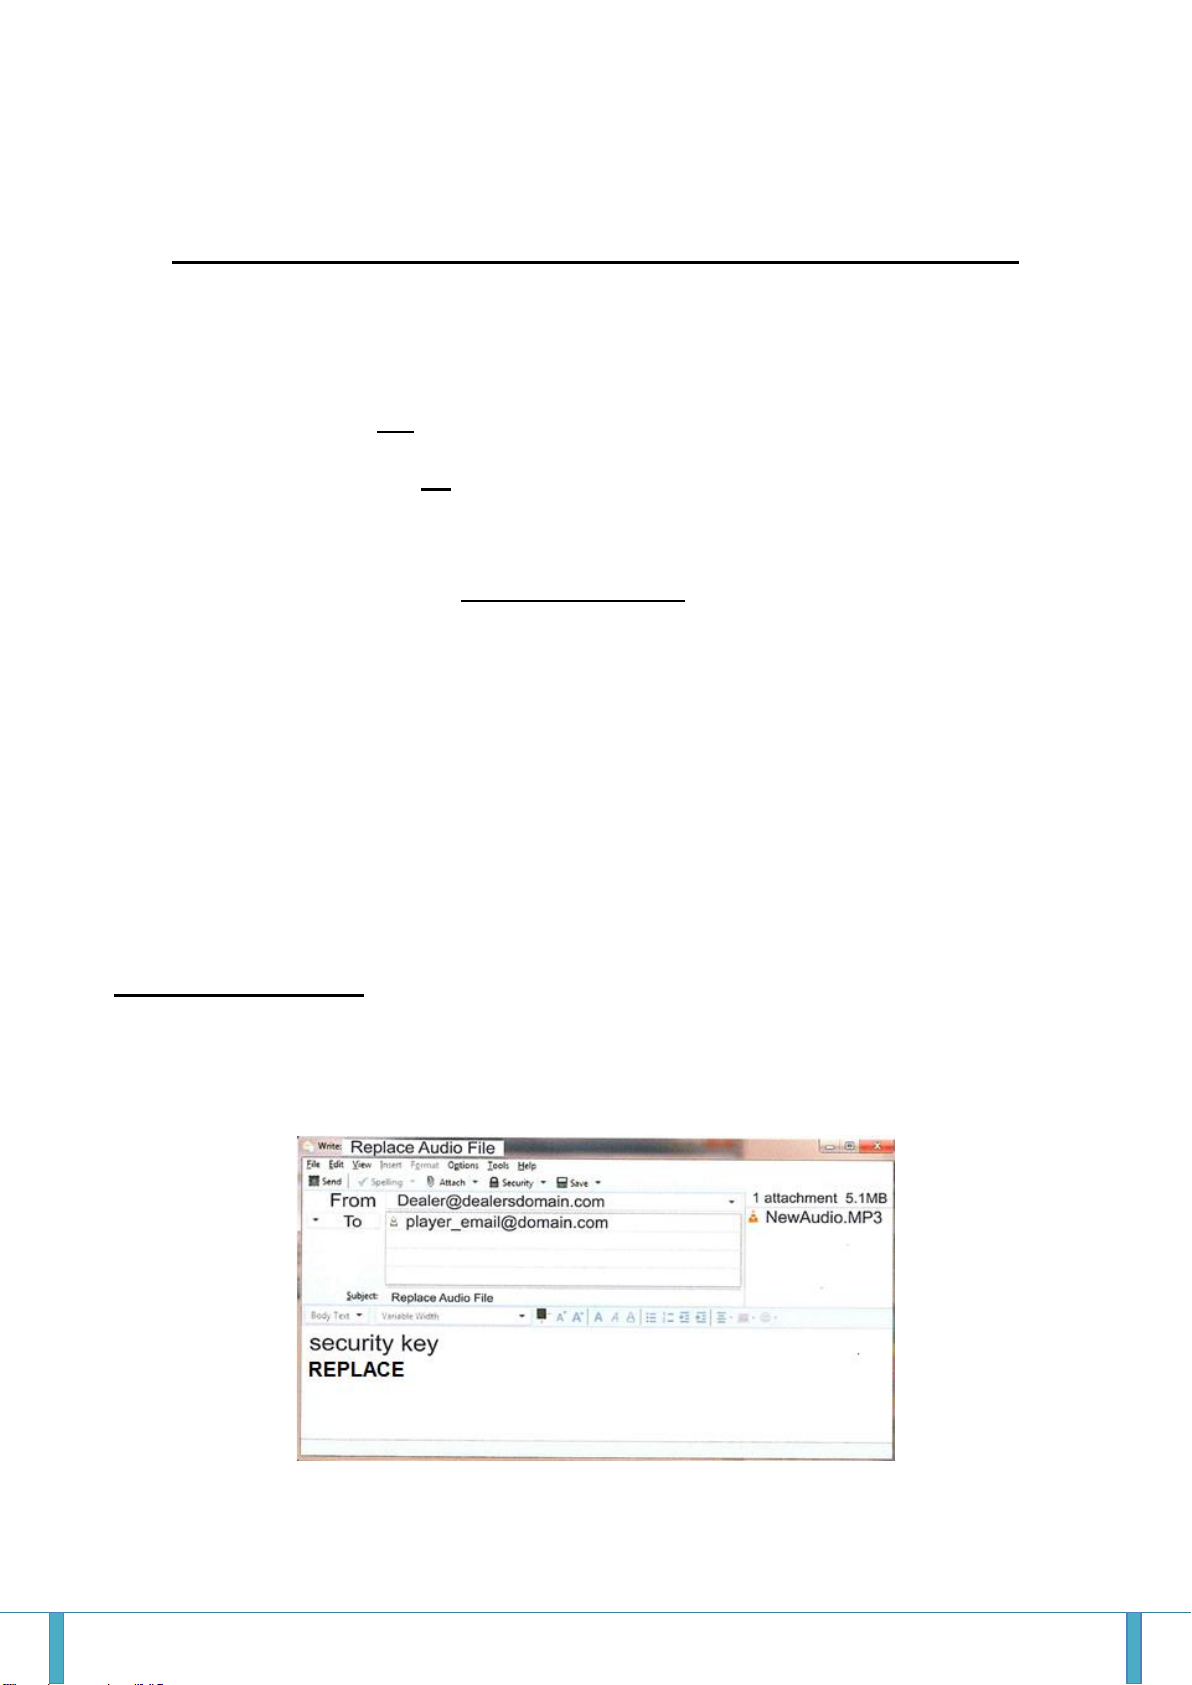
8. TEST send-to email –This is used to send a one-time test email, if connected to a
network.
9. Timezone –Europe/Zurich
Please note there is one blank space before and after the = sign. The eight headings
will already be loaded into the text document. All you have to do is fill in the information on
the right hand side of the = sign.
Here is an example of what it might look like:
unit nickname = Whatevermart120
email account = Choose YourEmail@Whatever.com
email username = Email-Username
email password = What-Ever-You-Choose
incoming mail server = YourServer.com
outgoing mail server = YourServer.com
security key = 123ABC
TEST send-to email = TestEmail@Whatever.com
Timezone = Europe/Zurich
2.1.3 Save the text document once you are sure the information has been entered
correctly and exit the file. You may use the same Configure USB drive for each MOH
Professional 60 you set up, simply enter the new information each time you configure
another MOH Professional 60 and remember to document the MOH Professional 60’s
information so it is not lost or forgotten.
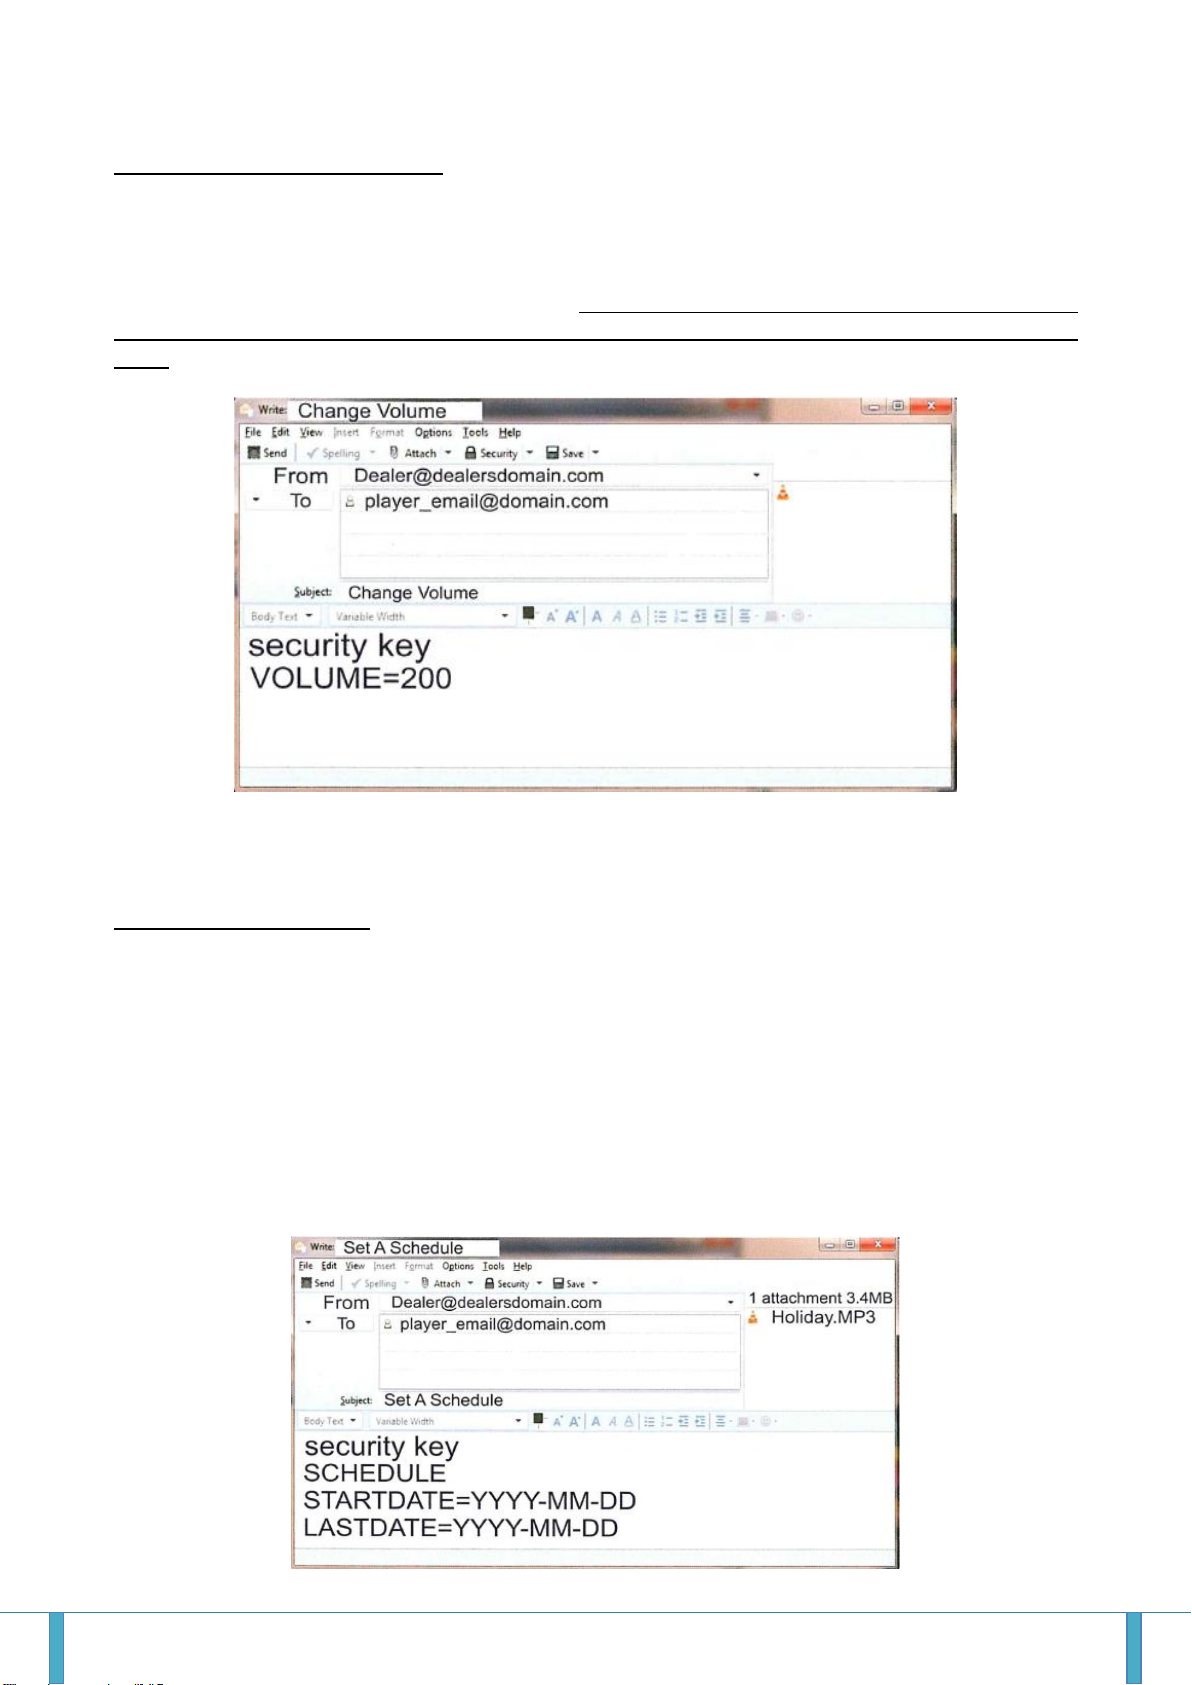
2.1.4 You may also add your audio at this time. Simply drag and drop the desired MP3
file(s) into the USB drive. If your production is not ready, load some type of Generic audio
to the USB drive so you can tell when configuration is complete as it will play. Press the
test speaker button on the front of the MOH Professional 60 or connect a speaker and
turn up the volume to hear the audio start when configuration is complete. If the
configuration is successful, the audio file will be deleted for you from the USB drive.
2.1.5 Now take your Configure Stick to your MOH Professional 60. Make sure the MOH
Professional 60 is not plugged into a power source. Insert the Configure Stick into the
USB port on the front of the MOH Professional 60. Press the test speaker button and plug
the supplied power adaptor into an AC power socket and into the MOH Professional 60.
The configuration information will be loaded into the MOH Professional 60. When you
hear the audio playing (takes about two minutes to download) you will know the MOH
Professional 60 configuration is complete.
If the audio does not play that means something did not load correctly. Pull the Configure
Stick from the unit, insert it into your laptop or desktop computer and open the drive up. A
file called status.txt should have popped up. This will tell you the error that occurred.
Please fix the error and retry the configure process.
You may delete the status.txt file at any time.

Satelco AG | Seestrasse 241 | CH-8804 Au/Wädenswil
Tel. +41 (0) 44 787 06 07 | Fax +41 (0) 44 787 06 08 | e-mail: satelco@satelco.ch | www.satelco.ch Seite 6
2.2 To configure your MOH Professional 60 for Static IP
You must complete the previous steps of configuring for DHCP first and save the config.txt
file to the USB Configure Drive, do not take the USB Configure Drive to the player yet.
Please complete the following set of instructions.
2.2.1 Open the Static.txt file on the USB Configure Drive with WordPad, always save
Static.txt file in plain text format.
Please fill in the specified lines, lines denoted * are required and ** are optional and only
used when it is specific to the network’s settings.
* 1) address –This is the Static IP Address. This must be on the first line.
* 2) gateway –This is sometimes called the "Default Gateway" and must be on the
second line.
* 3) netmask –This is sometimes referred to as the "Subnet Mask".
* 4) skipped Blank line –Empty new line, do not hit the space bar while in this line, there
can be no blank spaces here. Hit enter to get to the next line.
* 5) skipped Blank line –Empty new line, do not hit the space bar while in this line, there
can be no blank spaces here. Hit enter to get to the next line.
* 6) nameserver –This sometimes referred to as "DNS Server 1".
** 7) nameserver –Optional –You may use up to a total of 4 nameservers, each with
their own line.
** 8) nameserver –Optional
** 9) nameserver –Optional –IPV6 type nameserver is also be allowable.
Here is an example of how it could look:
Note only 1 space between the words and the IP numbers
Notation words not part of the configuration
address 192.168.1.100 Required
gateway 192.168.1.1 Required
netmask 255.255.255.0 Required
Blank Line
Blank Line
nameserver 8.8.8.8 Required Nameserver
nameserver 8.8.4.4 Optional Nameserver

Satelco AG | Seestrasse 241 | CH-8804 Au/Wädenswil
Tel. +41 (0) 44 787 06 07 | Fax +41 (0) 44 787 06 08 | e-mail: satelco@satelco.ch | www.satelco.ch Seite 7
Here is an example with other network options;
Notation words not part of the configuration
address 192.168.1.101 Required
gateway 244.18.75.255 Required
netmask 255.255.255.0 Required
Blank Line
Blank Line
nameserver 8.8.8.8 Required Nameserver
nameserver 45.123.55.44 Optional Nameserver
nameserver 2001:4860:4860::8888 Optional –IPV6 type Nameserver
nameserver 2001:4860:4860::8844 Optional –IPV6 type Nameserver
2.2.2 Save static.txt file once you are sure the information has been entered correctly and
exit the file.
2.2.3 If you have not loaded the desired MP3 file to the USB Configure Drive, please do
so now so that when the configuration is complete you will be able to hear it when the
audio file starts to play. If the configure was successful the audio will be deleted from the
USB drive automatically.
2.2.4 Now take your Configure Stick to your MOH Professional 60. Make sure the MOH
Professional 60 is not plugged into a power source. Insert the Configure Stick into the
USB port on the front of the MOH Professional 60. Press the test speaker button and plug
the power adaptor supplied into an AC power socket and into the MOH Professional 60.
The configuration information will be loaded into MOH Professional 60. When you hear
the audio playing (takes about two minutes to download) you will know the MOH
Professional 60 configuration is complete. Then you do a reboot by the static IP on the
player to update. Remove the AC adapter from the player and connect the power supply
after a few seconds again.
If the audio does not play that means something did not load correctly. Pull the Configure
Stick out of the unit, insert it into your laptop or desktop computer and open the drive up. A
file called status.txt should have popped up. This will tell you what error occurred. Please
fix the error and repeat the configure process.
You may delete the status.txt file at any time.
2.3 Restoring your MOH Professional 60
Insert the restore drive into any computer and type the security key (123ABC) of the MOH
Professional 60 into the first line of the restore.txt file. Disconnect the power to your MOH
Professional 60 unit. Insert the restore USB drive into the MOH Professional 60 unit and
plug in the power cable. The restore USB drive will remove all configuration information
from the player and the MOH Professional 60 unit will be returned to the factory setting.
You will know this operation has been completed when the unit powers itself down. This
process takes about one minute. The MOH Professional 60 unit is now ready to be
reconfigured for a new location.

Satelco AG | Seestrasse 241 | CH-8804 Au/Wädenswil
Tel. +41 (0) 44 787 06 07 | Fax +41 (0) 44 787 06 08 | e-mail: satelco@satelco.ch | www.satelco.ch Seite 8
3. Instruction Codes and Functions of MOH Professional 60
AUDIO FILE PARAMETERS
The audio create for MOH Professional 60 must be 16 bit and at 44,100 Hz.
The MOH Professional 60 will accept 64Kbps to 256Kbps MP3 files.
AUDIO FILE NAMES
Audio file names may not include the following characters; / \ I : * ? " < > ~ ( ) or ’.
If any of these characters are used the MOH Professional 60 will terminate and
delete the email. All filenames must start with a letter or number.
THE USE OF INSTRUCTION CODES
The following Instruction Codes must be used alone in the body of an email; they cannot
be used in conjunction with any other function or Instruction Code:
SCHEDULE and its date parameters and STATUS.
All other instruction codes can be used in combinations.
The instruction codes for MOH Professional 60 must be typed in FULL CAPS
or they will not be understood by the unit.
3.1 To Replace Files: This will add new file(s) and delete all existing file(s) in the file
directory. Enter your player’s email address and a short description of what you are doing
in the subject line. On the first line of the body of the email, type in your Security Key and
on the second line type REPLACE. Attach the desired MP3 file(s) to the email and click
send.

Satelco AG | Seestrasse 241 | CH-8804 Au/Wädenswil
Tel. +41 (0) 44 787 06 07 | Fax +41 (0) 44 787 06 08 | e-mail: satelco@satelco.ch | www.satelco.ch Seite 9
3.2 To Add: To add an audio file(s) to the existing file directory without deleting the
existing audio file(s) in the player, enter the player’s email address and a short description
of what are doing in the subject line. On the first line of the body of the email, type in your
Security Key and on the second line type ADD. Attach the desired MP3 file(s) to the email
and click send.
3.3 To Delete: To delete a specific audio file(s) from the existing audio file bed enter the
player’s email address and short description of what you are doing in the subject line. On
the first line of the body of the email, type in your Security Key and on the second line type
in the file to be deleted exactly as it was when you added it; it should always end in
".MP3". If you do not enter it exactly the file will not be deleted. You may delete as many
files as you want, just enter their names on the 3rd, 4th and 5th lines and so on, until you
have entered all the names of the files you want deleted, and then click send.

Satelco AG | Seestrasse 241 | CH-8804 Au/Wädenswil
Tel. +41 (0) 44 787 06 07 | Fax +41 (0) 44 787 06 08 | e-mail: satelco@satelco.ch | www.satelco.ch Seite 10
3.4 To Change The Volume: Enter the player’s email address and a short description of
what you are doing in the subject line. On the first line of the body of the email, type in
your Security Key and on the second line type VOLUME=x. The x represents a number
between 0 and 200. VOLUME=0 or VOLUME= (Blank or nothing text to the = sign) will
not allow sound to come out of the player, a good tool for a non-paying customer. As
standard the volume is factory set to 100. Please note there are no spaces between the
word VOLUME and the = sign and no spaces between the = sign and the desired volume
level. The player also has a volume control knob on the back of the unit as well.
3.5 To Set A Schedule: Enter the player’s email address and a short description of what
you are doing in the subject line. On the first line of the body of the email, type in your
Security Key. On the second line type SCHEDULE. On the 3rd line type
STARTDATE=YYYY-MM-DD, this is the day you want the audio file to start, it must be
entered in the format year- month-day separated in each case by a hyphen(-). On the 4th
line, type LASTDATE=YYYY-MM-DD, in the same format; this is the last full day you want
the scheduled audio to play and, once again, there are no spaces on either side of the =
sign in these two instructions. If the day and month are single digits –like 1 to 9 –add a
leading 0 before the number, e.g. 09. Attach the desired MP3 file(s) to the email and click
send. Once the schedule has expired, whatever file(s) were playing before the schedule
started will start playing again.

Satelco AG | Seestrasse 241 | CH-8804 Au/Wädenswil
Tel. +41 (0) 44 787 06 07 | Fax +41 (0) 44 787 06 08 | e-mail: satelco@satelco.ch | www.satelco.ch Seite 11
You may replace, add and delete files to the original file directory while it is in schedule
mode. Simply follow the directions to replace, add or delete. You may also start a
schedule immediately by putting today’s date as the start date. The next time MOH
Professional checks for an email it will download and start the schedule at that time.
3.6 To Clear A Schedule: To stop a schedule in progress and revert back to the audio
that was playing before the schedule started, enter the player’s email address and a short
description of what you are doing in the subject line. On the first line of the body of the
email, type in your Security Key. On the second line type CLEAR SCHEDULE. You may
leave a space between the two words. Then click send.
3.7 To Check Your Player’s Status: Enter the player’s email address and a short
description of what you are doing in the subject line. On the first line of the body of the
email, type in your Security Key and on the second line type STATUS. Then click send.

Satelco AG | Seestrasse 241 | CH-8804 Au/Wädenswil
Tel. +41 (0) 44 787 06 07 | Fax +41 (0) 44 787 06 08 | e-mail: satelco@satelco.ch | www.satelco.ch Seite 12
All the instruction codes and functions previously described have a built-in status
notification. Whenever you use a function or code to make a change, MOH Professional
60 will send you a status report. This status report includes:
What is currently playing in the file directory.
If a schedule exists, it will tell you when it starts, when it stops and what audio will be
played during the schedule.
The volume setting.
The temperature of the unit. The normal operating temperature is between 40 and 60 °C.
If a status report does not come back after one of the above mentioned functions or
instructions, it means that the Security Key was not entered correctly or not put on the
very first line of the body of the email.
Please check every STATUS that comes back to make sure your changes have taken
place. If they have not, it means that you typed the instruction wrong into the body of the
email. Some of the mistakes commonly made where an instruction was not carried out:
Improperly formatted SCHEDULE
Misspelled instruction code
Any instruction code that was not typed in FULL CAPS
A wrong or misspelled Security Key
Notes:
Table of contents
Other Satelco Media Player manuals