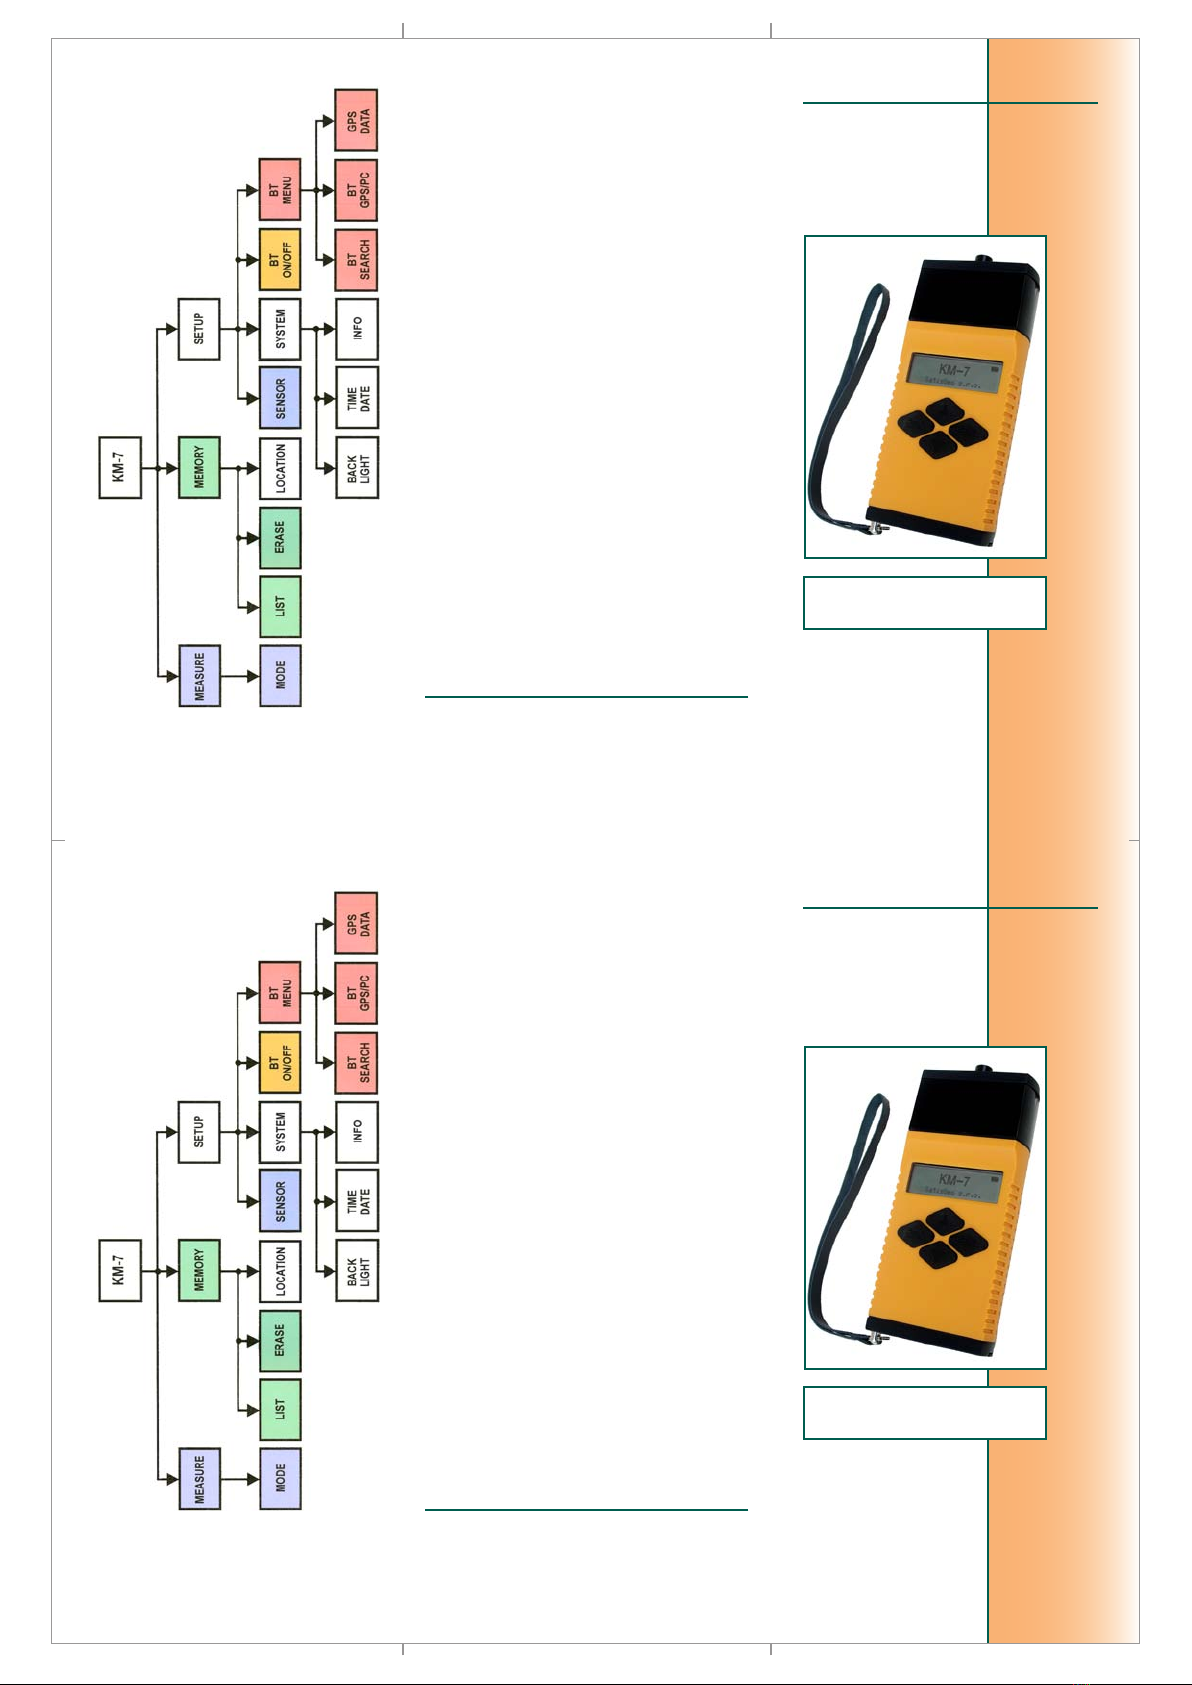
Kappameter KM-7
KM-7 is designed for quick eld measurements
of magnetic susceptibility of outcropping rocks,
drill cores and larger pieces of rocks.
Power Supply
Batteries or accumulators AAA, 2 pcs
Turning On/Off
To turn the KM-7 on, press Enter.
To turn the KM-7 off, press Escape for
3 seconds. The instrument is automatically tur-
ned off after cca 40 seconds of inactivity. If the
KM-7 is connected to a PC via USB/Bluetooth,
or connection to Bluetooth GPS is active, the
automatic turn off is disabled.
Buttons
Enter - going to a sub menu, enabling editable
items, activating action items, storing a value
to the memory
Escape - terminating an action on editable items
without change, returning to an upper menu
Up, Down - browsing among menu items, sele-
cting values from predened editable items
The position of the arrow at the left side of the
display points to the selected menu item.
Icons
Battery status icon
KM-7 conn. to PC via USB cable
Bluetooth enabled
KM-7 conn. to PC via Bluetooth
GPS data valid
Measuring in progress
M
Modes
1. Single - one measurement.
2. Scan - data are continually measured,
results are displayed on the display only.
3. Scan remote - continual measurement, the
measured data are transferred to the PC via
USB or Bluetooth and processed by the pro-
gram KMdata.
Measuring in Single mode
● Set sensor (Flat, Pin, Core) in Setup menu.
Be sure the pin is properly screwed to the
head when setting PIN.
● When measuring with GPS, make sure the
USB cable is disconnected, set BT ON in
Setup menu, set BT GPS in BT MENU, turn
on the GPS and wait for connection. When
measuring without GPS, set BT OFF in
Setup menu.
● Select Measure in main menu, set Single
mode. Measuring is done in three steps, with
maximum 10 s between them.
1. initial measurement with the instrument
placed minimum 30 cm far from the sample
(AIR1), press Enter
2. measurement of susceptibility with the
black head of the instrument placed para-
lel to the surce of the sample (SAMPLE),
press Enter
3. nal measurement with the instrument pla-
ced minimum 30 cm far from the sample
(AIR2), press Enter
● Do not move instrument while the icon M is
displayed (collecting signal ca 0.5 s).
● Save the displayed value by Enter, delete it
by Escape.
● Repeat the three steps or nish by Escape.
Measuring in Scan mode
● Set sensor (Flat, Pin, Core) in Setup
menu.
● Select Measure in main menu, set Scan
mode.
● Make initial measurement with the instru-
ment placed minimum 30 cm far from the
sample (AIR1), press Enter.
● Place the black head of the instrument para-
lel to the surce of the sample (SAMPLE),
press Enter.
● Measuring at the sample is repeated until
Escape.
Measuring in Scan remote mode
● Set sensor (Flat, Pin, Core) in Setup
menu.
● When using Bluetooth, set BT ON in Setup
menu and BT PC in BT MENU, otherwise
connect USB cable.
● Run program KMdata on PC, connect to
the KM-7, go to Scan remote tab of the
KMdata. Wait for the connection – check
the icon.
● Select Measure in main menu, set Scan
remote mode.
● Make initial measurement with the instru-
ment placed minimum 30 cm far from the
sample (AIR1), press Enter.
● Place the black head of the instrument para-
lel to the surce of the sample (SAMPLE),
press Enter.
● Measuring at the sample is repeated until
Escape.
Kappameter KM-7
KM-7 is designed for quick eld measurements
of magnetic susceptibility of outcropping rocks,
drill cores and larger pieces of rocks.
Power Supply
Batteries or accumulators AAA, 2 pcs
Turning On/Off
To turn the KM-7 on, press Enter.
To turn the KM-7 off, press Escape for
3 seconds. The instrument is automatically tur-
ned off after cca 40 seconds of inactivity. If the
KM-7 is connected to a PC via USB/Bluetooth,
or connection to Bluetooth GPS is active, the
automatic turn off is disabled.
Buttons
Enter - going to a sub menu, enabling editable
items, activating action items, storing a value
to the memory
Escape - terminating an action on editable items
without change, returning to an upper menu
Up, Down - browsing among menu items, sele-
cting values from predened editable items
The position of the arrow at the left side of the
display points to the selected menu item.
Icons
Battery status icon
KM-7 conn. to PC via USB cable
Bluetooth enabled
KM-7 conn. to PC via Bluetooth
GPS data valid
Measuring in progress
M