manuals.online logo
Brands
  1. Home
  2. •
  3. Brands
  4. •
  5. Saxby Lighting
  6. •
  7. Security Sensor
  8. •
  9. Saxby Lighting 90977 User manual

Saxby Lighting 90977 User manual

www.saxbylighting.com
Instruction manual
90977
PIR DETECTOR 2-IN-1
PIR Adjustment
Saxby Lighting. BH17 7BY
V1 16/10/2019
We recommend cleaning with a soft dry cloth. Do not use solvents or abrasive cleaners as these could damage the finish.
For your safety, always switch off the power supply before changing lightbulbs, or cleaning.
Care and Safety
Technical data
Conformity with all relevant EC Directive requirements.
The power supply is Double Insulated and does not require connection to an Earth circuit.
Waste electrical products should not be disposed of with household waste. Please recycle where facilities
exist. Check with your Local Authority or local store for recycling advice.
This product is rated at IP20.
IP
20
This product is not suitable for dimming.
Supply Voltage: 240V~ Detection Range: 360º
Power Frequency: 50Hz Detection Distance: Max. 8m (<24ºC)
Ambient Light: <10-2000LUX (adjustable) Working Temperature: -20~+40ºC
Time Delay: Min.10sec±3sec Working Humidity: <93%RH
Max.7min±2min Power Consumption: approx 0.5W
Rated Load: Max.2000W Installation Height: 2.2-4m
1000W
• Turn the TIME knob anti-clockwise on the minimum (10s). Turn the LUX knob
clockwise on the maximum (sun).
• Switch on the power, the sensor and its connected lamp will have no
signal at the beginning. After Warm-up 30sec, the sensor can start work.
If the sensor receives the induction signal, the lamp will turn on. While
there is no another induction signal any more, the load should stop
working within 10sec±3sec and the lamp would turn off.
• Turn LUX knob anti-clockwise on the minimum (moon). If the ambient
light is more than 10LUX, the sensor would not work and the lamp stop
working too. If the ambient light is less than 10LUX (darkness), the sensor
would work. Under no induction signal condition, the sensor should stop
working within 10sec±3sec.
Note: when testing in daylight, please turn LUX knob to (SUN) position,
otherwise the sensor lamp could not work!
Warning
Thank you for purchasing this light fitting. Please read the instructions carefully before use to ensure safe and satisfactory
operation of this product. Please retain these instructions for future reference.
Installation
This product is double insulated and does
not require connection to an Earth circuit.
Existing fittings must be completely removed before installation of a new product. Before removing the existing fitting, carefully
note the position of each set of wires.
Note that the switch is turned off before installation.
Ensure that the screws and cable entry points are sealed to maintain the IP rating of the product.
After deciding the layout of the light fittings ensure that the cables are long enough to connect to desired positions.
Having correctly identified the wiring from your existing light fitting and
connect to the connection block inside the product in the following way:
Wiring
Check that...
You have correctly identified the wires
The connections are tight
No loose strands have been left out of
the connection block
The cable clamp is fitted over the wires.
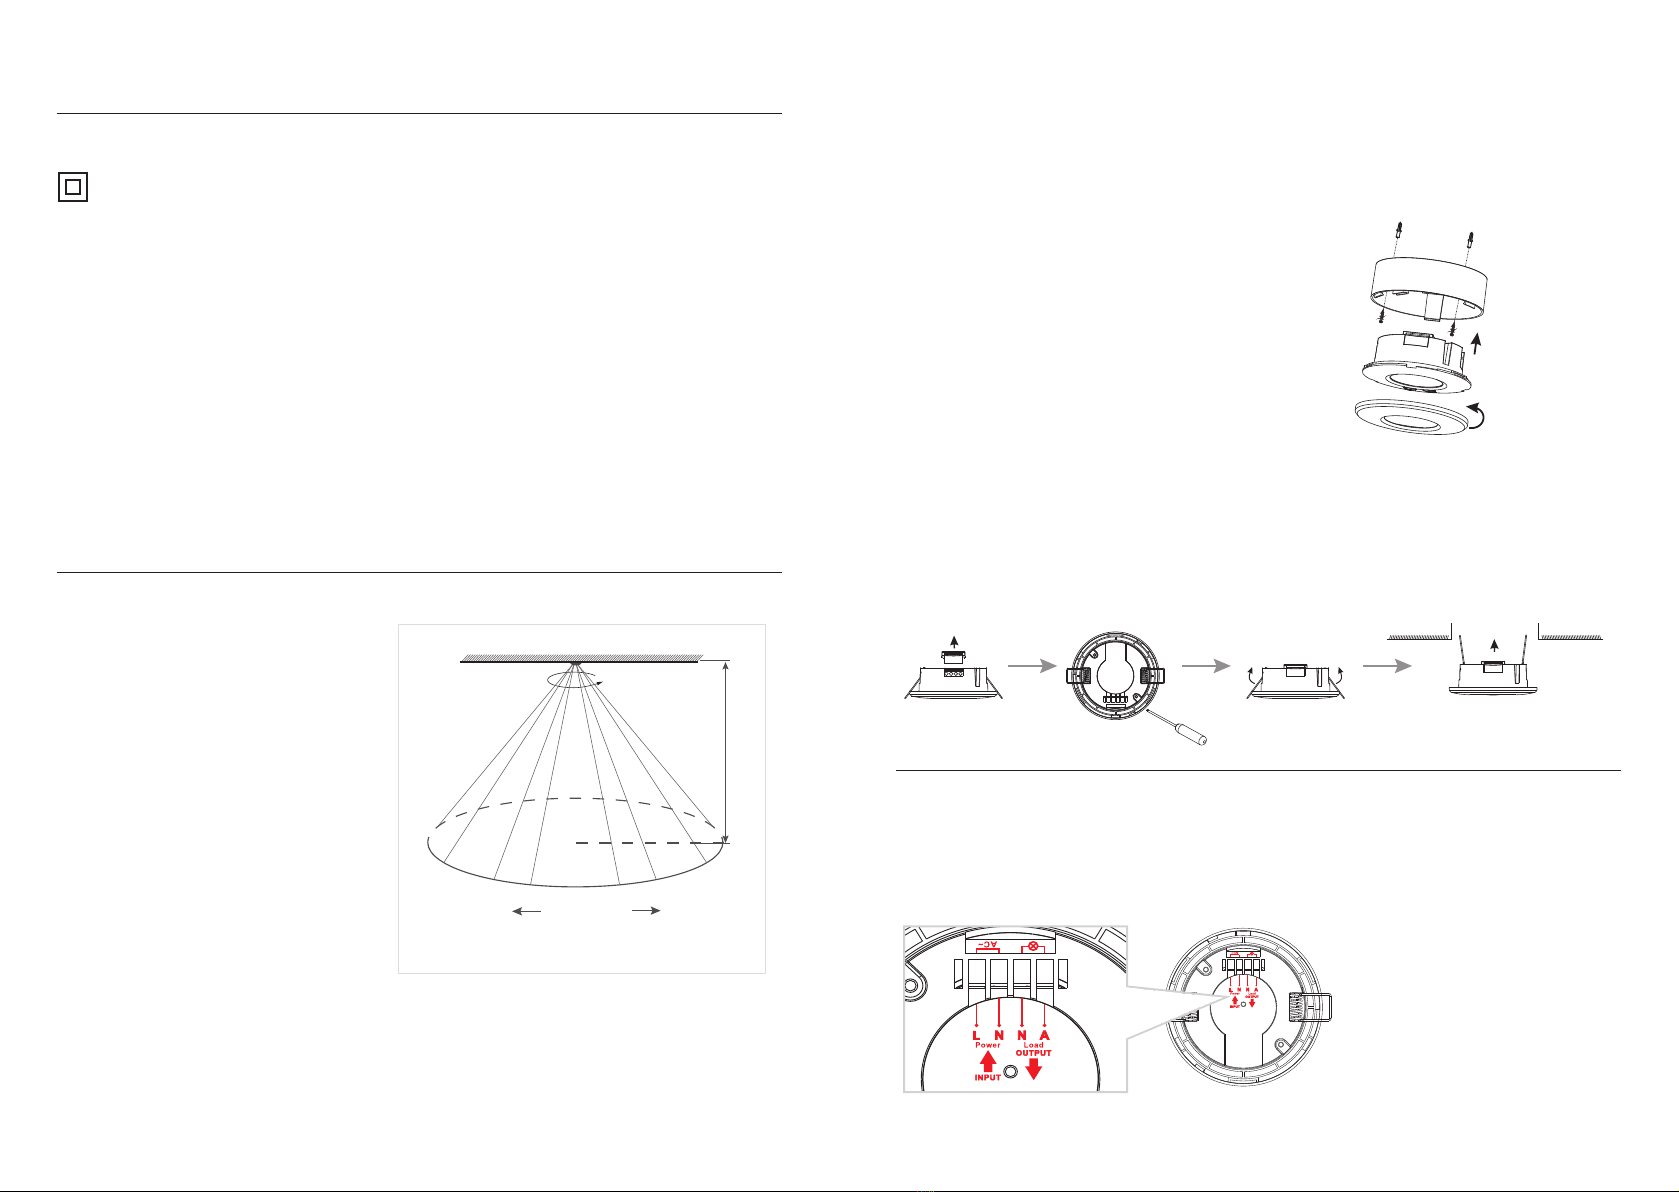
Layout
This product is designed for optimum performance
when mounted in ceiling 2.2-4m above the ground.
Avoid pointing at or positioning close to heat sources
such as flues or heat extraction units, which may cause
false triggering.
Avoid pointing at bright lights as unit will not function
when you set Lux control Level to dark.
Avoid locating near electromagnetic fields.
The mains supply cable must have a minimum cross
section area of 1.0mm2.
Cables must be protected using suitable conduit or
plastic trunking.
Please read these instructions carefully before commencing any work.
This unit must be fitted by a competent and qualified electrician.
Install in accordance with the IEE Wiring regulations and current Building Regulations.
Check the pack and make sure you have all the parts listed.
To prevent electrocution switch off at the mains supply before installing or maintaining this fitting. Ensure other persons cannot
restore the electrical supply without your knowledge.
If you are in any doubt, please consult a qualified electrician.
If replacing an existing fitting, make a careful note of the connections.
This unit should be connected to a fused circuit.
This unit is only suitable for indoor use.
Waste electrical products should not be disposed of with household waste. Please recycle where facilities exist. Check with
your local authority or retailer for recycling advice.
This product is double insulated and must not be earthed. If there are any incoming earth cables, they must be joined together
and well insulated with good quality insulation tape. This is to ensure earth continuity throughout your property.
Installation one:
• Please remove the metal spring of the sensor.
• Connect the power and the load according to the connection-wire diagram.
• Fix the bottom on the selected position with the inflated screw.
• Install back the upper cover on the sensor, then you could
switch on the power and test it.
• Wire as detailed below.
Installation two:
• Unload the transparent vinyl cover which is at the bottom of the sensor.
• Loose the screws in the connection terminal, and then connect the power to connection terminal of sensor according to
connection-wire diagram.
• Fold the metal spring of the sensor upwards, until they are in “I” position with sensor, and then put the sensor into the hole
or installation box which is on the ceiling and has the similar size with the sensor. Releasing the spring, the sensor will be
set in this installation position.
• After finishing installing, turn on the power and then test it.
• Wire as detailed below.
House Ceiling
360º
Radius
Max. 4m Max. 4m
2.2-4m
Detection Area

Other Saxby Lighting Security Sensor manuals

Saxby Lighting 90978 User manual

Saxby Lighting

Saxby Lighting 90978 User manual

Saxby Lighting PIR MINI User manual

Saxby Lighting

Saxby Lighting PIR MINI User manual

Saxby Lighting 90974 User manual

Saxby Lighting

Saxby Lighting 90974 User manual

Saxby Lighting 95283 User manual

Saxby Lighting

Saxby Lighting 95283 User manual

Popular Security Sensor manuals by other brands

Sun Microsystems FI316 user manual

Sun Microsystems

Sun Microsystems FI316 user manual

i4Technology BugHunter Professional BH-03 Expert Operation manual

i4Technology

i4Technology BugHunter Professional BH-03 Expert Operation manual

VOLTCRAFT LSG-10 operating instructions

VOLTCRAFT

VOLTCRAFT LSG-10 operating instructions

Protect 1206i user manual

Protect

Protect 1206i user manual

Ametek Universal Analyzers 270SF instruction manual

Ametek

Ametek Universal Analyzers 270SF instruction manual

MSA ALTAIR 5X operating manual

MSA

MSA ALTAIR 5X operating manual

Orno OR-GB-430 Operating and instalation instructions

Orno

Orno OR-GB-430 Operating and instalation instructions

Erone SEF2410AV Installation Notice

Erone

Erone SEF2410AV Installation Notice

Lamptime ST41 user manual

Lamptime

Lamptime ST41 user manual

JRT M88B user manual

JRT

JRT M88B user manual

System Sensor EBR Installation and maintenance instructions

System Sensor

System Sensor EBR Installation and maintenance instructions

Samotech SM301-Z instruction manual

Samotech

Samotech SM301-Z instruction manual

B.E.G. LUXOMAT PD11-KNX-FLAT-DX Short manual

B.E.G.

B.E.G. LUXOMAT PD11-KNX-FLAT-DX Short manual

LST OH-13001 Specification sheet

LST

LST OH-13001 Specification sheet

Carrier Graviner Mk7 INSPECTION & CLEANING INSTRUCTIONS

Carrier

Carrier Graviner Mk7 INSPECTION & CLEANING INSTRUCTIONS

steute EE RC Si 56 Series Mounting and wiring instructions

steute

steute EE RC Si 56 Series Mounting and wiring instructions

Schreder J1034-UV-A user manual

Schreder

Schreder J1034-UV-A user manual

Trax XT-JD10 installation manual

Trax

Trax XT-JD10 installation manual

manuals.online logo
manuals.online logoBrands
  • About & Mission
  • Contact us
  • Privacy Policy
  • Terms and Conditions

Copyright 2025 Manuals.Online. All Rights Reserved.