manuals.online logo
Brands
  1. Home
  2. •
  3. Brands
  4. •
  5. SBIG
  6. •
  7. Professional Video Accessories
  8. •
  9. SBIG FW8S-STXL User manual

SBIG FW8S-STXL User manual

Installation Instructions
FW8S-STXL / FW8G-STXL
Filter Wheel
SBIG Imaging Systems, A Division of Diffraction Limited.
59 Grenfell Crescent, Unit B, Ottawa, ON Canada, K2G 0G3
Tel: 613.225.2732 | Fax: 225.225.9688 | www.sbig.com
© 2018 Diffraction Limited. All rights reserved. The SBIG wordmark and logo are trademarks of
Diffraction Limited, all other trademarks, service marks and tradenames appearing in this brochure are
the property of their respective owners.
Page 1 of 6
Introduction
SBIG's STXL series cameras contain several innovative features that can be found in no other astro-
imaging camera. This innovation extends to STXL accessories as well, including the integrated
design of the FW8S-STXL and FW8G-STXL filter wheels. These filter wheels share common
mechanical and electronic design, the only difference being the type of housing that is used as a front
cover and some included items. The FW8S-STXL standard filter wheel can therefore be upgraded to
an FW8G-STXL self-guiding filter wheel by simply adding a replacement self-guiding front cover.
Conversely, if you have the self-guiding version and want to use a camera lens adapter you can simply
add the standard front cover which accepts Canon EOS or Nikon lens adapters.
Micron-Precision Filter Positioning
When taking flat field frames of filtered images, the flat field frame
must show exactly the same optical characteristics to be most
effective. If there is dust on the filter, or uneven illumination
caused by the filter, this must be represented precisely as seen in the
light image to be corrected by the flat field frame. The STXL filter
wheels are designed to provide a new level of accuracy when taking
flats through filters by repositioning filters to within a few microns
of the same position every time they are centered over the imaging
CCD. This degree of precision allows the imager to take extremely
accurate flat field frames even after rotating the filter out of the field of view and even after a loss of
power.
Self-Guiding in Front of the Filters
Self-guiding has long been acknowledged as the best, most accurate
way to guide long exposure astrophotos, particularly with
commercial SCTs. The single most common complaint however is
the difficulty of finding bright stars when guiding through dark or
narrowband filters. The FW8G filter wheel incorporates the self-
guiding CCD inside the front cover of the filter wheel so that the
guider picks off light from the guide stars before passing through
the filters. There are two adjustment knobs on the filter wheel base:
one for moving the guiding CCD to achieve good focus and one for moving the pick-off mirror. A
third knob on the side locks the adjustments in place.
Page 2 of 6
Attaching the Filter Wheel to the STT Camera
1. Note that the that the STXL filter wheel
comes with a red spacer attached to the
bottom plate as shown in the picture at
right. You must remove this red spacer and
attach it to the camera after removing the
camera’s front cover.
2. Remove the front
cover of the filter wheel and
the front cover of the
camera. Re-use the 8
screws from the camera
front cover to attach the red
spacer that you previously
removed from the back
plate of the filter wheel.
3. Attach the filter wheel base
to the red spacer that is attached to the
camera body.
Page 3 of 6
4. At this point you should install the filters by
removing the 16 screws, shoulder washers and
O-rings that secure the filters into the wheel.
Note: These fasteners may have been pre-
installed or may have shipped loose with your
filter wheel.
5. The shoulder washers can be inserted in either
orientation depending on the thickness of the filter. The
O-Rings, if necessary, can be used if thinner filters are
too loose.
Ensure that all the filters are secured in place before
proceeding.
6. Replace the filter wheel front cover being careful not
to pinch the cable that extends from one end.
7. Both the FW8S-STXL and FW8G-STXL filter wheels have
this “pig tail” cable with a DB9 connector on the end. Plug
this connector into the I2C port on the camera.
8. If you have the FW8G-STXL Self-Guiding filter Wheel, also attach
the short black HDMI cable between the filter wheel and the
camera’s remote guide head port as shown in the picture at right.
Note: The FW8S-STXL Standard filter wheel does not use the
HDMI cable.
Page 4 of 6
9. Finally, remove the 3” adapter ring from the camera front cover being
careful to note the location of any shims used to assure orthogonal
camera position and attach this adapter plate to the front cover of the
filter wheel replacing the shims, if any, in the same locations.
Page 5 of 6
Adjusting the Pick-Off Mirror (FW8G-STXL)
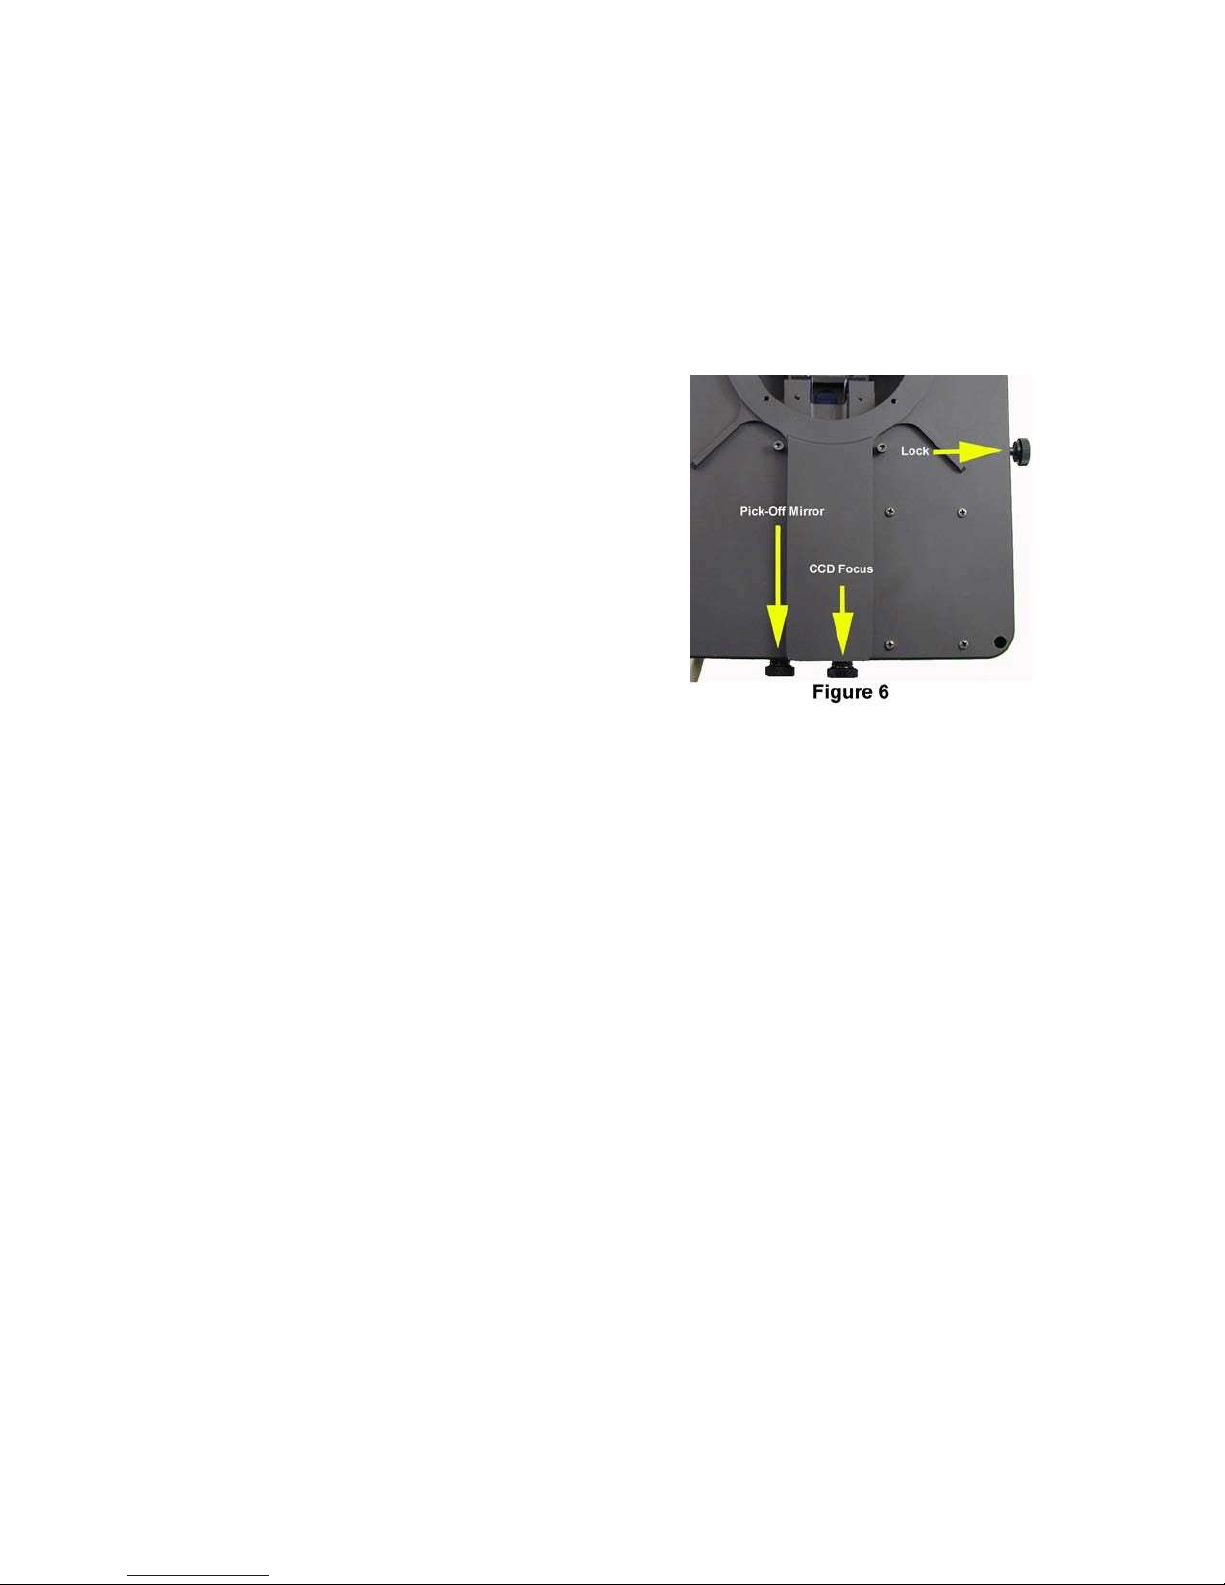
The STXL guider assembly has three black knobs that the user can adjust externally without
opening the cover. The knob by itself on one side is a lock knob that, when tightened clockwise, will
press against the Mirror and CCD slides and lock them both down. Of the pair of knobs on the other
side of the assembly, the knob closest to the centerline adjusts the CCD focus slide, and the one
farther to the side adjusts the mirror slide. They are easily set for optimal operation as follows:
First, mount the camera/wheel/guider assembly to the
telescope. Point the telescope at a nearby wall or flat field
screen illuminated by ambient light or a penlight of some
kind. Total darkness is not necessary. Start up the imaging
CCD in focus mode with an exposure adequate to get a
uniform, not saturated field. A count level of 5,000 to
50,000 counts should be fine. The CCD does not need to be
focused on a star field first. Loosen the lock knob on the
side of the guider assembly so the slides are free to move
(about a turn). Next, while watching the image updating on
the computer screen, rotate the mirror slide knob counter-
clockwise, which will push the mirror closer to the optical
axis. There is no danger of the screw falling out: when you
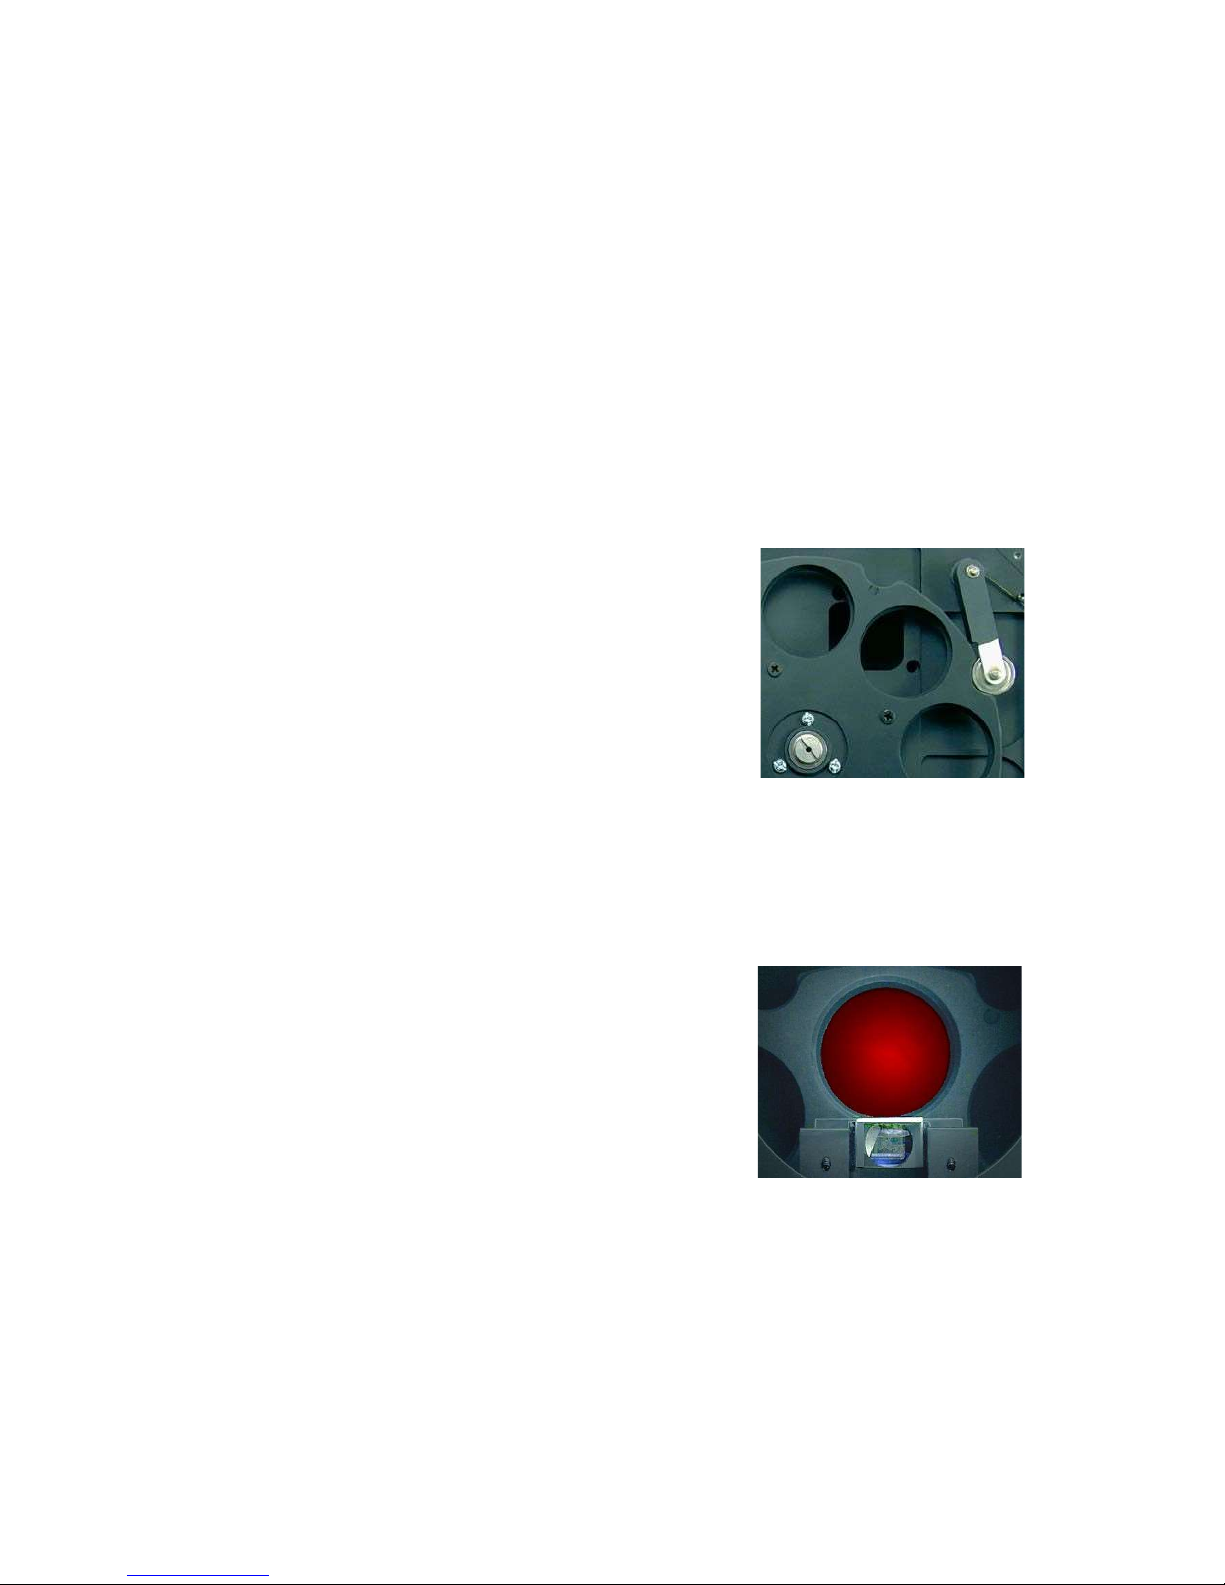
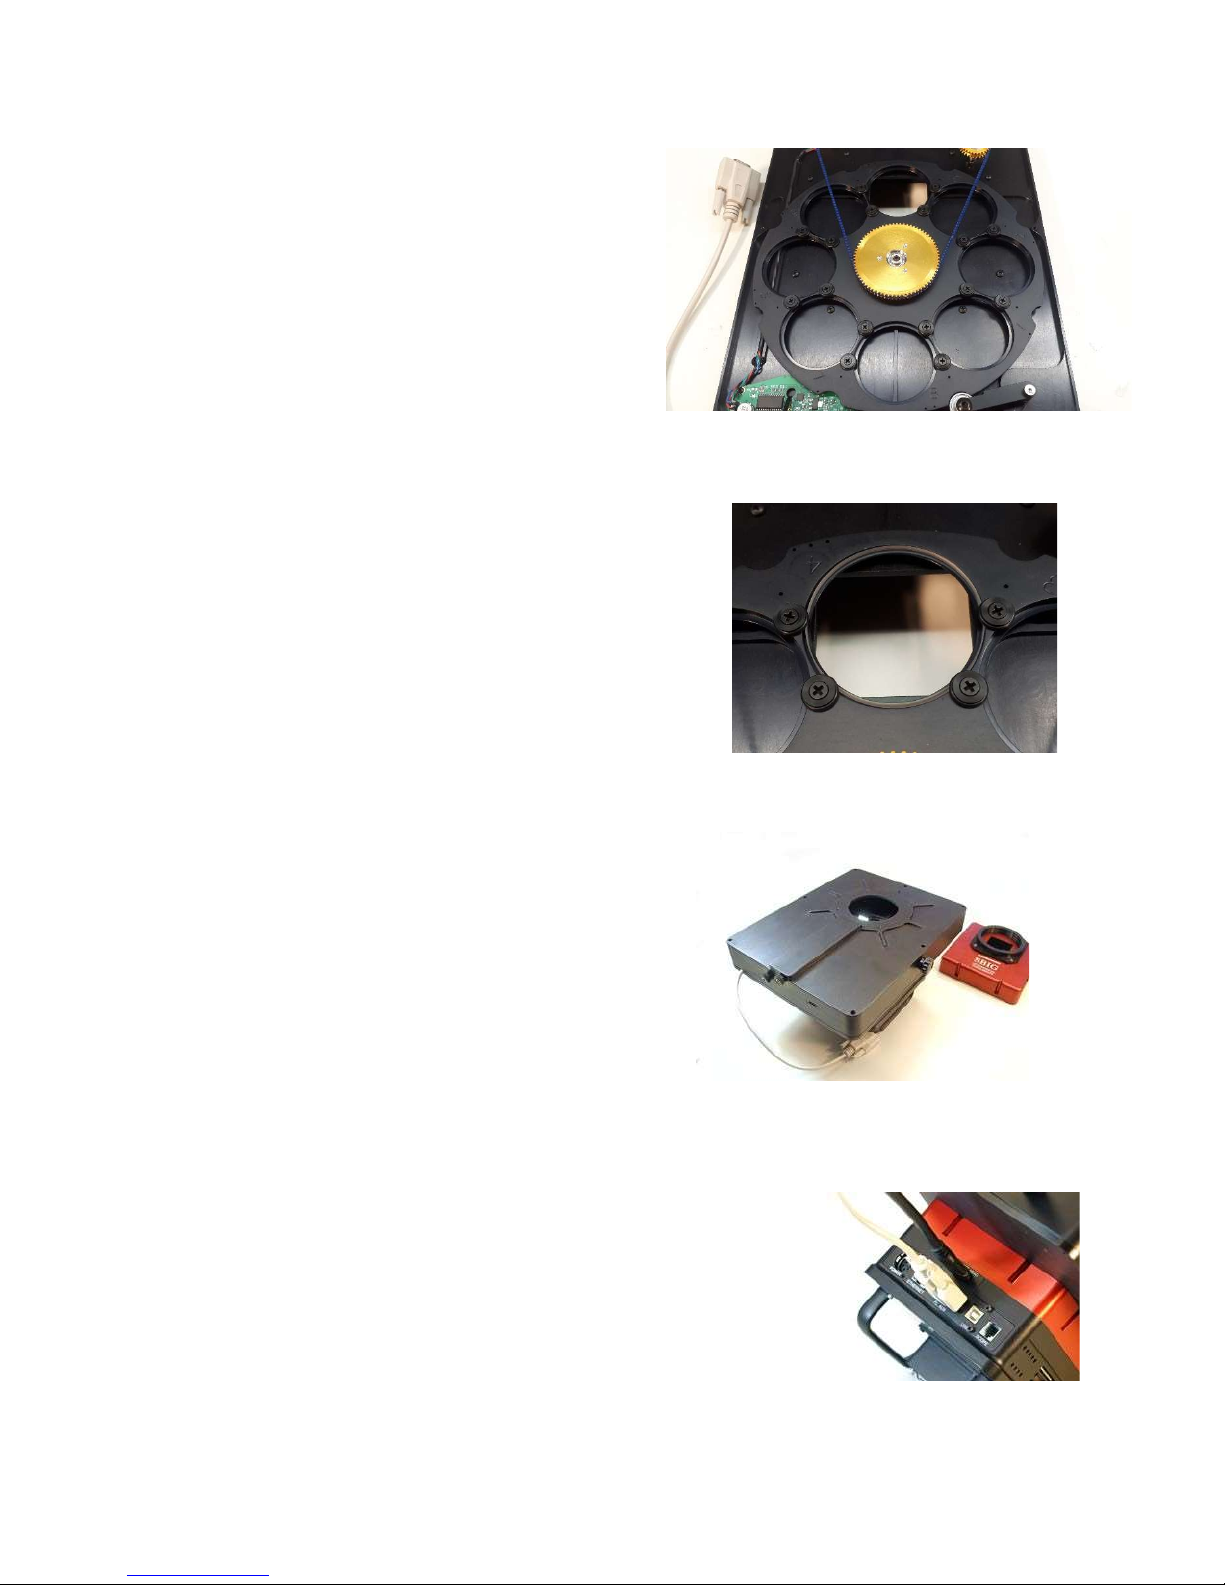
reach the limit of its travel it will jam up. You should eventually see a shadow start to appear at the
bottom of the image, which is the shadow of the mirror vignetting the imaging CCD. This is
undesirable. Adjust the image brightness in focus mode so that the contrast is not too stretched, and
then back out the mirror by rotating the knob clockwise until the shadow is fully off the screen. This
adjustment depends on telescope choice and F/number, which is why we cannot preset it at the
factory. Also, it is important to get the mirror as far in as you can without vignetting – popular
Schmidt-Cassegrain telescopes have limited exit apertures and can barely illuminate a guide chip off-
axis. [TIP: Once this knob has been positioned we recommend putting some tape over it so you don’t
accidentally grab the wrong knob in the dark and change the adjustment – Its easy to do! Black
electrical tape is best since it can be removed in the future with the least mess.]
Adjusting the CCD Focus (FW8G-STXL)
Once the mirror slide is adjusted, point the telescope at the sky and focus the imaging CCD on a star
field using the telescope focuser controls. If you plan on using filters do this with a filter installed.
Next, view the field hitting the guide CCD by starting it up in focus mode with an exposure of 1 to 3
seconds, and focus that image by turning the more central knob on the assembly, the CCD slide, back
and forth. Finding stars initially can be a bit tough, so go to an open cluster or crowded area to
facilitate this. Once you see stars, focusing on them is easy due to the action of the built-in focal
reducer. A critical focus is not required for the guider. If you change filter thicknesses over the
imaging CCD the guider focus may need to be adjusted, but with reasonably matched filters this is not
necessary. You will probably see a gradient in the sky background due to the apertures upstream of
the assembly limiting the field of view, but this does not affect guiding. It merely causes stars farther
off-axis to be dimmer, if it is occurring.
Page 6 of 6
Once the focus is good, rotate the knob on the side of the assembly clockwise to lock the two
slides, which should not perturb the focus. If it does, you may need to repeat the CCD focusing step.
Do not over-tighten the lock knob: just snugging it up is fine. You are now ready for guided imaging
with your STT camera.
Note: the star images on the tracking CCD may not be as good as your imaging CCD since the focal
reducer reduces the F/number by 0.7X, and you are quite a way off axis. This is not a problem for
guiding.
Software Settings
If your software supports SBIG cameras and you have the latest drivers, you should be able to select
the FW8-STT filter wheel in the software setup. If for some reason you do not see this filter wheel in
the list of supported SBIG filter wheels, try selecting select FW8-STL or CFW10 as these older
models use the same control codes.
Canon and Nikon Lens Adapters
Canon EOS and Nikon lens adapters are compatible with the FW8S-STXL standard filter wheel.
They cannot be used with the self-guiding filter wheel because the back focus requirements of the
lenses are too short for the self-guiding version. In this case, one can use the self-guiding cover for
longer focal length telescopes and add the standard cover for use with camera lenses where external
guiding is quite acceptable. Guiding with the standard filter wheel can be accomplished using the
remote guide head or separate guider like the ST-i.
Ver. 1.1 Dec. 10, 2018

This manual suits for next models

1

Popular Professional Video Accessories manuals by other brands

PROAIM Gladiator Action Dolly Assembly manual

PROAIM

PROAIM Gladiator Action Dolly Assembly manual

PROAIM DL-SPIN-01 Assembly manual

PROAIM

PROAIM DL-SPIN-01 Assembly manual

PROAIM P-W5P38-BASE instruction manual

PROAIM

PROAIM P-W5P38-BASE instruction manual

PROAIM Spark P-SPK-13 Assembly manual

PROAIM

PROAIM Spark P-SPK-13 Assembly manual

PortKeys BM5 user manual

PortKeys

PortKeys BM5 user manual

PROAIM P-WV-2SD instruction manual

PROAIM

PROAIM P-WV-2SD instruction manual

PROAIM SR-250-00 Assembly manual

PROAIM

PROAIM SR-250-00 Assembly manual

PROAIM CINEMA Series Assembly manual

PROAIM

PROAIM CINEMA Series Assembly manual

Prompter People Flex Series setup sheet

Prompter People

Prompter People Flex Series setup sheet

PROAIM P-OHCP-02 Assembly manual

PROAIM

PROAIM P-OHCP-02 Assembly manual

PROAIM TP-ULTM-01 Assembly manual

PROAIM

PROAIM TP-ULTM-01 Assembly manual

manuals.online logo
manuals.online logoBrands
  • About & Mission
  • Contact us
  • Privacy Policy
  • Terms and Conditions

Copyright 2025 Manuals.Online. All Rights Reserved.