Scalemaster Softline 100 Reference guide

SOFTLINE 100 & 200
ELECTRIC METERED WATER SOFTENERS
Installaon Procedures & Operang Manual
PLEASE READ FULLY BEFORE INSTALLATION

Contents
Introducon
Installaon
Control Operaon & Layout
3 Step Programming
Commissioning Your Water Soener
Technical Informaon & Specicaon
3
4 & 5
6 & 7
8
9 & 10
10 & 11
Page
DATE SOFTENER INSTALLED WATER HARDNESS (PPM)
………………………………………… …......…...…………………………
We suggest you keep this manual for future reference.
2
Before installing your Scalemaster Water Soener please make a note here of the water
hardness. This can be done with the Water Hardness Test Strips supplied with your soener.
If you are unsure you can contact your local Water Authority or contact the Scalemaster Sales
oce with your postcode.
PLEASE NOTE:
Before you start installing your Soline Water Soener ensure that you have all
the correct parts and tools required to install your water soener.
Ensure you have the correct installaon kit to complete your installaon.
YOUR SOFTLINE WATER SOFTENER IS COVERED BY A 5 YEARS PARTS &
LABOUR WARRANTY. TO ENSURE YOUR WATER SOFTENER IS COVERED
IT MUST BE INSTALLED IN ACCORDANCE WITH THESE INSTRUCTIONS
& REGISTERED ONCE INSTALLED.
In the interests of connuing product development, Scalemaster reserves the
right to make modicaons to the specicaon, design and appearance of the
unit without noce.

Thank you for choosing a Scalemaster Water Soener
Please take the me to read this installaon guide. It will tell you in simple terms how to install
and commission your new Scalemaster Water Soener to begin enjoying the benets of
soened water.
Before You Start
Before starng installaon, inspect the Water Soener for shipping damage or shortages.
Make sure you have all the necessary tools on hand before starng the installaon.
Follow all applicable Plumbing and Electrical regulaons when installing the Water Soener.
If in doubt, refer to the relevant WRAS Informaon and Guidance note at:
www.wras.co.uk/PDF_Files/ign9-07-01.pdf
This Water Soener is not intended for the treatment of water that is microbiologically
unsafe or of unknown quality without adequate disinfecon before or aer the Water
Soener and is to be used only for potable water.
Use cauon when installing soldered metal piping near the Water Soener. Heat can
adversely aect the plasc control valve or bypass valve system. Be sure all soldered pipes
are fully cooled before aaching plasc plumbing ngs.
Take care not to strip the threads when ghtening plasc pipe ngs. PTFE tape may be
used on connecons that do not use an ‘O’ ring seal. Do not allow pipe joinng compound
or sealant to come into contact with any plasc parts.
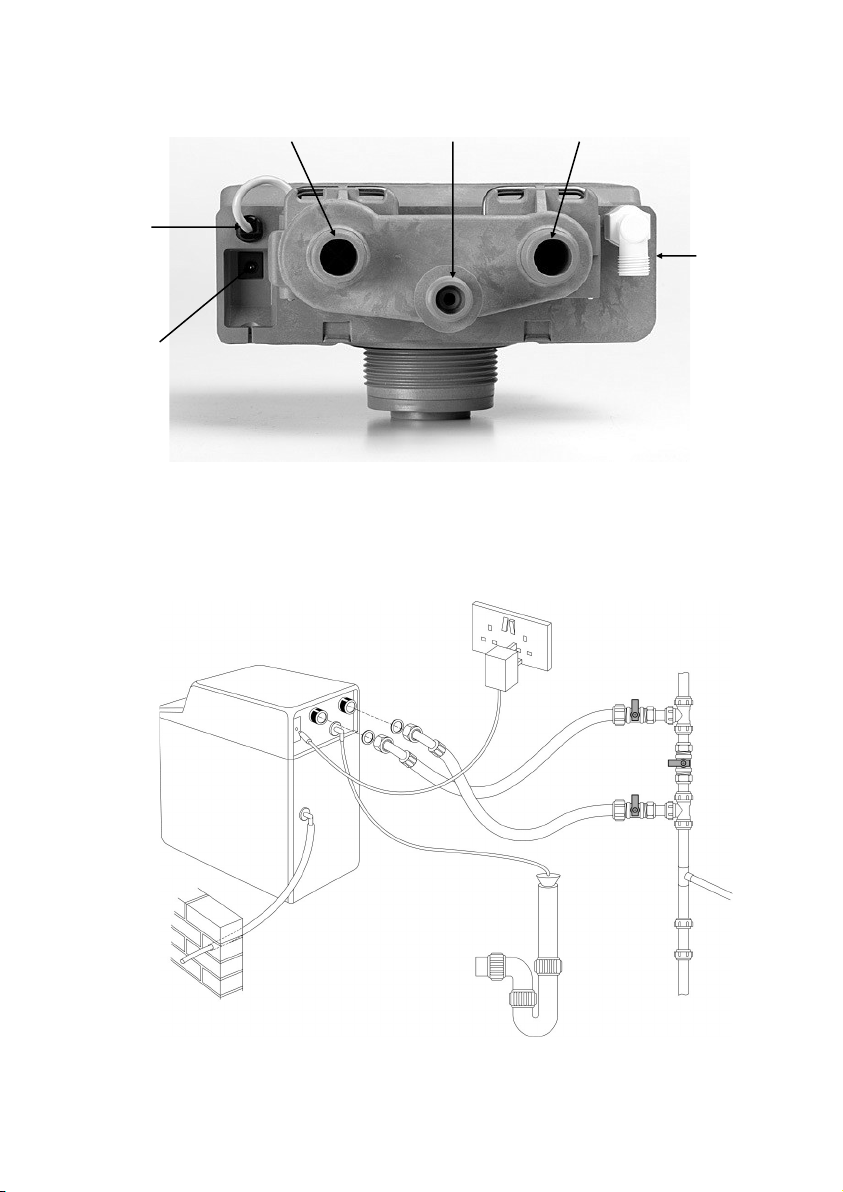
There should be a minimum runo at least 3 meters of pipe between a soener and a water
heater to prevent the possibility of hot water entering the soener unit.
Use only the power transformer supplied with the Water Soener unit.
The mains power adapter supplied is double-insulated and does not require earthing. Earth
bonding should be applied across metal inlet and outlet pipework of the Water Soener to
maintain earth connuity.
Observe drain line requirements. The drain line must be a minimum of 12.5mm diameter.
The unit should be above, and not more than 6 metres from a drain.
Do not support the weight of the Water Soener on the control valve connecons or
plumbing.
Protect the soener, soener drain and all other components from the eects of frost.
Evidence of damage due to freezing will invalidate your Water Soener warranty.
Keep the media vessel in the upright posion. Do not turn upside down or drop. Turning the
vessel upside down or laying the vessel on it’s side can cause treatment media to enter the
valve.
If in doubt contact the Technical Helpline on 07990 064096
3

4
Water Line & Bypass Connecons
A bypass loop should be installed on all Scalemaster 100 & 200 Water Soeners. The bypass
valve loop isolates the Water Soener from the water system and provides unsoened
water to the water system during roune maintenance and servicing procedures.
Installaon
It is recommended that your water soener is installed by a
professional plumber. This installaon guide is wrien with the professional
plumber in mind and assumes that this person has a working knowledge of
hydraulic water soeners and domesc plumbing systems. Any electrical work
required should be carried out by a fully qualied electrician.
Posioning the Water Soener.
Measure your Water Soener and the space where it will be installed. Remember to allow
extra space for connecng pipework and access for future servicing and topping up of salt.
Keep the distance of the incoming main and drainage to a minimum. 2 metres is usually
more than adequate but this can be longer in circumstances where the water pressure
allows.
The weight of a Water Soener is greatly increased when fully operaonal and lled with
salt so this must be taken into account when choosing where to site the soener.
Your Scalemaster Water Soener is designed to operate eecvely with an incoming
water pressure of between 1.0 bar and 6 bar. If your water supply is likely to fall outside
these parameters we recommend that a booster pump or pressure reducing valve should
be ed accordingly.
Do not install your water soener next to a boiler or other heat source or in an airing
cupboard where the ambient temperature will exceed 40°C.
IF YOU ARE CONSIDERING INSTALLING YOUR WATER SOFTENER IN A LOFT, THE
FOLLOWING INSTRUCTIONS SHOULD BE STRICTLY ADHERED TO:
Lo Installaon
The water soener may be installed in a lo or roof cavity but must be located within a
safety bund tank of not less than 100 litre capacity. A suitable tank would be a plasc roof
storage tank with an overow pipe of not less than 22mm diameter. This tank should also
be mounted on a board strong enough to spread the weight over a load-bearing
wall/joists.

5
Drain Line Connecon
The unit should higher than, and not more than 6 metres from the drain. Use an appropriate
adapter ng to connect 1/2” (12.4mm) plasc tubing to the drain (discharge) hose
connecon of the control valve.
The drain (discharge) hose may be elevated up to 1.8 meters providing the run does not
exceed 4.6 meters and water pressure at the soener is not less than 2.76 bar.
Where the drain (discharge) hose is elevated but empes into a drain below the level of the
control valve, form an 18cm loop at the far end of the line so that the boom of the loop is
level with the drain hose connecon. This will provide an adequate siphon tap.
Where the drain (discharge) empes into an overhead sewer line, a sink-type U-bend trap
must be used.
Secure the end of the drain (discharge) hose to prevent it from moving.
Drinking Water
When ng your Water Soener, allowance should be made for at least one drinking water
tap that is not fed by the Water Soener. Where praccal this should be at the kitchen sink
but a Ulity Room or other suitable alternave will suce.
It is recommended that people on a low sodium diet should not drink arcially soened
water. Water used for mixing infant powder for babies must only be taken from unsoened
water as soened water contains an increased level of sodium which will not be accounted
for in the infant formula.
Brine Line Connecons
Check the connecons taking care not to over-ghten. Be sure that the regeneraon line is
secure and free from air leaks.
Electrical Connecon
For added safety the Scalemaster 100/200 series control operates on low voltage via a
plug in transformer. Use only the transformer supplied with the soener.
ANY ELECTRICAL WORK REQUIRED TO INSTALL A MAINS POWER SUPPLY FOR
THE WATER SOFTENER SHOULD ONLY BE CARRIED OUT BY A FULLY
QUALIFIED ELECTRICIAN.

6
Controls: Layout & Operaon.
Large LED Display: A 2 digit LED readout is highly visible for easy reading.
Easy 3 - Step Programming: Only 3 buons are required to fully control the soener.
Camsha Indicator: A column of windows located on the le of the LED readout display
provides a visual indicator of the camsha operaon.
Service Posion Indicator: Is lit to indicate normal operaon.
Manual Regeneraon Buon: Iniates either a delayed regeneraon or immediate
regeneraon depending upon long or short pressing.
Flow Indicator: The decimal point/ow indicator blinks on and o when water ow turns
the meter.
Power Loss Memory Retenon: The controller features baery-free Time of Day retenon
during loss of power. The me will remain in memory for 6 to 24 hours depending on the
installaon. If the memory’s power source becomes exhausted, the Time of Day will reset
to ‘0’ immediately aer power is resumed. The Time of Day must be reset to ensure me of
regeneraon occurs at 02.00am.
NOTE: All other programmed parameters are stored in the ash memory and are retained
during power outages. Flash memory retenon is 100 years.
Valve Layout (Front)
Fig.1
Manual Regeneraon Buon LED Display Time Set Salt Dosage
Camsha
Indicator
Service
Posion
Indicator
Capacity
Set
Delayed Regeneraon Indicator Face Plate Latch Flow Indicator
. .

7
Outlet 3/4” BSPT Inlet 3/4” BSPT
Meter
Cable
Low
Voltage
Power
Supply
Connecon
Fig. 2
Layout drawing
Valve Layout (Back)
Typical Soener Installaon
Drain
(Discharge)
1/2” BSPT
Brine
Pickup
3/8”
BSPT
Fig. 3
Overow
Drain (Discharge)
Bypass Loop
Inlet / Outlet

Salt Dosage: Dosage is already pre-set before leaving the factory. Press to check the
correct seng (see Fig. 5). If you have a 10 litre unit (Soline 100) the seng will be 1.5 (see
Fig. 5) if you have a 15 litre unit (Soline 200) the seng will be 2.2. (If the seng is not
correct, press the buon unl the correct seng is shown.
8
Simple 3 - Step Programming
Time of Day: Press the Time Set buon (see Fig.1)unl desired hour appears. (see Fig.4*).
Note: The elapsed minutes will reset to zero when the hours are changed.
Consult the table on page 9 for cubic capacity sengs, decide on appropriate seng. Press
unl desired seng appears (see Fig. 6).
Programming is now complete
STEP 1
STEP 2
STEP 3
Fig. 5
Fig 6
Fig. 4
Soline 100
Soline 200
* Time
shown is
11.00 am

9
NOTE: During programming, if a buon is not pushed for 5 seconds, the control returns to the normal
operaon mode and displays the me of Day.
TABLE A (SOFTLINE 100) Soline 100 Meter
Hardness 200 250 300 350 400 450 500
Cu Meters Capacity 2.5 2.0 1.7 1.4 1.3 1.1 1.0
TABLE A (SOFTLINE 200) Soline 200 Meter
Hardness 200 250 300 350 400 450 500
Cu Meters Capacity 3.8 3.0 2.5 2.1 1.9 1.7 1.5
Commissioning
The Water Soener will now need to be placed into operaon. Do not put salt into the brine
tank yet.
1. With the supply water for the system sll turned o, posion the bypass valve to the ‘not
in bypass’ (normal operaon) posion.
2. Press and hold the buon on the controller for 3 seconds. This will iniate a manual
regeneraon, and cycle to the backwash posion.
3. Filling the resin vessel with water.
A. With the water Soener in backwash, open the water supply valve very slowly to
approximately the 1/4 open posion. Water will begin to enter the resin vessel.
Air will begin to be purged to drain as the resin vessel lls with water.
B. When all of the air has been purged from the resin vessel (water begins to ow
steadily from the drain line), open the main supply valve all the way. This will purge
the nal air from the tank.
C. Allow water to run to drain unl the water runs clear from the drain line. This purges
any debris from the media bed. Within the vessel.
D. Turn o the water supply and let the system stand for about ve minutes to allow any
trapped air to escape from the resin vessel.
4. Adding water to the salt tank.
Pour 6 litres of water into the Brine (Salt) Tank
Connued on Page 10

10
5. Checking Brine Draw
A. From the service posion press the buon to iniate a manual regeneraon and al-
low the control to move to the backwash posion (C1). (to display the C number, quickly
press the buon aer the cascading lines have started).
B. As the lines start to cascade slowly turn on the water to the soener and allow the air to
purge from the soener.(C1 will last approximately 1 minute).
C. When the control moves to C2 check that the water is being drawn from the brine (salt)
tank.
D. If the water level does not recede, check all brine line connecons.
6. If the water level is receding from the brine (salt) tank press the and the clock buons
together for 3 seconds, the soener will go to C3, repeat this unl you return to the service
posion (aer C7).
7. Turn on a tap plumbed aer the Water Soener. Run the tap unl the water runs clear.
8. Fill the brine (salt) tank with either granular or tablet salt (approximately 2/3 full is sucient),
Salt should be specically formulated for Water Soeners.
Congratulaons your Water Soener is now fully operaonal.
Technical Informaon - Approximate Cycle Times
Commissioning - Connued.
CYCLE ACTION SALT
USED TIME
C1 BACK WASH 1 MINUTES
C2 BRINE DRAW 1.5kg SOFTLINE 100 9 MINUTES
C2 BRINE DRAW 2.2kg SOFTLINE 200 15 MINUTES
C2 SLOW RINSE 25 MINUTES
C3 REPRESSURIZE 3 MINUTES
C4 FAST RINSE 1 MINUTES
C5 2nd BACKWASH 1 MINUTES
C6 2nd FAST RINSE 1 MINUTES
C7 BRINE REFILL SOFTLINE 100 8 MINUTES
C7 BRINE REFILL SOFTLINE 200 12 MINUTES

11
Technical Informaon - Product Specicaon
SPECIFICATION SOFTLINE 100 SOFTLINE 200
Height 445mm 600mm
Depth 460mm 460mm
Depth Incl Connector 460mm 460mm
Width 275mm 270mm
Resin Volume 10 litre 15 litre
Salt used per regen cycle 1500 grams 2200 grams
Water used per regen cycle 53 litre 59 litre
Maximum working pressure 8.0 bar 8.0 bar
Minimum Working Pressure 1.5 bar 1.5 bar
Max ambient temp (C°)45°45°
Max water temp (C°)38°38°
Electrical Supply 12v 50 Hz 12v 50 Hz
Max (peak) ow rate 42 litres per minute 42 litres per minute
Max ow rate (1 bar pressure drop) 33 litres per minute 33 litres per minute
Inlet & outlet connecons 3/4” male 3/4” male
Drain & overow connecons 1/2” 1/2”
Regeneraon me 42 mins 46 mins
Max soened water capacity @
200ppm (water eciency*)
2500 litres (2.1%) 3750 litres (1.6%)
Max soened water capacity @
300ppm (water eciency*)
1667 litres (3.2%) 2500 litres (2.4%)
Sizing recommendaon* Up to 5 person Up to 7 person
Carbon Neutral YES YES
Scalemaster product code 900216 900230
* Based on standard household use assuming average domesc use of 150 litres of
water per person per day.

Scalemaster Limited
Emerald way, Stone Business Park, Stone Staordshire, ST15 0SR, England.
TELEPHONE 01785 811636 FACSIMILE 01785 811811
TECHNICAL HELPLINE: 07990 064096
WWW.SCALEMASTER.CO.UK
Other manuals for Softline 100
1
This manual suits for next models
1
Other Scalemaster Water Dispenser manuals
Popular Water Dispenser manuals by other brands

Lenoxx
Lenoxx WC250 manual

DS Services of America
DS Services of America pure water dispenser 200k Series How to Clean

Sunbeam
Sunbeam 0282 manual

Halsey Taylor
Halsey Taylor Contour Series owner's manual

GE
GE GXSM01HWW Use and care & installation instructions

Elkay
Elkay VRCGRN8 Series Installation & use manual