Schacht LILLI LOOM User manual

THE LILLI LOOM
assembly instructions
Find out more at schachtspindle.com
Schacht Spindle Company 6101 Ben Place Boulder, CO 80301
p. 303.442.3212 800.228.2553 f. 303.447.9273
© 2017 Schacht Spindle Company, Inc. 08.17

– 2 –
ASSEMBLY INSTRUCTIONS
LILLI LOOM PARTS
2 – sides
2 -- beams with teeth
4 – #8 x 1-¼" Phillips truss head screws
1 – pick-up stick
1 -- shed stick
1 – 6” large-eye weaving needle
1 -- stick shuttle
1 -- beater
#8x1-1
/
4
"
trusshead screw
loom
side
beater
beam
weaving needle
stick
shuttle
loom
side
shed stick
pick-up stick
teeth
TOOLS NEEDED
Phillips screwdriver
Bar soap (optional: a little on
screw threads makes them easier
to insert)

– 3 –
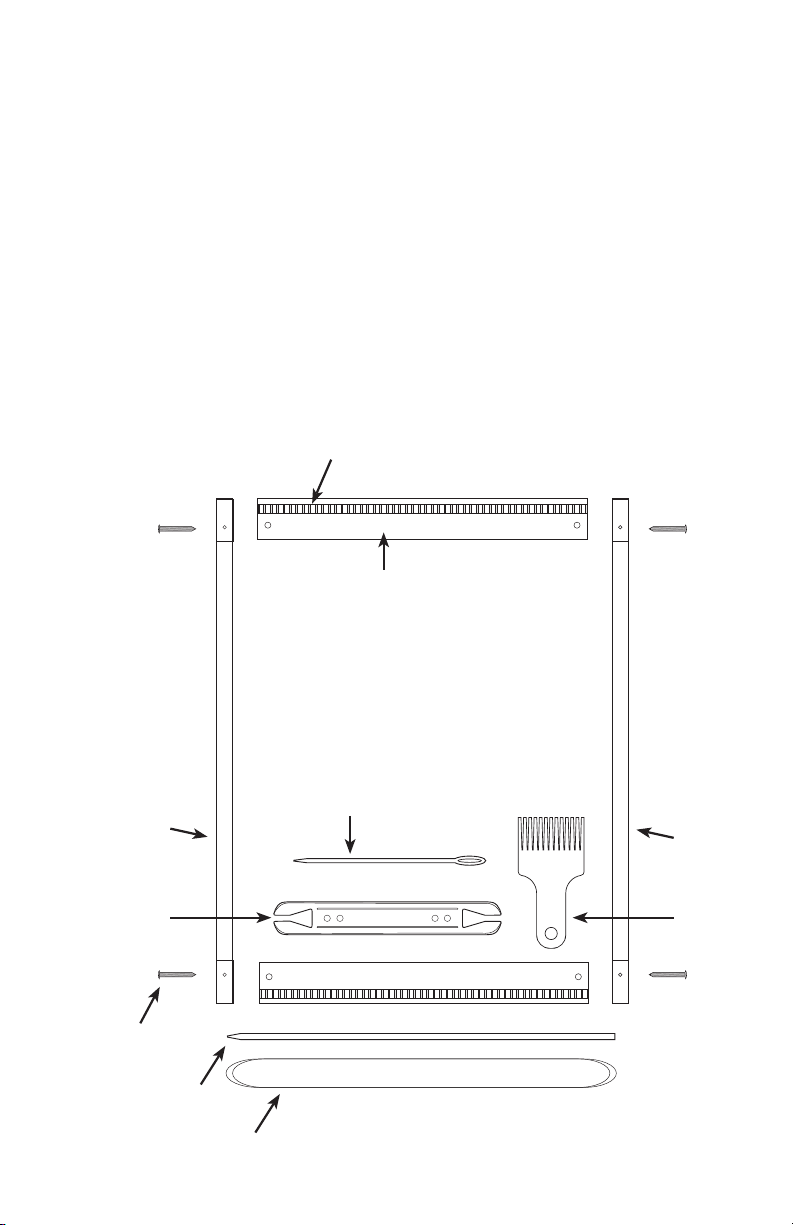
FIGURE 1: ASSEMBLED LILLI LOOM
ASSEMBLE THE LOOM
1. Lay the loom sides parallel to each
other and about 10” apart.
2. Place the top beam into the cut
grooves in the tops of the loom sides
(with the beam teeth facing up and
out). Line up the holes and fasten the
beam to each side with a screw.
3. Place the other beam into the bot-
tom cut grooves of the loom sides
(with the beam teeth facing down and
out). Line up the holes and fasten the
beam to each side with a screw.
WEAVING ON THE LILLI LOOM
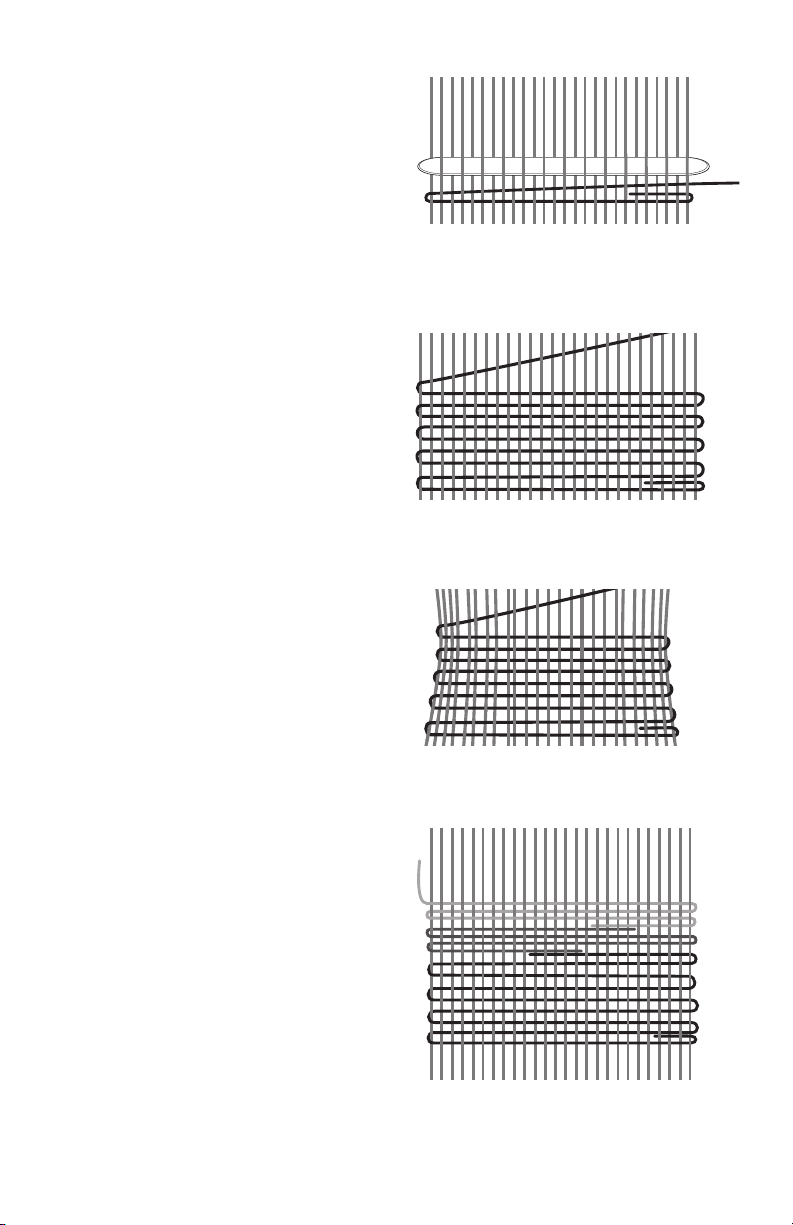
Weaving is the process of interlacing two sets of threads to make a fabric. One
set, the warp, is held taut by the loom; the other set, the weft, is woven across
the warp threads. There is no limit to the possibilities that can be explored by
changing colors, sizes, and textures of the weaving materials.
WEAVING TERMS
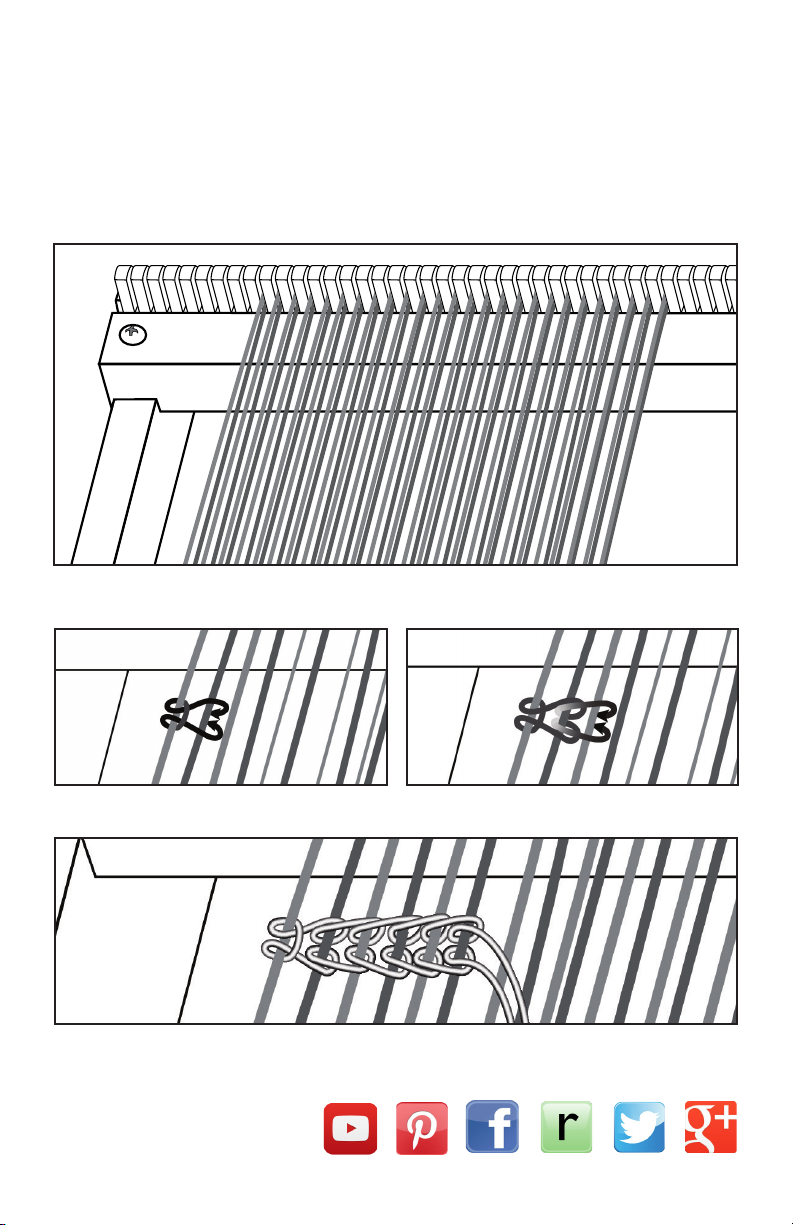
Beam teeth—the plastic “combs” or
“teeth” attached to the top and
bottom beams.
Beams—the top and bottom cross
pieces of the loom frame.
EPI—the number of warps in an inch.
This loom can be set up with either
6 or 12 ends per inch.
Pick-up stick—on the Lilli Loom the
pick-up stick is inserted in the
opposite row as the shed stick. It is
turned on edge to make the shed.
Plain weave—the most basic weave,
in which the threads interlace
alternating over and under.
PPI—picks or the number of weft
rows per inch.
Shed—the space between raised and
lowered warp threads through
which the shuttle passes.
Shed stick—narrow stick for marking
the shed. It stays in place, while
the alternate shed is created with
a pick-up stick, taken out after the
row is woven.
Shuttle—a tool for holding and
carrying weft.
Warp—the weaving threads which are
held taut on the loom.
Warping the loom—Putting the warp
threads on the loom.
Weaving needle—the large eyed
needle can be used for weaving. It
is especially useful for short rows
and for weaving at the very top of
the weaving when space is limited.
Weft—the weaving threads which are
woven crosswise through the warp
threads.

– 4 –
WARPING THE LOOM
1. Tie the warp yarn onto a tooth on
the bottom beam. (Figure 2) Tie onto
the edge of where your weaving will
begin. We prefer to center our weav-
ings on the loom.
2. Bring the yarn to the top beam,
place it around the tooth directly
above the one you started from.
Now take the yarn back to the bot-
tom beam, go around the next tooth
and back up to the top. Repeat until
you have warped the width of your
planned weaving.
3. After you have finished winding
all of the warp ends on your loom,
temporarily secure the working end
of your warp yarn around a beam
tooth.
4. Tighten the warp threads so that
they are taut. To do this start at the
first measured warp and pull up on it
to tighten the tension. Continue tak-
ing up slack from one warp thread
to the next all of the way across the
warp. Take out the extra length and
then again tie off the end temporarily.
If the warp needs further tensioning,
repeat as before until all of the warps
feel evenly taut. End by tying the
warp string onto the beam.
FIGURE 2: WARPING THE LOOM
FIGURE 2A: WARPING DETAILS

– 5 –
FIGURE 6: WEAVE THE SECOND ROWFIGURE 5: WEAVE THE FIRST ROW
FIGURE 3: WINDING THE SHUTTLE
FIGURE 4: INSERT THE SHED STICK
BEGINNING TO WEAVE
1. Wind a length of yarn on the stick
shuttle (Figure 3), or cut a length of
weft yarn and thread it through the
weaving needle.
2. Weave the shed stick over then
under every other warp thread all the
way across the warp (Figure 4). The
shed stick stays in place throughout
the weaving. To increase the size of
the shed, you can also insert the pick-
up stick into the narrow shed and
turn it on edge. (Remove the pick-up
stick after weaving the first row and
use it to make the next shed.)
3. Weave the first row (Figure 5).
Use the beater to press the weft into
place. You can also use the narrow
side of the inserted pick-up stick for
beating.
Remember that the shed stick remains
in the warp throughout your weaving.
4. Use the pick-up stick to weave the
opposite shed. Weave it under and
over the opposite the threads on the
shed stick. (i.e. a warp thread that is
under the shed stick will be over the
pick-up stick, and so on) Now, weave
across in this space. You must remove
the pick-up stick after every row.
5. Repeat steps 3 and 4 until your
weaving is finished.

– 6 –
CORRECT SELVEDGE
INCORRECT SELVEDGE
CHANGING THE YARN
WEAVING IN THE WEFT TAIL
When you start weaving, leave a 2”
tail and weave across. Tuck in the tail
when you weave the next row. Trim
this tail after you’ve removed the
weaving from the loom and washed
the fabric.
REMOVING THE WEAVING FROM
THE LOOM
If you’ve woven the full length of the
loom, you may need a crochet hook
to lift off the weaving. If you have left
lengths of warp at the top or bottom,
you’ll need to tie knots in the ends to
keep the weft from raveling.
SELVEDGES
Selvedges are the edges of the weav-
ing. Generally you want them to be
straight up and down, to not pull in
excessively or have too much weft
hanging out at the edges. Managing
the selvedges is a manner of insert-
ing enough but not too much weft
into the shed. Insert the weft so that
it is snug at the edge but not pulling
in nor leaving a loop. Then place the
weft at an angle. This will help adjust
the weft in the shed.
CHANGING YARN
To change to a new length of yarn
when the first yarn runs out, or when
you want to change colors: leave
the tail of the first length of yarn in
the shed. Start with the new yarn
and weave it into the same shed as
the old yarn. Overlap the new and
old yarns where they meet. You can
also start and stop the yarns at the
selvedges, especially when changing
colors. Weave the tails in as you go
or after you’ve removed the weaving
from the loom.

– 7 –
TAPESTRY - LINKED
TAPESTRY - SEPARATE
CREATING PATTERNS
You can create patterns in your weft
using two weft colors—be sure to push
each row down firmly, covering the
warp yarn.
• Horizontal stripes—weave
several rows of color A, then switch to
color B for several rows.
• Thin wavy stripes—weave 2 rows
of color A, then 2 rows of color B;
repeat.
• Vertical stripes—weave 1 row of
color A, then 1 row of color B; repeat.
• Spots of color—Weave several
rows of color A, then 1 row B; then
several rows of color A.
SIMPLE TAPESTRY
To weave two colors side by side, you’ll
need two lengths of yarn in different
colors. Begin color A on the one side,
and color B on the other side. Weave
the two colors into the same shed until
they meet. Change the shed and push
the two yarns in place and weave each
color back to its edge. At the point
where the yarns meet at the center you
can choose to have them link around
each other or not. You can expand on
this technique and weave three, four,
or more colors beside each other at
once. You will need a separate length
of yarn for each color area.

12 EPI - WARPED
12 EPI CHAINING - STEP 1 12 EPI CHAINING - STEP 2
12 EPI CHAINING - DETAIL
WARPING THE LILLI LOOM FOR 12 EPI
The teeth on the Lilli Loom are set at 6 ends per inch. You can double your
sett to 12 epi by warping the loom with doubled warp threads. Just wind the
warp on the loom as usual but wind two yarns together. After you have all of
the warp yarns wound and tightened, you can split the doubled threads by
chaining them across the top and bottom.
VISIT US:(hyperlinks)
Table of contents
Other Schacht Sewing Machine manuals
Popular Sewing Machine manuals by other brands

Baby Lock
Baby Lock Gallant XL Instruction and reference guide

Baby Lock
Baby Lock Anna BL20A Instruction and reference guide

Brother
Brother Quattro 2 6700D Manual de instrucciones

PAMI
PAMI Hemming Machine 99 Instructions for use and maintenance

DURKOPP ADLER
DURKOPP ADLER M-Type Premium Series Additional instructions

Singer
Singer 8280 instruction manual