ACOUSTIC X
AMPS
Class–A High Voltage Preamp / No Integrated Circuits / No NFB
1
2
53 4
MIC IN P24 GAIN LOW
GAIN RESON LOW MID HIGH REV / AUX VOLUME
INSERT LINE OUT
10VØ GAIN WARM LOW PARAMETRIC MIDS
flat
300 Hz
3.3 KHz
HIGH
REV / AUX
VOLUME VOLUMEL RSTEREO IN
D.I. OUT
SWISS
MADE
240 Hz
150 Hz
700 Hz
gain
PARAMETRIC MIDS
JAM X
GND LIFT
2 4 0 W A T T
A C O U S TIC
A M P L I F I E R
LENNAHC5
A C O U S TIC
A M P L I F I E R
S E R I A L N U M B E R
WWW . S C H E R T L E R . C O M
M
A
D
E
+
S
W
I
S
S
JAM X
1 3 0 W A T T P O W E R C O N S U M P TIO NX S E R I E S
P24
INSTRUMENT IN
MIC IN 10V
CAUTION
RISK OF ELECTRIC
SHOCK
DO NOT OPEN
TO REDUCE RISK OF FIRE,
DO NOT EXPOSE THIS
EQUIPMENT TO RAIN
OR MOISTURE. FOR
CONTINUED PROTECTION
AGAINST RISK OF FIRE,
REPLACE ONLY WITH THE
SAME TYPE AND RATING
OF FUSE.
Class–A High Voltage Preamp / No Integrated Circuits / No NFB
1
INSTRUMENT IN
GAIN RESON LOW MID HIGH REV / AUX VOLUME
INSERT LINE OUT
10VØ GAIN WARM LOW PARAMETRIC MIDS
flat
300 Hz
3.3 KHz
HIGH
REV / AUX
VOLUME AUX OUT
VOLUME VOLUMEL RSTEREO IN
MASTERREVERB
master
DECAY
D.I. OUT
240 Hz
150 Hz
700 Hz
gain
PARAMETRIC MIDS
JAM X
GND LIFT
2 4 0 W A T T
A C O U S TIC
A M P L I F I E R
LENNAHC5
A C O U S TIC
A M P L I F I E R
S E R I A L N U M B E R
WWW . S C H E R T L E R . C O M
M
A
D
E
+
S
W
I
S
S
JAM X
1 3 0 W A T T P O W E R C O N S U M P TIO NX S E R I E S
P24
INSTRUMENT IN
MIC IN 10V
CAUTION
RISK OF ELECTRIC
SHOCK
DO NOT OPEN
TO REDUCE RISK OF FIRE,
DO NOT EXPOSE THIS
EQUIPMENT TO RAIN
OR MOISTURE. FOR
CONTINUED PROTECTION
AGAINST RISK OF FIRE,
REPLACE ONLY WITH THE
SAME TYPE AND RATING
OF FUSE.
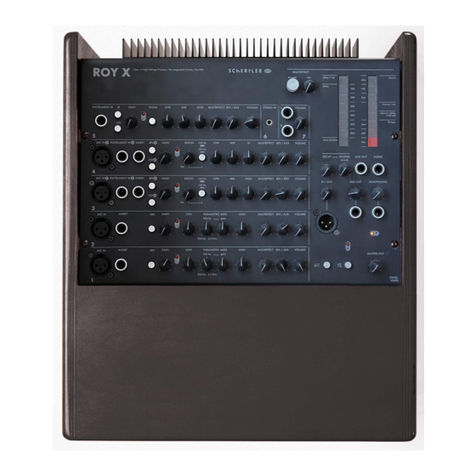
CONTROLS
1.1 1.2 1.3 1.4 1.5 1.6 1.7 1.8 1.9
7
2.1 2.2 2.3 2.4 2.5 2.6 2.7 2.8 2.9 2.10 2.11
1.1. INSTRUMENT IN: An unbalanced input for the connection of 1/4” jacks, with optimal sensitivity
for high level signals. The electronics will adapt to any situation - no special action is required.
1.2. PHASE: In the event of feedback, or unwanted effects between channels, use the PHASE
REVERSE button.
1.3. 10V: This supplies the jack connector with 10 VDC for powering electret microphones.
1.4. GAIN: This variable gain preamplier adjusts the sensitivity level to ensure the best possible
processing of the signal through the channel. It is important that this input level is set and optimized
in the best way to achieve the cleanest sound possible.
1.5. OVERLOAD: This LED (when lit) indicates that the level of the input signal is too high and it
might therefore introduce distortion.
Practical tip: When using an amplied speaker, distorted input signals should be avoided at all cost
in order to prevent potential damage to the speaker. While playing your instrument, carefully set the
preamp/gain level by turning up the GAIN control until the OVERLOAD LED begins to blink. At this
point, turn the gain back down slightly. Now set the MASTER Volume between 30% and 60%. With
the gain and master levels appropriately set, you can now set the channel volume as you please.
1.6. WARM: When active, this low-pass lter dampens higher frequencies to produce a warmer
sound when using bridge-mounted pickups such as the SCHERTLER STAT Series for violin, cello and
double bass.
1.7. HIGH, MID, LOW (EQ): These controls are for high, mid and low frequency regulation. Offering
cut and boost of ±15 dB, they allow a wide range of tonal variations to be explored. Parametric
MID regulation offers the possibility to cut or boost a frequency range between 300 Hz and 3.3
kHz. When the controls are positioned centrally there is no cut or boost of the selected frequency
band.
1.8. REV/AUX: This rotary control sets the level of the digital reverb on the channel and the level
of the signal to the AUX OUT output. If you want to bypass the onboard reverb, you can set the
REVERB Master control to zero and use the REV/AUX to control the amount of signal you want to
send to an external effect unit, or to an additional monitor.
1.9. VOLUME: This rotary control regulates the channel volume.
2.1. MIC INPUT (XLR): This input is electronically balanced for XLR-type connections. The channel is
designed for any kind of microphone source e.g. dynamic and condenser mics.
2.2. INSTRUMENT IN: An unbalanced input for the connection of 1/4” jacks, with optimal sensitivity
for high level signals. The electronics will adapt to any situation - no special action is required.
2.3. P24: Phantom power supplies the XLR connector with 24 VDC for powering condenser
microphones. Most condenser (and dynamic) mics, and some preamps, can be safely phantom
powered. In certain cases however, phantom power can cause damage. This tends to happen with
unbalanced microphones, preamps, or stompboxes that have been modied for balanced XLR use.
If in doubt, please contact the manufacturer to check the compatibility of your audio device before
using the amplier.
2.4. 10V: This supplies the jack connector with 10 VDC for powering electret microphones.
2.5. GAIN: This variable gain preamplier adjusts the sensitivity level to ensure the best possible
processing of the mic/instrument signal through the channel. It is important that this input level is set
and optimized in the best way to achieve the cleanest sound possible.
2.6. OVERLOAD: This LED (when lit) indicates that the level of the input signal is too high and it
might therefore introduce distortion. (See “Practical tip”, 1.5.)
2.7. RESON: The RESONANCE (notch) lter cuts the frequency of 150 Hz/240 Hz to reduce low-
frequency feedback. Left: no attenuation (at), Right: maximum attenuation.
2.8. RESON button: Use the RESON button to select the resonant frequency of the instrument
(240 Hz/150 Hz).
2.9. HIGH, MID, LOW (EQ): These controls are for high, mid and low frequency regulation. Offering
cut and boost of ±15 dB, they allow a wide range of tonal variations to be explored.
When the controls are positioned centrally there is no cut or boost of the selected frequency band.
2.10. REV/AUX: This rotary control sets the level of the digital reverb on the channel and the level
of the signal to the AUX OUT output. If you want to bypass the onboard reverb, you can set the
REVERB Master control to zero and use the REV/AUX to control the amount of signal you want to
send to an external effect unit, or to an additional monitor.
2.11. VOLUME: This rotary control regulates the channel volume.
