Operation Manual
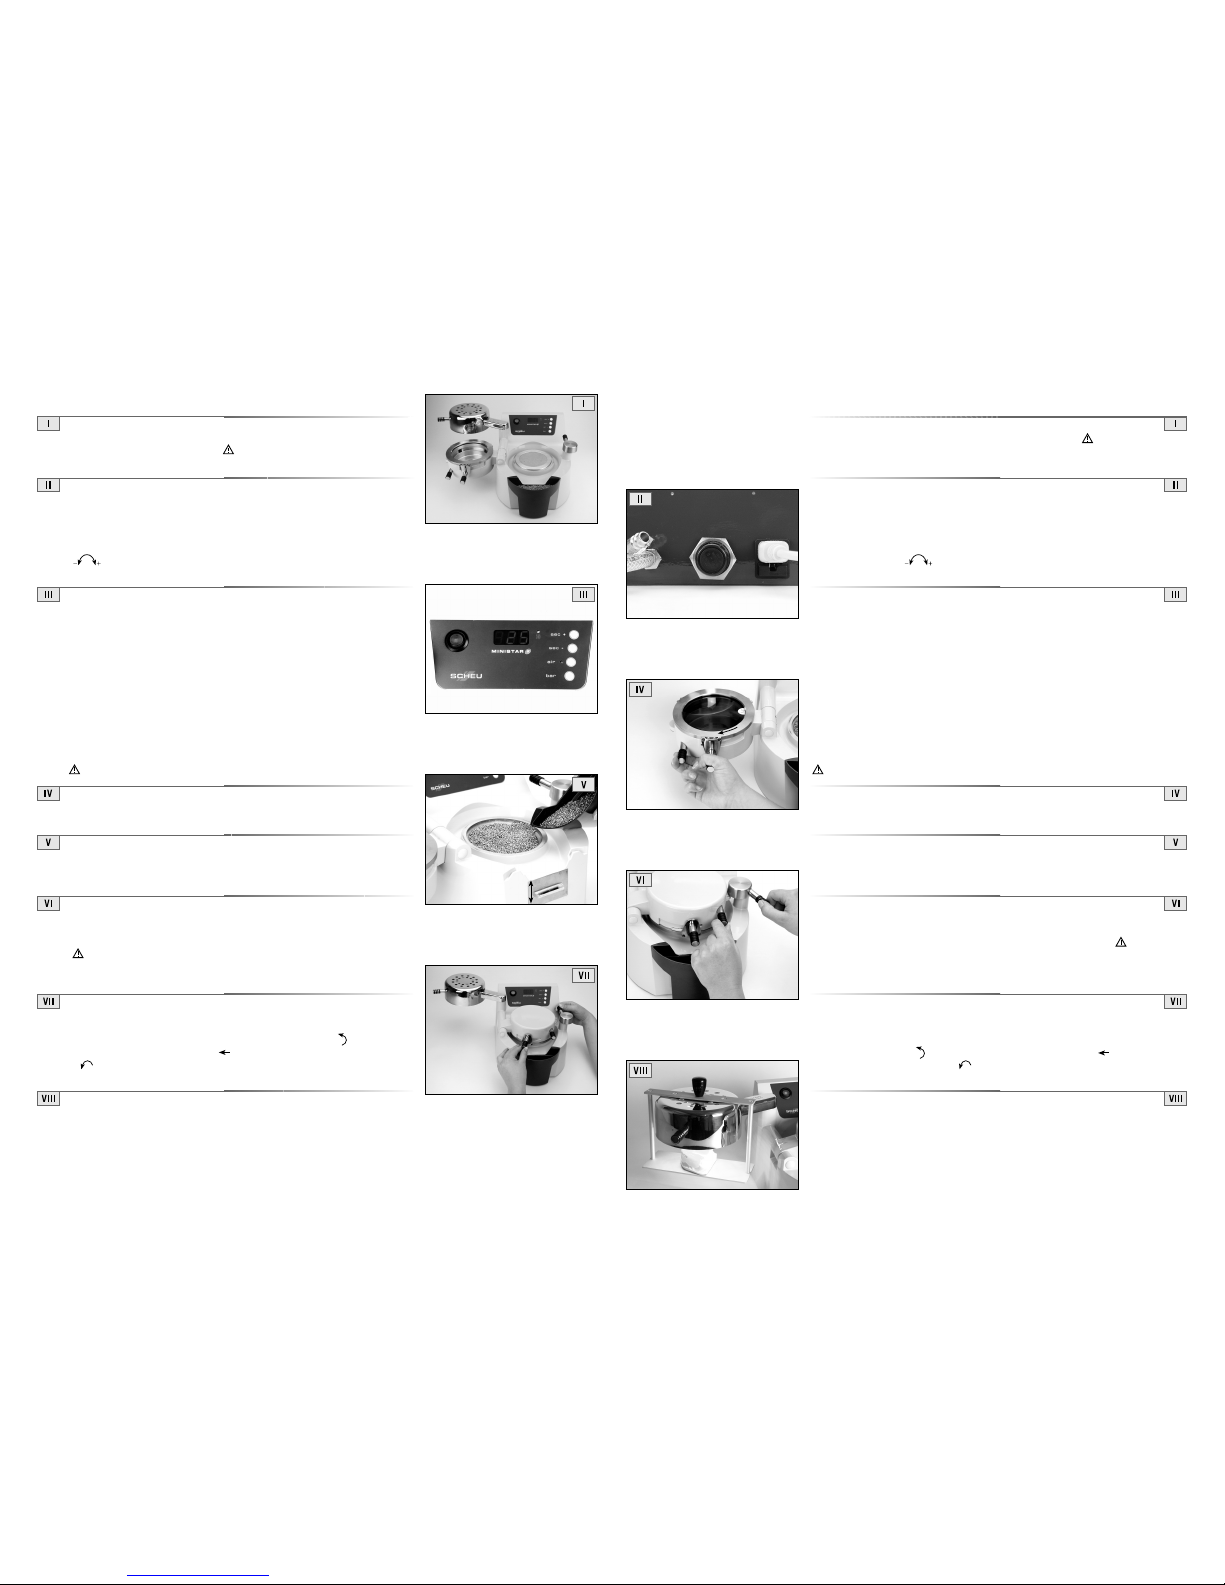
The pellets for embedding the model are in the pellet container which is
removable by pulling it upwards. This particular movement also pulls a
metal plate upwards closing the deep pellet channel around the model
cup.
Acoustic and optical signals indicate the end of the cooling process
(blue LED flashes/4 short beeps). Press "air" button to depressurize the
chamber, 4 additional short beeps (after 3 seconds) indicate the end of
depres-surization.
Turn locking handle 180° to the back, turn locking ring to the left
and open pressure chamber . The machine is now ready for the next
pressurizing procedure.
Hint: If the chamber is closed and the locking handle opened, time
intervals of 60/120/180 seconds can be programmed for fabrication of
positioners, mouth protectors and splints. This is done in connection with
the MINISTAR®heating support (REF 3451) for warming up or bonding
occlusal surfaces. After the corresponding heating time is programmed, the
heater with heating support is turned to the front in heating position.
Depending on the thickness of the material, this can be repeated several
times.
Place the machine on a level work surface allowing sufficient space to operate
the pressure chamber , heater and locking handle . Avoid placing
inflammable material close to the heater.
Connect the main cable to the corresponding network (230 V/115 V,
50/60 Hz). Two fuses are integrated under the plug . Connection to
compressed air is done by quick connect coupling to the air pressure
system. If the maximum standard air pressure deviates from 3 bar, the
pressure can be adjusted by the pressure regulator on the back of the
machine. Release the pressure regulator by pulling the knob, adjust the
pressure by turning( ). The air pressure can be controlled by the "bar"
button on the panel.
The front panel has the following operating elements:
ON/OFF switch
panel indicating heating/cooling time and air pressure
Duo-LED: green = operating mode, red = heating mode
"+/-" button to input heating time in steps of 5 seconds
"air" button for depressurization
blue LED for indication of cooling time (continuous light)
and depressurization (flashing light)
"bar" button indicates working pressure
The machine is activated by using the illuminated ON/OFF switch . The
green LED indicates the machine is ready to use. Heating times can be
programmed in 5 second intervals by the "+/-" buttons. Swivelling the heater
over the foil activates heating immediately (LED flashes red).
Heater and heater arm become very hot; avoid touching it.
Only round foils and plates 125 mm diameter can be placed on the adjusting
ring in the pressure chamber and clamped with the bayonet of the locking
ring . Close by turning it 50° to the left.
Acoustic signals indicate the end of the heating process (+5 sec. until 0 sec. =
short beeps/0 sec. until - 5 sec. = continuous signal). At 000 seconds the heater
should be turned to the back, at -5 seconds the heater switches off automatically
for safety reasons. Turn the pressure chamber 180° to the right ( Make
sure that the rim of the model cup is clean) and turn locking ring 180° to the
front. The magnetic valve opens and the chamber is filled immediately. Cooling
time starts automatically, which is indicated by the blue LED (continous light).
Bedienungsanleitung
Stellen Sie das Gerät auf einen ausreichend großen Platz, sodass Druck-
kammer , Strahler und Verschlusswelle in alle Richtungen bis zu den
Anschlägen frei beweglich sind. Vermeiden Sie brennbare oder leicht
entzündliche Materialien im Schwenkbereich des Strahlers.
Verbinden Sie das Netzkabel mit der entsprechenden Stromquelle (230 V,
50/60 Hz). Unterhalb der Netzsteckdose sind zwei Sicherungen
integriert. Die Luftdruckversorgung wird mittels Schnellkupplung zum
Kompressornetz hergestellt. Ein vom maximalen Standarddruck von 3,0 bar
abweichender Arbeitsdruck kann auf der Geräterückseite mit dem Druckregler
eingestellt werden. Druckregler durch Zug lösen und durch Drehen
( ) einstellen, der Luftdruck kann im Display über die "bar" Taste über-
prüft werden.
Die Frontblende trägt folgende Bedienelemente:
Ein-/Ausschalter
Display zur Anzeige von Heiz-/Abkühlzeit und Druck
Duo-LED: grün = Betriebsbereitschaft, rot = Heizbetrieb
Drucktasten "+/-" zur Heizzeiteingabe in 5 Sekunden Schritten
Drucktaste "air" zum Entlüften
LED blau zur Anzeige von Abkühlzeit (Dauerlicht) und Entlüften (Blinklicht)
Drucktaste "bar" zur Kontrolle des Arbeitsdrucks
Das Gerät wird über den beleuchteten Ein-/Ausschalter aktiviert. Die grüne
LED signalisiert Betriebsbereitschaft. Heizzeiten können über die "+/-" Tasten
in 5 Sekunden Intervallen programmiert werden. Sobald die Zeit auf dem
Display erscheint, kann durch Schwenken des Strahlers nach vorn das
Beheizen gestartet werden (LED blinkt rot).
Achtung Verbrennungsgefahr, Strahler und Strahlerarm werden heiß.
Auf dem Ausgleichsring in der Druckkammer werden ausschließlich runde
125 mm Folien positioniert und mit dem Bajonett des Folienspannringes
festgesetzt. Verriegeln erfolgt durch 50°-Drehung nach links.
Der nach oben abnehmbare Granulatbehälter enthält das zum Einbetten
der Modelle notwendige Füllgranulat. Durch das Abnehmen nach oben wird
gleichzeitig die umlaufende Rille für das Füllgranulat nach vorn mittels eines
beweglichen Schiebers verschlossen.
Akustische Signale zeigen das Ende des Heizvorgangs an (+5 sec. bis 0 sec.
= Pieptöne/0 sec. bis -5 sec. = Dauerton). Bei 000 sollte der Strahler
zurückgeschwenkt werden, bei -5 Sekunden schaltet sich der Strahler aus
Sicherheitsgründen ab. Druckkammer um 180° nach rechts schwenken
( Saubere Dichtfläche beachten) und Verschlusswelle um 180° nach
vorne drehen. Dadurch wird die Druckkammer belüftet und die Abkühlzeit
automatisch gestartet, Signal erfolgt durch blaue LED.
Optische (blaue LED blinkt) und akustische Signale (4 Pieptöne) zeigen das
Ende des Abkühlvorgangs an. Druck auf die blinkende "air" Taste entlüftet
die Druckkammer, 4 weitere Signaltöne nach etwa 3 Sekunden zeigen das
Ende des Entlüftungsvorganges an. Jetzt Verschlusswelle um 180° nach
hinten drehen, Verschlussring nach links schieben und Druckkammer
öffnen. Nach Entnahme des Modells ist das Gerät für den nächsten
Tiefziehvorgang wieder bereit.
Hinweis: Bei geschlossener Druckkammer und geöffneter Verschlusswelle
können speziell bei der Herstellung von Positionern, Mundschutz oder Schienen
Zeitintervalle von 60/120/180 Sekunden programmiert werden. Diese Zeiten
dienen dem Erwärmen oder dem Verbund der Okklusalflächen unter Zuhilfe-
nahme des MINISTAR®Heizsupports (REF 3451). Nach Programmierung
der entsprechenden Heizzeit wird der Strahler mit angehängtem Heizsupport
nach vorne in die Heizposition geschwenkt. Dieser Vorgang kann je nach
Materialstärke mehrfach durchgeführt werden.