schmalenberger fluvo luchs NT Spot User manual

luchs NT Spot
luchs NT2
luchs NT56
LED | RGB
Assembly Manual
Translation of the original
27134-D

Assembly Manual
2 Schmalenberger GmbH + Co. KG
D-72072 Tübingen / Germany
l
uchs NT Spot | NT2 | NT56
Version: 27134-D

l
uchs NT Spot | NT2 | NT56
Version: 27134-D
Schmalenberger GmbH + Co. KG
D-72072 Tübingen / Germany
3
Table of contents
1. General information.......................................................................................................... 4
1.1. Warranty notice ......................................................................................................................... 4
1.2. Introduction ............................................................................................................................... 4
1.3. Proper use .................................................................................................................................. 4
1.4. Usage limits ................................................................................................................................ 5
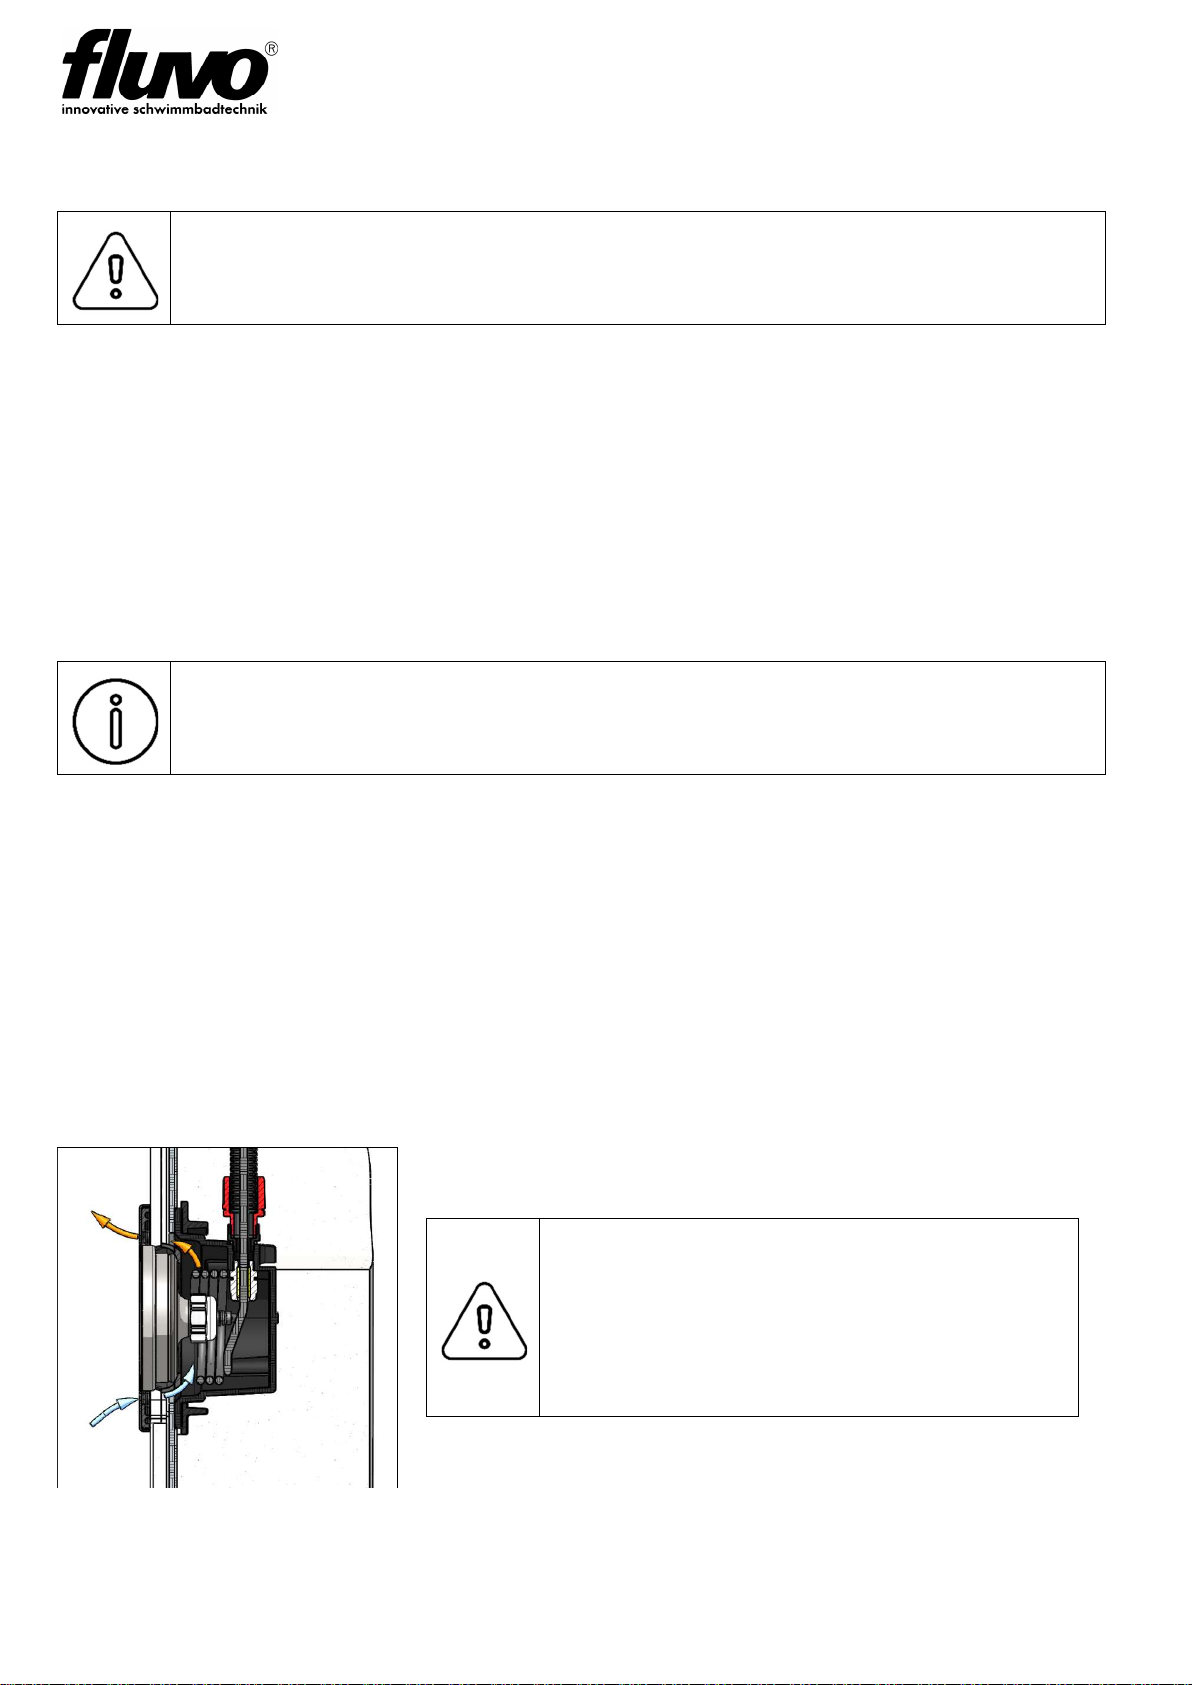
1.5. Cable protection system ............................................................................................................ 5
2. Safety Instructions ............................................................................................................ 6
2.1. General information .................................................................................................................. 6
2.2. Abbreviations ............................................................................................................................. 6
2.3. Marking ...................................................................................................................................... 7
2.4. Safety instructions for the operatorety instructions ................................................................. 7
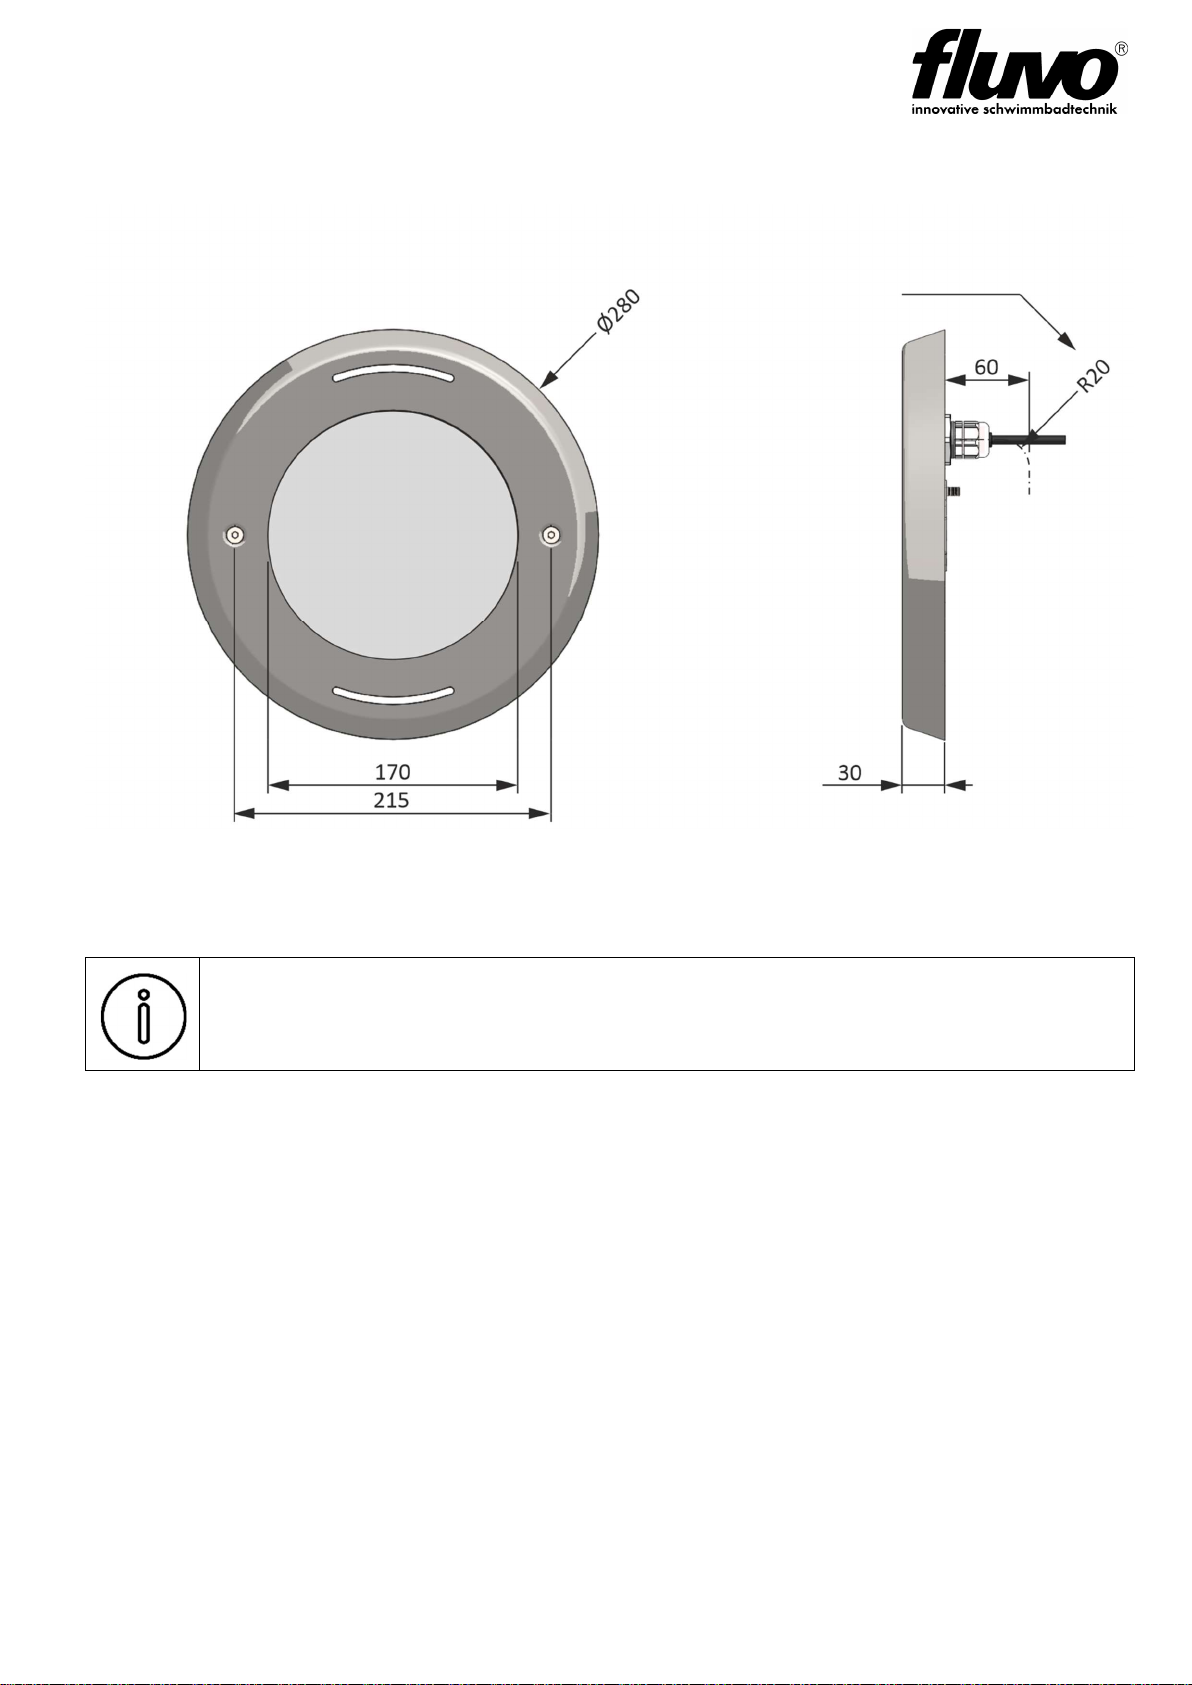
3. Dimensionsn ..................................................................................................................... 8
3.1. luchs NT Spot and luchs NT2 Spotlight ...................................................................................... 8
3.2. luchs NT56 Spotlight .................................................................................................................. 9
4. Other applicable documents ............................................................................................. 9
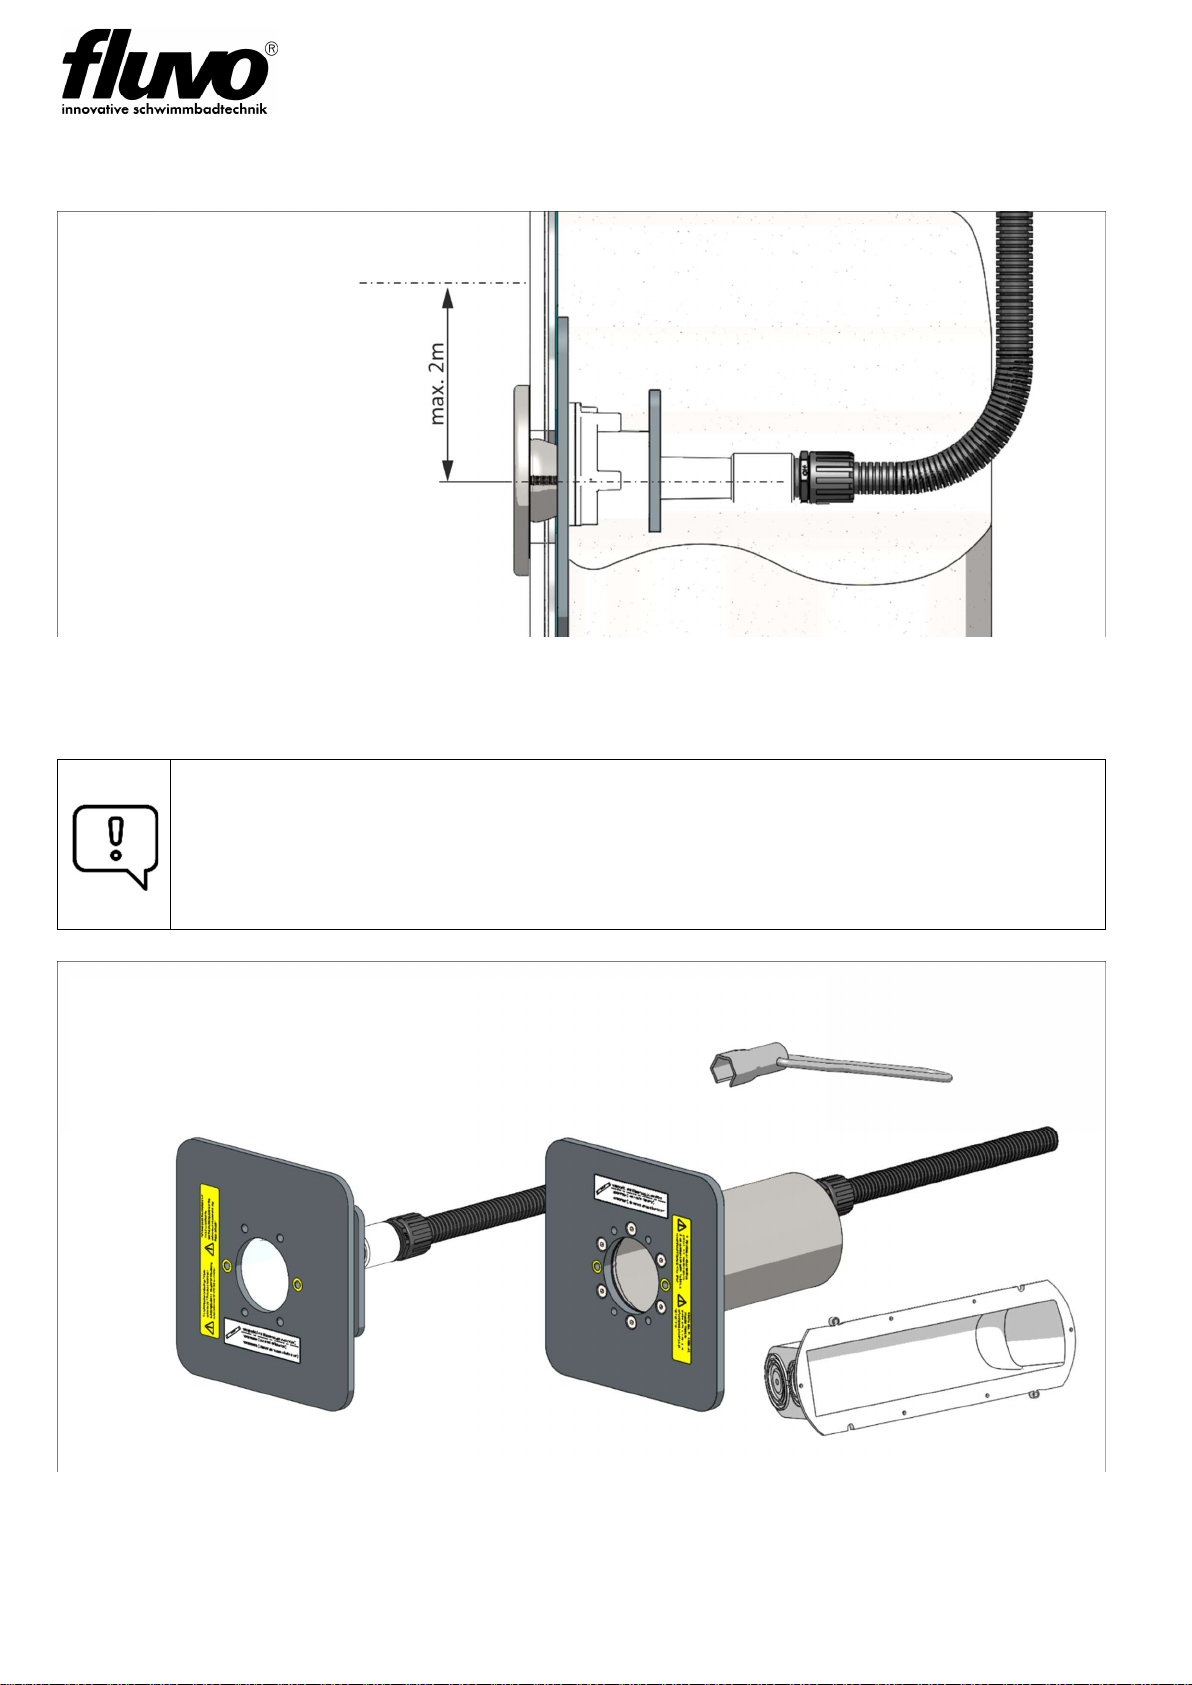
5. Preparation for Installation and Assembly of luchs NT Spot ............................................... 10
5.1. Installation instructions for concrete pool installation kit ........................................................ 10
5.2. Installation instructions for concrete pool assembly kit (tiled – with and without liquid seal) 12
5.3. Installation instructions for concrete pool with liner seal assembly kit ................................... 12
5.4. Preparation for installation of preassembled pool/template ................................................... 13
5.5. Installation instructions for preassembled pool ....................................................................... 14
5.6. Installation instructions for stainless steel pool ........................................................................ 15
6. Installation preparation and assembly luchs NT2 ............................................................... 16
6.1. Installation instructions for concrete pool (tiled – with and without liquid seal) .................... 16
6.2. Installation instructions for concrete pool assembly kit (tiled – with and without liquid seal) 17
6.3. Installation instructions for concrete pool with liner seal ........................................................ 18
6.4. Installation preparation - pre-fabricated pool / Drilling template ............................................ 20
6.5. Installation instructions for preassembled pool ....................................................................... 21
6.6. Installation instructions for stainless steel pool ........................................................................ 22
6.7. Installation instructions for retro-fitting ................................................................................... 23
7. Installation preparation and assembly luchs NT 56 ............................................................ 24
7.1. Installation instructions for concrete pool (tiled – with or without liquid seal) ....................... 24
7.2. Installation procedure, retrofitting ........................................................................................... 24
8. Explosions drawings .......................................................................................................... 25
8.1. Installation kit luchs NT Spot ..................................................................................................... 25
8.2. Assembly kit luchs NT Spot ........................................................................................................ 25
8.3. Installation kit luchs NT2 ........................................................................................................... 26
8.4. Assembly kit luchs NT2 .............................................................................................................. 26
8.5. Installation kit luchs NT56 ......................................................................................................... 27
8.6. Assembly kit luchs NT56 ............................................................................................................ 27

Assembly Manual
4 Schmalenberger GmbH + Co. KG
D-72072 Tübingen / Germany
l
uchs NT Spot | NT2 | NT56
Version: 27134-D
1. General information
For your own safety and to protect the product, please read the Operator's Manual
carefully before starting with the settings and the installation!
1.1. Warranty notice
Failure to comply with the information provided in this operator's manual voids all claims under
warranty.
1.2. Introduction
The luchs NT Spot | luchs NT2 | luchs NT56 Spotlight is an independent lighting unit for illuminating
swimming pools. The lighting unit consists of the Spotlight and corresponding control unit.
All listed diaphragms are available on request in high-gloss polished or white coated
version available.
1.3. Proper use
The luchs NT Spot | luchs NT2 | luchs NT56 is a stationary functional unit consisting of a Spotlight and
control unit.
The Spotlight is designed for continuous use under water (IP68 to a depth of 5m).
The luchs NT Spot | luchs NT2 | luchs NT56 Spotlight may only be operated under water.
The control unit is designed for DIN rail mounting in a heat-diverting control box.
Using the device in a manner other than what is described in these operator's manual may result
in damage to the product and shall void all claims under the warranty.
In the installed state of the spotlight it must be
ensured that a free water circulation is
guaranteed by the headlight housing!
Fig. 1 Exemplary illustration

l
uchs NT Spot | NT2 | NT56
Version: 27134-D
Schmalenberger GmbH + Co. KG
D-72072 Tübingen / Germany
5
1.4. Usage limits
The
materials are designed for chlorinated water (at swimming pool concentration) and
optionally for salt water (up to 5%) (on request).
Observe maximum permissible water temperature of 36°C!
1.5. Cable protection system
Always guide the cable
protection cover up above the level of water in the pool. Lay the
cable protection cover with long bending radii so that the Spotlight connection cable can
be drawn in with no problems.
An extension of the cable protection cover is available on request (see also 72242 Installation
information for cable protection system).

Assembly Manual
6 Schmalenberger GmbH + Co. KG
D-72072 Tübingen / Germany
l
uchs NT Spot | NT2 | NT56
Version: 27134-D
2. Safety Instructions
Danger of lethal electrical current!
Electrical connections must only be made by a professional electrician in
accordance with VDE Regulation 0100. Observe the local requirements of the responsible
electrical power provider as well as standards and safety requirements for electrical
systems in swimming pools.
In case of damage caused by failure to observe the information provided in these operating instructions,
all claims under warranty shall be void. Also, if the devices had been opened. The manufacturer cannot
accept any liability for resulting consequential damages.
Unpack the luchs NT Spot | luchs NT2 | luchs NT56 Spotlight and control unit. Before using the device,
make certain there is no damage caused by transport.
The luchs NT Spot | luchs NT2 | luchs NT56 Spotlight must only be operated with the
control unit designed for it by the manufacturer.
2.1. General information
Use the system only when it is in flawless condition technically and according to its intended
purpose. Be conscious of safety and dangers and observe all the instructions of this Operator’s
Manual!
Eliminate malfunctions without delay.
Before making repairs to the system, disconnect it from its electrical power source and prevent
it from being turned on again.
Repairs of any nature must only be made by qualified professionals.
The device must only be used when it is in flawless technical condition.
If serious operating problems occur, disconnect the system from the electrical power source.
Check the device and the electrical power line at regular intervals for damage.
Attention: The luchs NT control unit is still capable of conducting dangerous voltages for a short
time after it is turned off.
2.2. Abbreviations
-A Pre-fabricated pool
-B Concrete-tile pool – without liquid sealing (string foil )
-E Stainless steel pool
-H Concrete-liner pool
-S Concrete with brushed applied sealant pool + optional tiles
-W Wooden-liner pool or similar (with additional film sealing)
-N Retrofitting

l
uchs NT Spot | NT2 | NT56
Version: 27134-D
Schmalenberger GmbH + Co. KG
D-72072 Tübingen / Germany
7
2.3. Marking
Caution! Risk of injury! / Attention! Risk of damage!
This symbol warns of hazards due to mechanical effects and of actions that will damage
the product.
Caution! Danger of death!
This symbol warns you of dangers due to electrical current.
Information
Important note!
2.4. Safety instructions for the operatorety instructions
Please ensure that the users have read and understood the
manual before operating the
system. Not the users, but the owners (operators) are responsible for the safety.
The operator must ensure that:
The instruction manual is always readily available to the users,
The instructions in the manual are followed,
The system is immediately stopped should abnormal voltages, temperatures, noises, vibrations,
leakages or other faults occur.
All persons involved in setting up, commissioning, operating, maintaining, and repairing this device must:
be appropriately qualified
meticulously observe the operator's manual
consider the operator's manual to be part of the product
keep the operator's manual in a safe place throughout the service life of the product
forward the operator's manual to each successive owner or user of the product
ensure that all additions that are received are inserted into the operator's manual
observe all legal requirements

Assembly Manual
8 Schmalenberger GmbH + Co. KG
D-72072 Tübingen / Germany
l
uchs NT Spot | NT2 | NT56
Version: 27134-D
3. Dimensions
All dimensions in mm.
3.1. luchs NT Spot and luchs NT2 Spotlight

l
uchs NT Spot | NT2 | NT56
Version: 27134-D
Schmalenberger GmbH + Co. KG
D-72072 Tübingen / Germany
9
3.2. luchs NT56 Spotlight
4. Other applicable documents
In addition, the notes and information in the operator's manual 27142 – luchs NT-LED/RGB
apply
27136 Installation templates for pressembled pool
27253 Information about stanless steel
72242 Installation information cable protection system
Possible minimum
bending radius of the
cable

Assembly Manual
10 Schmalenberger GmbH + Co. KG
D-72072 Tübingen / Germany
l
uchs NT Spot | NT2 | NT56
Version: 27134-D
5. Preparation for Installation and Assembly of luchs NT Spot
Fig. 2 Maximum permissible installation depth – please observe!
5.1. Installation instructions for concrete pool installation kit
Attention!
Make certain before concrete encasing that the installation kit is horizontal, assembled to
correct dimensions, and secured from moving (on the pool wall or form wall). It will not be
possible to adjust it later.
Fig. 3 Delivery condition: left - standard model; right - version with stainless steel installation housing
Water level

l
uchs NT Spot | NT2 | NT56
Version: 27134-D
Schmalenberger GmbH + Co. KG
D-72072 Tübingen / Germany
11
Fig. 4 Information on installation situation of concrete pool with liner seal
Fig. 5 Information on tile area [minimum | maximum]
In order to ensure sufficient
cooling and coverage area of the
screen, the tiles must be
positioned in the specified area!
Für Folienbecken unbedingt Einbau
-
gehäuse um 90° gedreht einbauen!
Schalungsbolzen in der gelben Markierung
verwenden und SENKRECHT ausrichten!
With liner poolst he installation kit
Should be rotated 90°!
Use the shuttering screws in the
Yellow marked area and align
These vertically!

Assembly Manual
12 Schmalenberger GmbH + Co. KG
D-72072 Tübingen / Germany
l
uchs NT Spot | NT2 | NT56
Version: 27134-D
5.2. Installation instructions for concrete pool assembly kit (tiled – with and without liquid seal)
Fig. 6 Concrete pool assembly kit (tiled – with and without liquid seal)
5.3. Installation instructions for concrete pool with liner seal assembly kit
Fig. 7 Mounting the clamp ring – make sure that the clamp gasket is placed under the liner!

l
uchs NT Spot | NT2 | NT56
Version: 27134-D
Schmalenberger GmbH + Co. KG
D-72072 Tübingen / Germany
13
Fig. 8 Concrete pool with liner seal assembly kit
5.4. Preparation for installation of preassembled pool/template
Fig. 9 Pool cut-out and template
Attention!
Ensure a horizontal and dimensionally correct installation. Subsequent adjustment of the
assembly kit is no longer possible.
Align parallel to water
level!

Assembly Manual
14 Schmalenberger GmbH + Co. KG
D-72072 Tübingen / Germany
l
uchs NT Spot | NT2 | NT56
Version: 27134-D
5.5. Installation instructions for preassembled pool
Fig. 10 Installation housing of preassembled pool – installation sequence
Fig. 11 Preassembled pool assembly kit (example: standard model – round)

l
uchs NT Spot | NT2 | NT56
Version: 27134-D
Schmalenberger GmbH + Co. KG
D-72072 Tübingen / Germany
15
5.6. Installation instructions for stainless steel pool
Attetion!
Ensure a horizontal and dimensionally correct installation. Subsequent adjustment of the
assembly kit is no longer possible.
Fig. 12 Installation housing of stainless steel pool – weld on flush with the pool (then fit the cable
protection system tightly)
Fig. 13 Stainless steel pool assembly kit (example: standard model – round)

Assembly Manual
16 Schmalenberger GmbH + Co. KG
D-72072 Tübingen / Germany
l
uchs NT Spot | NT2 | NT56
Version: 27134-D
6. Installation preparation and assembly luchs NT2
Fig. 14 Observe maximum permissible installation depth!
Attention!
Always guide the cable protection cover up above the level of water in the pool. Lay the
cable protection cover with long bending radii so that the Spotlight connection cable can
be drawn in with no problems.
6.1. Installation instructions for concrete pool (tiled – with and without liquid seal)
Fig. 15 Delivery status -S | -B (mould protector/wedge)
Water level

l
uchs NT Spot | NT2 | NT56
Version: 27134-D
Schmalenberger GmbH + Co. KG
D-72072 Tübingen / Germany
17
Fig. 16 Information on tile area [minimum | maximum] – example: tiled concrete pool with liquid seal
6.2. Installation instructions for concrete pool assembly kit (tiled – with and without liquid seal)
Fig. 17 Concrete pool assembly kit (tiled – with and without liquid seal)

Assembly Manual
18 Schmalenberger GmbH + Co. KG
D-72072 Tübingen / Germany
l
uchs NT Spot | NT2 | NT56
Version: 27134-D
6.3. Installation instructions for concrete pool with liner seal
Fig. 18 Information on installation situation of concrete pools with liner seal
Fig. 19 Mounting the clamp ring
Attention!
Make sure that the clamp gasket is placed under the liner!

l
uchs NT Spot | NT2 | NT56
Version: 27134-D
Schmalenberger GmbH + Co. KG
D-72072 Tübingen / Germany
19
Fig. 20 Assembly kit for concrete pool with liner seal

Assembly Manual
20 Schmalenberger GmbH + Co. KG
D-72072 Tübingen / Germany
l
uchs NT Spot | NT2 | NT56
Version: 27134-D
6.4. Installation preparation - pre-fabricated pool / Drilling template
Fig. 21 Basin neckline and Drilling template
Attention!
Ensure a horizontal and dimensionally correct installation.
Subsequent adjustment of the assembly kit is no longer possible.
Aligning parallel
to water leve!
This manual suits for next models
2
Table of contents
Other schmalenberger Lighting Equipment manuals
Popular Lighting Equipment manuals by other brands

FARSEEING
FARSEEING FS-LED60W user manual

ProLights
ProLights DIAMOND19CC user manual

Lightolier
Lightolier UCS specification

Safe Fleet
Safe Fleet FRC COLLINS DYNAMICS HALOGEN/HID CD Series quick start guide

Whelen Engineering Company
Whelen Engineering Company Lightheads installation guide

Milwaukee
Milwaukee M18 ONESLDP Operator's manual