Schulte freedomRail Installation guide

SCHULTE freedomRail Training Manual Page 1
Training Manual
Product Description.........................................................................2
Design Fundamentals ...................................................................11
Space Planning Fundamentals .....................................................15
Basic Installation...........................................................................17
Technical Specification .................................................................20
Melamine/Laminate Color Matches...............................................29
Warranty........................................................................................30

Product Description
SCHULTE freedomRail Training Manual Page 2
Hanging Rail
•The Hanging Rail is the primary support component of
the freedomRail Garage system. Once mounted to the
wall, all other components simply hang from the Hanging
Rail. Constructed of heavy duty 12 gage steel with a
durable baked-on epoxy finish.
•Beveled at the top to allow optional mounting into sill
plate at ceiling height.
•Available in 24”, 40”, 64”, and 80” lengths, in White and
Nickel.
•Part Number: 7913-(4424,4440,4464,4480)-(11,45)
Hanging Upright
•Hanging Uprights are hung from the Hanging Rail.
Double-slotted design accepts Brackets along 1”
increments. Constructed of heavy duty 12 gage steel
with a durable baked-on epoxy finish.
•Uprights may be permanently attached to the wall
(optional) using 7913-9137-11 Wall Screws, Anchors,
and Spacers, or left unattached for greater adjustability
•Available in 30”, 48”, 78”, or 90” lengths, in White and
Nickel
•Part Number: 7913-(3530,3548,3578,3590)-(11,45)
Shelving Bracket
•Shelving Brackets come in two types--Ventilated
Shelving Brackets (VSBs) and Solid Shelving Brackets
(SSBs). Constructed of heavy duty steel in a double-body
design.
•VSBs lock securely into the Uprights and support Profile
Shelves and Open Slide® II Shelves. VSBs are specially
designed to receive Rod Clips that support Chrome Rods.
•SSBs also lock securely into the Hanging Uprights, and
support solid wood, glass, or melamine shelves. Shelves
may be securely fastened to SSBs with one of several
available hardware items.
•Part Number: VSB-(7913,7910)-
(1309,1313,1412,1416,1320)-(11,45)
SSB-(7913,7910)-
(1004,1006,1008,1010,1012,1413,1014,1114,1118,1124)-
(11,45)

Product Description
SCHULTE freedomRail Training Manual Page 3
Profile Shelving
Wood Shelving
Rod Clip
•Rod Clips are inserted into 12" and 16" VSBs in order to
support Clothes Rods. Patented open-slide design allows
easy passage of hangers. Rod Clips are simply inserted into
the opening on the underside of the brackets and then snap
into place.
•Available in nickel or chrome
•Part Number: (7913,7910)-1500-(34,36)
Clothes Rods
•Chrome Rods simply snap into Rod Clips to provide a
continuous-slide hanging rod anywhere within the closet.
•Constructed of heavy gage 1" tubing in either chrome or
nickel.
•Part Number: 7913-(1524,1530,1536,1548,1572,1596)-
(34,36)
Rod Stops
•Rod Stops provide a convenient and secure "stop" for
hangers gliding along the Clothes Rod.
•Snap easily into open ends of Clothes Rod, secured with a
simple twist, and is finished in either chrome or nickel for an
upscale look.
•Part Number: 7913-1510-(34,36)
Profile Shelves are constructed of heavy gage steel with a durable baked on epoxy finish. Each
Profile Shelf has double bars both front and rear for added strength. The low "profile" front lip
allows more storage space between shelves. Profile Shelves snap securely into VSBs and are
used either as storage shelves, or as hanging shelves with the addition of Rod Clips and
Chrome Rod.
Depth Length Part Number
9” 96” 1813-2096-(11,45)
12” 24”, 30”, 36”, 48”, 72”
and 96” 1813-(1224,1230,1236,1248,1272,1296)-
(11,45)
16” 24”, 30”, 36”, 48”, 72”
and 96” 1813-(1424,1430,1436,1448,1472,1496)-
(11,45)
20” 96” 1813-2096-(11,45)
•Available in White and Nickel
5/8” Wood Shelving is constructed of melamine laminated particleboard with 1.4mm radius
edgeband on three sides. Wood Shelves are supported by SSBs.
Depth Length Part Number
8” 24”, 48” and 96” 7313-(0824,0848,0896)-(11,24,27)
12” 24”, 36”, 48” and 96” 7313-(1224,1236,1248,1296)-(11,24,27)
14” 24”, 30”, 36”, 48” 72”
and 96” 7313-(1424,1430,1436,1448,1472,1496)-
(11,24,27)
•Available in White, Maple and Cherry

Product Description
SCHULTE freedomRail Training Manual Page 4
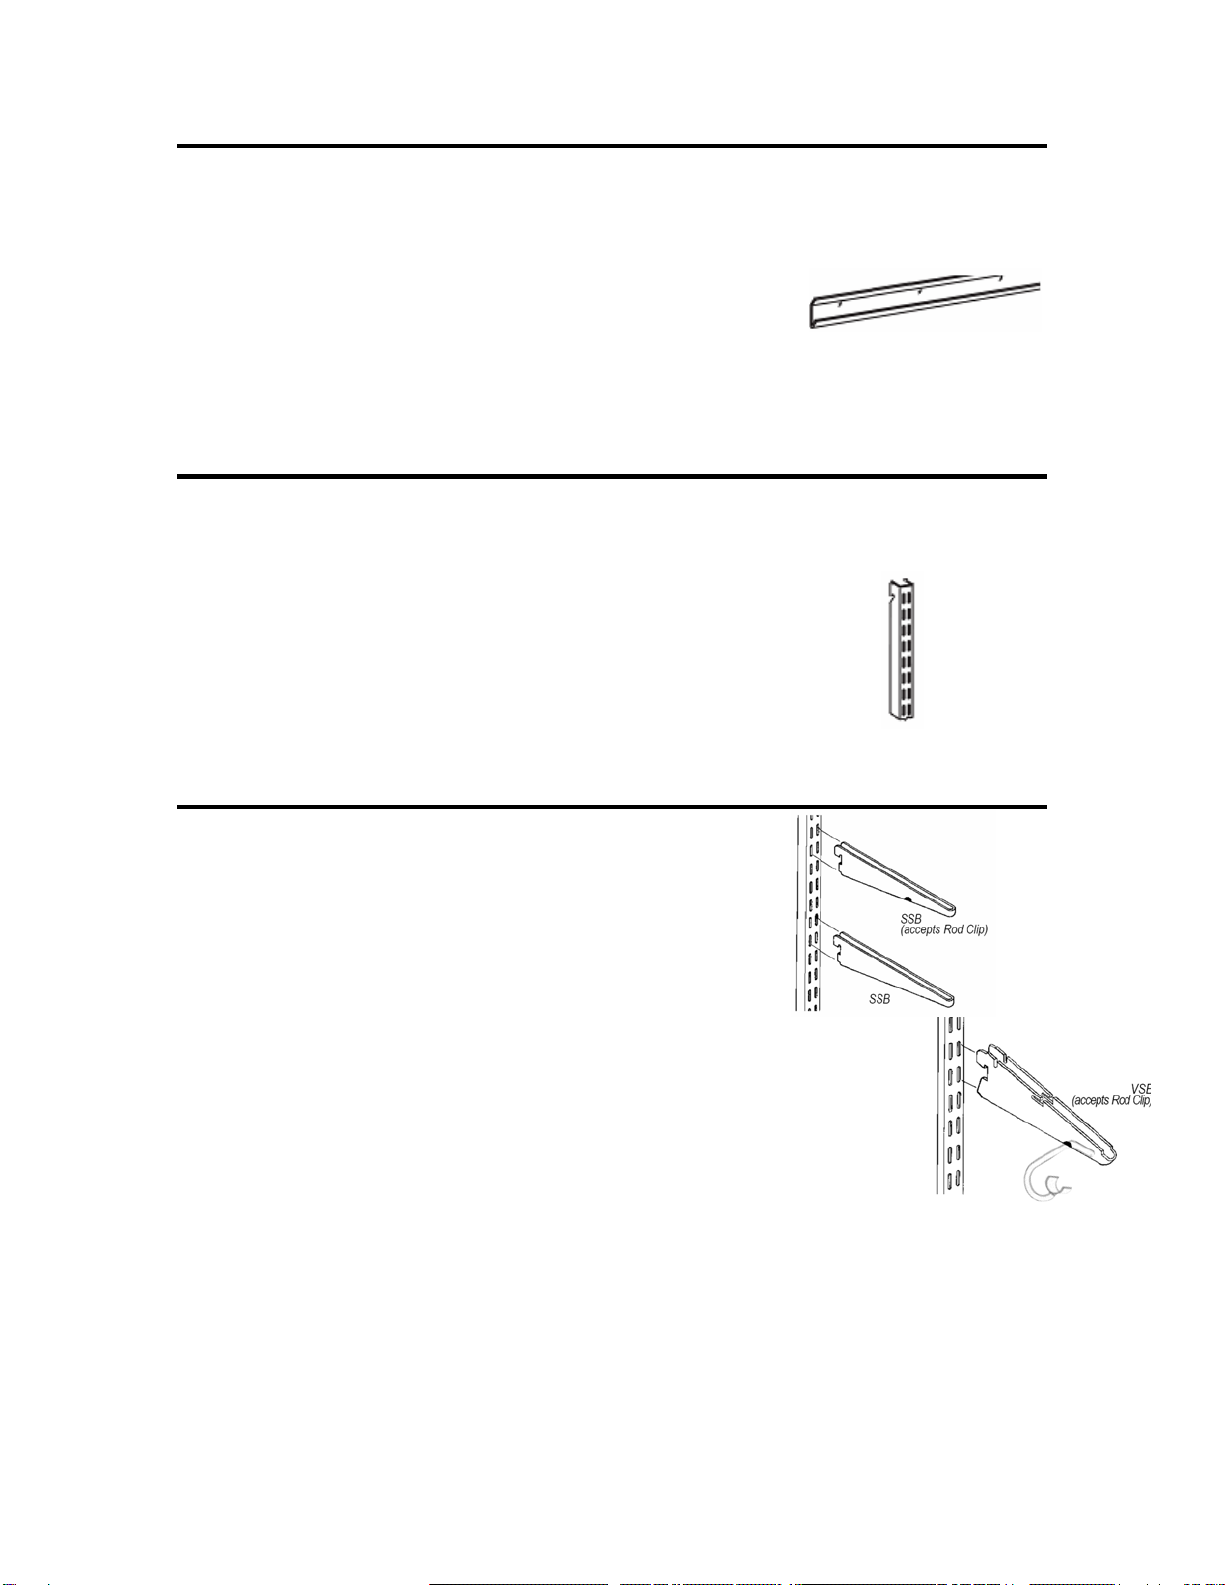
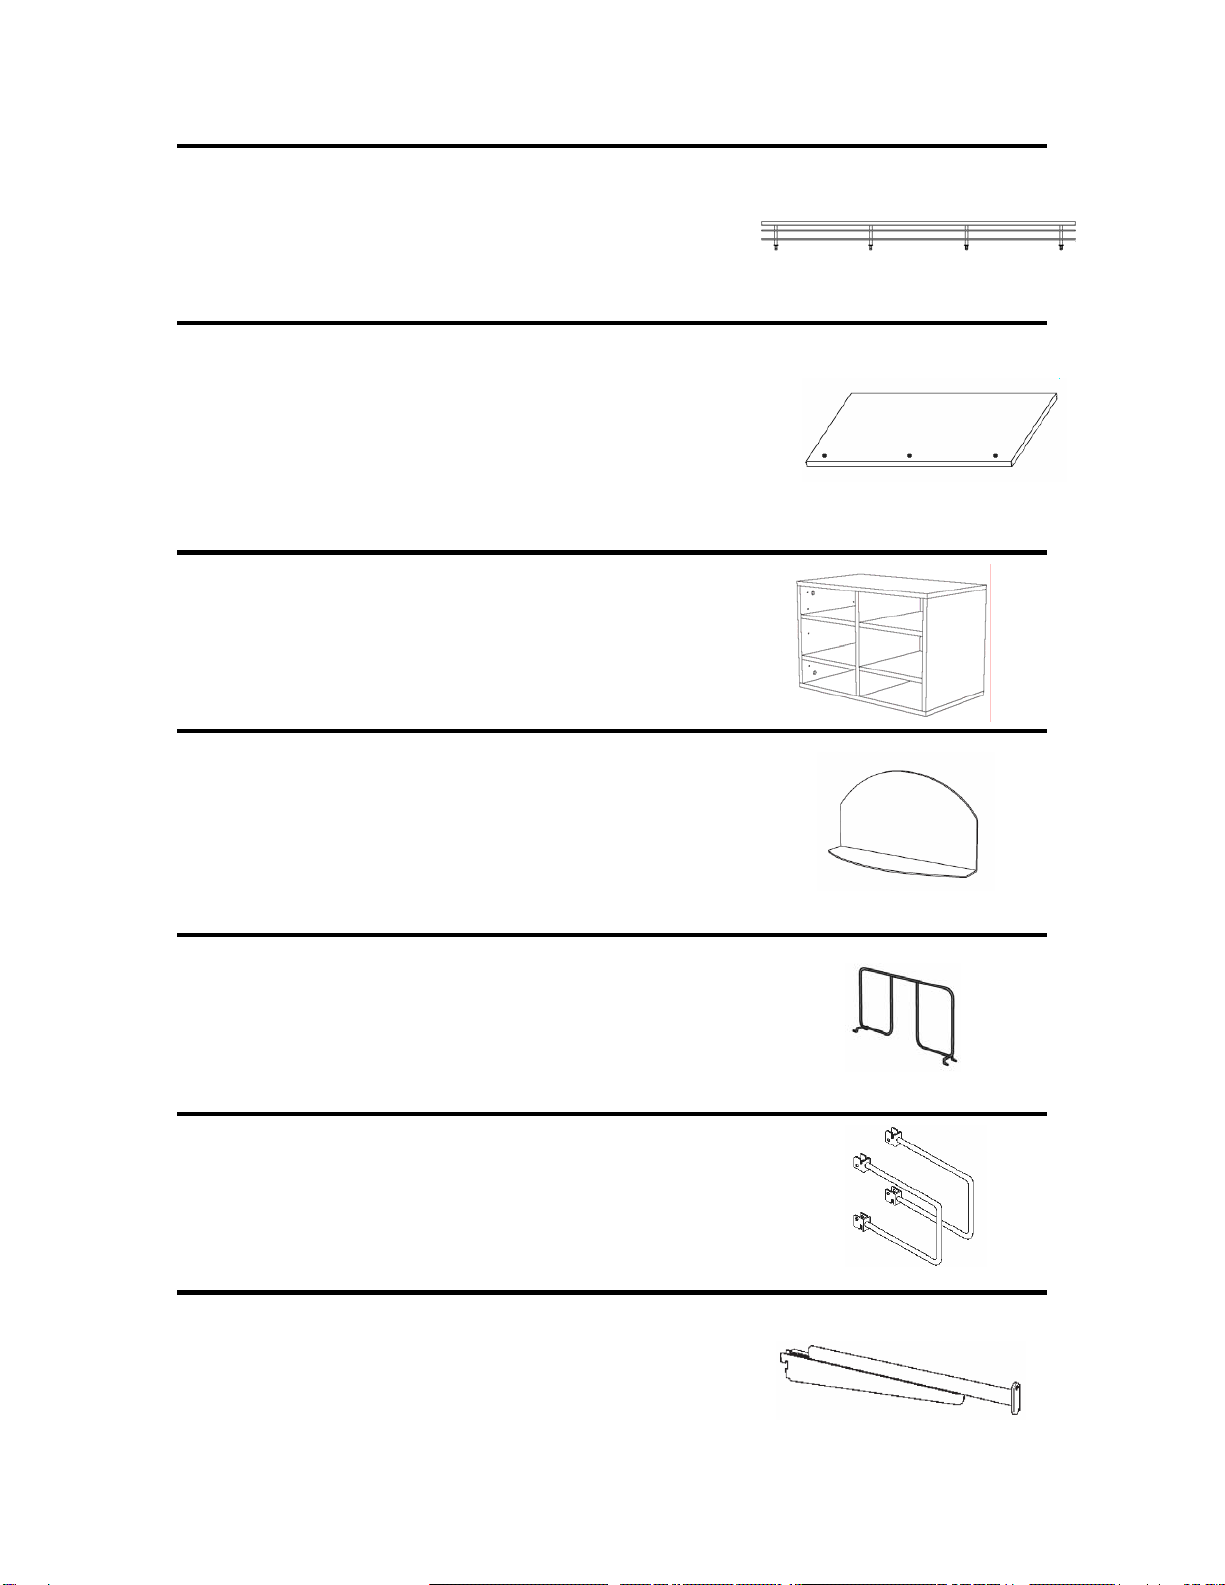
O-Boxes
O-Boxes--short for "Organization Boxes"--are modular cabinets that
are 24”W x 16-1/4”H x 14"D. Recessed brackets allow O-Boxes to
be mounted directly to Hanging Uprights. O-Boxes may be positioned
side-by-side horizontally, or stacked vertically within any closet,
pantry, linen, or laundry configuration. Each O-Box is packaged
separately with all hardware needed for assembly and installation.
O-Boxes are available in the following configurations.
O-Boxes are constructed of 5/8” furniture grade melamine, and are
available in White, Maple and Cherry. Backing Material matches all
O-Box colors and attaches with small nails into the O-Box frame to
keep small items from falling behind the O-Box.
•O-Box with Shelf
-Part Number: 7315-0124-(11,24,27)
•O-Box with Shoe Cubby
-Part Number: 7315-0424-(11,24,27)
•O-Box with Two Drawers (two 6" drawers)
-Part Number: 7315-0224-(11,24,27)
•O-Box with Three Drawers (one 6" and two 3" drawers with
built-in lock)
-Part Number: 7315-0324-(11,24,27)
•Hanging File O-Box (one 3" and one 9" drawers with built-in
lock)
-Part Number: 7315-0524-(11,24,27)
•O-Box Back
-Part Number: 7513-2215-(11,24,27)
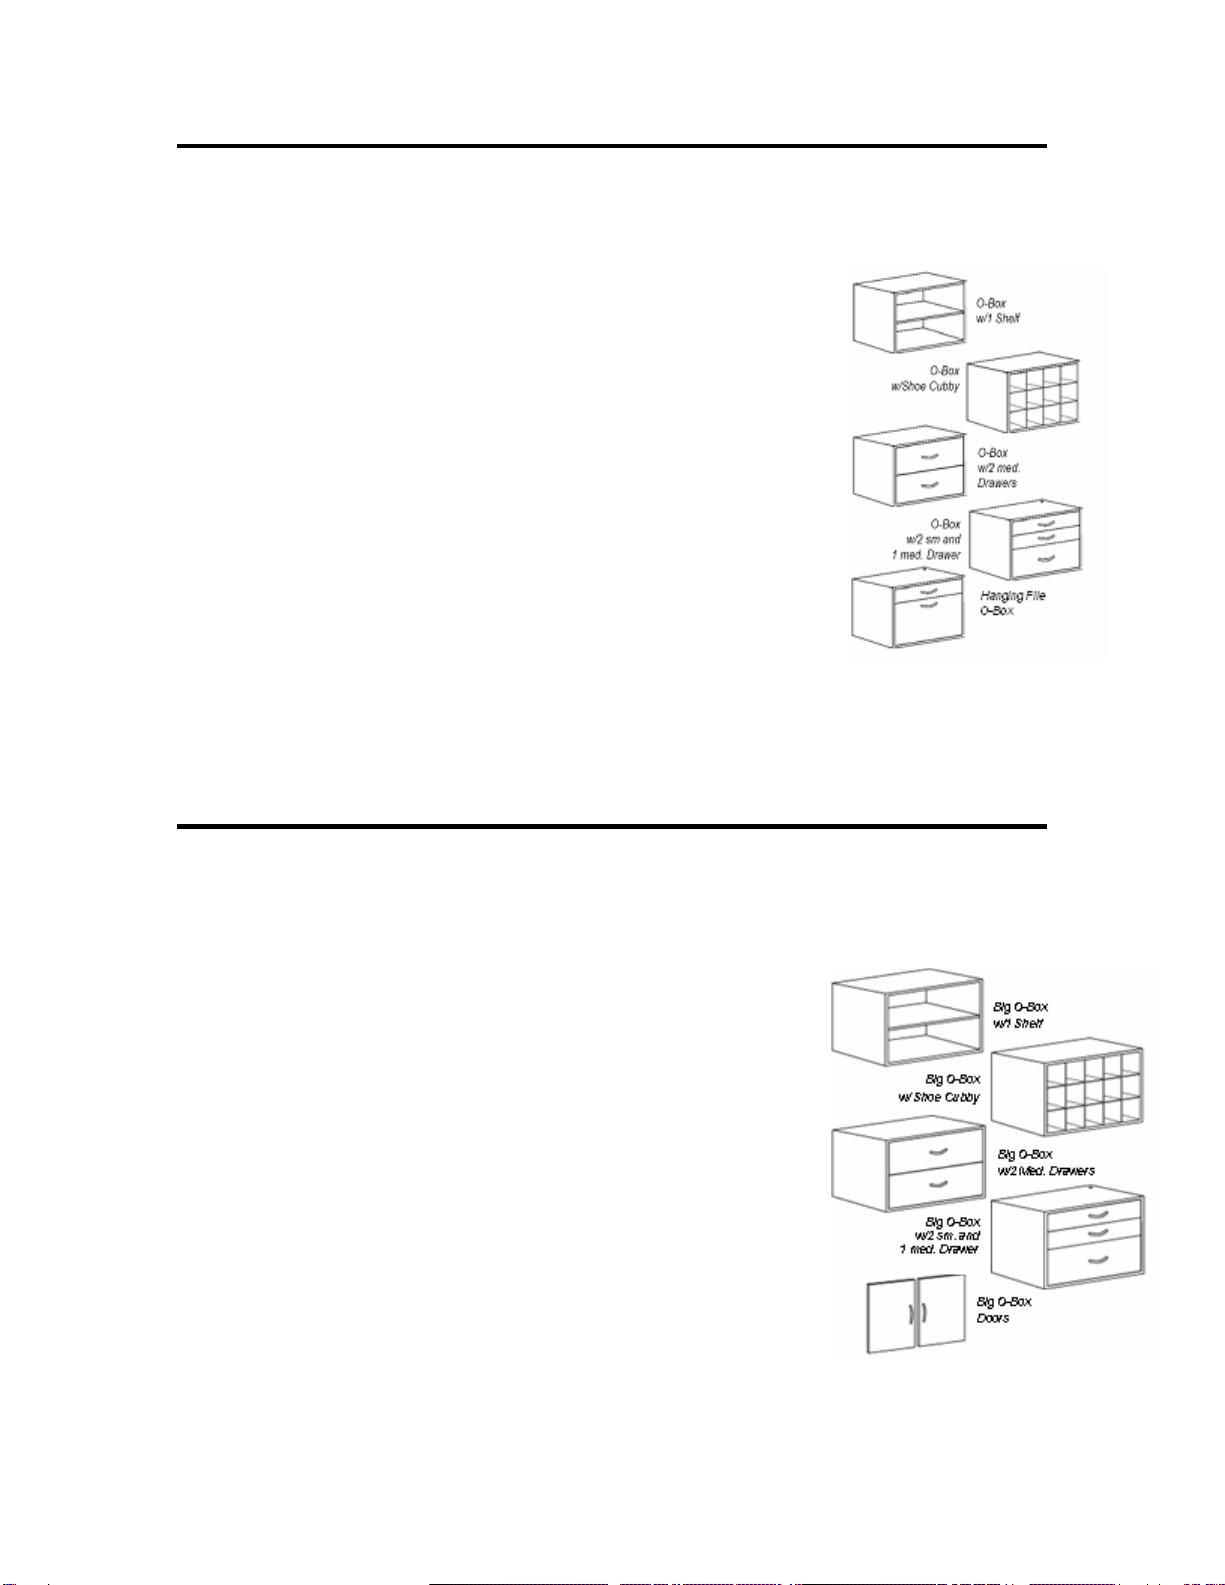
Big O-Boxes
Big O-Boxes--short for "Big Organization Boxes"--are modular
cabinets that are 24”W x 20”H x 16"D. Recessed brackets allow O-
Boxes to be mounted directly to Hanging Uprights. O-Boxes may
be positioned side-by-side horizontally, or stacked vertically within
any closet, pantry, linen, or laundry configuration. Each O-Box is
packaged separately with all hardware needed for assembly and
installation. O-Boxes are available in the following configurations.
O-boxes are constructed of 5/8” furniture grade melamine, and are
available in White, Maple and Cherry. Backing Material matches all
Big O-Box colors and attaches with small nails into the Big O-Box
frame to keep small items from falling behind the Big O-Box.
•Big O-Box with Shelf (Doors sold separately)
-Part Number: 7315-3130-(11,24,27)
•Big O-Box with Shoe Cubby
-Part Number: 7315-3430-(11,24,27)
•Big O-Box with Two Drawers (two 6 1/2" drawers)
-Part Number: 7315-3230-(11,24,27)
•Big O-Box with Three Drawers (one 6 1/2" and two 4 3/4"
drawers with built-in lock)
-Part Number: 7315-3330-(11,24,27)
•Big O-Box Doors
-Part Number: 7315-3530-(11,24,27)
•Big O-Box Backs
-Part Number: 7513-2921-(11,24,27)

Product Description
SCHULTE freedomRail Training Manual Page 5
Double Hang O-Boxes
Double Hang O-Boxes and Big O-Boxes are modular cabinets that are 24”W x 9-1/2”H
x 14"D and 30”W x 9 1/2” H x 14”D. Each Double Hang O-Box is packaged separately
with all hardware needed for assembly and installation. Double Hang O-Boxes have a
sleek design that allows consumers to use wasted space in the center of the closet.
Typical Hand for clothing ranges from 36” for people who are shorter up to 42” for a
good sized person. When used in between double hung clothing, it allows more for
the drawers and shoe cubbies to be more accessible for the vast majority of people.
Double Hang O-Boxes are available in the following configurations and are
constructed of 5/8” furniture grade melamine, available in White, Maple and Cherry.
Single Hook
•Attaches securely to Profile Shelf
•Multipurpose Hook
•Comes in pack of 4
•Available in Nickel and White
•Part Number: 7215-1880-(11,45)
Profile Shelf Hook
•Attaches securely to Upright or Spanner
•Multipurpose Hook
•Comes in pack of 4
•Available in White
•Part Number: 7215-1880-(11,45)
Over The Door Hook – Top/Bottom Capture
•Used to hold an upright onto a door by capturing the top
and bottom or a door
•Can be adjusted to fit most size doors
•Holds accessories that attach to a single upright
•Available in White only
•Part Number: 7215-1800-11
•Double Hang O Box Cubby
-Part Number: 7315-1424-(11,24,27)
•Double Hang O Box 1-Drawer
-Part Number: 7315-1124-(11,24,27)
•Double Hang O Box 2-Drawer
-Part Number: 7315-1224-(11,24,27)
•Double Hang Big O Box Cubby
-Part Number: 7315-4430-(11,24,27)
•Double Hang Big O Box 1-Drawer
-Part Number: 7315-4130-(11,24,27)
•Double Hang Big O Box 2-Drawer
-Part Number: 7315-4230-(11,24,27)

Product Description
SCHULTE freedomRail Training Manual Page 6
Over The Door Hook – Paper Towel Holder
•Can be attached to the Spanner or a single Upright to
allow versatility
•Holds one roll of paper towels
•Patented locking system ensure secure fit
•Available in White only
•Part Number: 7215-1860-11
Over The Door Hook – Shoe Rack
•Can be attached to the Spanner or a single Upright to
allow versatility
•Securely holds 2 pairs of shoes
•Patented locking system ensure secure fit
•Available in White only
•Part Number: 7215-1820-11
Over The Door Hook – Basket 18” X 6”
•Can be attached to the Spanner or a single Upright to
allow versatility
•Tight Mesh bottom holds keeps items from falling
through the basket
•Deeper to hold taller, bigger items
•Patented locking system ensure secure fit
•Available in White only
•Part Number: 7215-1860-11
Over The Door Hook – Basket 18” X 4”
•Can be attached to the Spanner or a single Upright to
allow versatility
•Tight Mesh bottom holds keeps items from falling
through the basket
•Keeps smaller items together to make them easier to
find
•Patented locking system ensure secure fit
•Available in White only
•Part Number: 7215-1860-11
Over The Door Hook –Can Holder
•Can be attached to the Spanner or a single Upright to
allow versatility
•Holds smaller cans and items in place
•Patented locking system ensure secure fit
•Available in White only
•Part Number: 7215-1860-11

Product Description
SCHULTE freedomRail Training Manual Page 7
Over The Door Hook – Large Can Holder
•Can be attached to the Spanner or a single Upright to
allow versatility
•Holds up to 4 large cans
•Patented locking system ensure secure fit
•Available in White only
•Part Number: 7215-1860-11
Jewelry Insert, Black (O-Box and Big O-Box)
•Used in the top drawers of a 3 Drawer O-Box or Big O-
Box
•Black Velvet Jewelry Insert fits snugly in drawer
•Part Number: 7513-(1424,2430)-14
Wine Cubby
•Used in a O-Box Shelf Unit
•Hold up to 12 bottles of wine
•Available in White Only
•Part Number: 7513-0724-11
Drawer Divider
•Used in the top drawers of a 3 Drawer O-Box
•Fits snugly in drawer
•Available in White, Maple and Cherry
•Part Number: 7510-(0324,0330)-(11,24,27)
Chrome Baskets for O-Box
•Fits in O-Box Shelf Unit
•Comes with all hardware
•Available in 6” and 13” Sizes
•Part Number: 7510-(1406,1413)-34
Chrome Baskets for Big O-Box
•Fits in Big O-Box Shelf Unit
•Comes with all hardware
•Available in 6” and 16” Sizes
•Part Number: 7510-(1606,1616)-34
fR Canvas Liner for Baskets
•Fits easily in O-Box Chrome Baskets
•Fits in 6” and 16” Baskets
•Comes in Chocolate and Wheat colors
•Part Number: 7513-(2406,2416)-(13,18)

Product Description
SCHULTE freedomRail Training Manual Page 8
Chrome Shoe Fence
•Used with any 24” or 30” Shelf and Angled Shoe
Bracket
•Installs by drilling into Shelf with Shoe Fence Template
•Part Number: 6881-(0224,0230)-34
Pre-Drilled Shoe Shelf
•For use with any 24” or 30” Shelf Fence and Angled
Shoe Bracket
•Shoe Fence gets Installed into shelf and shelf is
installed on the Angled Shoe Bracket
•Comes in White, Maple and Cherry
•Part Number: 7305-(1424,1430)-(11,24,27)
O-Box Paper Sorter
•Fits in O-Box Shelf Unit
•Comes with all hardware
•Available in all colors
•Part Number: 7513-0714-(11,24,27)
Acrylic Shelf Divider
•Attaches to 14” Melamine Shelves with double sided
tape
•Sold in pairs
•Available in Frosted Acrylic
•Part Number: 7513-0814-40
Wire Shelf Divider
•Used with 12” and 16” Profile Shelves
•Clips on Profile Shelves
•Available in White and Nickel
•Part Number: 7513-(1412,1416)-(11,45)
Book Ends
•Attaches to Uprights by clipping into place
•Sold in pairs
•Available in White
•Part Number: 7913-1408-11
Valet Rod
•Mounted on a Solid Shelf Bracket
•Used to Set clothes out for later time
•Available in White and Nickel
•Part Number: 7513-1414-(11,45)

Product Description
SCHULTE freedomRail Training Manual Page 9
Tie Rack
•Mounted on a Solid Shelf Bracket
•Pegs on one side only for use close to walls
•Available in White and Nickel
•Part Number: 7513-1428-(11,45)
Floor-to-Ceiling Uprights
•Used in Peninsula applications
•Attaches to stud in ceiling
•Uses double sided Uprights
•Available in White
•Part Number: 7913-(3318,9118,9120)-(11,33)
Hardware
Strong-Loc Anchors and Screws (#9137)
• Used to firmly secure the Rail to the wall. Each of these heavy duty Anchors
spirals into a tight, ½" plastic ball behind the drywall surface, providing maximum
system strength without having to attach to or mount into studs. Package
includes peel-and-press Cover Stickers to cover and conceal metal Screws. The
Spacers in the package are used for Wall Mount Uprights (see Wall Mount
Uprights, next page).
Shelf Locators (#9158)
• Forms a quick, secure bond between the bracket and shelf. Two Locators are
used in each bracket (4 per shelf). Tape forms the bond between the two
components. No tools are required, and there is no permanent damage to the
shelf. The tape can later be removed if there is a desire to move or adjust
shelves. Optional screws are also included in the package in the event that a
permanent bond is desired. The screws are inserted through the bottom of the
bracket, and up into the plastic Locators.
Shelf Screws (#9155)
• A short and long screw are offered in this package to provide a permanent
connection between the bracket and shelf. The short screw is inserted into the
front of the bracket, and the long screw into the rear of the bracket. Both screws
are then drilled into the melamine shelf, creating a permanent connection.
Profile Shelf End Cap Assortment Pack (#6600)
• Pack contains 3 sizes of End Caps (small, large, and double) to finish off the
ends of any cut Profile shelf. Each package contains 12 Caps, or enough to finish
4 cut sides.

Product Description
SCHULTE freedomRail Training Manual Page 10
Additional Components
Wall Mount Uprights
• May be used to create a stack of shelves. They are not recommended for closets,
where the Hanging Rail would be much easier to install and level.
• For most applications, Wall Mount Uprights are mounted into studs. It is important to
level the two Uprights carefully in order to create proper shelf alignment. The #9137
Hardware package provides the necessary hardware, including Spacers that are
inserted into the hollow of the Upright. (See “Wall Mount Uprights”, pages 17-18)
• Spacing: Every 32” for normal loads, and every 16” for heavier loads, including
pantry.
• Available in 6-3/4”, 16-3/4”, 28”, 39-1/4”, 48:, 63”, 78”, and 94-1/4” lengths in White
and Black.
Open Slide® II
• Ventilated shelving that provides a durable hanging solution that also offers
adjustability options when mounted onto freedomRail components. The shelf is
offered in 12” and 16” versions.
Shelf End Caps
• Provide the right assortment of End Caps to finish off the cut edge of the Open
Slide II shelving when it needs to be cut to fit a particular size space. The #6683
Shelf End Cap package includes enough End Caps to finish off 4 cut sides.
3/4” Wood Shelving
• Constructed of particleboard with square edgebanding, and finished on 4 sides.
These shelves are typically used to create a stack of shelving. They are
supported by various size Solid Shelf Brackets (SSBs). These SSBs do not
accept Rod Clips for hanging purposes.

Design Fundamentals
SCHULTE freedomRail Training Manual Page 11
Traditional Planning - versus - freedomRail Planning

Design Fundamentals
SCHULTE freedomRail Training Manual Page 12
Hanging Rail
1) Mounting Heights
• Rails should be mounted at 84” and run wall-to-wall for
the greatest storage capacity, adjustability, and future
expansion possibilities.
• For “extra tall” (over 6’ 2”) wardrobes, you may mount
the rail at 86”. Use of 78” Uprights is recommended in this
application.
• With 8-foot ceilings, Rails may be pushed to the ceiling
to simplify installation and maximize use of vertical space.
Use of long Uprights (78” or 90”) is recommended in this
application.
2) Widths of Rails
• To achieve wall-to-wall installation, combine different
size Rails or cut Rails to fit.
• Subtract 1” from wall-to-wall measurement to allow for
wall variation.
Hanging Uprights
1) Size of Uprights
• 78” Uprights provide the greatest storage capacity, adjustability,
and future expansion possibilities. Other size Uprights are available
for specific use areas.
• 30” Uprights - allows for short stack of shelves or long hanging
garments.
• 48” Uprights - allows two rows of short hanging garments.
• 78” Uprights - ideal for total flexibility -- short hanging, long
hanging, shelves and O-Boxes. 78” Uprights also provide more
options for “extra tall” (over 6’ 2”) or “petite” wardrobes.
• 90” Uprights - used in high ceiling applications for maximum
flexibility.
2) Spacing of Uprights for Profile and Wood Shelving
• Shelves may overhang the uprights by up to 9” (a).
• 36” maximum spacing for standard closet or linen
applications - supports 50 lbs. per linear foot (b).
• 30” maximum spacing for standard pantry or garage
applications - supports 75 lbs. per linear foot.
• 24” spacing for extra heavy-duty applications, supports
100 lbs. per linear foot.
Tie Rack Note: If you plan to use a freedomRail Tie Rack (mounted into Upright.
This could occur easily in the middle of a longer shelving run, or by
insetting the Upright 4” from the end of a Shelf.

Design Fundamentals
SCHULTE freedomRail Training Manual Page 13
3) Spacing of Uprights for O-Boxes
• 24” spacing is required for O-Boxes - supports 200 lbs.
Per O-Box (a).
• When O-Boxes are placed side-by-side, each O-Box
requires its own set of Uprights (b).
• When Profile Shelving is directly next to an O-Box,
each requires its own set of Uprights (c).
4) Spacing of Uprights for Open Slide® II Shelving
• Shelves may overhang the uprights by up to 3” (a).
• 30” maximum spacing for standard closet or linen
applications – supports 50 lbs. per linear foot (b).
• 24” spacing for pantry or laundry applications, supports 75
lbs. per linear foot.
Shelving Brackets
Before placing Shelving Brackets onto the Uprights, consider your
storage needs as you plan your closet layout. What percentage of
your wardrobe consists of long-hang? Short-hang? How much of
the closet do you wish to devote to folded items, shoes, belts, ties,
boxes, or luggage? Once you have taken these percentages into
account, attach your Brackets using the following heights as a
general guideline, then simply add Rod Clips and Chrome Rods
where applicable.
• 68" for long-hang (a).
• 84" and 42" for adult short-hang (b).
• 84", 68", 56", 42", 28", and 14" for shelf stack in closet, pantry
or linen (c).
• 84", 56", and 28" for child's triple-hang (not shown).

Design Fundamentals
SCHULTE freedomRail Training Manual Page 14
Shelves/Chrome Rods/Rod Clips
Depth: Shelving is offered in different depths to satisfy different requirements. 12” deep
shelving has wide application, including many clothes closets. For large spaces, such as Walk-
In closets or pantries, 16” deep shelving offers greater storage capabilities.
Length: Allow 1” clearance so that shelving and chrome rods fit comfortably within
your wall-to-wall measurement. For example, in a 73" wide closet, center a 72" shelf
and leave a 1/2 inch gap on each side.
• Shelving is available in pre-cut sizes of 24", 36", 48", and 96". In order to minimize
cutting, design your closet using these sizes. For closets that are not in exact
increments of 12", pre-cut Shelves may be trimmed to fit (see “ Cutting Guide” for
further information).
Tips for Using Pre-Cut Lengths
• Acceptable gaps: allow up to 1-1/2” of gap between the shelf and each return wall.
So, a 51” closet could use one (1) 48” shelf or two (2) 24” shelves (a).
• Overlaps: allow shelves to overlap by as much as 2”. For example, a 46” closet could
be designed using two (2) 24” shelves that overlap 2”, rather than having to cut down a
48” long shelf (b).

Space Planning Fundamentals
SCHULTE freedomRail Training Manual Page 15
Types of Closets and Closet Terms
• Reach-in
A Reach-In Closet is generally designed to accommodate one row of shelving and is often
24” deep. It typically has sliding or bi-fold doors. When measuring for a Reach-In closet, you
will need to know the width, depth, height of header and width of return walls. (See below for
“header” and “return walls”). These measurements will help determine the depth and width of
shelving you use. Typically, 12” deep shelving is used in Reach-In Closets where the
shelving must fit behind the “header”.
A good place to start is with the “50/25/25 rule”, which allocates 50% of the space for double
hang, 25% for long hang and 25% for stacked shelves or O-Boxes. Using this rule for a
typical 8-foot Reach-in closet, you would allow 4 feet for short hang, 2 feet for long hang, and
2 feet for stacked shelves or O-Boxes.
However, with freedomRail, it is very easy to move beyond the 50/25/25 rule. For example, in
a man’s closet, there may be little need for long hang spaces, so revise your plan to
accommodate a higher percentage of short hang garments.
• Walk-in
A Walk-in Closet has enough depth to allow the user to walk inside. A variety of door styles
may be used. While you may start with the 50/25/25 rule (see above), the extra space in
most Walk-in Closets gives you more freedom to accommodate different wardrobe
requirements - custom designs are easy with the adjustability of freedomRail.
• Child Reach-in
In a Child’s Reach-in closet, you may choose to create a “triple hang” space because of the
small size of the clothing. Mount shelves at 28 inches, 56 inches, and 84 inches from the
floor. As the child grows, the adjustability of freedomRail allows the consumer to easily adjust
components. A pre-teen may use shelving at 32 inches, 64 inches, and a storage shelf at 84
inches from the floor providing two short hanging areas and added storage above. Children’s
closets should include a large percentage of shelving space for folded clothes, games, toys,
and books.
• Bypass Doors
Bypass doors leave the center of the closet somewhat cumbersome to access. Avoid
positioning O-Boxes or Stor-Drawers in the center. Instead, plan less frequently accessed
areas, such as long hang, in the center.
• Return Walls
Reach-in closets often have return walls on either side of the door. These walls may interfere
with access to O-Boxes or Stor-Drawer units.
• Headers, or Above Doors
Remember that once you get above the door frame, the wall above the door frame may
restrict access to shelving. If the closet is 22" deep, for instance, once you are above the
door height (80"), a 16" deep shelf will leave you only 6" of space to place items on a shelf.
Use 12" deep shelving at the top of the closet for better access.

Space Planning Fundamentals
SCHULTE freedomRail Training Manual Page 16
Clothing Measurements and Spacing
The best-designed storage space considers the customer's available space and an inventory of
the items to be stored. Ask the consumer to organize his or her items into three groups; long
hanging, short hanging, and items to be placed on shelves or in drawers. This inventory will assist
in determining how much space should be allocated to each type of storage. Below you will find a
chart of general space guidelines.
Men's Clothing Chart Width Length Women's Clothing Chart Width Length
Sport Coat 2" 39-45" Jacket 2" 36"
Long Coat 2.5" 60" Long Coat 2.25" 60"
Bathrobe 1.5" 54" Short Coat 2" 42"
Suit 2-4" 42" Bathrobe 1.5" 51"
Slacks over Hanger 1.5" 39" Suit 2-4" 36"
Slacks hung from Cuff 1" 54" Slacks over Hanger 1.5" 36"
Shirt 1.25" 39" Slacks hung from Cuff 1.5" 51"
Shoes (Pair) 9" 12-16" Skirt 1.75" 36"
Ties 6" 30" Dress 2" 60"
Folding Clothes 14" 12" D Blouse 1.25" 36"
Folding Clothes 12" 10-12"
Shoes 7" 12"
The width and length measurements found in the chart are approximates and should be adjusted
to fit the size of the individual.
Plan ahead for future additions by adding 10-15% to the storage space required.
Weight Capacities
See also page 5, “Hanging Upright”, for spacing and weight capacities.
UPRIGHT SPACING
24” 30” 36”
Open Slide® II 75 lbs./ft/ 50 lbs./ft. -----
Profile 100 lbs./ft. 75 lbs./ft. 50 lbs./ft.
Melamine 100 lbs./ft. 75 lbs./ft. 50 lbs./ft.
O-Boxes 250 lbs. 275 lbs.

Basic Installation
SCHULTE freedomRail Training Manual Page 17
Hanging Rail
You will have selected Rails to fit your wall-to-wall measurement, less one inch.
You may be using one long Rail, or two Rails that are trimmed to fit your wall-to-
wall measurement.
1 With measuring tape and pencil, measure up 84" from the floor.
2 Using a level, draw a level line at 84”.
Method a) Use a long level.
Method b) Use a short level, placed on top of a long Rail.
3 Position the Rail on the wall so the 84” line is visible through the Rail
mounting holes. Allow 1/2” space between the side wall and the Rail.
4 Circle each mounting hole with a pencil where it intersects the level line.
- If you are installing more than one Rail, complete the installation of the
first rail, then repeat those same steps to install each subsequent Rail.
Having the first Rail firmly anchored to the wall allows for a tighter fit
when butting the next. Continue along the wall leveling and marking the
holes for each additional Rail.
5. Remove the Rail from the wall and drill each hole using a 5/16" drill bit.
- As stated previously, there is no need to locate studs. The Universal
Anchors and Screws provide maximum system strength even in a
hollow wall, drywall application.
- If you do hit a stud with the 5/16" drill bit, it is likely that you will hit
studs every 16”. In this case, stop drilling, mark the hole with your
pencil, and come back to it with a smaller 5/32" hole into the stud. (See
“Mounting Rail Into Studs”, page 16)
6. Insert Anchors into the previously drilled 5/16” holes.
- Tap the Anchor into the hole, flush to the wall. Do not twist or turn the
Anchor. Twisting the Anchor will enlarge the hole and make the
installation more difficult.
7. Return Rail to wall, align holes over Anchors, and insert Screws by
hand to hold the Rail in place.
8. Replace the level atop the Rail to insure levelness, then tighten each
Screw using a drill with #2 phillips head screw bit attachment.
- Do not stop your drill when the screwhead is flush to the Rail. It is very
important to give each Screw 6-8 turns (about a 3 second burst with the
drill) after the head has met the Rail so that the Anchor may rosette
properly behind the wall. Do not worry about stripping out the Screw. It
cannot be over tightened.
9. If you had 5/32” pilot holes in stud locations (see #5 above) go back
now and drill wood screws into these pilot holes.
10. Place Cover Stickers over each screw head.

Basic Installation
SCHULTE freedomRail Training Manual Page 18
Hanging Uprights
1. Hang Uprights from Rail.
-See "Design Considerations" for appropriate length and proper spacing of
Uprights.
Ventilated Shelving Bracket (VSB)
Insert Brackets into the Uprights wherever a Shelf will be installed.
1. Tilt Brackets upward at a slight angle and snap into openings in Uprights.
Rod Clip
Insert a Rod Clip into each Bracket that will be supporting a Chrome Rod for
hanging purposes.
1. Insert Rod Clip into the large hole on the underside of the Bracket.
2. Snap Rod Clip securely into the dimple in the Bracket.
Profile or Open Slide® II Shelves
Snap shelves into VSBs according to your closet design layout.
1. Lay shelf onto brackets with center support rod positioned in center bracket
notch.
2. Push down and maintain pressure on center of shelf. Then lift front edge and
slide shelf back. Shelf will snap into place.
- For 24", 36", and 48" shelves, the entire shelf can be secured in a single
motion.
-If one person is installing a long shelf, they will secure the shelf to the
brackets as they work their way along the shelf.
Chrome Rod/Rod Stop
1. Install Rod Stops into Chrome Rods.
- Before inserting Rod Stop, make certain that the umbrella-like metal
connector is positioned approximately half-way down the threaded bolt
portion of the Rod Stop.
- Push Rod Stop into Chrome Rod.
- Twist Rod Stop clockwise until snug.
2. Install Chrome Rod onto Rod Clips.
- Align Chrome Rod under shelf.
- Put downward pressure on each Chrome Rod until it snaps into place

Basic Installation
SCHULTE freedomRail Training Manual Page 19
O-Boxes – 4 Styles
•Each is packaged as a complete set with all necessary hardware and
instructions*.
•Each mounts to the Hanging Uprights
•Each is 24” W x 16-1/4” H x 14” D.
•Each requires a phillips #3 screwdriver or power drill.
Big O-Boxes – 4 Styles
•Each is packaged as a complete set with all necessary hardware and
instructions*.
•Each mounts to the Hanging Uprights
•Each is 30” W x 20” H x 16” D.
•Each requires a phillips #3 screwdriver or power drill.
Design Considerations
•If O-Boxes are placed side-by-side, two (2) side-by-side Uprights are
required.
•If the O-Box is placed into a corner, the Hanging Rail needs to be cut to go
up against the wall.
•It is not recommended to use Wall Mounted Uprights because of leveling and
spacing issues.
Installation
•When aligning the O-Box bracket to the Hanging Upright, use the slots on the
inside of the Uprights.
•When installing a stack of O-Boxes, install the bottom O-Box first.
Big O-Box w/1 Shelf Big O-Box w/ Shoe Cubby Big O-Box w/2 Drawers Big O-Box w/3 Drawers

Technical Specifications
SCHULTE freedomRail Training Manual Page 20
ADJUSTABLE STORAGE SYSTEM
HANGING RAIL& HANGING
UPRIGHTS
GENERAL INFORMATION:
•System relies on horizontal Rail as primary
structural support.
•Vertical Uprights hang from the Rail and are
not dependent on stud locations.
•All components designed with adjustability in
mind.
COLORS:
•White (-11)
•Nickel (-45)
•Granite (-50)
MATERIAL SPECIFICATIONS:
•.079" (2.0mm) 1008 steel.
INSTALLATION:
•Countersunk holes in the Hanging Rail are
placed every 8” on center. Hardware
provided in the #9137 package enables
mounting into:
• hollow walls
• studs
• masonry
•When installing into drywall, use 7913-9137-
11, Universal Anchor.
•Use Rail mounting holes every 8”.
•Uprights are then hung from the Rail. A 9/32"
hole in the bottom of the Upright further
secures Upright to wall using a #10 x 2 ¾"
Flathead Screw with Universal Anchor and
spacer. This procedure is not necessary but
eliminates possible swaying of the upright.
•For heavier loads, secure the Hanging Rail
into studs every 16". Space Hanging
Uprights every 24".
UPRIGHT SPACING & WEIGHT
CAPACITIES:
•General spacing of Uprights depends on the
type of shelf and the desired use. See chart
below for detail on spacing guidelines.
•Weight capacities depend on the type of
shelf used and the spacing of Uprights. See
chart below for weight guidelines.
MISCELLANEOUS:
•All measurements are ± 1/8" (2mm).
•Drawings are not to scale.
•See Bracket Specifications for load
capacities.
HANGING RAIL
7913-4424-11 (-45,-50)
Length: 24" (61.0 cm)
Screw Holes: 3
Weight Ea: 1.25 lbs (56 kg)
Case: 8
7913-4440-11 (-45,-50)
Length: 40" (101.6 cm)
Screw Holes: 5
Weight Ea: 1.55 lbs (70 kg)
Case: 8
7913-4464-11 (-45,-50)
Length: 64" (154.9 cm)
Screw Holes: 7
Weight Ea: 2.32 lbs (1.05 kg)
Case: 8
7913-4080-11 (-45,-50)
Length: 80" (203.2 cm)
Screw Holes: 9
Weight Ea: 3.08 lbs (1.40 kg)
Case: 8
HANGING UPRIGHTS
7913-3530-11 (-45)
Length: 30" (76.2cm)
Screw Holes: 1
Weight Ea: 3.16 lbs (179 kg)
Case: 6
7913-3548-11 (-45,-50)
Length: 48" (121.9cm)
Screw Holes: 1
Weight Ea: 1.68 lbs (.627 kg)
Case: 6
7913-3578-11 (-45,-50)
Length: 78" (198.1cm)
Screw Holes: 1
Weight Ea: 2.73 lbs (1.018 kg)
Case: 6
7913-3590-11 (-45,-50)
Length: 90" (228.6cm)
Screw Holes: 1
Weight Ea: 7.68 lbs (2.866 kg)
Case: 6
Table of contents
Other Schulte Indoor Furnishing manuals
Popular Indoor Furnishing manuals by other brands

Furniture of America
Furniture of America YNJ-19701C35 Assembly instructions

Lightolier
Lightolier Lytespan 8201WH specification

Perfecta
Perfecta VARIO HPL Assembly instructions

Organized Living
Organized Living freedomRail Assembly instructions

Rapidline
Rapidline RST1875 Assembly instructions

Coaster
Coaster 300525Q Assembly instruction

Spectrum Industries
Spectrum Industries 37310 Assembly instructions

Bosch
Bosch TS1002 Assembly instructions

Arthauss Furniture
Arthauss Furniture LAURA Assembly instructions

Bayside Furnishings
Bayside Furnishings SON3N1CGT Assembly instructions

modway
modway EEI-5568 Assembly instructions

Pillow Talk
Pillow Talk DUTTON Assembly instructions