Scott 20220 User manual

1
SCOTT SLIMISSIMO INTENSE MILK
Instruction Manual
Model no.: 20220

2
IMPORTANT INFORMATION
For safety purposes, you should read the instructions carefully before using the appliance for the
first time. Save the instructions for future reference.
The appliance is designed for domestic use and may only be operated in accordance with
these instructions for use.
Always handle with care and warn other users of the potential danger.
Danger: The appliance can cause injuries if misused.
DO’S
1. Check that the mains voltage of the appliance stated on the rating plate is suitable for the
local mains supply.
2. Ensure all packaging materials, labels and stickers are removed from the appliance
before the first use.
3. Unwind and straighten the power cord before using the appliance.
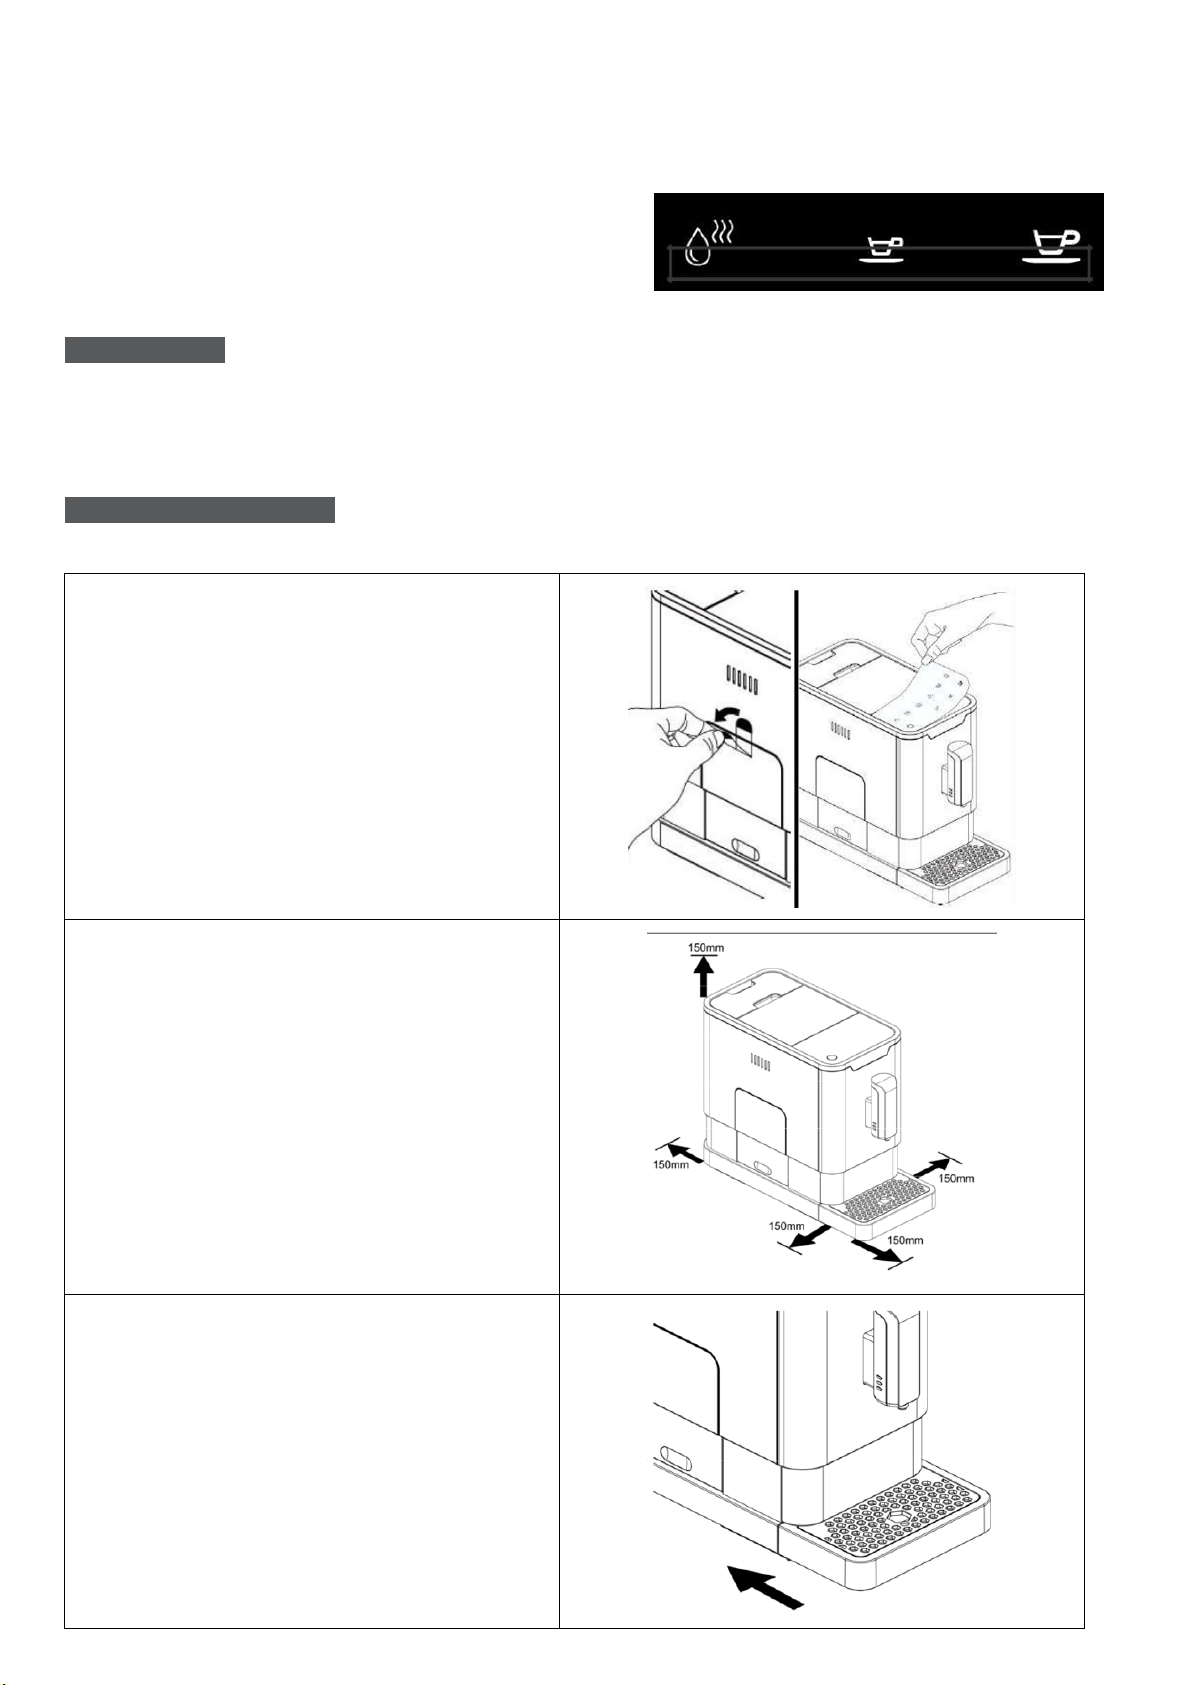
4. Place and use the appliance on a dry, flat and stable surface.
5. Use the appliance only in areas where trained personnel can monitor the operation.
6. This appliance is not intended for use by persons with reduced physical, sensory or
mental capabilities, or lack of experience and knowledge, unless they have been
given supervision or instruction concerning the use of the appliance by a person
responsible for their safety.
7. Disconnect the appliance from the mains supply outlet under the following conditions:
- Before filling the water tank.
- Before removing any parts from the appliance or refitting any parts inside the
appliance.
- Before cleaning or carrying out maintenance.
- When the appliance is not working correctly.
- After using the appliance.
8. Empty the water tank if the appliance is not in use for a long period of time.
9. Allow the machine to cool before putting on, taking off parts, before cleaning, or
storing the appliance.
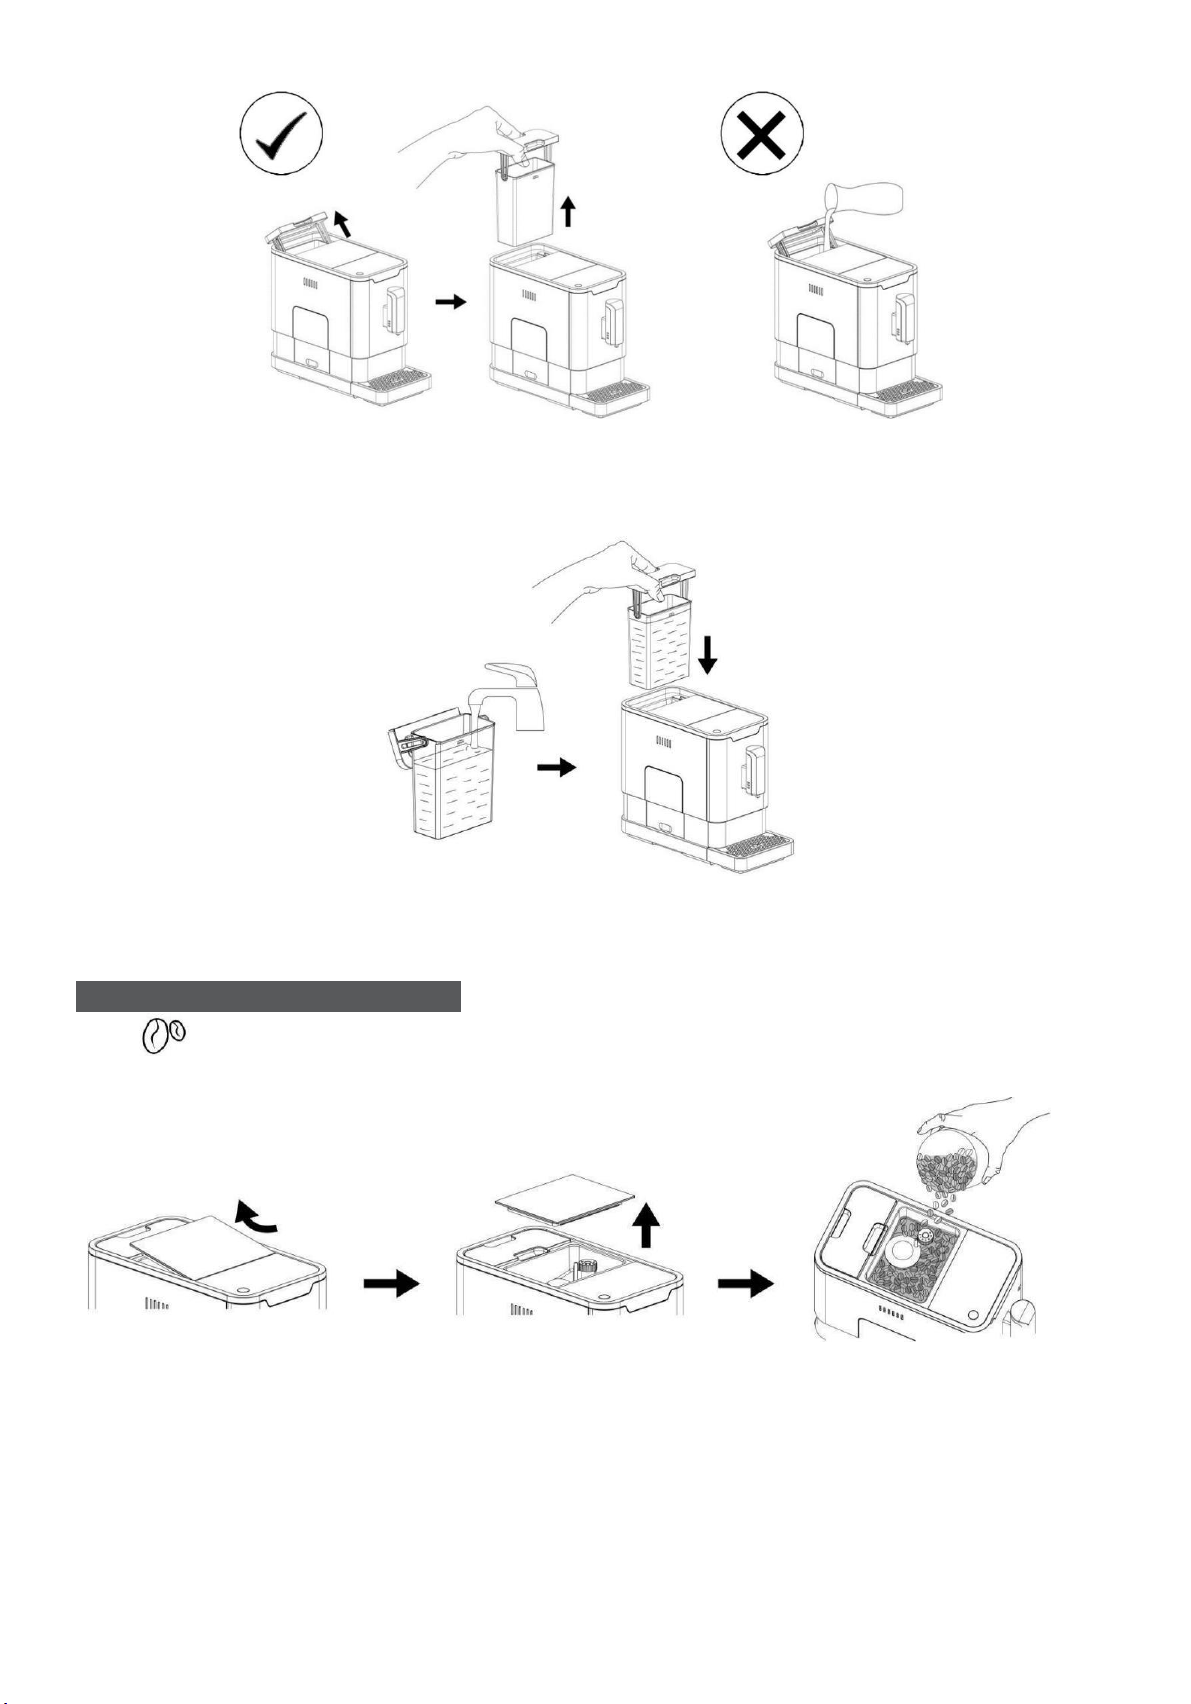
10. Always use tap water or distilled water to make coffee or fill up the tank. Warm water,
hot water, or other liquids can damage the appliance.
11. Use the grinder for grinding coffee beans only.
12. Always ensure that your hands are dry before removing the plug from the mains socket.
13. If the power cord is damaged, it must be replaced by the manufacturer or its
service agent or similarly qualified person in order to avoid any hazard.
14. This appliance is intended for household and domestic use only.
15. The plastic bags used to wrap this appliance or the packaging may be dangerous.
To avoid risk of suffocation, keep these bags out of reach of babies and children.
These bags are not toys.

3
DO NOT’s
1. Do not use or place the appliance on a wet or hot surface, near hot ovens, electric
and gas burners.
2. Do not use an extension power cord set unless a competent authority has approved it.
3. Do not leave the cord hanging over the edge of a kitchen table, work top or touch
hot surfaces.
4. Do not let children play with the appliance or the appliance’s power cord whilst the machine
is in use.
5. To protect against fire, electric shock and injury, do not immerse the appliance,
power cord or plug in water or other liquids.
6. Do not put the appliance in the dishwasher.
7. Do not cover the appliance when in use.
8. Do not operate the hot water function continuously for more than one tank of water.
9. Do not unplug the appliance by pulling the power cord from the mains supply.
10. Do not operate the appliance if the drip tray is improperly placed in position.
11. Do not operate the appliance if the power cord or plug has been damaged or if the
appliance malfunctions or is damaged in any way. Contact the service agent when
in doubt.
12. Do not attempt to open the main body or dismantle any parts from the appliance, there
is no serviceable part inside.
13. Do not use any accessories or attachments with this appliance other than those
recommended by SCOTT.
14. Do not insert fingers or other objects into the grinder.
15. To disconnect from the mains supply outlet, do not drag the cord itself.
Pull by the head of the plug.

4
GET TO KNOW YOUR AUTOMATIC COFFEE MACHINE
I. GENERAL DESCRIPTION
1.
External drip tray
11.
Service door
2.
Internal drip tray
12.
Cleaning brush
3.
Coffee grounds container
13.
Milk container
4.
Adjustable coffee spout
14.
Milk container lid
5.
Control panel
15.
Connection milk tube
6.
Coffee bean container
16.
Container milk tube
7.
Coffee beans container cover
17.
Milk tube connector
8.
Water tank
18.
Connection rubber
9.
Power cord
19.
Needle
10.
Brewer
20.
Automatic milk frothing system

5
CONTROL PANEL
Flashing: low water level or water tank is missing
Lack of coffee beans
Lighting up stably: the coffee grounds container is
full
Flashing: the internal drip tray or coffee grounds container is
missing
Lighting up stably: the brewer is missing or installed
improperly
Flashing: the service door is opened or installed
improperly
Lighting up stably: requires undergoing the descaling process
Flashing: descaling is under process
Empty system function is under process
Power ON/OFF
Hot Water button
Espresso button
Latte Macchiato
Cappuccino
Quick clean button/Milk froth button

6
Note: The touch-sensitive area is located at the lower part
of icons. Press the touch-sensitive area firmly in front of
the appliance.
ACCESSORIES
In the box, three packs of cleaning agents are included for the process of self cleaning. More packs of
cleaning agent can be bought from our website www.scott-gear.co.uk .
MACHINE INSTALLATION
1. Remove any protective films, stickers
and any packaging material on the
appliance.
2. Choose a safe and stable surface with
an easily reachable power supply and
allow minimum distance from the
sides of the machines.
3. Insert the external drip tray. Make sure
it is inserted correctly.

7
4. Fill the water tank with water
(see “FILLING THE WATER TANK”).
5. Fill the bean box with coffee bean
(SEE “FILLING THE COFFEE BEAN
CONATINER).
6. Unwind and straighten the power cord
and insert the plug into the socket
located on the back of the machine.
Insert the other end of the power cord
into a wall socket with suitable power
voltage.

8
FIRST TIME USE
Press the hot water button to clean the inner parts of the coffee machine before use.
Note: Press the hot water button any time to stop the machine from dispensing hot
water and to start coffee making.
OPERATION
PREPARING YOUR COFFEE
1. Switch on the appliance by pressing the Power ON/OFF button. .
2. The appliance is in standby condition.
3. Place a cup under the coffee spout and adjust the height of the spout to fit the cup. Depending
on the size or height of the cup, remove the drip tray or adjust the position of the drip tray as below:
4. Press the Espresso button once.
5. The button will flash after being pressed. It will then light up to indicate that the appliance is preparing
the coffee.
6. When the appliance resumes to standby condition, the coffee is ready to serve.
FILLING THE WATER TANK
When is flashing, the water level in the water tank is too low and filling it is necessary.
1. Use the integrated handle on the lid to lift the water tank.
Note: To prevent overflow of water from the water tank, do not fill water directly into the
container.

9
2. Rinse the water tank with fresh water and fill the tank to the “MAX” level. Place it into the
machine and make sure it is fully inserted.
Important: Never fill the water tank with warm, hot, sparkling water or any other liquids which
can damage the water tank and the machine.
FILLING THE BEAN CONTAINER
When is flashing, the appliance needs to be filled with coffee beans.
1. Remove the bean container lid.
2. Slowly pour in the coffee beans.
3. Place the bean container lid to its original position.
Important: Fill the coffee bean container with coffee beans only. Do not use ground coffee,
instant coffee powder, caramelised coffee beans and any other objects.

10
ASSEMBLING THE AUTOMATIC MILK
FROTHING SYSTEM
1. Place the connection rubber into the slot
inside the lid.
3. Insert the flexible milk tube into the
rubber outside of the milk container lid.
Note: There is a protective cover on
the inlet of the milk spout, please open
it before inserting the flexible milk tube
connector.
2. Insert the tube of the milk container into the
rubber inside the lid. Please note you must
insert the straight part of the tube into the
covered connector (the slanted part will be
immersed into the milk). Put the cover back
on the milk container.
4. Insert the metal end of the flexible milk tube
into the inlet of the milk spout (open the inlet
cover first).
Protective cover

11
PREPARING LATTE MACCHIATO
1. Fill the milk container with milk and close the lid.
2. Place a cup under the spout.
3. Switch the coffee machine on and press the Latte Macchiato button . The button
will light up, indicating the process is starting. The indicator will stay on during the
preparation process.
4. The machine will dispense milk first and then coffee.
5. The preparation will stop automatically. The drink is ready when the machine returns to the
standby position and the light below the cup goes out. If you want to stop your drink sooner,
press the button again during the operation.
Note:If you want to use the milk container several times within 1 hour, remove the milk container
from the machine and put it in the refrigerator.
Then press the button once to perform a quick cleaning of the system.
If you no longer want to use the milk container (or you wish to use it later than 1 hour), it is imperative
to refer to the chapter "Complete cleaning of the milk accessories".
Note:
Clean the automatic milk frothing system before using it for the first time.
Use cold (at a temperature of about 5°C/41°F), semi-skimmed or even whole milk for optimal foaming
results. Do not use skimmed milk.
Warning:
Steam and hot milk may escape from the nozzle when starting to brew the drink.
Place the flexible milk hose around the lid of the milk container after use.

12
PREPARING CAPPUCCINO
Assemble the automatic milk froth system as described in the “Assembling the automatic milk frothing
system”section, on page 11 of this instruction manual.
1. Fill the milk container with milk and close the lid.
2. Place a cup under the spout.
3. Switch on and press the Cappuccino button . The button will light up, indicating the
process is starting. The indicator will stay on during the preparation process.
4. The machine will dispense coffee first and then milk.
5. The preparation will stop automatically. The drink is ready when the machine returns to the
standby position and the light below the cup goes out. If you want to stop your drink sooner,
press the button again during the operation.
Note: If you want to use the milk container several times within 1 hour, remove the milk container from
the machine and put it in the refrigerator.
Then press the button once to perform a quick cleaning of the system.
If you no longer want to use the milk container (or you wish to use it later than 1 hour), it is imperative
to refer to the chapter "Complete cleaning of the milk accessories".
Note:
Clean the automatic milk frothing system before using it for the first time.
Use cold (at a temperature of about 5°C/41°F), semi-skimmed or even whole milk for optimal foaming
results. Do not use skimmed milk.
Warning:
Steam and hot milk may escape from the nozzle when starting to brew the drink.
Place the flexible milk hose around the lid of the milk container after use.

13
PREPARING MILK FROTH
Assemble the automatic milk froth system as described in the “Assembling the automatic milk frothing
system”section, on page 11 of this instruction manual.
1. Fill the milk container with milk and close the lid.
2. Place a cup under the spout.
3. Press the button twice. The button will light up, indicating the process is starting. The
indicator will stay on during the preparation process.
4. To stop the machine from frothing milk, press the button once.
Note: If you want to use the milk container several times within 1 hour, remove the milk container from
the machine and put it in the refrigerator.
Then press the button once to perform a quick cleaning of the system.
If you no longer want to use the milk container (or you wish to use it later than 1 hour), it is imperative
to refer to the chapter "Complete cleaning of the milk accessories".
Note:
Clean the automatic milk frothing system before using it for the first time.
Use cold (at a temperature of about 5°C/41°F), semi-skimmed or even whole milk for optimal foaming
results. Do not use skimmed milk.
Warning:
Steam and hot milk may escape from the nozzle when starting to brew the drink.
Place the flexible milk hose around the lid of the milk container after use.

14
HOT WATER
Hot water can be dispensed by pressing the hot water button . The hot water button will light up
and the appliance will start preparing the hot water. When the light turns off, the water is ready to
serve. The hot water will come out of the steam nozzle.
Warning: Do not use the hot water function continuously for more than a water tank’s water
capacity.
Note:
Hold down the hot water button for 3 seconds to access the different temperature choices. Scroll
through the possible choices by pressing the key successively (3 different set temperatures: 65 °C,
75°C and ‘high temperature’. Release the button and wait 3 seconds, the desired temperature is
selected when the temperature indicator no longer flashes.
Press the button once to dispense hot water at the desired temperature.
Press the button a second time to stop dispensing hot water.
DAILY CLEANING OF THE APPLIANCE
Timely cleaning and maintenance of the appliance is very important to prolong the life of the
appliance.
IMPORTANT
Manually rinsing the machine is absolutely essential AT LEAST ONCE PER WEEK.
Please see instructions on page 26 of this instruction manual.
1. Disconnect the power cord from the mains supply outlet.
2. Pour away all water in the internal and external drip tray.
3. Use a damp cloth or non-scratching cleaner to clean the water stains on the appliance.
Important: Never use any abrasive, vinegar or descaling agents not included in the box to
clean the appliance.
After using the appliance for a long period of time, coffee grounds may stick to the wall of
grounds outlet. It is recommended to clean the outlet by following the steps below to ensure
that coffee grounds can be delivering to the brewer.

15
1. Push the recess area of service door.
2. Remove the service door.
3. Press the release buttons firmly.

16
4. Remove the brewer by pressing both
release buttons simultaneously and
pulling the brewer out.
5.Wash the brewer with fresh water.
6. Use the cleaning brush provided to
clean the grounds outlet.
7. After completing all cleaning
processes, replace all units to their
original position.
.

17
CLEANING THE WATER TANK
1. Lift up and remove the water tank from the machine and clean it with fresh water. It is essential to
dry the exterior walls of the tank.
2. Fill it with potable water to the MAX level indication and place it back in the machine.
VERY IMPORTANT
COMPLETE CLEANING OF THE MILK ACCESSORIES
Note:
It is important to do this step daily to make sure the automatic milk frother is working
properly.
A- CLEANING THE AUTOMATIC MILK FROTHING SYSTEM
1. Remove the cover of the height-adjustable spout then remove the automatic milk frothing system.
2. Separate the automatic milk frother in half and clean it with hot soapy water. You can use
the brush provided with the machine to clean the area circled below to make sure you remove
all residue.

18
3. Reposition the automatic milk frothing system inside the adjustable spout
B- CLEANING THE MILK CONTAINER AND THE MILK TUBE
1. Empty the milk from the milk container and wash it with hot soapy water.
2. Remove the rigid tube, the connector of the milk container’s lid, the flexible milk tube and
the cover to wash them in hot soapy water, then reassemble them.
To make sure the hose holes are clean (see illustration below), use the spiral needle or brush
(supplied with the machine) to clean them.
C- CLEANING THE MILK CIRCUIT
1. Connect the milk container to the coffee machine as described in section "Assembling the
automatic milk frothing system" on page 11.
2. Place a large cup under the spout.
3. Fill the milk container with cold tap water.
4. Double press the clean button and wait.
5. The machine will distribute hot water and steam to wash all parts used for milky drinks.
6. As soon as half of the milk container (filled with water) has been used, press the button
again to stop the cleaning cycle.
7. Switch off the device by pressing the on / off button.

19
FURTHER SETTINGS
I. ADJUSTING THE VOLUME OF YOUR COFFEE / HOT WATER
The desired volume of Espresso, Lungo and hot water can be memorised, ranging from 25ml to
250ml.
1. To make your coffee (either Espresso or Lungo) or dispense hot water, press and hold the
corresponding button. Hold the button while the appliance is making the drink.
2. When the drink reaches your desired volume, release the button. Two beep sounds will
be heard, indicating that the volume is memorised. You can get the exact volume of
coffee every time during future use.
3. Reset the volume to factory settings by selecting default settings (see FURTHER SETTINGS
- IV. MODE SELECTION on page 21).
II. ADJUSTING THE VOLUME OF YOUR LATTE MACCHIATO / CAPPUCCINO
The desired volume of Latte Macchiato and Cappuccino can be memorised, ranging from 25ml
to 250ml. If less than 25ml, the memory saving function will not work. These steps allow for
setting the volumes of milk and coffee independently.
1. Place a cup under the spout.
2. Turn on the machine.
3. Press the button of the drink you want, either the latte macchiato or cappuccino. Only the
selected button will remain lit.
WHEN the latte macchiato or cappuccino coffee BEGINS TO FLOW INTO YOUR CUP
CONTINUOUSLY, press and hold the button again. The appliance will continue to brew the
drink.
When the desired volume is reached, release the button. Two beeps sounds will indicate that
the volume is memorised.
III. GRINDING ADJUSTMENT
You can adjust the grind size to suit your coffee taste by turning the knob in the coffee beans
container:
1. Only turn the knob for adjustment when the grinder is in operation.
Caution: Never adjust the grinding when the grinder is not operating. It can damage the
grinder.

20
2. The dots on the adjuster knob indicate the grinding fineness. Turn the knob to the
pointer, clockwise for a coarser grind and counterclockwise for a finer grind.
IV. MODE SELECTION
The machine is equipped with different settings: Default Setting, ECO Mode and Speed Mode.
ECO Mode helps save energy, whereas the Speed Mode can make coffee more quickly than the
default setting.
Default Setting
Speed Mode
ECO Mode
Illumination light
Yes
Yes
No
Pre-brewing
Yes
No
Yes
Auto shut off time
20 mins
30 mins
10 mins
Cup volume memory
Yes
Yes
Yes
The pre-brewing function pre-wets the ground coffee in the brewer with a small amount of water
before extraction. This will provide better extraction performance and a coffee with better quality.
1. When the machine is in standby condition, press and hold for 5 seconds.
2. The will flash and the following buttons will have the following indications in different
settings:
3. Press the cappuccino button
for ECO mode, the latte macchiato
button for quick
mode and the espresso button for default setting mode. Two beeps will sound indicating that
the mode is selected. (Note: if you press the illuminated button corresponding to each mode, the
machine will not respond).
4. If you want to keep the settings unchanged, press again or wait 5 seconds for the machine
to return to standby.
Cappuccino button
Latte macchiato button
Espresso button
In ECO Mode
Lights on
Flashing
Flashing
In Speed Mode
Flashing
Lights on
Flashing
In Default Setting
Flashing
Flashing
Lights on
Table of contents