Described below are some frequently asked questions about how to use and care for your Solar
SeV. If you have a question that is not addressed here, please email us at
1. Where can I purchase USB charging cables?
USB charging cables are not included, but are readily available from numerous sources,
including www.SCOTTEVEST.com, Radio Shack, and www.ziplinq.com.
2. What devices can I charge?
The auxiliary battery pack should charge most USB compatible devices. However, there are
some devices that require authentication with a computer in order to charge. Our technology
partner, Global Solar, tested numerous devices (including most phones, MP3 players, digital
cameras and PDAs) and have to date only found that the Apple iPod requires such
authentication. We are working diligently with Apple to resolve this issue, and plan on offering
a replacement battery or adapter if and when the issue is resolved, but we cannot make any
promises that this will ultimately be resolved. Please note that USB charging is only an option
for the newest iPods. We understand that this is a popular product and would like you to be
aware of this issue. If you are unsure about your device, please consult device manufacturer’s
information to determine whether it can be charged via USB cables.
3. Can the solar panels be used independently of my SeV?
Yes! You can use the solar panels to charge your devices without attaching it to the jacket as
long as the panels are exposed to light, preferably direct sunlight.
4. How can I tell if the battery is charging and when it is fully charged?
When exposed to light sufficient to provide a charge, the red “Charging” light on the battery
will illuminate. Once the battery is fully charged, the “Charging” light will extinguish and the
green “Charged” light will illuminate. You can now remove the solar panels from the jacket
and battery. Note that you can begin using your device almost immediately after it is
attached to the battery while the solar panels are exposed to light, even if the battery is not
fully charged.
5. What are the solar panels made from and why are they so special?
The solar panels consist of unique flexible thin-film photovoltaic material made from copper
indium gallium diselenide (CIGS) sun-absorbing material placed onto a thin substrate. The
solar panels are made by Global Solar and are called PowerFLEX™. Global Solar’s CIGS
technology is a high-efficiency, ultra-lightweight personal solar power solution that has
proven itself in numerous applications, ranging from marine to desert environments for the
military and others. It is highly durable and the highest performance flexible solar cell
available in the market, ideally suited for mobile applications. Combined with integrated
charge control and optional battery/charger systems, it provides the convenience of backup
and always on, on-demand small scale solar electrical power. Benefits and attributes of
Global Solar PowerFLEX™ include:
• The solar cells are lightweight, flexible and durable, making them ideal for portable power.
• PowerFLEX™ uses CIGS, which is 1.5 to 2X greater in performance than comparable thin
film flexible solar materials. CIGS has achieved the highest performance of any thin film
solar cell technology in domestic and international laboratories.
• Global Solar employs roll-to-roll manufacturing, which is a proven industrial manufacturing
process to reduce labor, materials, energy, handling and capital costs.
• Unlike other thin film solar cells, Global Solar’s PowerFLEX™ does not exhibit instabilities
that cause reduction of power output over time.
6. What is the material the solar panels are attached to?
The material used to attach the solar panels is the same material Version Three.0 Finetex is
made from, Finetex®. Finetex is an innovative material. It is both waterproof and breathable
(like Gore-Tex, but not as costly).
7. Can the solar panels get wet?
Yes, but they are not intended to be submerged in water.
8. Can I charge more than one device at a time?
Only one device can be charged at a time.
9. What pocket do you use to hold the battery while charging?
You can use any pocket that is connected to the Personal Area Network (P.A.N.) to hold the
battery. The cord to the solar panels is 4 feet long and is capable of reaching any of the
pockets. We recommend leaving the battery in one of the front hand warmer pockets. You
can then connect the USB charging cables to the battery using the P.A.N.
SOLAR SCOTTEVEST [SeV]
SOLAR SeV FAQs STEP BY STEP SETUP INSTRUCTIONS
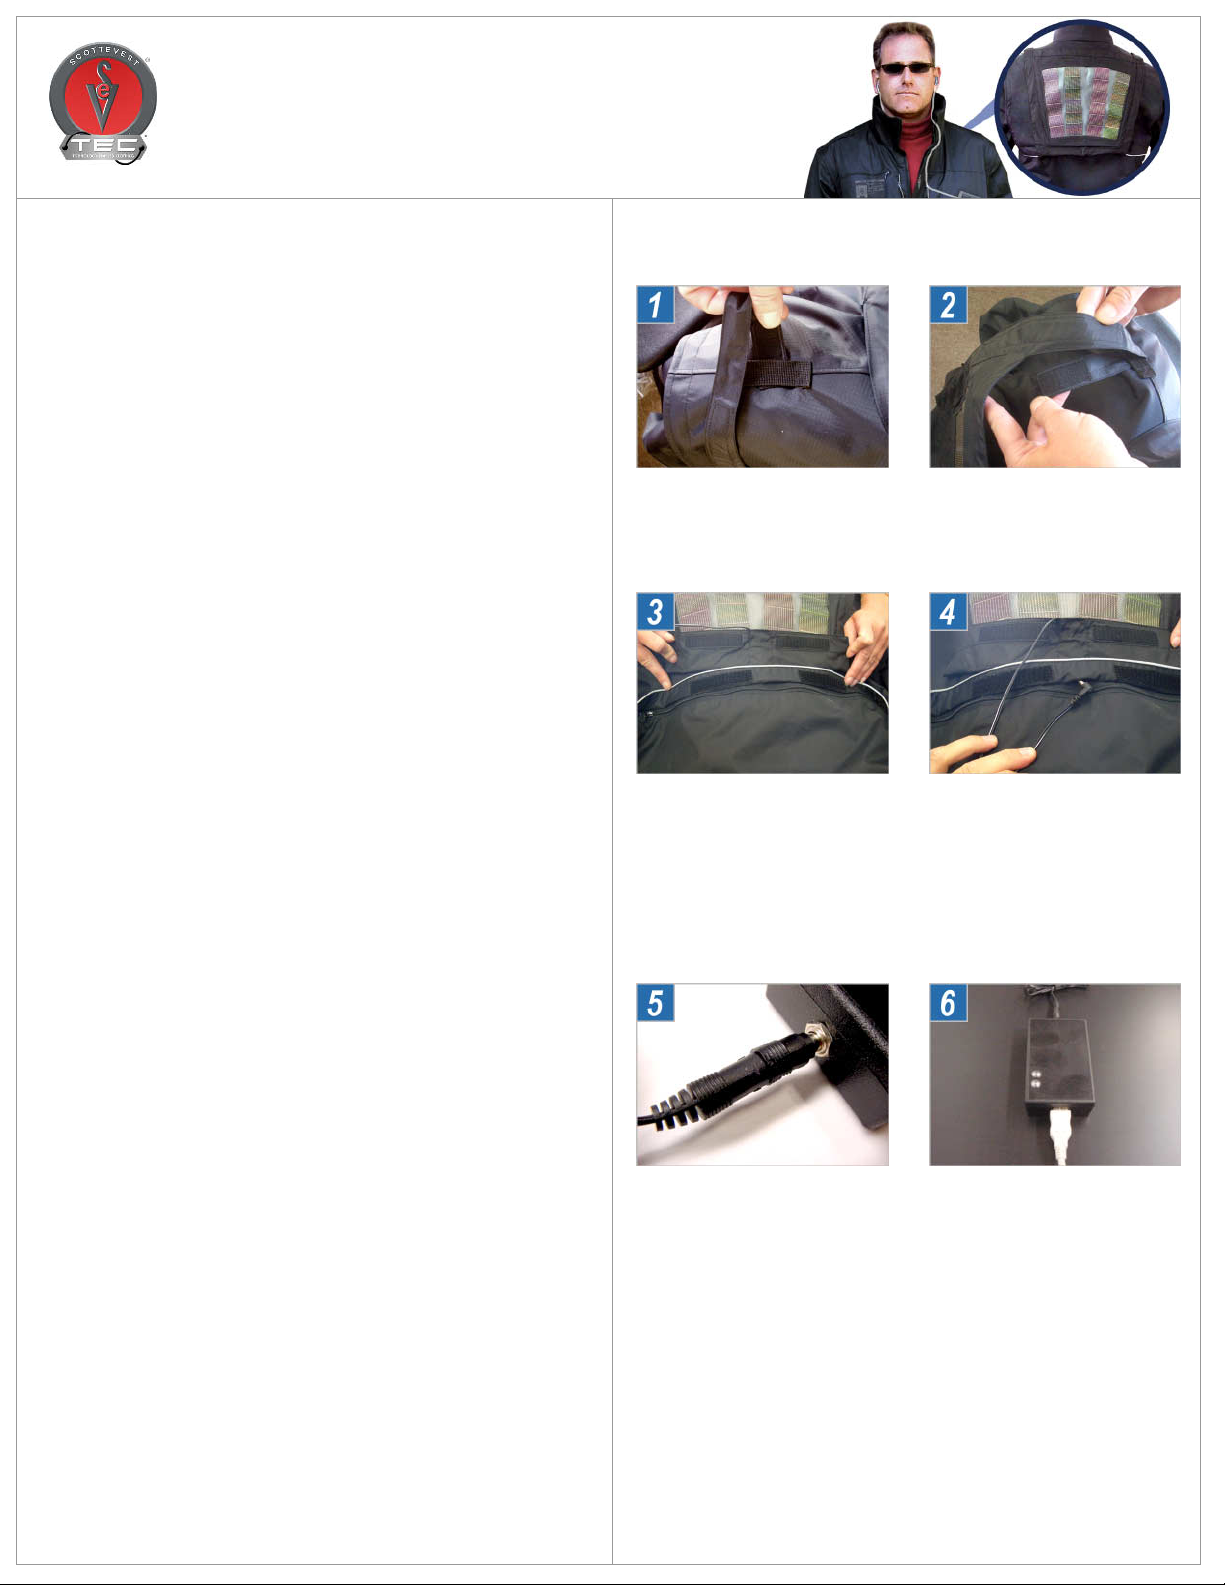
Step 1 – Solar Panel Installation
Loop the top flaps on the solar panel
through the canvas straps on the shoulders
of your SeV jacket.
FAQ & STEP BY STEP SETUP INSTRUCTIONS
Step 3 – Solar Panel Installation
Affix the bottom of the solar panel to the
strips in the middle of the jacket.
*Note - If you purchased your solar panels
separately, please refer to the instructions
provided with your purchase to properly
attach the strips mentioned above.
Step 5 – Attaching the Auxiliary Battery
to the Solar Charger
Simply insert the solar charger male
connector into the auxiliary battery female
connector as shown in the picture to the
right.
SOLAR SeV INSTRUCTIONS COMPLETE! - SYSTEM OPERATION
Once connected, the solar charger will continuously charge the auxiliary batteries. While
charging, the red ‘charging’ LED on the auxiliary battery will be illuminated. Once the auxiliary
battery is fully charged, the charging light will extinguish and the green ‘charged’ light will
illuminate. If there is insufficient light for the solar charger to operate, the red 'charging’ light
will remain off. The auxiliary battery will charge even if it is not connected to the solar charger
(dependent on the auxiliary battery state of charge).
Step 2 – Solar Panel Installation
Secure the flap with the strips on the solar
panel to the same flaps located on the
shoulders of your SeV jacket.
Step 4 – Wire Routing
Route the 4-foot solar charger wire into the
zipper pocket located on the back of the
jacket. Once on the inside of the jacket,
the wire can be routed to any of the
internal or external jacket pockets through
openings that already exist in the jacket
(Personal Area Network - P.A.N.).
Step 6 – Attaching Your Hand Held
Device to the Solar Module
Insert the separately purchased cable into
the auxiliary box female USB port and
connect to your hand held device. Examine
your hand held device for charging
indication.
CEO & FOUNDER SCOTT JORDAN