EN
Congratulations on your purchase of Suntrica SolarPlate™
SCOUT, a solar powered charging device. SCOUT provides
charging power to most USB compatible devices having a
charging voltage of 5V DC, e.g. mobile phones, MP3 players,
GPS devices and digital cameras.
PLEASE NOTE! To be able to use the solar charger, a charging
cable supporting the USB standard is required. If the target
device is not USB compatible, Suntrica recommends using an
adapter recommended by the target device manufacturer.
However, disruptions may occur if the target device is not
supporting the USB standard.
This guide contains important safety and operating instructions.
Before using SCOUT, carefully read this user guide and all
instructions and cautionary markings on SCOUT and the device
to be charged.
Contents of the sales package
• Suntrica SolarPlate™ SCOUT solar charger
• User guide
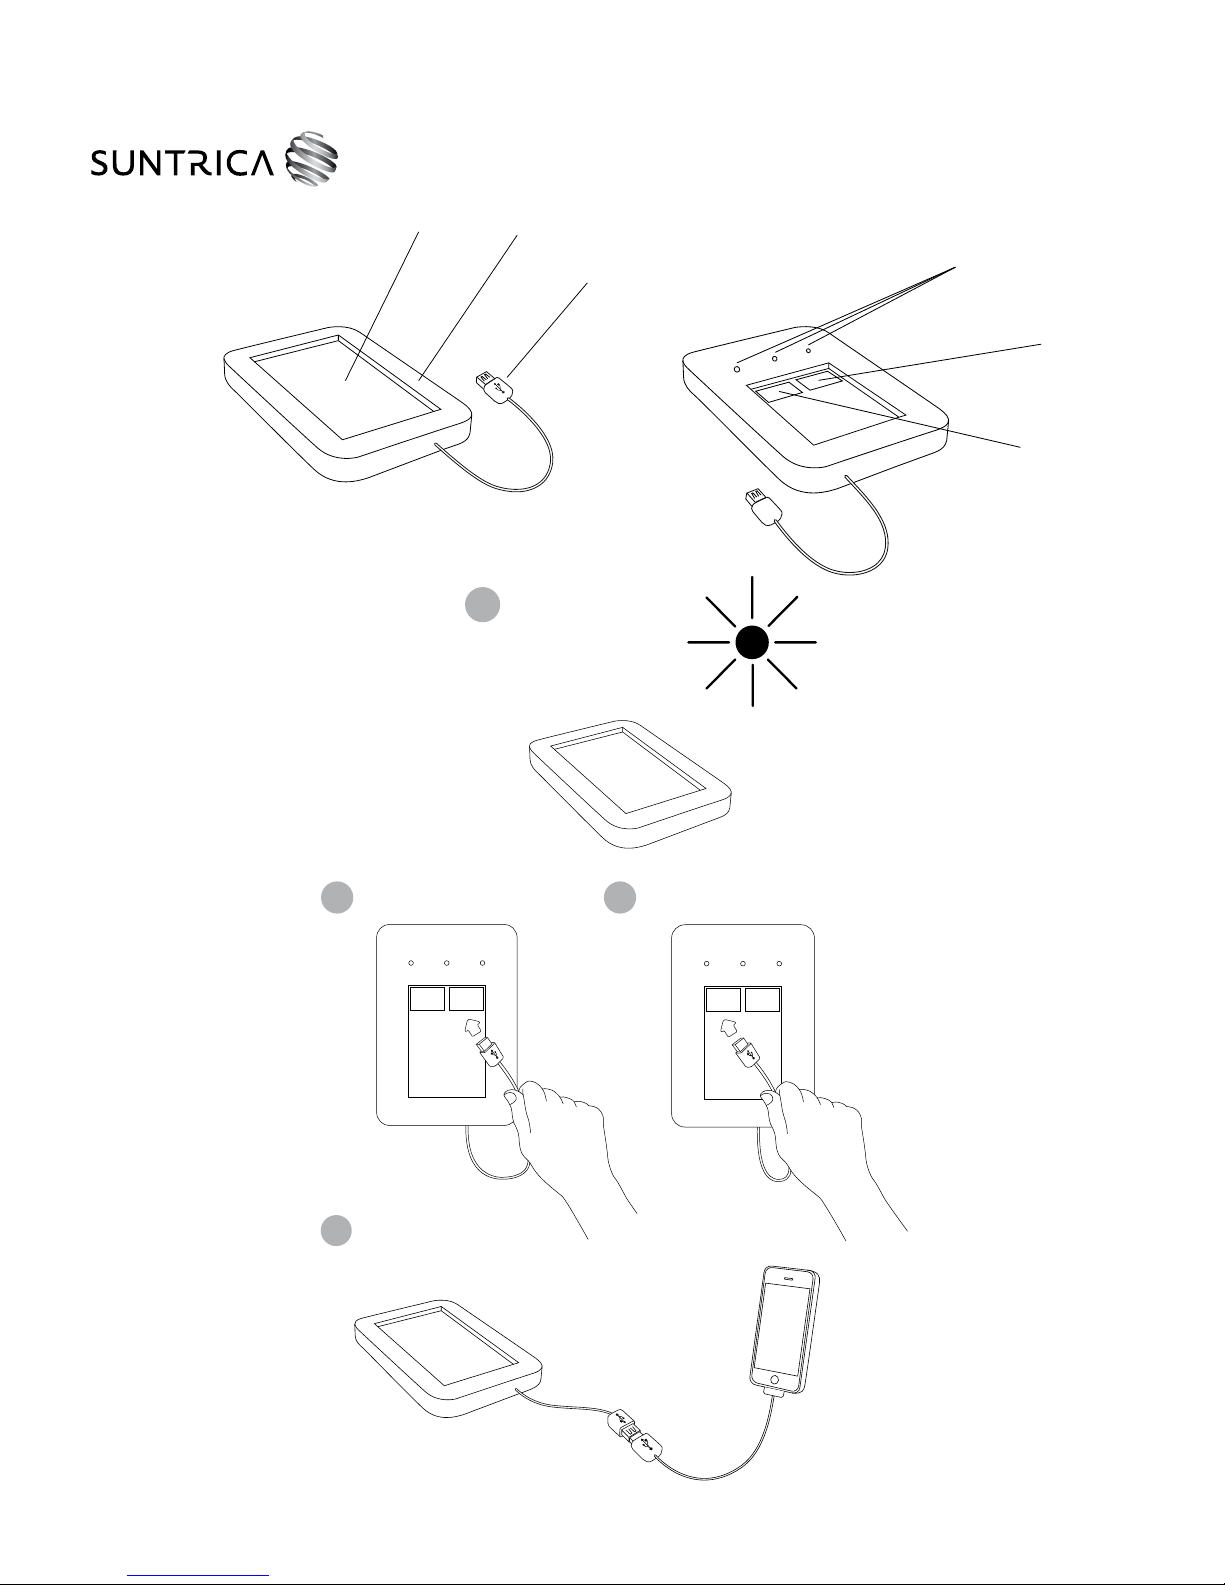
Description of the solar charger
1. Solar panel
2. Enclosure
3. Charging cable (USB connector)
4. Power switch – ON
5. Power switch – OFF & battery charge level indicator
6. LED-lights
Important safety instructions
• Read and follow all warnings on the sales package and in
this user guide.
• Do not use SCOUT if it has been subjected to damage.
• Do not expose SCOUT under water – the solar panel is splash
proof, but the cable has to be protected from moisture.
• SCOUT is an electronic device, ensure fire safety.
• Do not place any heavy objects on SCOUT.
• Do not bend SCOUT heavily.
• Do not cause unnecessary tensile stress to the charging
cable.
• Recycle SCOUT like any other electronic device. SCOUT
includes an internal battery which is forbidden to be disposed
by burning or with other household wastes.
• Use SCOUT only in proper temperature
(+0...+50°C). Make sure to leave free space
around SCOUT to ensure adequate cooling.
• PLEASE NOTE! SCOUT’s internal battery can only
be charged with its own solar panel. Do not
charge SCOUT with a wall charger, car charger or
with a USB cable from e.g. a laptop. The wrong
type of charge may damage the product
permanently.
Functional overview
Figure A: Sun charging
Suntrica SolarPlate™ SCOUT gathers solar energy by the high
efficiency solar panel and stores the energy into an internal
battery.
SCOUT starts gathering solar energy instantly, when it is placed
in the sun. SCOUT is capable of charging its internal battery
from the sun and the target device from the internal battery
simultaneously.
Optimal charging performance is achieved outdoors in direct
sunlight when the solar panel is positioned towards the
sun. Clouds, shades, and window glass reduce the charging
performance notably. Theoretical battery charge from 0% to
50% takes 2,5 hours in ideal conditions. Power absorption of
the Li-Po battery slows down in the end of its charging cycle,
causing the battery to charge up from 50% to 100% in a longer
period.
• The solar charger is designed to be used in
outdoors only. Suntrica does not recommend
charging behind a window glass or through
a car windshield as they weaken the charging
performance and the temperature might rise
dangerously high for the solar charger.
Figure B: Testing the battery charge level
The charging cable is used for:
• Charging the target device.
• Testing the charge level of SCOUTS’s internal battery by gently
touching the gold colored ”POWER OFF/TEST” contact surface
with the tip of the cable.
• Switching SCOUT on and off (touching ”POWER ON” and
”POWER OFF/TEST” contact surfaces).
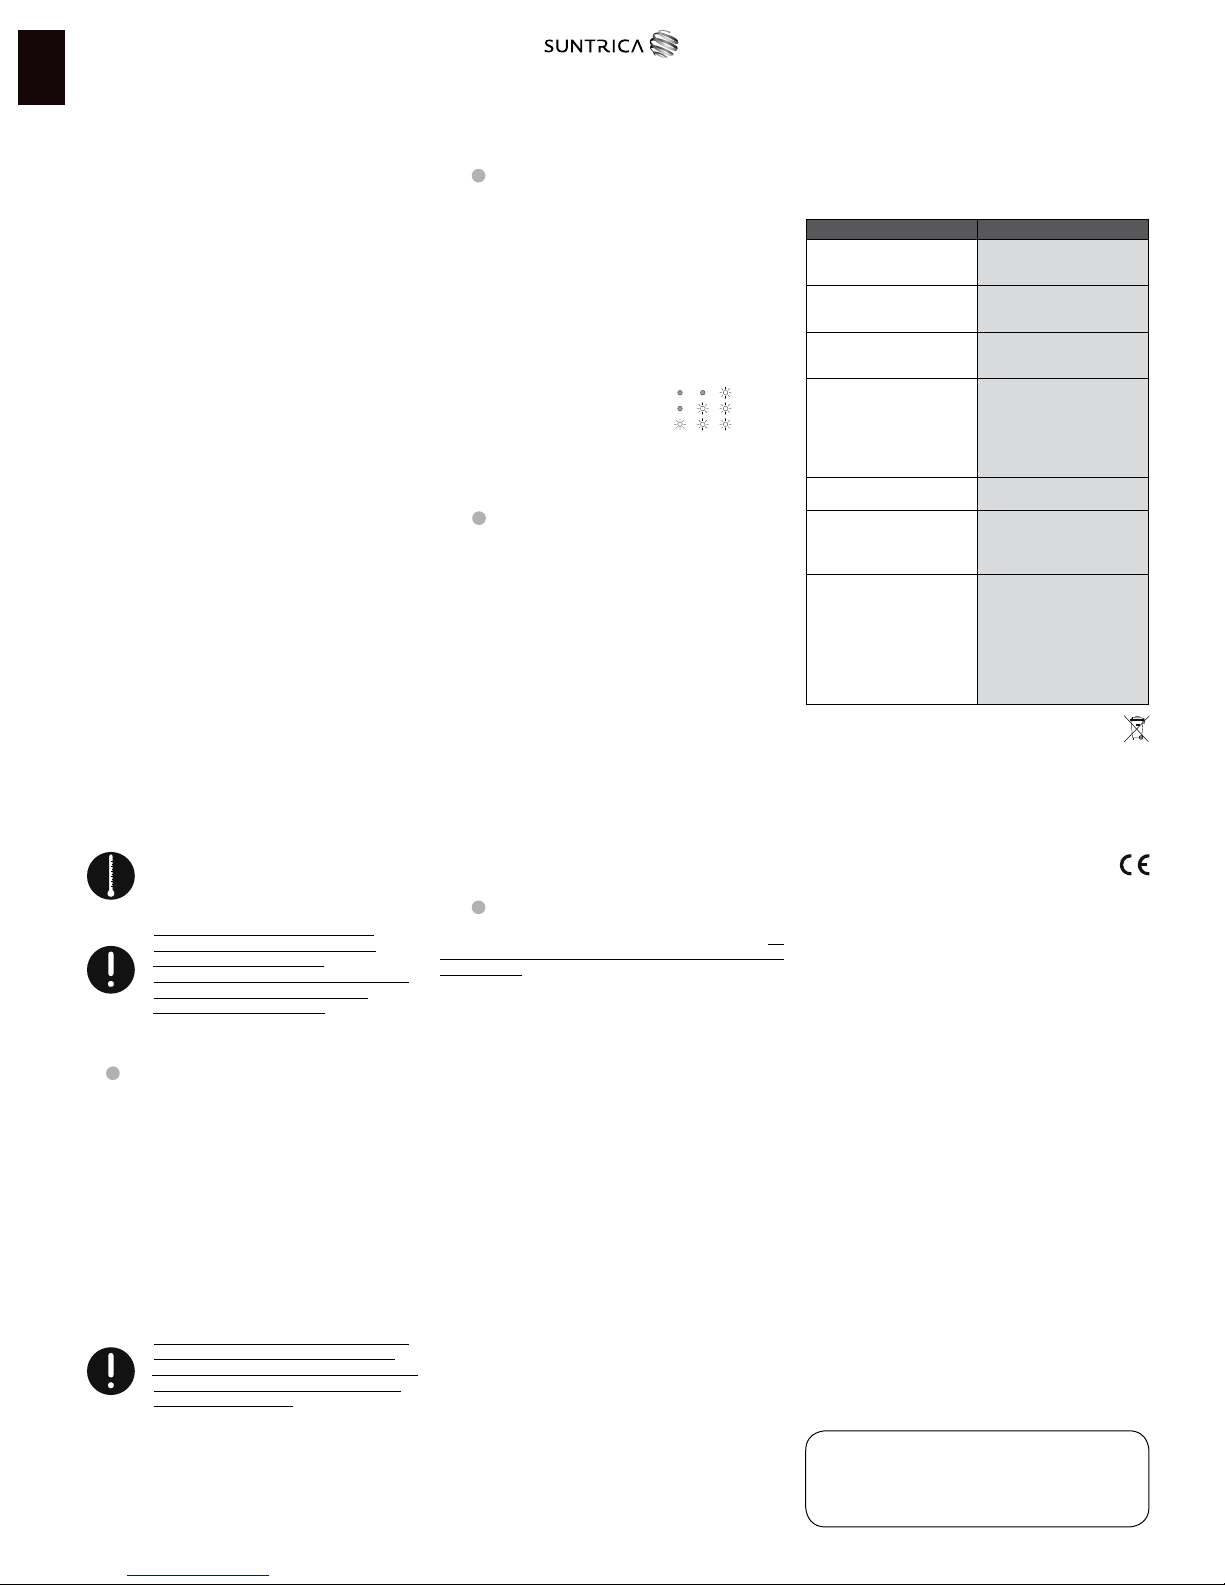
The three embedded LED lights on the back of the product
indicate SCOUT’s charge level. By touching the ”POWER OFF/
TEST” contact surface with the tip of the charging cable,
one, two or three LED lights will light up to indicate the
approximate charge level.
1 LED-light approx. 10% charge level
2 LED-lights approx. 50% charge level
3 LED-lights approx. 90% charge level
SCOUT’s battery is empty or almost empty if the LED lights flash
quickly but do not stay illuminated while the tip of the USB
connector is hold on to the ”POWER OFF/TEST” contact surface.
Figure C: Charging the target device: preparations
To charge the target device with SCOUT, switch the solar charger
on by touching the ”POWER ON” contact surface with the tip of
the charging cable. The three LED lights will turn on.
PLEASE NOTE! Charging the target device is possible only
when SCOUT has been turned on. The LED lights will illuminate
always when the power is switched on! SCOUT’s internal
battery is empty or almost empty if the three LED lights will
not light up while touching the ”POWER ON” contact surface.
SCOUT can be used also as a source of light. Switching the LED
lights on by touching the ”POWER ON” contact surface with the
tip of the charging cable, SCOUT can be used also as a source of
light without having the charging cable attached to the target
device. If SCOUT is used only for illuminating purposes, a fully
charged internal battery will provide power to the LED lights
approx. 10 hours.
Using the tip of the charging cable for operating SCOUT is based
on the grounding of the fixed USB cable. If you are unable to
switch the solar charger on and off with the tip of your target
device’s cable, the cable may not be grounded properly. SCOUT
can still always be operated with the tip of its own fixed cable.
Firure D: Charging the target device
Connect your target device’s USB cable to SCOUT’s fixed USB
charging cable and the other end to the target device. If the
charging does not start, remember to switch the solar charger
on! The LED lights will illuminate througout the charging period.
After SCOUT’s internal battery is empty, the charging period is
finished or you don’t use the LED lights anymore, remove the
charging cable from the target device and the target device’s
cable from SCOUT. Remember to switch SCOUT off by touching
the ”POWER OFF/TEST” contact surface with the tip of the
charging cable to save energy.
The charging time with SCOUT is approximately similar as it
would be with the target devices own charger.
Maintenance
• Use a soft, dry/damp cloth to clean SCOUT’s exterior.
• Do not use harsh chemicals, cleaning solvents or strong
detergents.
• Do not disassemble SCOUT.
Technical specifications
Battery capacity 1500mAh / 5,5Wh (Li-Po)
Solar panel power (peak) 1,3W (epoxy laminated
polycrystalline solar panel)
Rated Output 5V, 1000mA
Operating temperature +0°C…+50°C
Dimensions 170 x 118 x 19mm
Weight 185g
Enclosure Soft foam rubber, splash- and
shockproof
Electrical connections Standard USB female adapter,
fixed cable
Lights Three LED lights, use time
more than 10 hours with a
full battery
Charge level indicator The embedded LED lights
indicate the charge level with
1-3 LED lights, when the
contact surface is touched
Troubleshooting
Problem: SCOUT does not charge the connected device.
Possible cause: Solution:
SCOUT has not been switched on
from the ”POWER ON” contact
surface.
Switch SCOUT on by touching
”POWER ON” contact surface
with the tip of SCOUT’s fixed USB
charging cable.
SCOUT’s internal battery is empty. Charge SCOUT in direct sun light
until the LED lights indicate a
charge level.
SCOUT or the target device’s
charging cable is not compatible
with the target device.
Use an adapter recommended by
the target device manufacturer.
The power absorption of the
target device exceeds SCOUT’s
nominal output power.
Read the target device’s
instruction manual and make sure,
that SCOUT is compatible with
the target device. SCOUT provides
charging power to USB compatible
devices having a charging voltage
of 5V DC.
Target device’s charging cable is
damaged.
Change the target device’s charging
cable.
SCOUT’s charging system has been
damaged.
See warranty information. If you
suspect that SCOUT is defected,
please contact your local
distributor.
SCOUT’s internal battery does not
charge from direct sunlight.
Please note, that the operating
temperature should be between
+0° to +50°C. If the temperature
of SCOUT’s battery rises above
+50°C, it stops charging until the
temperature has dropped back
within the limits. Take SCOUT out
of sunlight to cool down and try
charging again later.
Correct disposal of the product
The markings shown on the product and its literature indicate,
that it should not be disposed with other household wastes
at the end of its working life. This product should be disposed
similarly like any other product having batteries and electrical
components. The product should not be mixed with other
wastes for disposal.
DECLARATION OF CONFORMITY
Hereby, Suntrica Ltd. declares that this SolarStrapTM MOVE
product is in compliance with the essential requirements and
other relevant provisions of Directive 2004/108/EC.
©2013 Suntrica. All rights reserved. Suntrica, SolarStrap™ and
SolarPlate™ are trademarks or registered trademarks of Suntrica
Ltd. Suntrica Ltd. reserves all rights to any changes to this User
Guide and/or product specification without prior notice.
WARRANTY
Suntrica agrees to warrant the Products in accordance with
Suntrica’s Limited Manufacturer’s Warranty terms in force from
time to time (the ”LMW”) for the applicable Product type. The
LMW is given directly to end-users of Products and can be found
at www.suntrica.com. Defective Products under warranty will
be replaced or refunded at Suntrica’s discretion.
Local Distributor:
scout
SolarPlate™