SDS Standard Box User manual

USER MANUAL
Smart Delivery System

Contents
1 Smart Delivery System 2
1.1 Overview ........................................ 2
1.2 TechnicalSummary................................... 4
2 Quick Startup Guide 4
2.1 Whatisincluded .................................... 4
2.2 Required......................................... 5
2.3 ConnectingtotheSDS................................. 5
2.4 PINsandKeys ..................................... 6
3 Web Interface 6
3.1 Deliveries ........................................ 6
3.1.1 Creating a New Delivery . . . . . . . . . . . . . . . . . . . . . . . . . . . . 6
3.1.2 Activating a Repeat Buy Delivery . . . . . . . . . . . . . . . . . . . . . . 6
3.1.3 Managing Delivery Items . . . . . . . . . . . . . . . . . . . . . . . . . . . 7
3.2 AccessPINs....................................... 7
3.2.1 Creating an Access PIN . . . . . . . . . . . . . . . . . . . . . . . . . . . . 7
3.2.2 ManagingAccessPINs............................. 8
3.3 RepeatBuys ...................................... 8
3.3.1 CreatingaRepeatBuy ............................ 8
3.3.2 Managing Repeat Buys . . . . . . . . . . . . . . . . . . . . . . . . . . . . 8
3.4 Archives......................................... 8
3.5 AccessLogs....................................... 9
3.6 Help ........................................... 9
3.7 Settings ......................................... 9
4 Synchronisation 10
5 Changing Batteries 10
6 Proof of Delivery 11
1
1 Smart Delivery System
1.1 Overview
The SDS provides a secure means for items to be delivered regardless of whether someone is
present to accept the package at the time of delivery. The SDS relies on two pieces of hardware,
referred to as the Smart Box and the Parcel Box. When a 4 digit PIN is entered into the Parcel
Box keypad the PIN is sent for validation to the Smart Box. If the Smart Box recognises this as
an active PIN it will respond with permission for the Parcel Box to open. Inside each Parcel Box
is a barcode and data-matrix, unique to each individual system which provides the verification
required by couriers that the package was successfully delivered.
A successful delivery will prompt an email to be sent to the registered email address alert-
ing the user to the perceived delivery of a package. Every PIN is unique to a delivery which
allows the specific item to be known and a description to be included in the notification email.
The SDS is more than just a delivery system to be used by one specific courier company.
Its simplicity (while not sacrificing security) makes it possible for anyone with a valid PIN
to access your Parcel Box. This flexibility allows it to not only be used for receiving pack-
ages but is a safe place to store packages waiting to be picked up. The person accessing
the Parcel Box also need not be from a registered courier company but can be used to allow
friends/family/neighbours/acquaintances to drop off/pick up items. All that is needed is a valid
PIN which can automatically become invalid after it is used.
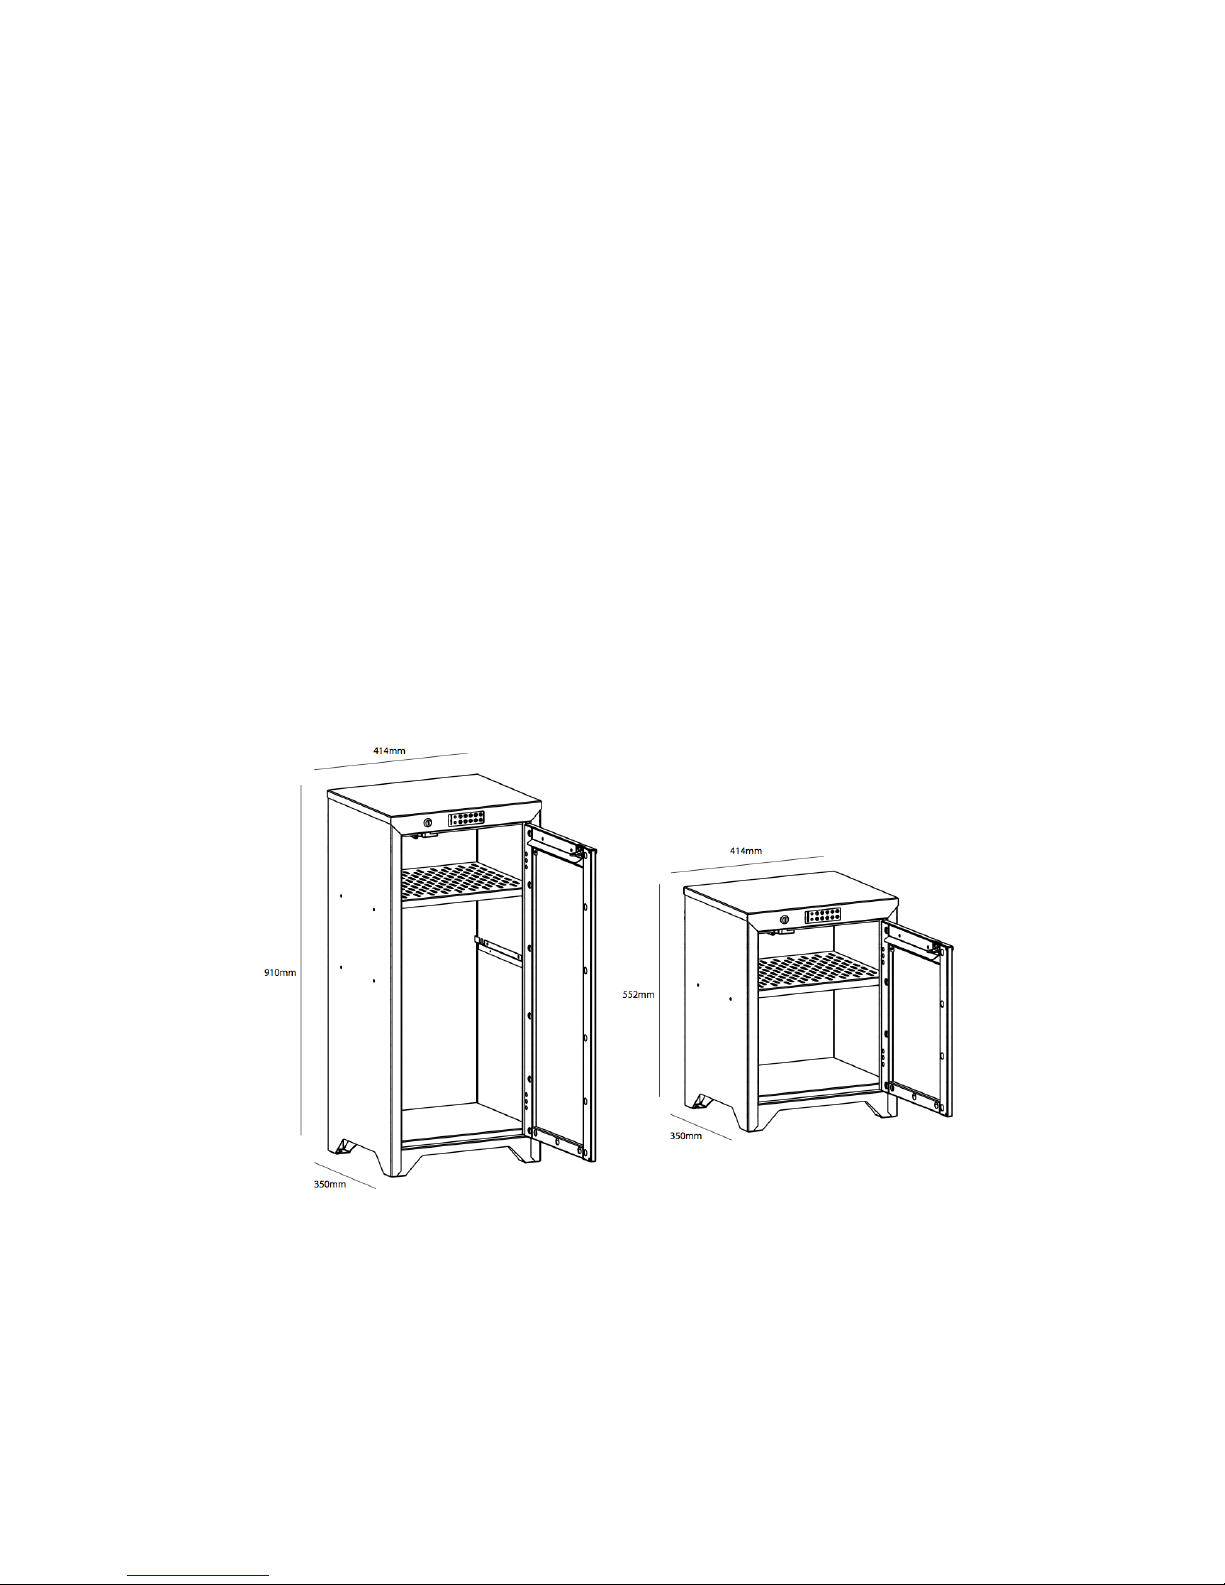
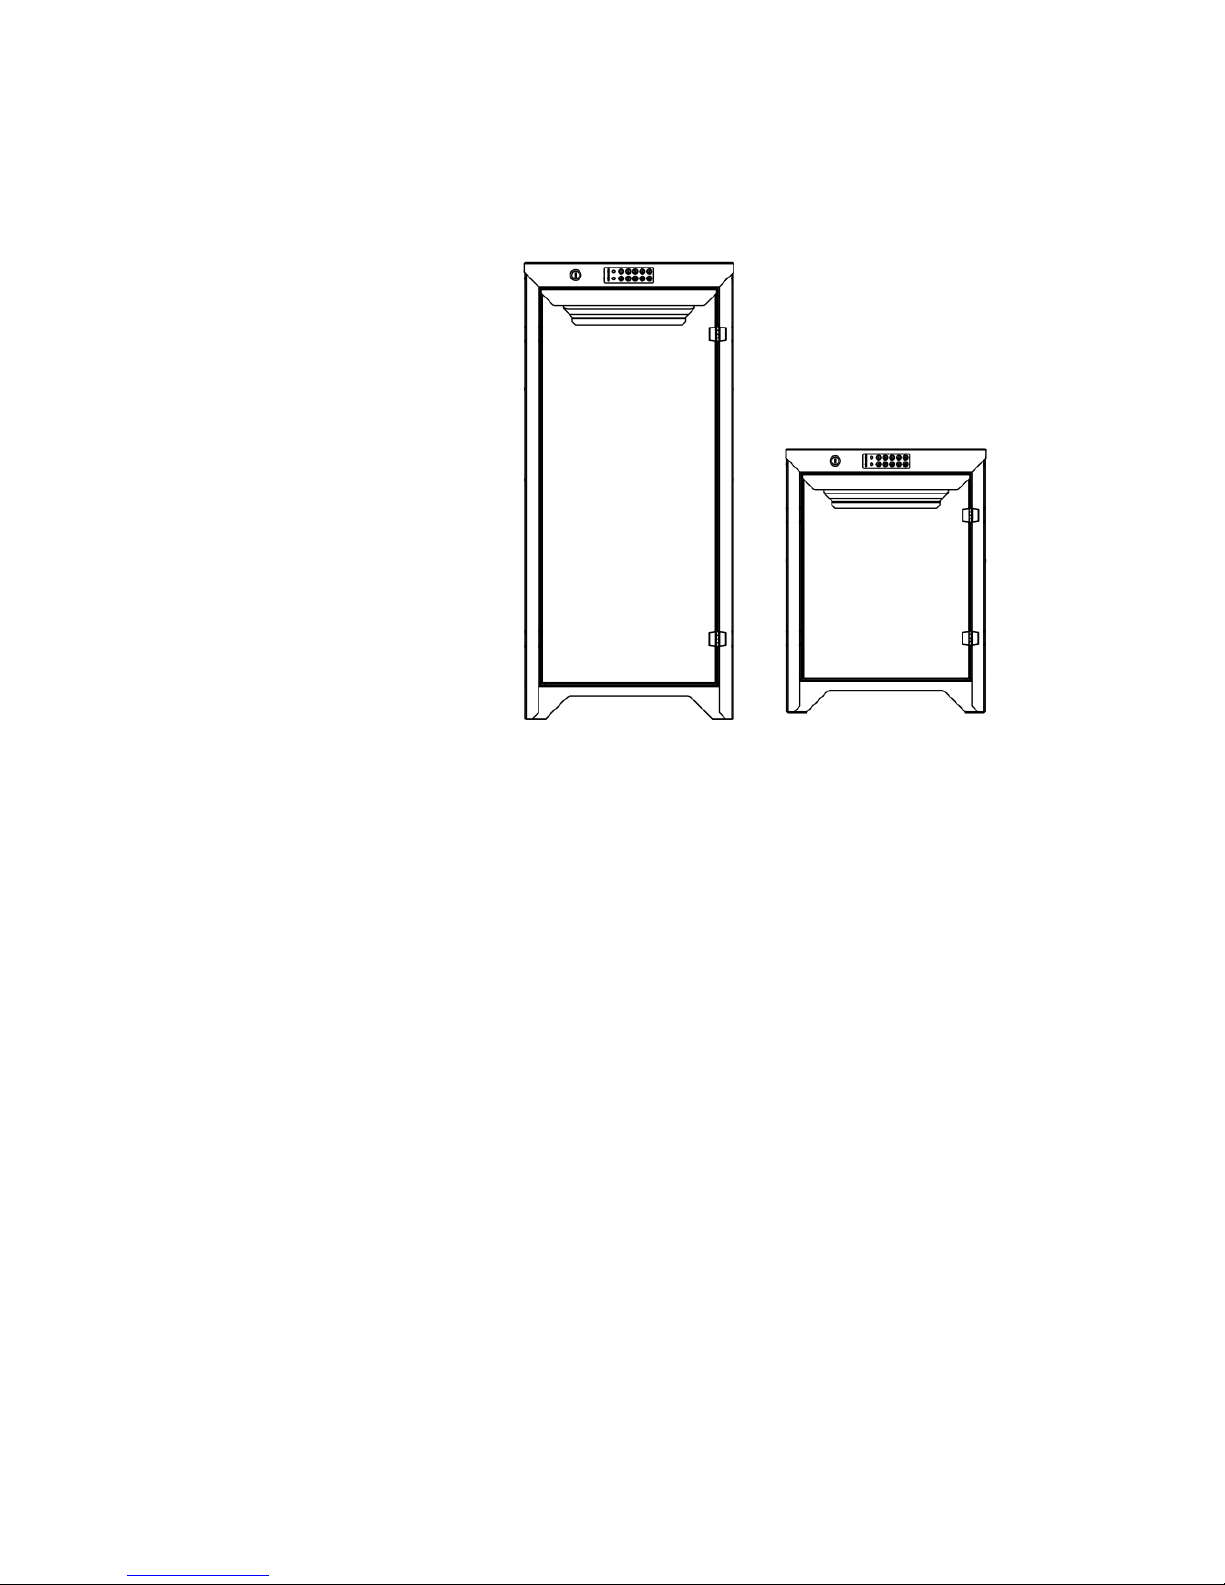
Figure 1: The SDS comes in 2 sizes: Standard (left) and compact (right)
2
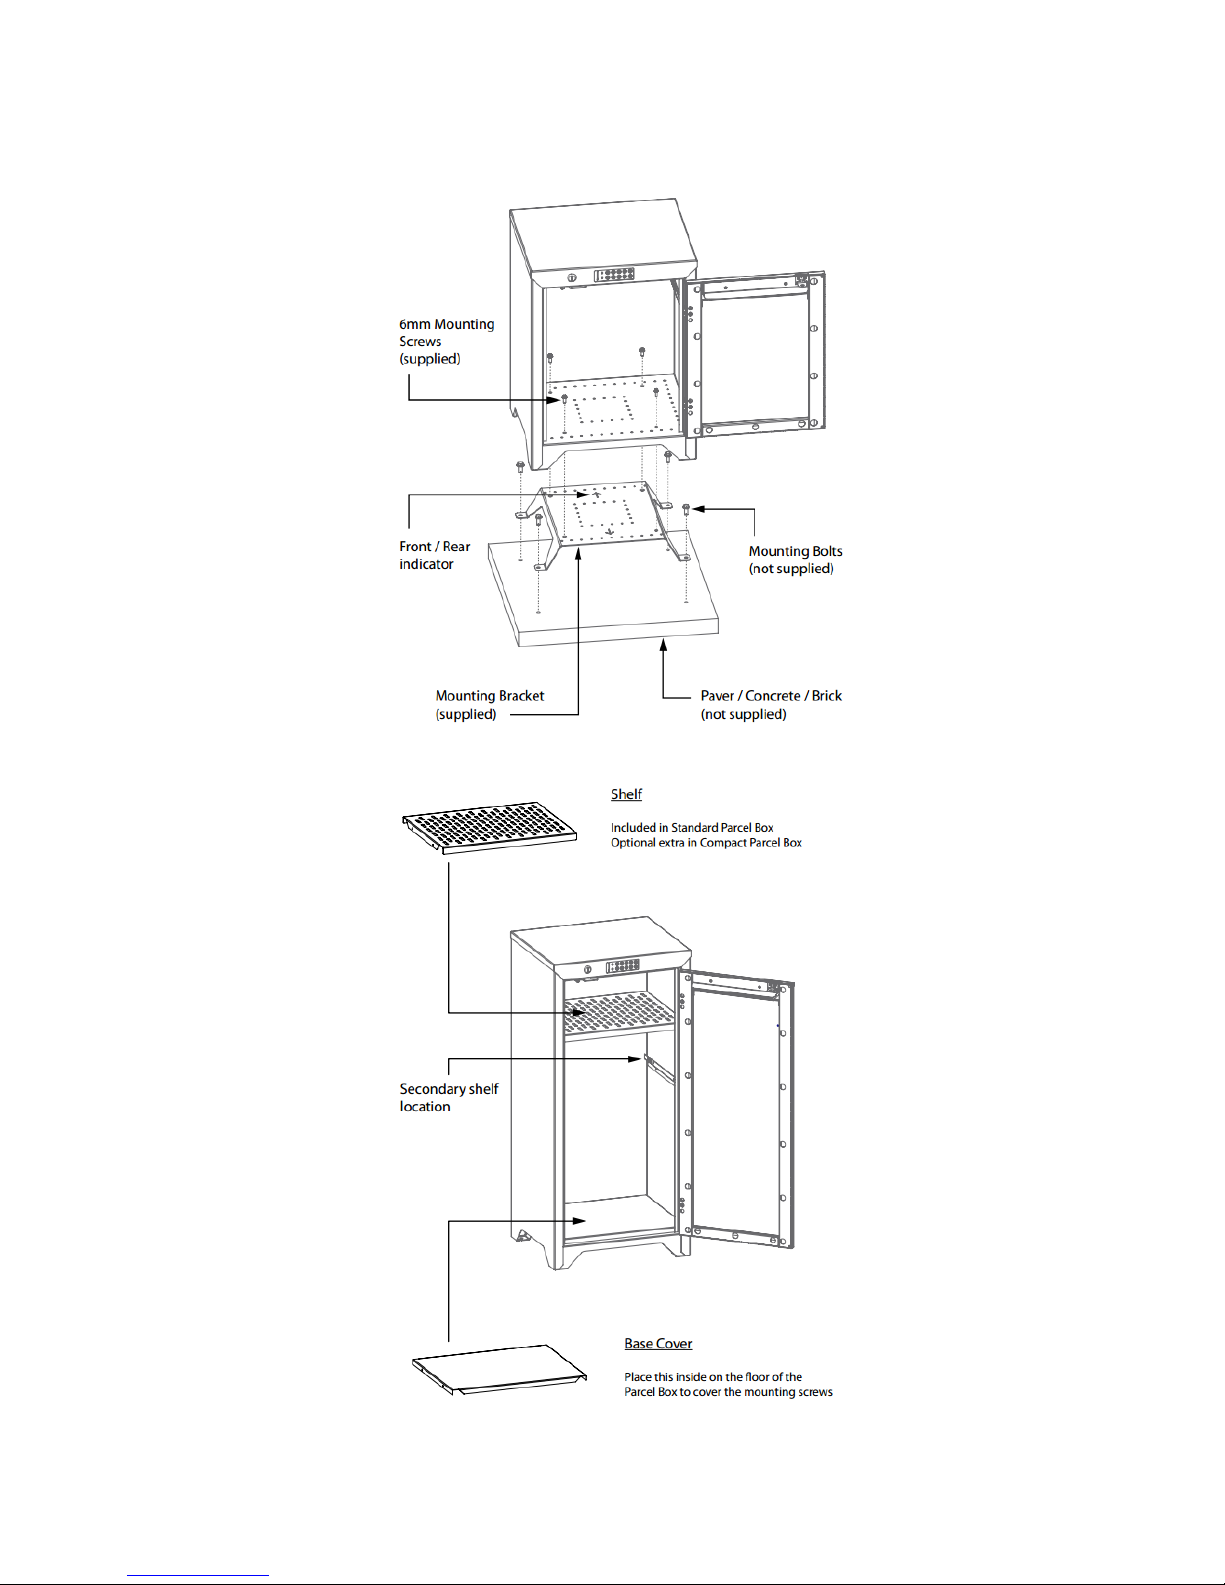
(a) Exploded view of how to secure your Parcel Box
(b) Removable shelves
Figure 2
3
1.2 Technical Summary
PARCEL BOX Standard Compact
SIZE 414mm x 350mm x 910mm 414mm x 350mm x 552mm
WEIGHT 20kg 15kg
SUBURBAN RANGE 60 meters 60 meters
OPEN AREA RANGE 180 meters 180 meters
BATTERY LIFE 3 years 3 years
REQUIRED BATTERIES 2xAA, 9V 2xAA, 9V
SURFACE FINISH Powder Coat Powder Coat
STEEL CONSTRUCTION 1.2mm zinc anneal steel 1.2mm zinc anneal steel
COLOUR SCHEMES White, Beige, Grey, Black White, Beige, Grey, Black
INCLUDED SHELF One (can support two) None (can support one)
2 Quick Startup Guide
2.1 What is included
•Parcel Box
•Smart Box
•Power adaptor
•Ethernet cable
•Parcel Box Key
•Mounting Bracket
•6mm Mounting Screws (x4)
4

2.2 Required
•Router with available ethernet port
•Power socket
The following steps give a high level description of the process for setting up your SDS. Where
indicated steps are discussed in more detail in subsequent sections.
1. Place the Secure Parcel Box in a location which can be accessed by couriers.
2. Using a network cable, plug one end into the Smart Box and the other into an available
socket on the desired router.
3. Using the power adaptor, connect the Smart Box to a power socket. Turn it on.
4. Access the SDS web interface for the initial configuration and creating the first user account.
Your SDS is ready to go. You can now create Deliveries, Access PINs and much more. Enjoy
your new Smart Delivery System.
Figure 3
2.3 Connecting to the SDS
The web interface is the main point of interaction with the SDS. It is the gateway to controlling
and setting up all the features provided. To access the SDS web interface, go to any web browser
on a device connected to the same network as the Smart Box and enter one of the following:
•SDS/
•SDS.local/
•IP address of Smart Box (Note: this is required if you are on an Android device)
5

SDS/ is the correct address for all Windows machines. SDS.local/ will find the correct page on
all Apple devices and Windows machines which have installed on them the program “Bonjour”
(which comes with iTunes, and several other common programs). If all else fails, explicitly
entering the IP address of your Smart Box will take you to the correct page regardless of the
OS used. This is the only way to access the Smart Box page on an Android device. There
are many free software packages available for finding the IP address of all devices connected to
your network. We recommend Advanced IP Scanner (for Windows) or Angry IP Scanner (for
Mac). Run your chosen IP scanner and look for the entry which has the name “sds”. Enter the
corresponding IP address into your chosen browser to load the login screen of the SDS.
2.4 PINs and Keys
Access to the Parcel Box requires a PIN or a key. Two keys are provided which will grant you
access. All PINs generated are 4 digits long. On each press of the Parcel Box keypad the green
LED will light up. When 4 digits have been entered one of two things will happen
SUCCESS: Green LED will illuminate for three seconds.
FAIL: Red LED will blink twice.
If a mistake is made before entering the fourth digit of the PIN, wait 8 seconds and the PIN
buffer will reset allowing the PIN to be re-entered without logging a failed PIN attempt.
3 Web Interface
3.1 Deliveries
This is where you create and manage all your delivery items. You create a delivery item whenever
you are shopping online to allow the deliverer to use your Parcel Box. Creating a delivery item
generates a unique PIN which can be used to gain access to your Parce Box. When a PIN
associated with a delivery item is used an email is sent to the user that created the delivery item
to alert them that this PIN was just used.
3.1.1 Creating a New Delivery
•In the side menu Deliveries tab, click the button in the top right corner of the page. A
dialogue box will pop up giving the option to create a new delivery or use a Repeat Buy
(Repeat Buys are explained later). Click
•Fill out the text boxes to appropriately describe your delivery.
•Set the validity period of the generated PIN using the drag bars.
•You can copy the generated delivery instruction to paste into your online order form.
•Click in the bottom left corner to save and finish creating the New Delivery and exit
back to the deliveries list.
3.1.2 Activating a Repeat Buy Delivery
•In the side menu Deliveries tab, click the + button in the top right corner of the page. A
dialogue box will pop up giving the option to create a new delivery or use a Repeat Buy
6
(Repeat Buys are explained later). Click on the desired Repeat Buy Delivery option.
•The “Delivery From” field will already be filled out. Fill out the “Delivery What” field.
The value of the PIN will be whatever it was when the Repeat Buy was created.
•The validity period will be what was set when the Repeat Buy was created but can be
again configured here.
•You can copy the generated delivery instruction to paste into your online order form.
•Click in the bottom left corner to activate the Repeat Buy Delivery and exit back to
the deliveries list.
3.1.3 Managing Delivery Items
On the right side of the deliveries list there several buttons which can used to manage your
deliveries. Which ones are present next to a particular delivery will depend on the status of the
delivery.
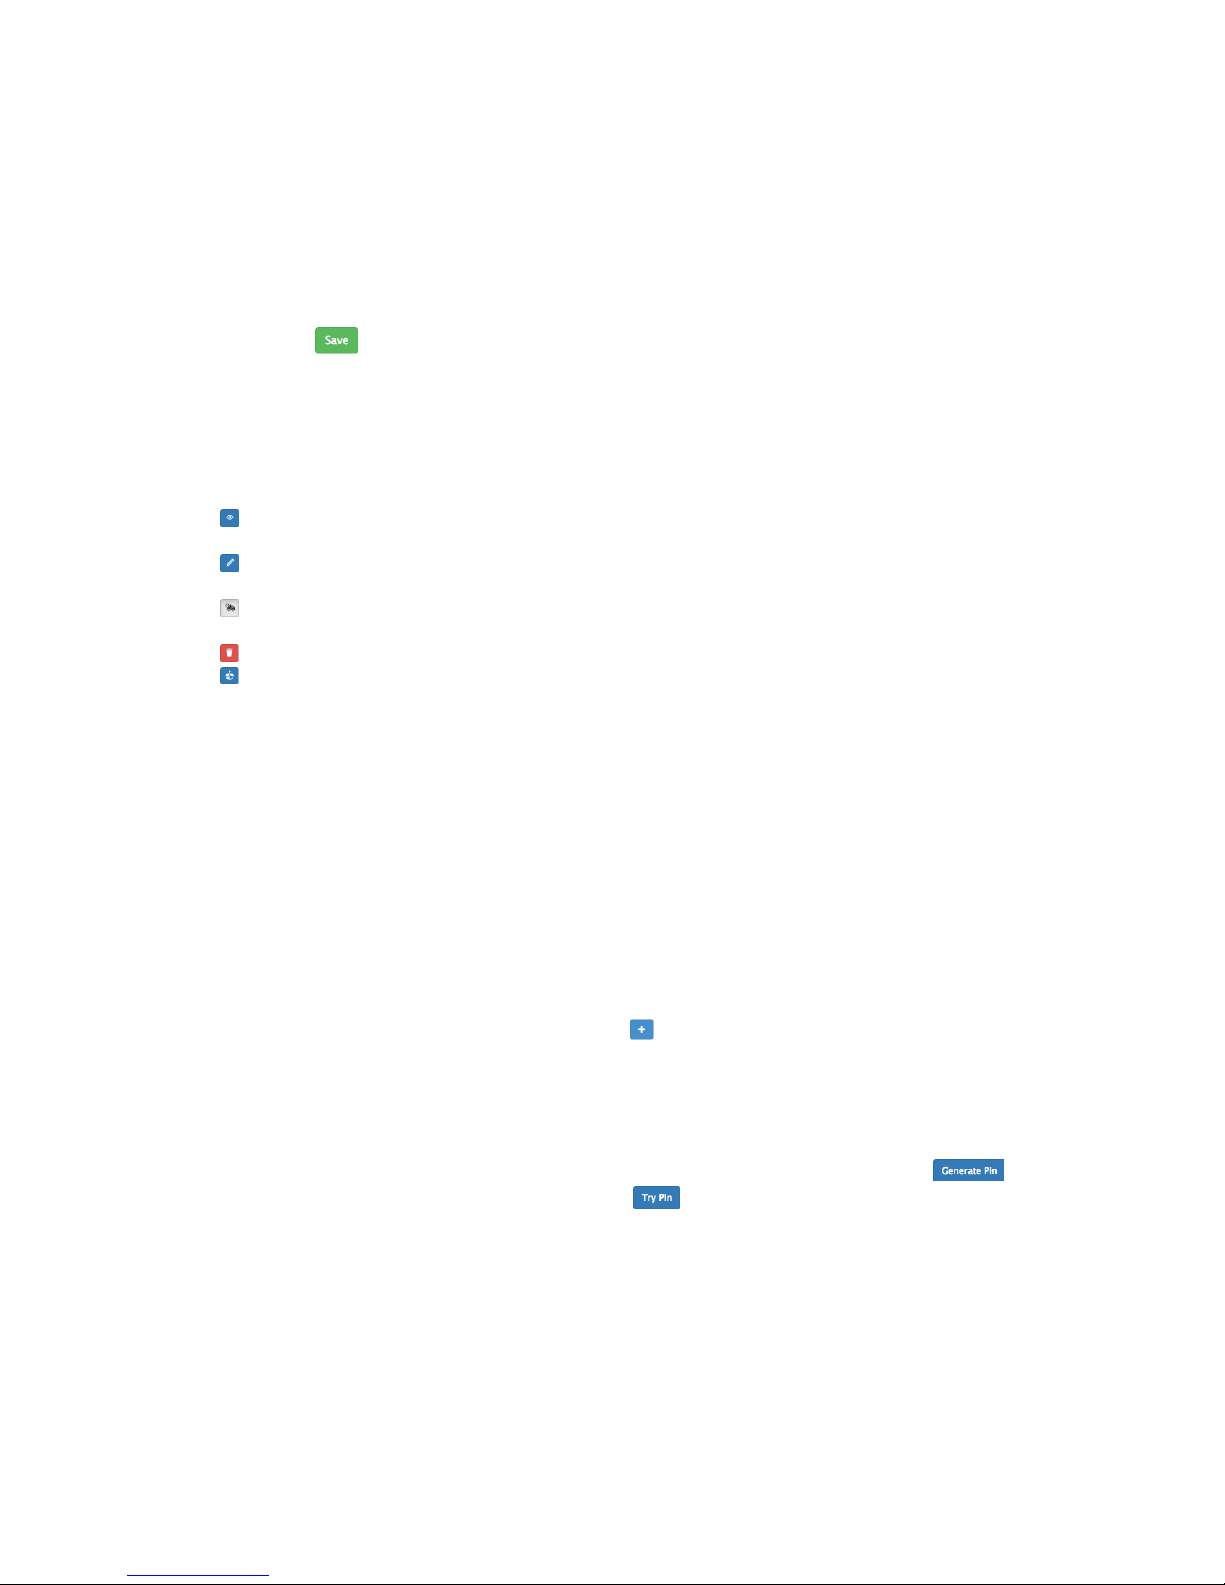
Allows you to view the details of the delivery item which were set when the delivery item was
created. No editing can be done on this page.
Allows you to change the details of a delivery item which were set when it was originally
created. Note: the PIN can not be changed.
Remove a delivery item from the deliveries list and adds it to the archives. The archive is a
way to keep track of all completed delivery items.
Deletes a delivery. No reference of the delivery item will be kept.
Allows you to manually change the delivery status. A delivery item can be manually set as
Delivered, Not Delivered or Partially Delivered. When marked as partially delivered the delivery
item is split in two. The first part is marked as delivered and the second part is marked as
pending. The PIN for this new partial delivery is what it was for the original delivery item.
3.2 Access PINs
This is where you create and manage all your general purpose Access PINs. Access PINs are a
less formal method to gain access to your Parcel Box. Access PINs are similar to delivery items
in that each PIN generated much be unique. However, Access PINs can be chosen, they can be
set to have an unlimited validity period, expire after one use, or can be configured to have an
unlimited number of uses within a specified time range. The use of an access PIN DOES NOT
result in an email being sent.
3.2.1 Creating an Access PIN
•In the side menu Access PINs tab, click the button in the top right corner of the page.
•Choose a name for your new Access PIN.
•The access PIN type can be:
–Unlimited: It never expires and is valid at all times of the day.
–Time Period: Can be used an unlimited number of times in a specified time window.
–Use Once: Can be used only once in a specified time window.
•The value of the Access PIN can be randomly generated and changed using the
button, or it can be user defined by clicking .
•If the PIN type was chosen as Use Once or Time Period the time window can be set using
the drag bars.
•Click “Save” in the bottom left corner to activate the Access PIN and exit back to the
Access PIN list.
7
3.2.2 Managing Access PINs
On the right side of the Access PINs list there are several buttons which can be used to manage
your Access PINs.
Allows you to view the details of the Access PIN which were set when the Access PIN was
created. No editing can be done on this page.
Allows you to change the details of an Access PIN which were set when it was originally
created. The PIN and PIN type can also be changed.
Deletes an Access PIN. No reference of the Access PIN will be kept.
3.3 Repeat Buys
Repeat Buys are saved delivery stubs which can be reactivated in the Deliveries tab. Repeat
Buys are useful in cases where you commonly order from the same supplier. A Repeat Buy saves
a PIN and supplier and can be quickly re-activated as a delivery item so that you do not need
to supply a new PIN to a common supplier each time you want to place an order. This allows
you to continue to save your details with your online supplier without having to edit the PIN for
each new order.
3.3.1 Creating a Repeat Buy
•In the side menu Repeat Buys tab, click the button in the top right corner of the page.
•Choose a name for the Repeat Buy. This will automatically fill in the “Delivery From”
box when it is activated when creating a new Delivery item.
•Select a PIN and choose a validity period for which this PIN will be active when it is
activated as a Delivery. The PIN and validity period will automatically populate the fields
when it is selected to be activated in the Deliveries tab.
•Click in the bottom left corner to save the Repeat Buy item and exit back to the
Repeat Buys list.
3.3.2 Managing Repeat Buys
On the right side of the Repeat Buys list there are several buttons which can be used to manage
your Repeat Buys.
Allows you to view the details of the Repeat Buy which were set when the Repeat Buy was
created. No editing can be done on this page.
Allows you to change the details of a Repeat Buy which were set when it was originally
created. The PIN can also be changed.
Deletes the Repeat Buy. No reference of the Repeat Buy will be kept.
3.4 Archives
Archives is a place to store completed Deliveries. Instead of leaving completed Delivery stubs
in the Deliveries list where they will just clutter up the list, or just deleting them which means
there will be no record of the delivery having taken place, the Archive is a location specifically
for completed deliveries.
You can interact with the items in the Archive with the buttons provided.
Allows you to view the details of the Delivery Item which were set when the Delivery item
was created as well as when it was delivered. No editing can be done on this page.
8

Deletes the Delivery item. Removing an item from the Archive means there will be no record
of this Delivery item.
3.5 Access Logs
Access Logs keep a record of every 4 digit PIN entered into the Parcel Box. The default page on
the Access Logs is showing all successful openings, the time, and if you are the user who created
the PIN then also what was the PIN which opened the Parcel Box.
Takes you to a table of all denied PIN entries, the time the PIN was entered and what was
the attempted PIN.
Takes you back to the table of PIN entries to the Parcel Box which were successful in gaining
access.
Gives you the option to clear all Access Logs, or configure how far back you would like access
logs kept.
3.6 Help
This contains manuals and videos showing how to use the SDS. There are videos showing how
to set up Deliveries, Repeat Buys, and Access PINs, and much more. This User manual as well
as the Quick Start Guide, and product brochure can also be found.
Click “Return to SDS” button down the bottom of the page to return to the Smart Box Deliveries
tab page.
3.7 Settings
In the top right corner of the page there is a profile of a persons head with the name of the
current user next to it. Clicking on this will reveal a drop down menu with items:
Profile: This is where a User can change their user name and password.
Logout: Logs the current user out of the Smart Box.
Settings: This page is of most interest to system administrators. It is where all system config-
urable settings reside.
System Details: The top grey box shows the hardware and software version numbers,
and your SDS ID. There is also the option to register your SDS....
Emails By default the SDS will send emails when a delivery takes place, when you or
the administrator changes your password, or the door has been left open for over 5
minutes. There is the option to ask for an email when too many incorrect PINs are
entered within a specified time window. All emails can be turned on or off as you like.
Grace Period: The grace period is a small time period after a PIN associated with a
delivery has been used in which it is still valid. Setting it to 0 makes all delivery PINs
strictly use once. A grace period allows for the re-opening of the Parcel Box in cases
where the door accidentally closes before the delivery is complete.
PIN Failure Limit: Sets how many times and in what period of time invalid PINs can be
entered before an emails alerting the system administrators to a possible attempted
breach. Default is 12 failures in 4 minutes.
Time Zone: Change your time zone if you move your SDS.
Digital Signature: Re-generate the proof of delivery data matrix, QR code, and ID which
is placed on the inside of the door.
Switch Off: Safely shuts down and turns off the Smart Box.
9

Restart: Restarts the Smart Box.
Re-sync with lock: Puts the Smart Box into its sync mode. If the Smart Box and Parcel
Locker stop communicating, re-syncing the devices with each other can sometimes
solve this problem.
Factory Reset: Resets the Smart Box to its factory state. All Deliveries, Access PINs,
Repeat Buys, Access Logs will be erased.
Usage Details: Usage logs allow us to tailer our product to better meet the needs of out
customers. No personal information is gathered. The logging is no intrusive (we don’t
look at what items are being purchased), they merely give us an indication of which
features are being used, or if users are having to re-sync their devices too many times,
or if no-one is using Repeat Buys.
Users: In the left side menu there is the Users tab which is where new user accounts can
be created.
4 Synchronisation
The Smart Box and Secure Parcel Box must be paired before they can communicate with each
other. Your Parcel Box and Smart Box should already be paired when you receive it. However,
it is possible for communication channel to break down. Follow the below steps to synchronise
your Secure Parcel Box and Smart Box:
1. Click on the Settings item in the drop down menu in the top right hand corner of the Smart
Box interface. If you are a system administrator you will be able to select the button which
says “Re-sync with lock”.
2. This will put the Smart Box in its synchronisation mode.
3. Remember the 4 digit PIN displayed on the page.
4. Go to the Secure Parcel Box. Take out one of the AA batteries and then reconnect it.
5. You now have 15 seconds to press and hold ’0’ for about 5 seconds until the green LED
flashes twice. This puts the Parcel Box in its synchronisation mode.
6. Enter the PIN you remembered earlier. You have 10 seconds to enter this PIN before the
locker automatically exits this synchronisation mode, indicated by 2 flashes of the red LED.
7. If it was successful the green LED will flash 3 times. If it was unsuccessful the red LED
will flash 3 times. If less than 4 keys were entered the red LED will flash 2 times. The
Smart Box has a 10 minute window from the time the PIN is generated to the time the
PIN can be entered to achieve synchronisation. If the wrong PIN is entered return to step
3. If the 5 minute time window expires return to step 2.
After a successful synchronisation attempt the Parcel Box and Smart Box can communicate with
each other. This means that when a delivery is set up, the generated PIN is valid for this newly
paired Secure Parcel Box.
5 Changing Batteries
The SDS Parcel Box lock requires 2 AA batteries and one 9V battery to operate.
1. Undo the M3 screw in the top of the box, just inside the door, with a Philips Head screw
driver. This will release the battery tray, exposing the batteries.
2. Take out the 2 AA batteries and replace them with fresh ones.
3. Using the same screw driver, undo the M3 screw securing the 9V battery case.
4. Unclip the old 9V battery from its lead and attach it to the fresh one.
5. Re-insert the 9V battery into its case and re-attach it with the M3 screw.
10

6. Push the battery tray up into the top of the box and secure it with its M3 screw.
6 Proof of Delivery
It is not uncommon for a parcel delivery to be verified by the signature of one of the residents.
As the SDS addresses the issue of accepting packages when occupants are away from their houses
a system is required that couriers can use as proof of a successful delivery in lieu of an actual
signature.
Inside each Parcel Box is a unique number and barcode encoding this number. When a courier
comes to deliver an item they can either scan the barcode or record the unique number. To
get access to these digital signatures the Parcel Box must first be opened. This opening will
be recorded by the access logs of the SDS so that the user can have a record of the delivery
taking place, and the scanning of the unique barcode or recording of the unique number provides
evidence for the couriers that the item was delivered.
11
This manual suits for next models
1
Table of contents
Popular Personal Care Product manuals by other brands

gk-medizinmechanik
gk-medizinmechanik GK PRIMUS 2000-HYD operating manual

Juzo
Juzo 9662 Instructions for use

Fusion
Fusion BRACE Fitting instructions

REH4MAT
REH4MAT AM-OSN-U-11 quick start guide

Gaiam restore
Gaiam restore 05-61830 Setup, Workout Tips and Care & Safety Guide

American Standard
American Standard Enfield 2860 Series parts list


