Sealey IR3000S User manual

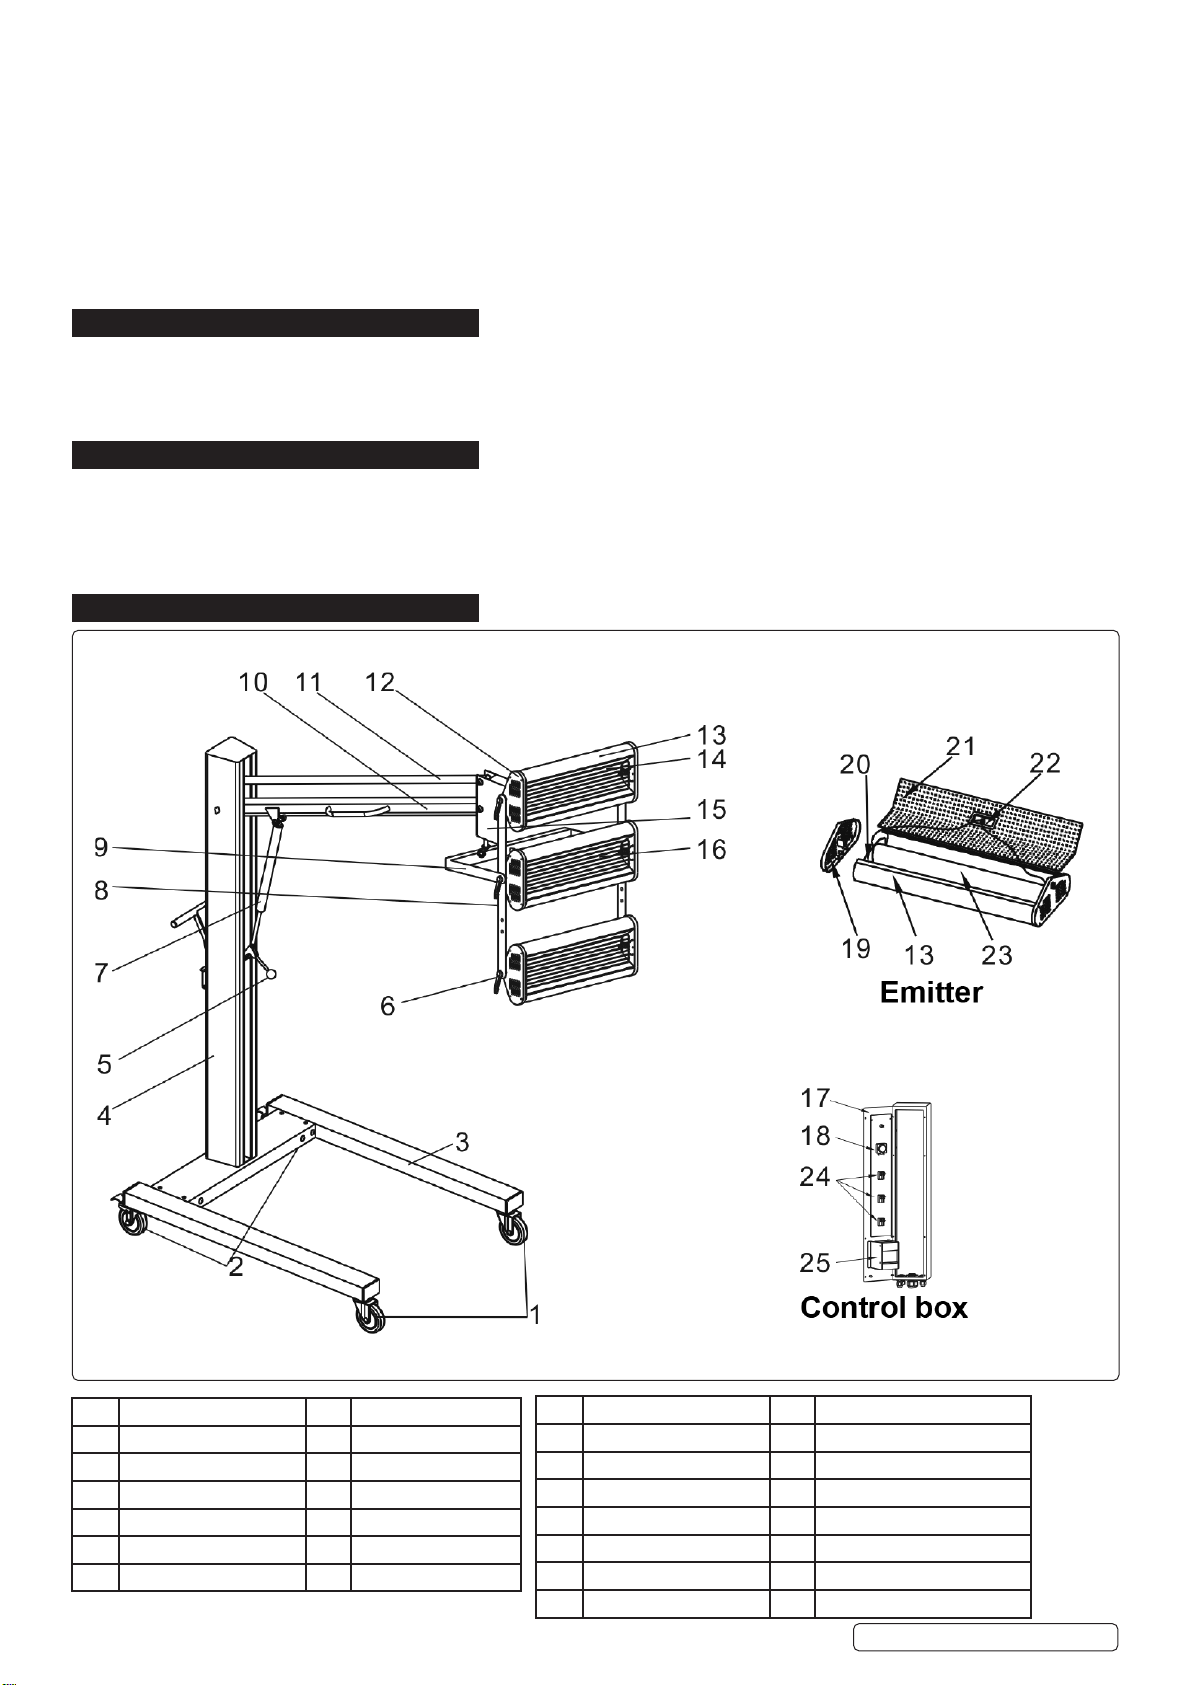
3150W INFRARED PANEL DRYER - SHORT WAVE
MODEL NO: IR3000S
Thank you for purchasing a Sealey product. Manufactured to a high standard, this product will, if used according to these instructions,
and properly maintained, give you years of trouble free performance.
IMPORTANT: PLEASE READ THESE INSTRUCTIONS CAREFULLY. NOTE THE SAFE OPERATIONAL REQUIREMENTS, WARNINGS & CAUTIONS. USE
THE PRODUCT CORRECTLY AND WITH CARE FOR THE PURPOSE FOR WHICH IT IS INTENDED. FAILURE TO DO SO MAY CAUSE DAMAGE AND/OR
PERSONAL INJURYAND WILL INVALIDATE THE WARRANTY. KEEP THESE INSTRUCTIONS SAFE FOR FUTURE USE.
1. SAFETY
1.1. ELECTRICAL SAFETY
WARNING! It is the owner’s responsibility to read, understand and comply with the following:
You must check all electrical equipment and appliances to ensure that they are safe before use. You must inspect power supply leads,
plugs and all electrical connections for wear and damage. You must ensure the risk of electric shock is minimised by the installation of
appropriate safety devices. An RCCB (Residual Current Circuit Breaker) should be incorporated in the main distribution board. We also
recommend that an RCD (Residual Current Device) is used with all electrical products. It is particularly important to use an RCD with
portable products that are plugged into an electrical supply not protected by an RCCB. If in doubt consult a qualified electrician. You
must also read and understand the following instructions concerning electrical safety.
1.1.1. The Electricity At Work Act 1989 requires all portable electrical appliances, if used on business premises, to be tested by
aqualiedelectrician,usingaPortableApplianceTester(PAT),atleastonceayear.
1.1.2. The Health & Safety at Work Act 1974 makes owners of electrical appliances responsible for the safe condition of the appliance
and the safety of the appliance operator. If in any doubt about electrical safety, contact a qualified electrician.
1.1.3. Ensure the insulation on all cables and the product itself is safe before connecting to the mains power supply. See 1.1.1. & 1.1.2. above
anduseaPortableApplianceTester(PAT).
1.1.4. Ensure that cables are always protected against short circuit and overload.
1.1.5. Regularly inspect power supply, leads, plugs for wear and damage and all electrical connections to
ensure that none are loose.
1.1.6. Important: Ensure the voltage marked on the product is the same as the electrical power supply
to be used and check that supply is correctly fused, see fuse rating at right.
1.1.7. DO NOT pull or carry the powered appliance by its power supply lead.
1.1.8. DO NOT pull power plugs from sockets by the power cable.
1.1.9. DO NOT use worn or damaged leads, plugs or connections. Immediately replace or have repaired
by a qualified electrician.
1.1.10. This product comes without a plug. You must contact a qualified electrician to ensure an
adequate supply is available.
If fitting such a plug -
Ensure that the unit is correctly wired and earthed, as follows:
a) Connect the GREEN/YELLOW earth wire to the earth terminal ‘E’.
b) Connect the BROWN live wire to live terminal ‘L’.
c) Connect the BLUE neutral wire to the neutral terminal ‘N’.
d) After wiring, check there are no bare wires, that all wires have been correctly connected, that the cable outer insulation is clamped by
the cable grip and that the grip is tight.
1.1.11. Cable extension reels. When a cable extension reel is used it should be fully unwound before connection. A cable reel with an RCD
fittedisrecommendedsinceanyproductwhichispluggedintothecablereelwillbeprotected.Thesectionof the cores of the cable is
important. 2.5mm² section is a minimum, but to be absolutely sure that the capacity of the cable reel is suitable for this product and
for others that may be used in the other output sockets, we recommend the use of 2.5mm² section cable.
1.2. GENERAL SAFETY
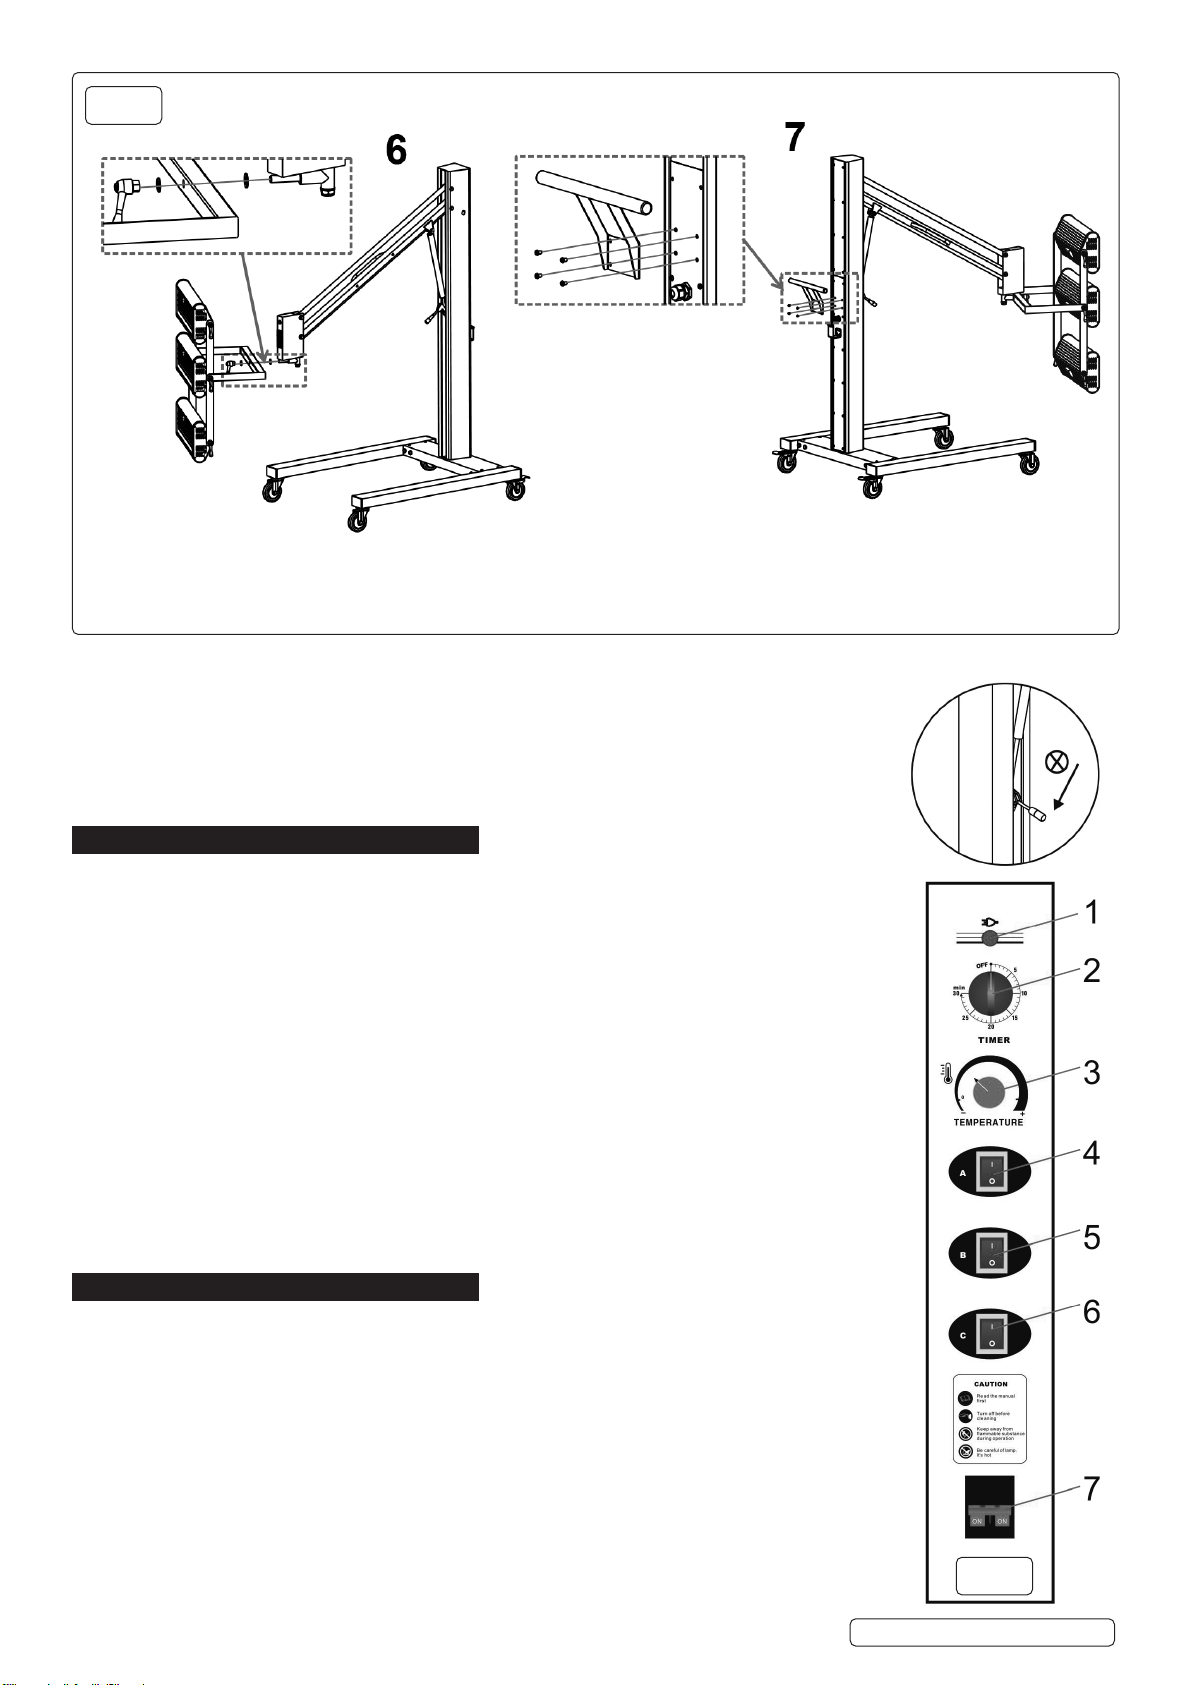
WARNING! Ensure there is nobody in front of the lamp when it is switched on.
9Disconnect the panel dryer from the power supply before servicing, changing accessories, or performing any maintenance.
9Ensure that the panel dryer is in good condition before use. If in any doubt do not use the unit and contact an electrician.
9Familiarise yourself with the application and limitations of the panel dryer.
9Check that lamp guards are in place, undamaged and firmly attached.
9Keep tools and other items away from the panel dryer when it is in use.
9Keep the work area clean and clear of unnecessary items.
9Remember that the lamp panel will get hot, allow to cool after use.
9Maintain the panel dryer in good condition. Use authorised agent for servicing.
9Keep the dryer clean, but DO NOT use solvents. Refer to section 7 for cleaning of emitter tubes.
9Use only genuine parts and accessories. Unauthorised parts and accessories may be dangerous and will invalidate your warranty.
8DO NOT misuse the electric cable, do not drag the product by the cable. Keep power cable away from hot, oily sharp or fixed
objects. Replace damaged cables as soon as possible.
8DO NOT use this product to perform a task for which it has not been designed.
IR3000S Issue:3 31/05/23
Original Language Version
© Jack Sealey Limited
Refer to
instruction
manual
Warning:
Electricity Warning:
Hot Surface Indoor
Use Only Keep away
fromammable
substances
during
operation
Unplug before
cleaning Do not cover
THIS PRODUCT REQUIRES A
MINIMUM 16 AMP
SUPPLY

8DO NOT cover the product.
8DO NOT use the panel dryer outdoors, or in damp, or wet locations.
9DO NOT operate within the vicinity of flammable liquids, gases or solids.
WARNING! Never use in explosive situations.
9Keep children and unauthorised persons away from the work area.
9When not in use, store the panel dryer carefully in a safe, dry, childproof location.
9Maintain a safe and tidy working environment.
9In case the machine is used in a spray booth, it is a must to purify the in-house air first.
9Be careful of the uneven floor when moving the machine to avoid any overturn.
9Remove all objects in front of the lamp tubes before use.
9Keep any person at least 4 meters away from the painting surface.
2. INTRODUCTION
Lampsemitshortwaveinfraredheat,idealforoptimiseddryingofwaterbasedpaints.In-builttimerturnslampsoafterasettime.Fittedwith
four swivel castors, two with brakes for maximum manoeuvrability and safe positioning. Flexible manoeuvrable lamp system allows each heater
to be adjusted and locked in position around the contours of the vehicle, ensuring maximum area coverage. Height adjustment is made using the
lockinggasstrut,oeringnearweightlessmovementofthesupportarm.
3. SPECIFICATION
Model No: ................................................................IR3000S
ElementPower:...........................................................3150W
Number of Elements: ............................................3 x 1050W
Optimal Baking Area: ......................................... 1.0m x 0.8m
OperatingTemperature(°C):.....................................40-70°C
4. CONTENTS.
. assembly
4.1. EMITTER HEAD ASSEMBLY
Original Language Version
© Jack Sealey Limited IR3000S Issue:3 31/05/23
Power Supply:................................................................3.7m
Reectorsize: .............................................530mm x 140mm
Supply:.......................................................230V~50Hz16A
Timer Range:.......................................................... 0-30mins
No. Description No. Description
1 Front castor wheel 7 Gas spring
2 Back castor wheel 8 Connective plate
3Pedestal 9 U shaped support
4Post 10 Flat cross arm
5 Gas spring handle 11 Round cross arm
6 AM8 adjustable handle 12 Side panel of emitter
No. Description No. Description
13 Bent plate 20 Smallreectivepanel
14 Front protective grill 21 Rear panel
15 Connection box 22 Ceramic connector
16 Emitter tube 23 Reectivepanel
17 Panel 24 Lamp tube switch
18 Timer 25 Circuit breaker
19 Emitter side panel

5. ASSEMBLY
5.1. EMITTER HEAD ASSEMBLY
5.2. PEDESTAL ASSEMBLY
Original Language Version
© Jack Sealey Limited IR3000S Issue:3 31/05/23
fig.1
fig.2

5.3. Takeoutthepedestalfrompackage;installthebrakedcastorwheelsattherearofthepedestalandthebrakelesscastorwheelsatthe
frontofthepedestal,g.2.1.
5.4. Fixthepostonthepedestal,andmountthegasspringontotheatcrossarm,g.2.2,g.2.3.
WARNING! Note: When assembling, do not press the gas spring handle on the post, otherwise it may
cause injury due to the rapid lifting of the cross arm as the emitter head assembly has not yet been
tted.
5.5. Installtheemitterheadassembly,g.3.
5.6. Plugcablesfromemitterheadsintotheconnectionbox(15).
6. OPERATION
6.1. CONTROL PANEL, g.4
KEY
1. Power light
2. Timer
3. Temperature adjustment
4, 5, 6: Lamp tube switches
7. Power switch
6.2. OPERATION
6.2.1. Position Adjustment
6.2.1.1. Move the machine and adjust the distance between the lamp cassette and the surface to be repaired
(about 50cm)
6.2.1.2. Pressthegasspringhandletoadjusttheheightofthelampcassettetothesurfacetoberepaired.
6.2.1.3. Adjust the lamp cassette angle to allow it to be parallel to the surface to be repaired.
6.2.1.4. Apply the brakes on the rear castor wheels.
6.2.2. Ensureswitch7iso,connecttomainssupply.
6.2.3. Turnonmainswitch7.
6.2.4. Pressswitches3/4/5tostarttubes.
6.2.5. Adjust temperature switch 3 to adjust baking level if necessary.
6.2.6. Set timer (alarm sounds when time is up).
7. MAINTENANCE
WARNING! Ensure the machine is disconnected from mains supply and cooled down before cleaning
or performing any maintenance.
7.1. CLEANING
7.1.1. Regularcleaningoftubesandreectorpanelshouldbedoneusingapieceofsoftclothorcottonwith
alcohol.
8DO NOT start the lamp tube until the alcohol has evaporated, otherwise it may lead to an explosion.
7.2. REPLACEMENT OF LAMP EMITTER TUBE (g.5)
WARNING! Ensure the machine is disconnected from mains supply and cooled down before cleaning
or performing any maintenance.
7.2.1. Takeoutthefrontprotectivegrill(14)infrontofthelampemittertube.
7.2.2. Loosen the screws on the side panel of the emitter and remove the side panel (19).
7.2.3. Release rear panel (21).
7.2.4. Loosen the two leads in the lamp tube and remove the tube. Clean if necessary see section 7.
7.2.5. Fix the new tube with same model number and wire the tube correctly.
fig.3
fig.4
Original Language Version
© Jack Sealey Limited IR3000S Issue:3 31/05/23

7.2.6. Installtherearpanel(21),reectivepanel(23)andthesidepanel(19).
7.2.7. Useapieceofsoftclothtocleanthereectivepanelandtubewithalcohol,rememberingtoletitevaporatebeforeuse.
7.2.8. Install the front protective grill (14).
8. TROUBLESHOOTING
NOTE: For optimal baking performance, we recommend that users should work out the suitable operating procedures, baking time and
distance according to the local conditions, working environment and the type of paint.
g.5
DEFECT CAUSE TROUBLESHOOTING
Small pores on the baked paint surface Lamp too close to the repaired surface. Increase the distance.
Insucientpreheatingtime. Increase the preheating time.
Fast thinning agent included in the paint. Use standard or slow thinning agent.
Dim paint Lamp too far away from the repaired surface. Move dryer closer.
InsucientBaking. Increase the baking time
Too thick coating. Thin the coating.
Stains Too long baking. Shorten the baking.
Too close. Increase the distance.
Fuzzyedge The repair surface is too large. Separate it into two pieces for baking.
Uneven baking The lamp is not at the correct height. Adjust the lamp to allow it to be as height as the
repaired surface.
Sealey Group, Kempson Way, Suffolk Business Park, Bury St Edmunds, Suffolk. IP32 7AR
01284 757500 sales@sealey.co.uk www.sealey.co.uk
ENVIRONMENT PROTECTION
Recycle unwanted materials instead of disposing of them as waste. All tools, accessories and packaging should be sorted, taken to
a recycling centre and disposed of in a manner which is compatible with the environment. When the product becomes completely
unserviceable and requires disposal, drain any fluids (if applicable) into approved containers and dispose of the product and fluids
according to local regulations.
Note: It is our policy to continually improve products and as such we reserve the right to alter data, specifications and component parts
without prior notice.
Important: No Liability is accepted for incorrect use of this product.
Warranty: Guarantee is 12 months from purchase date, proof of which is required for any claim.
WEEE REGULATIONS
Dispose of this product at the end of its working life in compliance with the EU Directive on Waste Electrical and Electronic Equipment
(WEEE). When the product is no longer required, it must be disposed of in an environmentally protective way. Contact your local solid
waste authority for recycling information.
REGISTER YOUR
PURCHASE HERE
Original Language Version
© Jack Sealey Limited IR3000S Issue:3 31/05/23
Table of contents
Other Sealey Dryer manuals

Sealey
Sealey SDA03.V2 User manual

Sealey
Sealey SDAST.V2 User manual

Sealey
Sealey IR3000.V2 User manual

Sealey
Sealey SDA01 User manual

Sealey
Sealey SDA01 User manual

Sealey
Sealey POWER PRODUCTS ML2751 User manual

Sealey
Sealey IR1000 User manual

Sealey
Sealey SDA03 User manual

Sealey
Sealey SDA01 User manual

Sealey
Sealey IR3000 User manual
Popular Dryer manuals by other brands

Hotpoint
Hotpoint HTDP120EDWW Specification sheet

Buchi
Buchi B-290 Operation manual

SMC Networks
SMC Networks IDG3 V4 X017 Series Operation manual

Electrolux
Electrolux T5130 installation manual

Dexter Laundry
Dexter Laundry T-30 Operators manual installation & operation instructions

GE
GE DSXH43EFWW Dimensions and installation information