manuals.online logo
Brands
  1. Home
  2. •
  3. Brands
  4. •
  5. Sealey
  6. •
  7. Outdoor Light
  8. •
  9. Sealey LED3009 User manual

Sealey LED3009 User manual

Thank you for purchasing a Sealey product. Manufactured to a high standard this product will, if used according to these instructions and properly main-
tained, give you years of trouble free performance.
IMPORTANT: PLEASE READ THESE INSTRUCTIONS CAREFULLY. NOTE THE SAFE OPERATIONAL REQUIREMENTS, WARNINGS &
CAUTIONS. USE THE PRODUCT CORRECTLY AND WITH CARE FOR THE PURPOSE FOR WHICH IT IS INTENDED. FAILURE TO DO SO
MAY CAUSE DAMAGE AND/OR PERSONAL INJURY AND WILL INVALIDATE THE WARRANTY. PLEASE KEEP INSTRUCTIONS SAFE
FOR FUTURE USE.
1. SAFETY
1.1. GENERAL
Ensure the lamp is fully charged before initial use.
 DO NOT turn the lamp on when it is being charged.
 DO NOT shine directly into your, other person’s or
animal’s eyes.
 DO NOT allow children to use the lamp.
 DO NOT handle or move the lamp whilst it is being
charged.
 DO NOT use the lamp if you suspect that the battery or
the lamp casing is damaged.
DO NOT leave battery in a discharged state, recharge
battery immediately. Before storage, fully recharge the
battery, subsequently recharge the battery at least once
every three months of non-use.
1.2. ELECTRICAL SAFETY FOR USE OF CHARGER.
USE ONLY THE SUPPLIED CHARGER.
 WARNING! It is the user’s responsibility to read,
understand and comply with the following electrical
instructions:
You must ensure the risk of electric shock is minimised
by the installation of appropriate safety devices.
An RCCB (Residual Current Circuit Breaker) should be
incorporated in the main distribution board. We also
recommend that an RCD (Residual Current Device) is
used with all electrical products, particularly portable
equipment which is plugged into an electrical supply not
protected by an RCCB.
You must also read and understand the following instructions
concerning electrical safety.
1.2.1. The Electricity At Work Act 1989
requires all portable electrical appliances, if used on
business premises, to be tested by a qualified electrician,
using a Portable Appliance Tester (PAT), at least once a
year.
1.2.2. The Health & Safety at Work Act 1974 makes owners
of electrical appliances responsible for the safe condition
of the appliance and the safety of the appliance operator.
If in any doubt about electrical safety, contact a
qualified electrician.
1.2.3. You must ensure that you:
Inspect the charger plug, cable and connector for wear
and damage to ensure items are safe before connecting
to the mains power supply.
If worn or damaged DO NOT use.
Important: Check that the voltage marked on the charger
is the same as the power supply to be used.
 DO NOT pull the charger plug from the mains socket by
the lead.
 WARNING! DO NOT use any other type of charger with
this product, other than the supplied mains charger.
Failure to observe this warning could result in
injury and or fire and will invalidate the warranty.
 DO NOT try to take the charger apart.
 DO NOT get the charger wet, or use in wet, damp
conditions (for indoor use only).
1.2.4. Ensure that the insulation on all cables and on the
appliance is safe before connecting it to the power
supply. See 1.2.1. and 1.2.2. and use a Portable
Appliance Tester.
1.2.5. Ensure that cables are always protected against short
circuit and overload.
1.2.6. DO NOT use worn or damaged cables, plugs or
connectors. Immediately have any faulty
item repaired or replaced by a qualified electrician.
When a BS 1363/A UK 3 pin plug is damaged, cut the
cable just above the plug and dispose of the plug safely.
Fit a new plug according to the following instructions (UK
only).
a) Connect the GREEN/YELLOW earth wire to the
earth terminal ‘E’.
b) Connect the BROWN live wire to the live terminal ‘L’.
c) Connect the BLUE neutral wire to the neutral
terminal ‘N’.
d) After wiring, check that there are no bare wires, that
all wires have been correctly connected, that the
cable outer insulation extends beyond the cable
restraint and that the restraint is tight.
Double insulated products, which are always marked
with this symbol , are fitted with live (brown) and
neutral (blue) wires only. To rewire, connect the wires as
indicated below.
DO NOT connect either wire to the earth terminal.
1.3 Battery Safety
 WARNING! To reduce the risk of burns or fire:
 DO NOT Attempt to open, disassemble, modify or
service the battery pack.
 DO NOT Crush, puncture, short external contacts or
dispose of in fire or water.
 DO NOT Expose to temperatures above 60°C (140°F).
 Replace only with the battery pack designated for this
product.
 Recycle or dispose of used battery as stipulated by local
regulation.
 If the electrolyte in the cells gets on your skin, thoroughly
wash with soap and water. If it gets in your eyes, rinse
thoroughly with cool water and seek immediate medical
attention
FUSE RATING
3 AMP
Blue
Neutral
Wire
Yellow & Green
Earth Wire
Cable
Restraint
Brown
Live
Wire
INSTRUCTION MANUAL FOR:
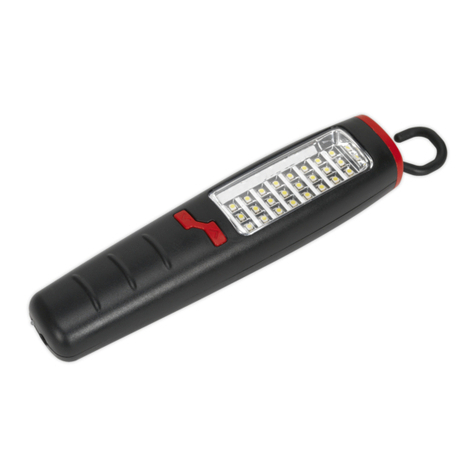
CORDLESS 30 + 5LED RECHARGEABLE
INSPECTION LAMP
MODEL No. LED3009
Original Language Version LED3009 Issue: 2 - 15/03/10
3. CHARGING
4. OPERATION
Robust lightweight inspection lamp for the professional. Shock, oil and water resistant (IP68) rubber housing with contoured grip
and 360° swivel hook with integral storage. Recessed shatterproof polycarbonate lens with a highly polished reflector board gives
an increased spread of light. Featuring 35 super bright LEDs. 30 LEDs used as an inspection lamp or 5 LEDs in the end for use
as a directional torch. Ideal for use around engine bays and for under body inspections. A unique feature to this unit is the
intelligent charging docking station incorporating inductive charging, so no vulnerable locating pins are required.
Lithium-ion polymer battery (3.7V/2000mAh) for longer life, no memory effect, a much slower discharge than typical Ni-MH
batteries and can operate for up to eight hours on a single charge.
Battery: ..................................3.7V/200mAh Lithium-ion polymer Operating Time: .....................................................8Hrs
Charging Time: .....................................................................4hrs Storage Temp: .........................................-20°C ~ 40°C
Operating Temp:...................................................... -5°C ~ 45°C Charger Fuse:........................................................... 3A
Shock / Oil / Water Resistant ...............................................IP68
Environmental Protection.
Recycle unwanted materials instead of disposing of them as waste. All tools,
accessories and packaging should be sorted, taken to a recycle centre and
disposed of in a manner which is compatible with the environment.
When the product is no longer required, it must be disposed of in an
environmentally protective way.
Battery Removal
Pull out the two rubber bungs at the hook end of the lamp.1.
Undo the 2x screws in the end using a Phillips #1 driver.2.
Remove complete hook end cap and un-clip the wiring from the main board.3.
Un-clip battery, remove and dispose of according to local authority4.
guidelines.
Note: LED arrays are designed to allow individual LEDs to cease functioning
without causing the entire array to fail. This could be as a result of shock or impact.
Shock or impact will invalidate warranty.
4.1 Switch the lamp 'ON & OFF' using the push switch on the handle. Direct the lens
away from your eyes before switching on.
1st press switches on the main 35 x LED inspection lamp.•
2nd press switches OFF the main 35 x LED inspection lamp and ON the 5 x LED•
directional torch.
3rd press turns all LED's OFF.•
4.2 Suspend the lamp by the hanging hook.
When the light is hanging from its hook it can be rotated through 360° for more
precise positioning.
On-Off
Switch
Rotating
Suspension
hook
Charging
Base
Power
Indicator
LED
Lamp
Charging
Indicator
LED.
Note: Fully charge the lamp before first use.
3.1 Plug the charger into the mains supply and turn on, the green LED on the charger will
light to show the charger has power.
3.2 Ensure the lamp is turned off. Insert the lamp into the charger ensuring that the lamp is
in full contact with the charging base (FIG.1), the red LED on the lamp will light to show
charging has begun.
3.3 When the battery has fully charged (approx 4hrs) the red lamp LED will go out.
3.4 When the battery has less than 30 minutes remaining the lamp LED will blink 3 times.
3.5 The lamp will automatically shut down before the battery becomes completely
discharged.
Note: The Lithium battery does not suffer from memory effect and once fully charged may be
stored for up to six months without another charge.
2. INTRODUCTION / SPECIFICATION
FIG.1
Parts support is available for this product.
To obtain parts please email sales@sealey.
co.uk or phone 01284 757500.
NOTE: It is our policy to continually improve products and as such we reserve the right to alter data, specifications and component parts without prior notice.
IMPORTANT: No liability is accepted for incorrect use of this product.
WARRANTY: Guarantee is 12 months from purchase date, proof of which will be required for any claim.
INFORMATION: For a copy of our latest catalogue and promotions call us on 01284 757525 and leave your full name and address, including postcode.
01284 757500
01284 703534
sales@sealey.co.uk
Sole UK Distributor, Sealey Group,
Kempson Way, Suffolk Business Park,
Bury St. Edmunds, Suffolk,
IP32 7AR
www.sealey.co.uk
Web
email
Original Language Version LED3009 Issue: 2 - 15/03/10
Under the Waste Batteries and Accumulators Regulations 2009, Jack Sealey Ltd
are required to inform potential purchasers of products containing batteries (as
defined within these regulations), that they are registered with Valpak’s registered
compliance scheme. Jack Sealey Ltd’s Batteries Producer Registration Number
(BPRN) is BPRN00705

Other Sealey Outdoor Light manuals

Sealey LED3601.V2 Series User manual

Sealey

Sealey LED3601.V2 Series User manual

Sealey LED3602CF.V2 User manual

Sealey

Sealey LED3602CF.V2 User manual

Sealey LED013 User manual

Sealey

Sealey LED013 User manual

Sealey ML13230V.V2 User manual

Sealey

Sealey ML13230V.V2 User manual

Sealey LED307.V2 User manual

Sealey

Sealey LED307.V2 User manual

Sealey LEDFLEXG User manual

Sealey

Sealey LEDFLEXG User manual

Sealey ML36230F User manual

Sealey

Sealey ML36230F User manual

Sealey LED01 Series User manual

Sealey

Sealey LED01 Series User manual

Sealey ML36110F User manual

Sealey

Sealey ML36110F User manual

Sealey LED186 User manual

Sealey

Sealey LED186 User manual

Sealey LED36 User manual

Sealey

Sealey LED36 User manual

Sealey LED95230V User manual

Sealey

Sealey LED95230V User manual

Sealey LED37 User manual

Sealey

Sealey LED37 User manual

Sealey LED308 User manual

Sealey

Sealey LED308 User manual

Sealey LED3601.V3 Series User manual

Sealey

Sealey LED3601.V3 Series User manual

Sealey LEd36 User manual

Sealey

Sealey LEd36 User manual

Sealey LED3602.V3 Series User manual

Sealey

Sealey LED3602.V3 Series User manual

Sealey LED033 User manual

Sealey

Sealey LED033 User manual

Sealey ML100/GP User manual

Sealey

Sealey ML100/GP User manual

Sealey LED01 Series User manual

Sealey

Sealey LED01 Series User manual

Sealey LED0121R User manual

Sealey

Sealey LED0121R User manual

Popular Outdoor Light manuals by other brands

Nordic D'Luxx FLOWERPOT user manual

Nordic D'Luxx

Nordic D'Luxx FLOWERPOT user manual

LUG TRAFFIK LED Installation instruction

LUG

LUG TRAFFIK LED Installation instruction

Outsunny B30-027V00 manual

Outsunny

Outsunny B30-027V00 manual

LIGMAN KI-60785 installation manual

LIGMAN

LIGMAN KI-60785 installation manual

LEGRAND HPM LBL024KBL instruction sheet

LEGRAND

LEGRAND HPM LBL024KBL instruction sheet

Normande AFL012US instructions

Normande

Normande AFL012US instructions

Clas Ohlson LS7H01-UK instruction manual

Clas Ohlson

Clas Ohlson LS7H01-UK instruction manual

Maxim Lighting Morrow Bay VX 40285WGET installation instructions

Maxim Lighting

Maxim Lighting Morrow Bay VX 40285WGET installation instructions

Nemo NQ manual

Nemo

Nemo NQ manual

LIGMAN VANCOUVER 61 installation manual

LIGMAN

LIGMAN VANCOUVER 61 installation manual

Luce Plan Costanzina D13 pi. manual

Luce Plan

Luce Plan Costanzina D13 pi. manual

Quoizel RO1914IZ installation guide

Quoizel

Quoizel RO1914IZ installation guide

edishine HGSL04B instruction manual

edishine

edishine HGSL04B instruction manual

Trilux 9311 LED Mounting instructions

Trilux

Trilux 9311 LED Mounting instructions

Signature Hardware FOXFIELD 440676 Installation

Signature Hardware

Signature Hardware FOXFIELD 440676 Installation

RAB Lighting WP4 Series installation instructions

RAB Lighting

RAB Lighting WP4 Series installation instructions

LED's light 1000434 instruction manual

LED's light

LED's light 1000434 instruction manual

STEINEL Spot DUO Information

STEINEL

STEINEL Spot DUO Information

manuals.online logo
manuals.online logoBrands
  • About & Mission
  • Contact us
  • Privacy Policy
  • Terms and Conditions

Copyright 2025 Manuals.Online. All Rights Reserved.