Sears, Roebuck and Co. BBQ-Pro 16310 User manual

Use and Care Guide
22.5" Round Kettle Gri||
Sears item No. 16310
Kmart item No, 01243410-6
This Gri!l is for Outdoor Use Oniy
SAVE THESE
•Read and follow aH Safety, Assembly,
and Use and Care Instructions in this
Guide before assembling and cooking
with this grill.
- Failure to follow all instructions in this
Use and Care Guide may lead to fire or
explosion, which could result in property
damage, personal injury or death.
-Safety
• Parts
" Use and Care
. Assembly
Assembly Questions?
Call t-866-561-0731
Tools needed for assembly:
Screwdriver (not provided)
Open end wrench (not provided)
Sears, Roebuck and Co., Hoffman Estates, IL 60179 U.S.A.
See our extensive assortment of outdoor living products on-line at
www.sears.com and www. kmaff.com

Tips and Features tbr safety and ease of use
Verify that all parts are included with your grill beiorc beginning assembly by checking the Parts
List inside. If all parts are not included, please call our toll free number 1-866-561-0731 for part
USE DIAGI_M(S) IDED FOR ASSEMBLY. Leave nuts half-tightened on the grill during
assembly umil unit is completely assembled, then finish tightening nuts.
SAFETY GUIDELINES
1_This grill is intended for HOUSEHOLD OU]_)()OR US_Z
ONLY. Do not atmmpt m use grill in enclosed m_as or
under an overhead c_.)ver of aw kind, including a tent or patio _ver.
"Amr grill should never be used closer than 36 inches from wNls on the back and side(s) of grill.
2. Place your grill outdoors on a firm, level surface. Do not use this grill on a surface that will burn
or melt, such as a plastic or artificial surface or wood t_C_Ie. Keep grill away from wc_.._den fi_ncc_s,
overhanging trees, or other flammable ol:_iects before adNng and lighting charcoN.
3. DO NOT USE GAS E, ALCOHOL OR OE IN THIS GRILL. Use only c_mmlercial
charcoal ligt_mr fluid with charcoal brk/uettes or pre_soaked charcoal briquettes. Prepare charcoal
according to the products instructions. Do not ey_zeed 3 tbs of charcoN briquettes in this grill per use.
4. After lighting ch_wcoal, do not leave grill unattended.
5. Remember to keep children and pets away from lit grill at NI tLmes°
6. 3b avoid harm m people, pets, or l:_pe_y, do not mowz the grill once the charcx:)al has been lit.
7. Once cons arc lit, the grill and surrounding surtaces b e veop hot. Use proper outdoor ng
mitts, utensils and avoid sMn contact with NI hot su o_ grill.
8. To extinguish charc_:_al after cooking_ dov_se coals with sand or spray with a fine mist of wamr.
9. After your grill has cooled, remove ashes from the catcher and ce-vec and store the grill when
not in use.
ING! stion by-products produced ,Mien using this contain chemicals known
to the Stoic of California m cause cancer, bimh de_:ects, and _her ctive harm.
HARDWARE LIST
t (4pcs)
]/ g'xl-1 / 2*'Leg Bolt
6 (2pcs)
1/4_'Plastic Nut
2 (4pcs)
1/ 4_"x7/8"Handle Bolt 7 (2pcs)
5/I 6" Plastic Washer
3 (1pc)
5/32"x3/8" Damper Bolt
8 (9pcs)
i/ 4_Fiber Washer
4 (lpc)
5i3TDamper Winged Nut
9 (8pcs)
1/4" Metal Washer
5 (2pcs)
5/16 '_Hex Locknut
Customer Service-1-866-561-073! Page 1

B: BoSom Bowl (1)
210329N
F: Stationary Leg (2)
C: Cooking Grid (1)
D: Charcoal Gdd (1)
610201N
E: Ash Catcher (1)
230104N
CustomerService-l-866-561-0731
30048IN
G:_heelLeg(2)
H: Lid VentAssemb!y (?each)
220102N
I:Wheei(2)
500200N
J:WireShelf(LegSuppo_ (_
K: Leg Bowl (4)
L: Lid Bracket (t)
M: Handle (2)
2200 t8 N
240100N
O: Condiment Rack< 1_
rs
J
Customer Service-1-866-561-0731 Page 3
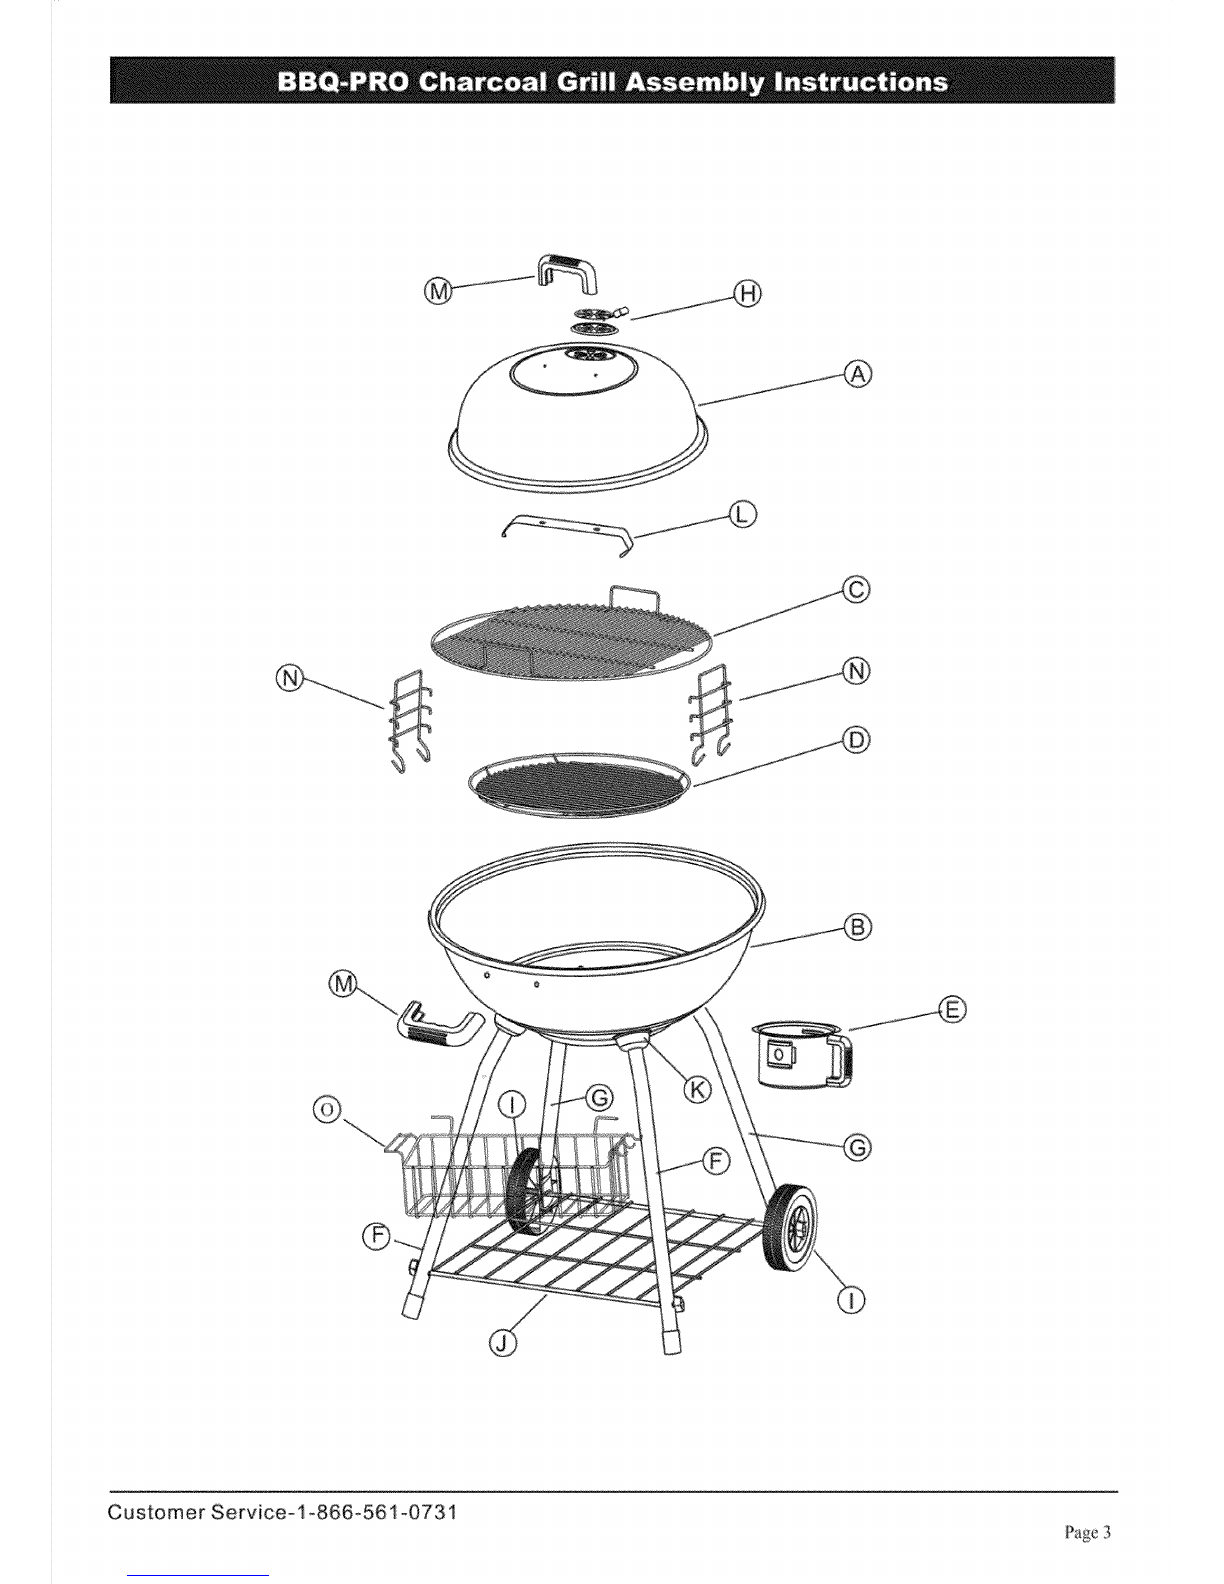
Remove all the parts from the carton
and lay them out on a smooth, clean
surface. Verify the presence of all
parts by comparing to Hardware
and Parts Lists on previous pages.
Do not throw away any of the packaging
until you locate all the parts.
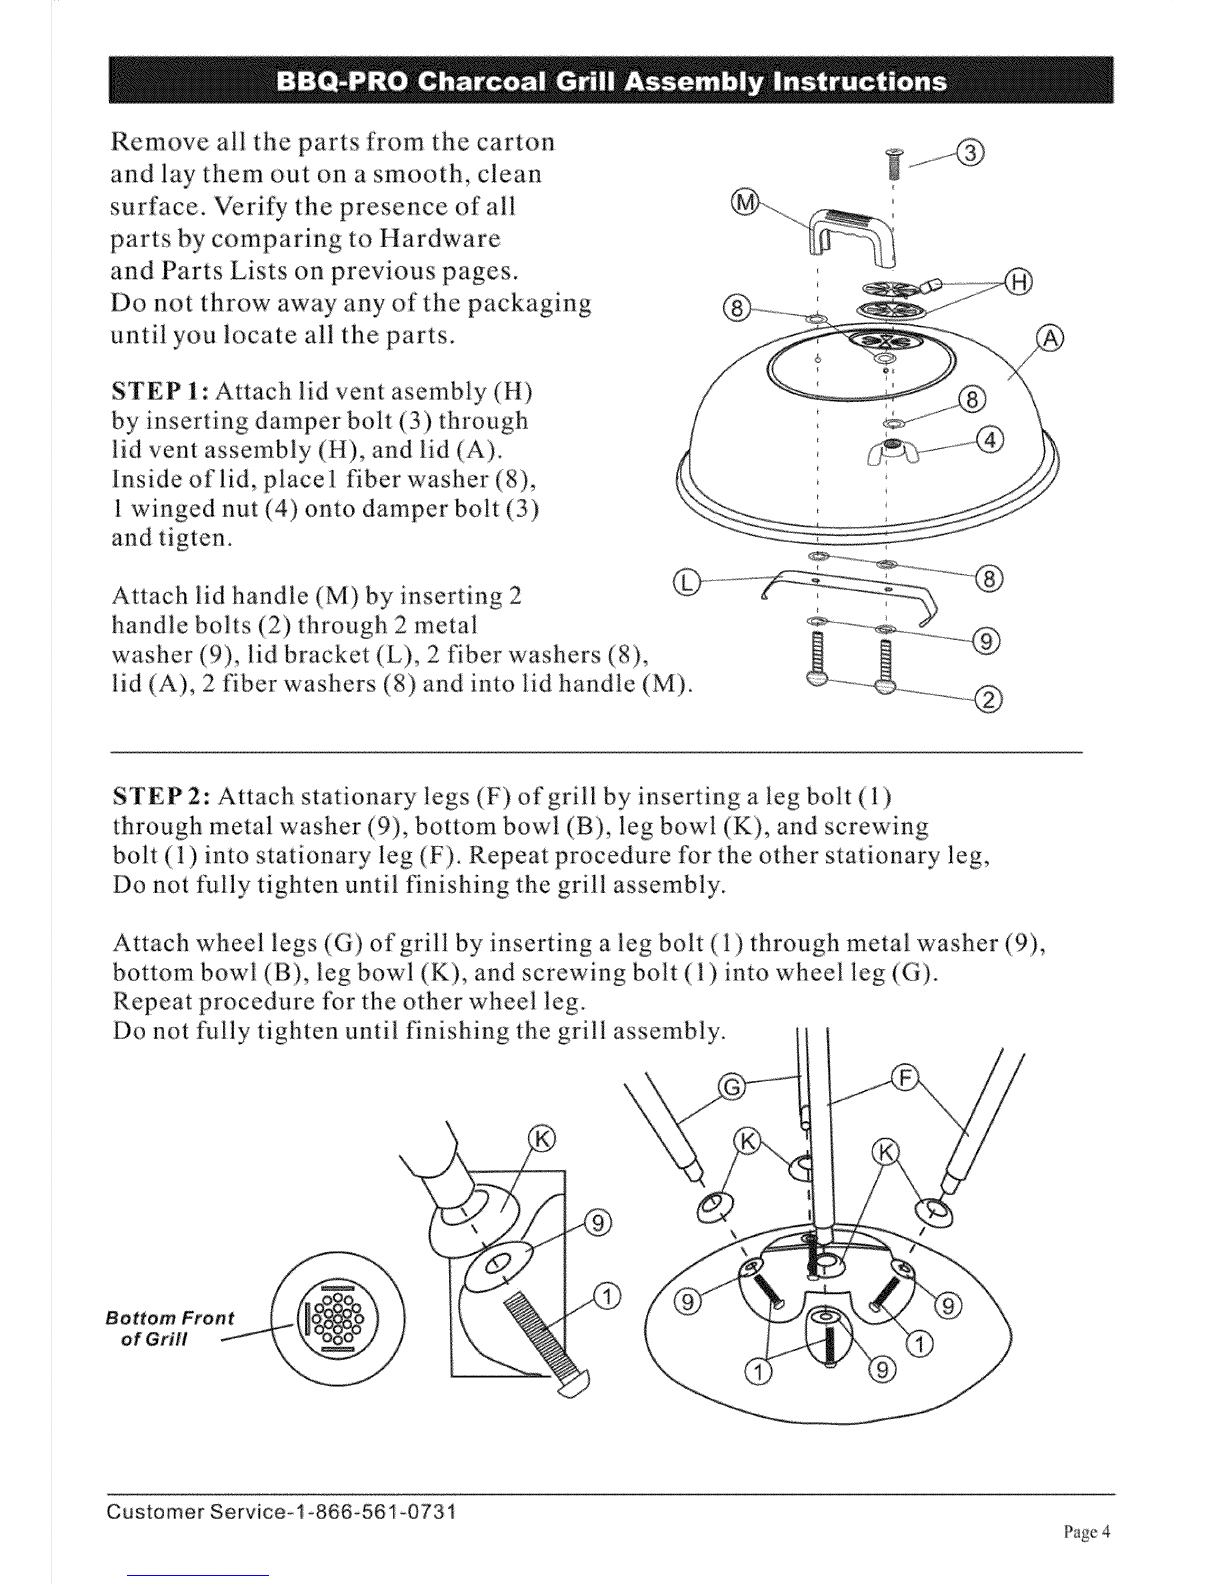
STEP 1: Attach lid vent asembly (H)
by inserting damper bolt (3)through
lid vent assembly (H), and lid (A).
Inside of lid, pla.cel fiber washer (8),
! winged nut (4) onto damper bolt (3)
and tigten.
STEP 2: Attach stationary legs (F) of grill by inserting a leg bolt (I)
through metal washer (9), bottom bowl (B), leg bowl (K), and screwing
bolt (1) into stationary leg (F). Repeat procedure for the other stationary leg,
Do not fully tighten until finishing the grill assembly.
Attach wheel legs (G) of grill by inserting a leg bolt (1) through metal washer (9),
bottom bowl (B), leg bowl (K), and screwing bolt (1) into wheel leg (G).
Repeat procedure tiar the other wheel leg.
Do not fully tighten until finishing the grill assembly.
Bottom Front
of Grill
Customer Service-1-866-561-0731
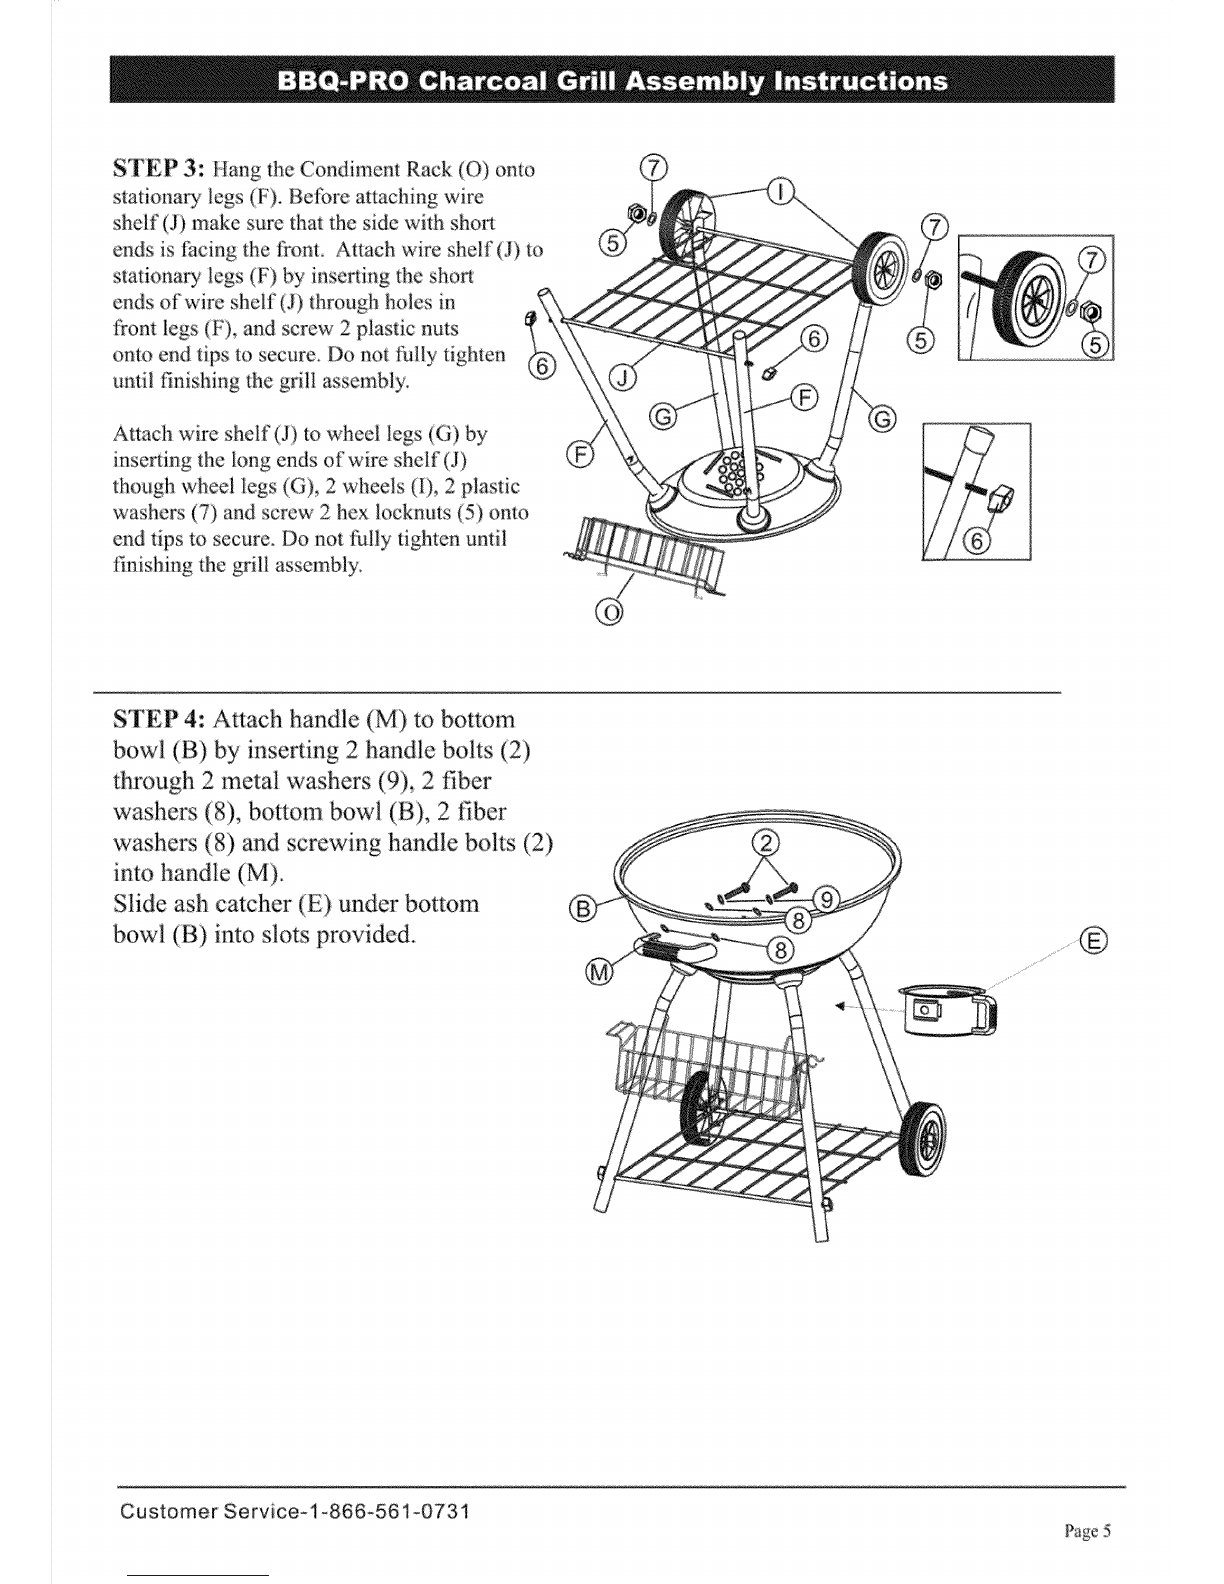
STEP 3: Hang the Condiment Rack (O) onto
stationary legs (F). Before attaching wire
shelf (J)make sure that the side with sho_t
ends is facing the front, A_ach wire shelf (J) m
stationary legs (F) by inserting the short
ends of wire shelf (J)through holes in
front legs (F), and screw 2 plastic mlts
onto end tips to secure. Do not fully tighten
until finishing the grill assembly.
Attach wire shelf (J) to wheel legs (G) by
inserting the king ends of wire shelf (J)
though wheel legs (G), 2 wheels (I), 2 plastic
washers (7) and screw 2 hex locknuts (5)Ohm
end tips m secure. Do not fully tighten until
finishing the grill assembly.
STEP 4: Attach handle (M) to bottom
bowl (B) by inserting 2 handle bolts (2)
through 2 metal washers (9), 2 fiber
washers (8), bottom bowl (B), 2 fiber
washers (8) and screwing handle bolts (2)
into handle (M).
Slide ash catcher (E)under bottom
bowl (B) imo slots provided.
Customer Service-1-866-561-0731 Page 5

STEP 5: Hook bouom of grid height
adjusters (N) m side of charcoal grid (D).
Slide grid height adjusters (N) through
the large openings on the side of
cooking grid (C)
Insert cooking gridichapcoal grid
assembly into bottom bowl (B). Place
top lid (A) on,top of bottom lid.
STEP 6: Fully tighten all nuts and screws
at this time.
COOKING GRiD
CHARCOAL GRiD ASSEMBLY
Customer Service-l-866-56 i:-0731 Page 6

ORDER PARTS #
A
B
C
D
E
F
G
H
l
J
K
L
M
N
o
1-9
1
I
1
1
I
2
2
I EACH
LID
BOTTOM BOWL
COOKING GRID
CHARCOAL GRID
ASH C?(FCH ER
STATIONARY LEG
WHEEL LEG
LID VENT ASSEMBLY
200423N
210329N
610201N
230!04N
300481 N
2
1
4
1
2
2
1
1
WHEEL
WIRE SHELF(LEG SUPPORT)
LEG BOWL
LID BRACKET
HANDLE
GRID HEIGHT ADJUSTER
CONDIMENT RACK
HARDWARE PACK
220018N
300484N
\YARNING: l_ ensue th, t it is sat? to eat, food mu..t be cooked
to the minimum internal temperatures listed in the table below:
USDA* SafTe Minimum Internal Temperatures
Fish I 145°F
Pork
Steaks and Roasts of Beet, '_vS._alof Lamb
Ground Beef, Veal or Lamb ..................................................................................
Who!e Ppultry_ ( TuNez, Chicken , Duck, etc.)
t60 ° F
145°F
160 ° F
@
165 F
*United States Department of Agriculture
90 Day Full Warranty
if this BBQ-Pro product t_its due to a defect in material or workmanship within 90 days _?om
the date ofpurchase, return it to any Sears or Kmart store or other BBQ-Pro outlet in the
United States with your proof of purchase for free replacement.
This.warramy gives you specific lega! rights, and you may also have other rights which vary from
state to state.
Sears, Roebuck and Co., Hoffman Estates, IL 60179
For further information, contact the manutlacturer, toll free at 1-866o561.-073I.
Customer Service-1-888_561-0731 Page 7
This manual suits for next models
1


