manuals.online logo
Brands
  1. Home
  2. •
  3. Brands
  4. •
  5. Sears
  6. •
  7. Water Filtration System
  8. •
  9. Sears 625.34823 User manual

Sears 625.34823 User manual

Other Sears Water Filtration System manuals

Sears 390.160000 User manual

Sears

Sears 390.160000 User manual

Sears 625.3444 User manual

Sears

Sears 625.3444 User manual

Sears 390.160500 User manual

Sears

Sears 390.160500 User manual

Sears 625.345600 User manual

Sears

Sears 625.345600 User manual

Sears 625.349224 User manual

Sears

Sears 625.349224 User manual

Sears Kenmore 625.348233 User manual

Sears

Sears Kenmore 625.348233 User manual

Popular Water Filtration System manuals by other brands

Atlantic Ultraviolet Mighty Pure MP16A owner's manual

Atlantic Ultraviolet

Atlantic Ultraviolet Mighty Pure MP16A owner's manual

SunSun CBG-500 Operation manual

SunSun

SunSun CBG-500 Operation manual

Hayward XStream Filtration Series owner's manual

Hayward

Hayward XStream Filtration Series owner's manual

Contech DownSpout StormFilter Operation and maintenance

Contech

Contech DownSpout StormFilter Operation and maintenance

Teka Airfilter MINI operating instructions

Teka

Teka Airfilter MINI operating instructions

Wisy LineAir 100 Installation and operating instructions

Wisy

Wisy LineAir 100 Installation and operating instructions

Schaffner Ecosine FN3446 Series User and installation manual

Schaffner

Schaffner Ecosine FN3446 Series User and installation manual

Pentair FLECK 4600 SXT Installer manual

Pentair

Pentair FLECK 4600 SXT Installer manual

H2O International H20-500 product manual

H2O International

H2O International H20-500 product manual

Renkforce 2306241 operating instructions

Renkforce

Renkforce 2306241 operating instructions

Neo-Pure TL3-A502 manual

Neo-Pure

Neo-Pure TL3-A502 manual

STA-RITE VERTICAL GRID DE FILTERS S7D75 owner's manual

STA-RITE

STA-RITE VERTICAL GRID DE FILTERS S7D75 owner's manual

Applied Membranes W-G844EM Operation and maintenance manual

Applied Membranes

Applied Membranes W-G844EM Operation and maintenance manual

BEGA 116 Instructions for use

BEGA

BEGA 116 Instructions for use

WATA Standard operating instructions

WATA

WATA Standard operating instructions

Price FFU series Installation and service manual

Price

Price FFU series Installation and service manual

Gaggenau BRITA INTENZA 467873 manual

Gaggenau

Gaggenau BRITA INTENZA 467873 manual

Brita SAFF-100 user guide

Brita

Brita SAFF-100 user guide

manuals.online logo
manuals.online logoBrands
  • About & Mission
  • Contact us
  • Privacy Policy
  • Terms and Conditions

Copyright 2025 Manuals.Online. All Rights Reserved.

v
V
Kenmore
CLARIFYING FILTER
-- HOW TO INSTALL --
-- HOW IT WORKS m
-- CARE OF --
-- SPECIFICATIONS --
-- REPAIR PARTS-
PRINTED IN U.S.A.
IWARRANTY I
SEARS RESIDENTIAL WATER FILTER I/I/
in accordance with our instructions, Sears will repair, free of charge, detects in material [_//
or workmanship in this water filter. I/l)
FULL FIVE YEAR WARRANTY AGAINST LEAKS _lll
I///
For five years from the date of purchase, Sears will furnish and install a new current [_/I
model water filter tank, free of charge, if the tank develops a leak. I///
TO OBTAIN WARRANTY SERVICE, SIMPLY CONTACT THE NEAREST SEARS SER- _//1
VICE CENTER THROUGHOUT THE UNITED STATES. This warranty applies only I(((
while this product is in use in the United States." ))))
This warranty gives you specific legal rights, and you may have other rights which [_/_
vary from state to state, lit/
T///
Sears, Roebuck and Co., Dept. 731-CR-W, Sears Tower, Chicago, IL 60684 t1/1
If you want you r clarifying filter professional ly installed, talk to you r Sears Salesperson who will arrange
a prompt, quality installation by Sears Authorized Installers.
SEARS INSTALLATION POLICY
All installation labor arranged by Sears shall be
performed in a neat, workmanlike manner in
accordance with generally accepted trade prac-
tices. Further, all installations shall comply with
all local codes, regulations and ordinances.
Customer shall also be protected, during installa-
tion, by insurance relating to Property Damage,
Workman's Compensation and Public Liability.
SEARS INSTALLATION WARRANTY
In addition to any warranty extended to you on
the Sears merchandise involved, which warranty
becomes effective the date the merchandise is
installed, should the workmanship of any Sears
arranged installation prove faulty within one
year, Sears will, upon notice from you, cause
such faults to be corrected at no additional cost
to you.
ITABLE OF CONTENTS
SECTION 1
SECTION 2
SECTION 3
SECTION 4
SECTION 5
SECTION 6
SECTION 7
PAGE
NO.
Safety Guides .............................................. 4
What Your Clarifying Filter Will Do .............................. 4
Water System Tests .......................................... 5
Where To Install The Filter .................................... 6
Planning Your Installation ..................................... 6-8
Step-by-Step Guides To Install ................................. 9-14
Water Filter TimerlRecharge Setup ............................. 15-16
Timer Features .............................................. 16-17
How The Filter Works ........................................ 17
Helpful Hints Checklist...Before You Call For Service ............... 18
Keep The Filter Frorn Freezing ................................. 19
Specifications/Dimensions ..................................... 19
Sweat Soldering Tips ......................................... 2(_
SECTION 8 Repair Parts ................................................ 21-23
REMOVE PACKAGING I
UNPACKING - Discard the carton, inserts,
foam pieces, and other packing items. DO
NOT throw away the small parts bag or the
transformer.
NOTE:
Check the filter (and carton) for shipping
damage, Ifyoufinddamage, callyourSears
store for help.
SMALL PARTS BAG
(See page 9)
OWNERS MANUAL,
OTHER LITERATURE
TRANSFORMER
• Read all steps, guides and rules carefully before
installing and using your new water filter. Follow all
steps exactly to correctly install. Failure to follow
them could cause personal injury or property damage.
Reading this book will also help you to get all of the
benefits from your water filter.
• Check with your local publicworks department for
plumbing and sanitation codes. You must follow
their guides as you install your filter.
• Protect the filter and piping from freezing, see page I
19. Damage fromfreezing voidsthefilterwarrant.
•Use only LEAD-FREE SOLDER AND FLUX, as re-
quired by Federal and State codes, when install-
ing soldered copper plumbing.
•Your clarifyingfilterwillclean yourwater as stated
below. It willnot softenhard wateror remove iron.
It will not purify pollutedwater or make it safe to
drink.
PLEASE READ AND COMPLY WITH THE
FOLLOWING GUIDES TO PREVENT DAMAGE.
TO THE FILTER OR OTHER PROPERTY, PER-
SONAL INJURY, OR POSSIBLE FATAL SHOCK.
•THIS FILTER WORKS ON 24 VOLTS ONLY.
BE SURE TO USE THE TRANSFORMER INCLUD-
ED, AND PLUG IT INTO A 120V OUTLET.
•Be sure the electric outlet for the
transformer is grounded the right way.
•Unplug the transformer right away if the
power cable should become damaged or frayed.
Make repairs before plugging back into the
power outlet.
•Always unplug the filter from electrical
power before removing outer valve covers.
•Connect the filter to the houee COLD water
(1200 max.) pipe only. DO NOT CONNECT TO
HOT WATER.
When you see this signin the book, •somethingcouldbedamaged, or someone hurt, ifthe guide isnot followed
exactly.
WHAT YOUR CLARIFYING FILTER WILL DO
A Sears Clarifying Filter takes sediments such as dirt,
sand, silt,clay, and fine organicmatterout ofwater. You
can see sediments in water by filling a clear drinking
glass. When held up to light,you can see the particles
floatinginthe water, or settledtothe bottomofthe glass.
The filterisfilledwith"filter aggregate" mineral thattraps
and holds the sediments as the water flows through it.
The Clarifier is sometimes installed alone, but is often
followedbya wamrsoftener.Besidessofteningthe water,
the water softener catches sediments that may get
through the filter. Sears Water Analysis Laboratorywill
test your water and tell you what equipment you need
(see page 5).
NOTE: If you will install the clarifyingfilter along with a
Sears SolutionDispensingSystem, read the dispensing
system ownersmanual for treating a privatewell before
installing.
4
I SECTION 21 BEFORE YOU START TO INSTALL
HELPFUL INFORMATION
If you know little about plumbing skills, we suggest
you get a book on the subject. There are many good
books for do-it-yourselfers on the basics of plumbing.
You can get a low cost book from Sears Plumbing and
Heating departments that will help you. If you have
soldered before, some basic sweat soldering tips are
on page 20 of this manual.
WATER SYSTEM TESTS
HAS YOUR WATER SUPPLY HAD A CHEMICAL
ANALYSIS? Sears has many kinds of water treating
units (see page 6) to correct different water problems.
To know the kind and size of unit you need, you must
first know what elements are in your house water
supply. A chemical analysis shows the type and
amounts of elements in water. If your water needs
analysis, call or write your nearest Sears store for
help.
CHECK YOUR WATER PRESSURE - For your filter
to work right, a water pressure of no lower than 20
pounds per square inch (psi) is needed in the house
water pipes. The highest pressure allowed in the
•waterpipesis 125 psi.Ifpressureisover 125 psi, buyand
install apressure reducingvalve in the water inlet pipe
tothefilter. NOTE: Ifwaterpressureduringthe dayis 100
psi or more, pressure during the night may go over 125
psi.
If you have a well water system, look at the pressure
gauge to find the water pressure. Call your local water
department if you have city water. They will tell you
what the water pressure is where you live.
CHECK YOUR WATER FLOW RATE - A water flow
of 51/2to 7 gallons per minute is needed. A lower flow
will keep your filter from working as well as it should.
To make an easy check of your flow rate, do the
following. You will need a 1 gallon container (can, jar,
pail, etc.).
1. Fully open 2 cold water faucets close to the point
water enters the house.
2. With both faucets open, fill the gallon container at
1 faucet while looking at a watch or clock to see
how many seconds it takes.
,Empty the container and go to the second faucet
(be sure BOTH faucets are still on). Fill the gallon
container at the second faucet and see how many
seconds it takes.
4. Turn off both faucets. Now add the number of
seconds it took to fill the container at both faucets.
5. A total of 35 seconds, or less, means the system
flow rate is good.
FACTS AND FIGURES TO KEEP
Fill in the blanks below and keep this book in a
safe place so you always have these facts.
Water Filter Model No. 1"
Serial Number 1
Date Installed
1"Get from the rating decal on the filter.
Iron Content Parts Per Million
*pH __ Taste And/Or Odor __
Water Pressure __ Pounds/Square Inch
Water Flow Rate __ Gallons Per Minute
* The acidity or alkalinity measure of water.
I SECTION 21 BEFORE YOU START TO INSTALL I
WHERE TO INSTALL THE FILTER
Think of the following points as you choose a place to
put your filter (See FIG. 1).
•Place as close as possible to the pressure tank
(well water) or water meter (city water).
• Place as close as possible to a water drain such as
a.floor drain, laundry tub, sump or standpipe.
• • Connect to the house main water pipe BEFORE
THE WATER HEATER. Temperature of water go-
ing through the filter must not be more than 120°F
(49°C).
• Locate the filter in the water system as shown in
FIG. 1below. For example, a taste and odor filter
always foltows a water softener, and the clarify-
ing filter is installed ahead of other filters, and the
water softener.
••DO NOT install in a place where the filter could
freeze. Freeze damage voids the warranty by
Sears, Roebuck and Co. (See page 20).
Ae
Put the filter in a place water damage is least likely
to occur if it develops a leak. Sears or the manufac-
turer will not repair or pay for water damage,
A 120V electric outlet, to plug the transformer into,
is needed within 10 feet of the filter (the filter has a
10 foot power cable). Be sure the outlet and trans-
former are in an inside place, to protect from wet
weather.
When installing in an outside location, you must
take the steps necessary to assure the filter, instal-
lation plumbing, and wiring, are as well protected
from the elements, contamination, vandalism, etc.,
as when installed indoors.
Keep the filter out of direct sunlight. The sun's heat
can melt plastic parts.
THE PROPER ORDER TO INSTALL WATER TREATING EQUIPMENT
(Shows sequence of equipmentonly- seldom, if ever, would all items be needed)
.._-. kitClmD=
COLOfaucet
Sediment or"_--E_._.._q
Taste & Odor _I
Cartridge II I+
Filter . _ |"
mid-aft .ter '_" .......
k0t-sdt.-at. -,_
I I Phosphate
II Feeder
water
Taste &
Odor
Fitter
l_d _rattrtQ _-_ Ir"--'-'--cltt mlw mlftt
utside faucetsl"l Il--+
F It._ . +aso
Sed ment b en
J_.] I o, r:+ ngw+',,
/_1 _(optional t_l water
Water Iron -- \location) ^ _,.=_..,__
_oftener Filter Neutral- C • PPIr_:-- _olunon
izing Fitter _R_er'e Dispensing System
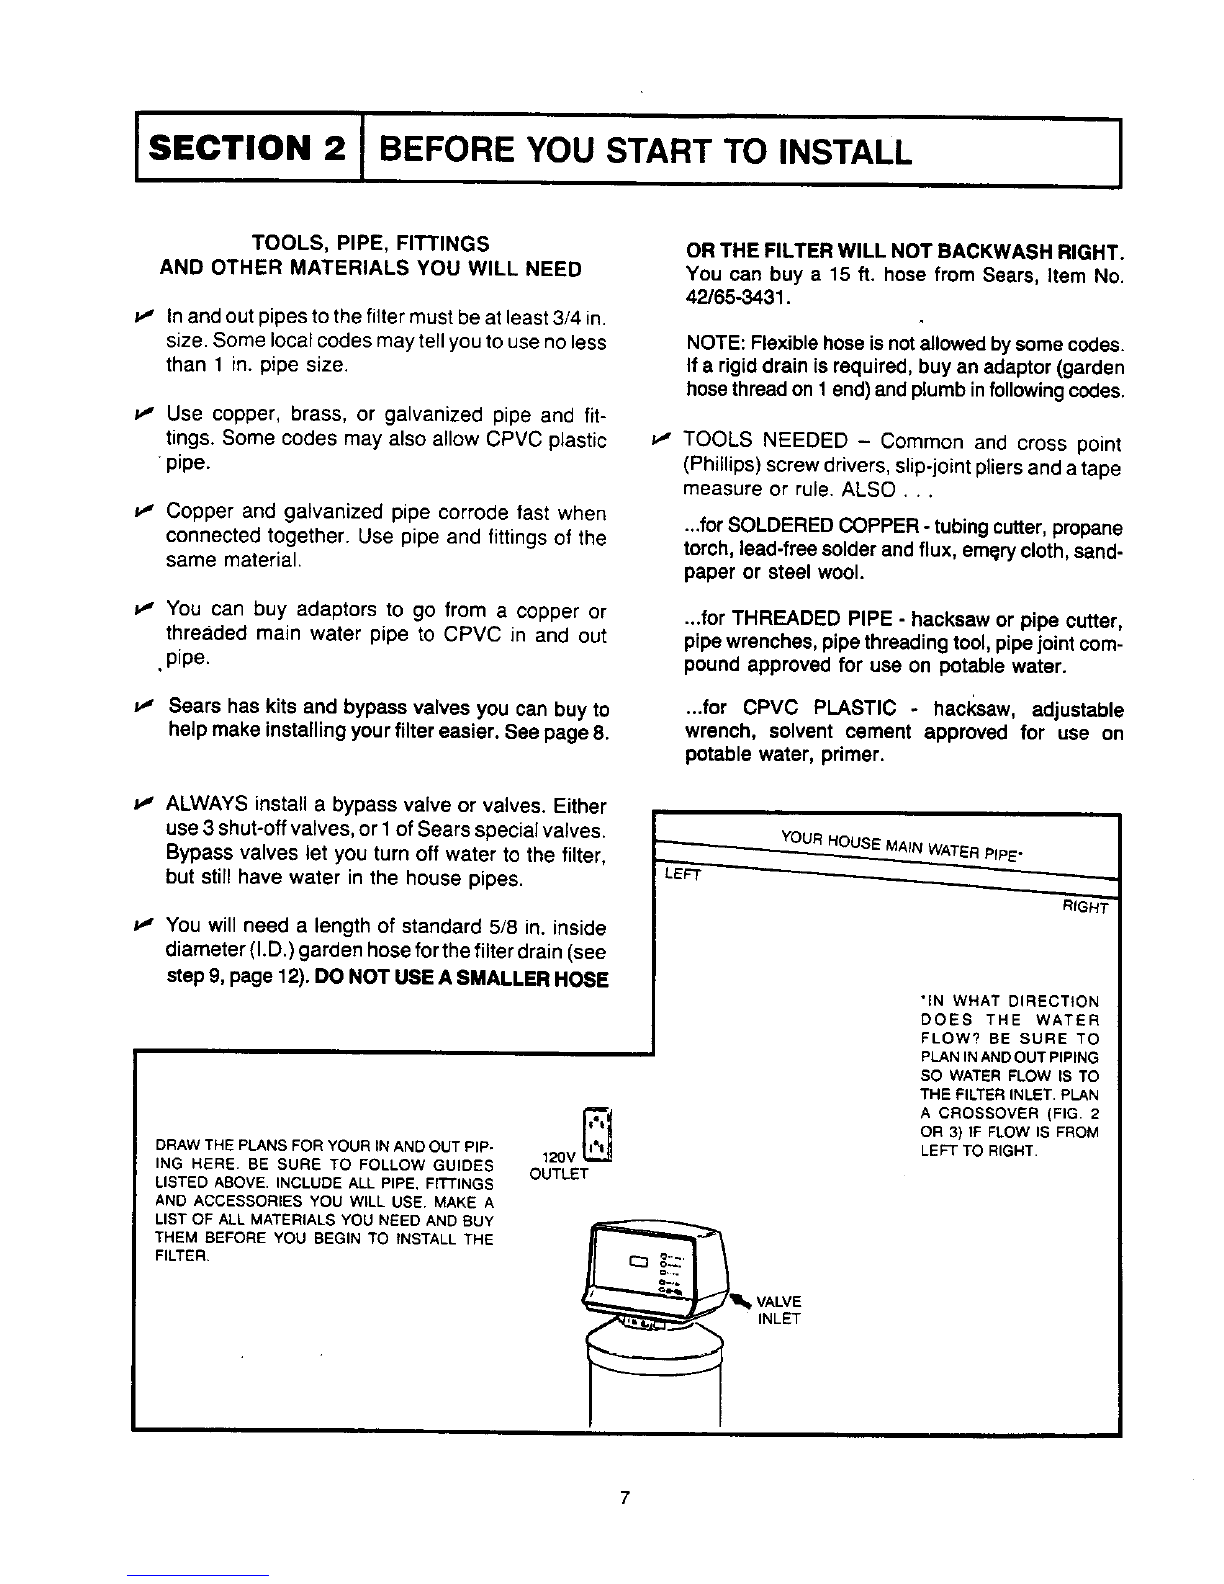
PLAN HOW TO INSTALL YOUR FILTER
You must firstdecide howto run in and out pipesto the
filter. Look at your house main water pipe at the point
you will connect the filter. Is the pipe soldered copper,
glued plastic, orthreaded galvanized or brass? What is
the pipe size?What kind of pipe and fittings is it easiest
for you to work with, and what tools do you have?
Now lookat the common plans for in and out piping on
page 8. SeLectthe drawingbest for you and use it as a
guide to plan what materials you will need, As you plan
yourin and out piping, keep in mindthe folk)wingcheck
list. Then get all the materials you will need before you
start.
6
ISECTION 2 I BEFORE YOU START TO INSTALL I
TOOLS, PIPE, FITTINGS
AND OTHER MATERIALS YOU WILL NEED
In and out pipes to the filter must be at least 3/4 in.
size. Some local codes may tell you to use no less
than 1 in. pipe size.
Use copper, brass, or galvanized pipe and fit-
tings. Some codes may also allow CPVC plastic
pipe.
t,_ Copper and galvanized pipe corrode fast when
connected together. Use pipe and fittings of the
same material.
You can buy adaptors to go from a copper or
threaded main water pipe to CPVC in and out
•pipe.
v,' Sears has kits and bypass valves you can buy to
help make installing your filter easier• See page 8.
v" ALWAYS install a bypass valve or valves. Either
use 3 shut-off valves, or 1of Sears special valves.
Bypass valves let you turn off water to the filter,
but still have water in the house pipes.
v," You will need alength of standard 5/8 in. inside
diameter (I.D.) garden hose for the filter drain (see
step 9, page 12). DO NOT USE A SMALLER HOSE
DRAW THE PLANS FOR YOUR IN AND OUT PIP-
ING HERE. BE SURE TO FOLLOW GUIDES
LISTED ABOVE. INCLUDE ALL PIPE, FITTINGS
AND ACCESSORIES YOU WILL USE. MAKE A
LIST OF ALL MATERIALS YOU NEED AND BUY
THEM BEFORE YOU BEGIN TO INSTALL THE
FILTER.
;=={,
1'20V
OUTLET
p,
OR THE FILTER WILL NOT BACKWASH RIGHT.
You can buy e 15 ft. hose from Sears, Item No.
42/65-3431.
NOTE: Flexible hose isnot allowed by some codes.
If arigid drain isrequired, buy an adaptor (garden
hose thread on 1 end) and plumb in following codes.
TOOLS NEEDED - Common and cross point
(Phillips) screw drivers, slip-joint pliers and a tape
measure or rule. ALSO...
...forSOLDERED COPPER -tubingcutter, propane
torch, lead-free solder and flux, emery cloth, sand-
paper or steel wool.
...for THREADED PIPE - hacksaw or pipe cutter,
pipe wrenches, pipe threading tool, pipe joint com-
pound approved for use on potable water.
...for CPVC PLASTIC - hacl_saw, adjustable
wrench, solvent cement approved for use on
potable water, primer.
--..........____. YOUR HOUSE MAIN WATER PIPE"
*IN WHAT DIRECTION
DOES THE WATER
FLOW? BE SURE TO
PLAN IN AND OUT PIPING
SO WATER FLOW IS TO
THE FILTER INLET, PLAN
A CROSSOVER (FIG, 2
OR 3) IF FLOW IS FROM
LEFT TO RIGHT,
VALVE
INLET
ISECTION 2 JPLANS FOR IN AND OUT PIPES TO FILTER I
SOLDERED COPPER CONNECTION
{_/, IN. SHOWN)
IN
INLET
VALVE
OUT
PUSH, BDI NOTINCLUDED
I
BUY FROM SEARS .
FOR BYPASS _J_,_._ pus/.I IN_lOB
Bypass Valve S_R .A/_D
Sears Item No. vtc_
47./65-3436
OUTLET
VALVE
for SERVICE
Open the inlet and outlet valves
Close the bypass valve
tot BYPASS
Close the inlet and outlet valves
Open the bypass valve
INOT INCLUDEDBUY FROM SEARS
Bypass Vtdve
Sears Item No.
42/65-3437
connecL_
directly to valve
inlet and outlet
NOTE: Flexible connec-
tors am not allowed in all
areas, Check your local
plumbing codes,
NOTINCLUDED
BUY FROM SEARS
Flexible
Connectors
Sears Item No.
42/65-3440
IPULL STEM OUTWARD
FOR SERVICE
PUSH STEMINWARD
FOR BYPASS
THREADED PIPE CONNECTION
(3/4IN. SHOWN)
i
OUTLET VALVE C
OUT
BYPASS VALVE
F'-'-WATER
I INLET VALVE
Union (2)
_" Reducer (21
CROSS-OVER
USE IF WATER SUPPLY
IS FROM "II"IE LEFT
NOTE: Flexibleconnectorsere
not allowed in all areas. Check
your localplumbing codes.
NOT tNCLUOED
BUY FROM SEARS
Fh_xitde
Connectors
Sears Item No
42/65-3440
II
_J NOT INCLUDED 7
BUY FROM SEARS
connects FBypass Valve
directly to valve Sears Item No.
inlet and outlet 42/65-3437
ISECTION 3 ISTEP BY STEP GUIDES TO INSTALL
Close the shut-off valve on the house main water
•I. pipe, near the water meter or pressure tank, to
turn off the water.
r-_. Shut off the gas or electric supply to the water
heater.
• 3. Open the highest and lowest water faucets in
your house to let water drain from the pipes.
Close faucets after water has drained.
Shutoff Shutofl Pressure
Valve Valve Tank
Meter Pump I'
Gas
Valve
Electrical
Panel
Take all the small parts from the parts bag and
4. lay out neatly where you can easily see and get
to them as they are needud.
NOTE: The inlet screen is not used on the clarifying
filter, and can be discarded.
SMALL PARTS BAG ITEMS
(_) INLET _'_ _NLET-OUTLET
SCREEN _ADAPTOR (2) CLIP (2)
(-_ WASHER OR
O _J GASKET (2)
GROUND
CLAMP (2) _ I] |NLET.OUTLET
___________ TUBE (2)
TRANSFORMER
_INL_r-OUTLE¢
_ _ NUT (2)
® _ GROUNDWIRE,
_, Q= SCREWS AND NUTS
5, INSTALL INLET AND OUTLET ADAPTORS OR
SEARS BYPASS VALVE, ITEM NO. 42/65-3437.
NOTE: If you will install the bypass valve, the adap-
tors are not used. If you do not install the bypass
valve, you must use the adaptors.
am INLET AND OUTLET ADAPTORS (Adaptors
and clips are small parts bag items.) - Push the
adaptors into the valve inlet and outlet ports
(FIG. 5 and 7) as far as they will go. Both adap-
tors are the same and fit either valve port. SNAP
THE 2 LARGE HOLDING CLIPS INTO PLACE,
FROM THE TOP DOWN AS SHOWN. BE SURE
THEY SNAP FIRMLY INTO PLACE, SO THE
ADAPTORS WILL NOT PULL OUT...GO TO
STEP 6.
INSTALLING INLET AND OUTLET
ADAPTORS OR BYPASS VALVE
Clips (2)
Adaptors
SEALS //4
PLACED tN OR
ONLY. CLIP SNAPS P/
INTO INNER GROOVES
(SEE FIG. 7)
9
ISECTION 3 STEP BY STEP GUIDES TO INSTALL I
BYPASS VALVE ITEM NO. 42/65-3437 -If not
L
D. already done, put a light coating ofsiliconegrease
or Vaseline on the bypass valve o-rings.
Push the bypass valve into the filter valve as far as
it will go (FIG. 5, 6 and 7). SNAP THE 2 LARGE
HOLDING CLIPS INTO PLACE, FROM THE TOP
DOWN AS SHOWN. BE SURE THEY SNAP FIRMLY
IN PLACE, SO THE BYPASS VALVE WILL NOT
PULL OUT. GO TO STEP 7.
IN
TURN BYPASS VALVE
UPStDF.-DOWN TO
CONNECT TO FLOOR
LEVEL PLUMBING
SIDE VIEW
/_-_CLIP
END VIEW
Valve Body
|ntet or Out_et Of
Bypass Venire
(Push all the way in)
6, INSTALLING 3 VALVE BYPASS, OR SEARS
BYPASS VALVE, ITEM NO. 42/65 3436, AND
PIPES (FIG. 8).
Cut the house main water pipe where you wilt
a, connect the filter. Loosely put together pipe, fit-
tings, and the 3 valves or Sears special bypass
valve. Place valve(s) within easy reach.
IMPORTANT: WHEN LOOKING AT THE FRONT OF
THE FILTER, THE INLET IS ON THE RIGHT SIDE.
IF WATER IN YOUR HOUSE MAIN WATER PIPE
RUNS FROM LEFT TO RIGHT, BE SU RE TO USE A
_CROSS-OVER" AS SHOWN IN FIG. 2 AND 3,
PAGE 8.
INSTALLING BYPASS VALVE
ITEM NO. 42/65-3436, OR
3-VALVE BYPASS
SINGLE VALVE BYPASS
Filter
3-VALVE BYPASS
FiRer
inlet
If all pipe, fittings and valves fit together good,
b, tighten all threaded joints (use pipe dope on
outside threads), or solder atl joints following the
soldering tips on page 20.
10