Seben CO2 Monitor 1200P W User manual

CO2 MONITOR 1200P
Instruction Manual
Reproduction of part or all of the contents of this document in any form is expressly
prohibited other than for individual use only. Subject to modifications and errors.
All text, images and labels are property of nimax GmbH.
(c) nimax GmbH

1
Table of contents
First steps ............................................................................................ 2
Packing list .......................................................................................... 2
Functions at a glance .......................................................................... 2
Overview .............................................................................................. 3
Operation and settings........................................................................ 4
Instruction Manual............................................................................... 4
LCD monitor ........................................................................................ 5
Trend chart display ............................................................................. 6
Max/Min ................................................................................................ 7
Functions in the main menu ............................................................... 8
Specifications .................................................................................... 13
Annex ................................................................................................. 15
(c) nimax GmbH

2
First steps
Thank you for your purchase!
This product can be used to monitor the CO2 concentration, relative humidity, temperature
and room air quality.
Packing list
CO2 monitor unit
USB cable for power supply
User manual
Mains adapter
Functions at a glance
Large display
Functions of the push-buttons
15° angled construction for easy reading
Low-drift NDIR sensor with long service life
Acoustic alarm
Diagram with variable time zoom levels
CO2/RH/temperature monitor tracer
Auto calibration and manual calibration
Max/Min value display over a set time
(c) nimax GmbH

3
2 1
7
8
9
10
3
4
5
11
6
12
13
14
15
16
Overview
Monitor sketch and component list
Item Description Item Description
1
Front side
9
Good value
2
LCD
10
Low value
3
button
11
USB port
4
button
12 Hole for wall mounting
5
button
13
Hole for screws
6
button
14
Buzzer grille
7 Operating display
15
Label
8
High value
16 Holes for sensors
(c) nimax GmbH
4
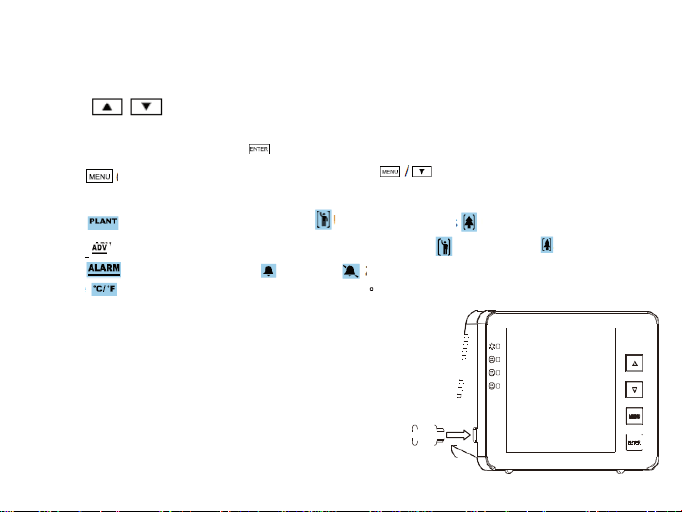
Operation and settings
- Use the USB cable supplied to connect up the device. The device is ready for operation as
soon as the countdown reaches zero. See p. 3.
- Press to switch between time axis and CO2/RH/TEMP. The trend chart shows
the recorded values over time for each of the three parameters. See p. 5.
- Reset to factory settings: Hold pressed for 3 seconds until an acoustic signal sounds.
- Press once to display the main menu. Press to select the desired
function. See p. 7.
- Press to switch between Persons and Plants mode .See p. 8.
- Press to change the high/low alarm limits for persons and plants .See p. 11.
- Press to switch from loud to mute . See p. 8.
- Press to select °C or °F for the temperature display. See p. 11.
Instruction Manual
1. Plug in the device using the USB cable supplied as shown
on the right.
2. After connection, the operating display and the 3 LEDs
flash in turn.
3. The main display shows a countdown. You can use the
product as soon as the countdown has reached zero.
NO CALIBRATION necessary.
(c) nimax GmbH

5
LCD monitor
Item
Name
Item
Name
17
CO2/RH/TEMP chart 23
Plants mode
18
Max. value of the chart 24 Persons mode
19
Min. value of the chart 25 Acoustic alarm ON/OFF
20
RH (relative humidity) 26 CO2 value in ppm
21
TEMP (Temperature in °C / °F)
27
Displays the timeline of the
chart
22 Main menu
(c) nimax GmbH

6
Trend chart display
The trend chart displays the measured values to date for each of the three parameters
(CO2/RH/Temp). There are 4 modes that can be selected with the button: CO2,
TEMP, RH and “Cycle symbol” (-> alternates automatically between CO2/Temp/RH).
Press to switch between the available zoom levels for each parameter
(minute/hour/day/week)
Press
Press
Press
Press
Press
Press
Press
Press
(c) nimax GmbH

7
The available zoom levels for all the parameters CO2/RH/Temp and the increments in the
different levels can be seen in the table below:
Zoom level (time interval) Time per
increment
1M (minute) 5 sec/increment
1H (hour)
5 m/increment
1D (day)
2 h/increment
1W (week)
0.5 d/increment
Max/Min
Two numerical indicators can be seen in the top right-hand corner of the display:
MAX and MIN. When the zoom level is changed, the MAX and MIN values reflect the highest
and lowest values in the table for the selected parameter (CO2, RH
and Temp).
(c) nimax GmbH
8
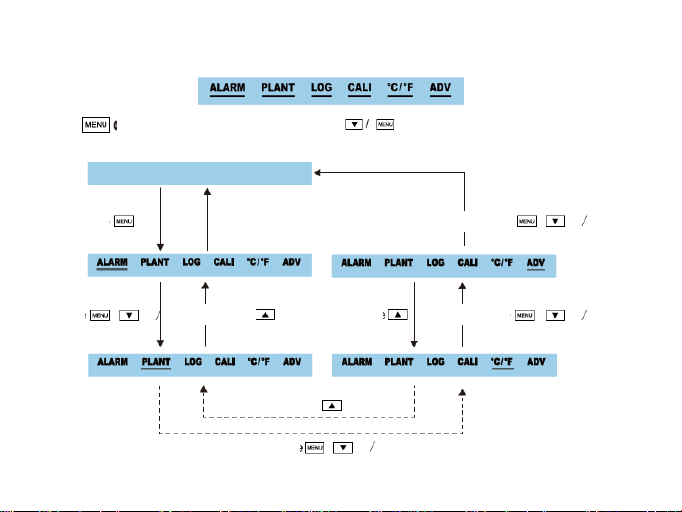
Functions in the main menu
Press to display the main menu. Press to change the selection;
an underlined flashing cursor indicates the current selection.
Press
Press
Press
Press
Press
Press
Press
Press
No button pressed within 1 minute
(c) nimax GmbH

9
To select a function, press while it is underlined by the flashing cursor. Note that if no
button is pressed within 1 minute, the main menu disappears and the device returns to
normal mode.
Function Description
ALARM
If ALARM is displayed, an acoustic alarm will sound as soon as thee CO2 value
reaches the high or low limit. means mute
PLANT
0 is the default setting for Persons mode. The default alarms for low and high values
lie at 800 and 1200 ppm. Press “ADV” to change these settings, if necessary. To
activate Plants mode, select one of the numbers 1-9 by pressing . A
description of the numbers and the respective plant types can be found on p. 14.
Press
Press
Press
(Main menu)
(Main menu)
Press
Press
Press
Press
Press
Press
Press
Press
Press
Press
Press
Press
Press
Press
Main
menu
(c) nimax GmbH
10
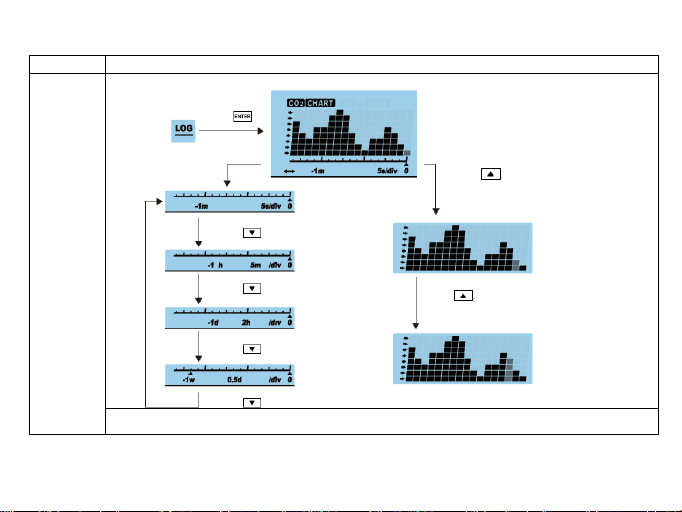
Function Description
LOG
This function allows you to view historical data sets.
Press
Press
Press
Press
Press
Press , the 2nd column on the
right now flashes
Press , the 3rd column on the
right now flashes, etc.
(c) nimax GmbH

11
Function Description
CALI
Place the device in front of an open window or outdoors for at least 20 minutes
before calibration in order to achieve an atmosphere with 400 ppm CO2. Wait
until the CO2 measured value is stable, then follow the steps above for
calibration. After calibration, wait 10 minutes before starting normal operation.
°C / °F
This function allows you to switch between Celsius (°C) and Fahrenheit (°F) for
the temperature display.
Press
Hold pressed for 3 seconds
until an acoustic signal sounds
CO2 level display
(Temperature display)
Press to go back
Press
Press
Press
Press
Press
Main menu
(c) nimax GmbH

12
Function Description
ADV
Use this function to set high and low alarm limits for Persons mode (0) and the
first option in Plants mode (1). The high and low alarm limits for the options 2-9 in
Plants mode cannot be set.
See details on page 14. (Annex)
Press
Press
Press
Press
Press
Press
Press
Press
Press
Press
(c) nimax GmbH
13
Specifications
Typical test conditions: ambient temperature: 23 +- 3°C, RH=50%~70%, altitude= 0~10 metres
Measurement
Specifications
Operating temperature 32°F ~ 122°F (0°C ~ 50°C)
Storage temperature -4°F ~ 140°F (-20°C ~ 60°C)
Relative humidity 0-95% (non-condensing)
CO2 measurement
Measuring range 0-5000 ppm
Display resolution 1 ppm (0-1000); 5 ppm (1000-2000); 10 ppm (>2000)
Precision 0~3000 ppm: ± 50 ppm ± 5% of the reading (take the max. value)
(>3000) ppm: ± 7% of the reading
Repetition accuracy 20 ppm at 400 ppm
Temperature
compensation
±0.1% of the reading per °C ±2 ppm per °C, referenced to 25°C
Reaction time < 2 min for 63% of the level changes and <4.6 min for 90%
Warm-up time < 20 seconds
(c) nimax GmbH

14
Temperature measurement
Operating temperature 32°F ~ 195°F (0°C ~ 90°C)
Display resolution 0.1°F (0.1°C)
Reaction time < 20 minutes (63%)
RH (relative humidity) measurement
Measuring range 5 ~ 95%
Precision ±5%
Display resolution 1% main menu display,0.1% max/min display
Operating voltage 5±0.25 V DC
Dimensions 120*90*35 mm
Weight
170 g (6.0 oz) (without AC adapter)
(c) nimax GmbH

15
A n n e x
No. Meaning Value for high/low alarm Variable
0 Persons mode 800-1200 ppm Yes
1 User-defined plants
600-900 ppm
Yes
2 Beans
600-900 ppm
No
3 Chillies
800-1000 ppm
No
4 Cucumbers
1000-1500 ppm
No
5 Grapes
800-1400 ppm
No
6 Orchids
800-1400 ppm
No
7 Potatoes
1200-1800 ppm
No
8 Strawberries
800-1200 ppm
No
9 Tomatoes
800-1200 ppm
No
(c) nimax GmbH
This manual suits for next models
3
Table of contents
Popular Measuring Instrument manuals by other brands


Keba
Keba KeContact E10 quick guide

Simpson
Simpson Minilab PVF-C operating instructions

PRECISION DIGITAL
PRECISION DIGITAL PD6060 instruction manual

Spirax Sarco
Spirax Sarco CP32 Installation and maintenance instructions

Greyline Instruments
Greyline Instruments TTFM 1.0 user guide

Dover
Dover TWG Tulsa Winch Intelliguard II user manual