Secufirst LCA230 User manual

Wireless Lighting Camera
Installation and Operating Instructions
Model: LCA230
Version 1.1
PLEASE READ THESE INSTRUCTIONS CAREFULLY BEFORE USING THIS PRODUCT
AND KEEP THIS MANUAL FOR FUTURE REFERENCE.
TM
Always safe

1
CONTENTS
OVERVIEW .......................................................................................................2
Please Read Before You Start ...................................................................................3
Wireless Device Operating Range .............................................................................3
Important Safety Precautions .....................................................................................3
KIT CONTENT ..................................................................................................5
SAFETY AND INSTALLATION TIPS .................................................................6
PRODUCT OVERVIEW .....................................................................................7
INSTALL YOUR DEIVCE ..................................................................................8
ETHERNET CONNECTION (OPTIONAL) .........................................................8
CAMERA SETUP INSTRUCTION .....................................................................9
APP DOWNLOAD AND INSTALL ...................................................................12
APP SETUP ....................................................................................................12
Wired Setup .............................................................................................................12
Wireless Setup ........................................................................................................14
Home Page / Device List .........................................................................................16
PIN Lock ..................................................................................................................17
Live View .................................................................................................................18
Edit Setting ..............................................................................................................19
Basic Setting ...........................................................................................................20
Advance Setting .......................................................................................................21
E-mail Setting ..........................................................................................................26
Video Setting ...........................................................................................................27
Sensitivity Setting ....................................................................................................28
Push Notify Settings ................................................................................................30
Lighting Auto Mode ..................................................................................................30
SD Cad Settings ......................................................................................................31
About Device ...........................................................................................................32
Event .......................................................................................................................33
Play Back ................................................................................................................35
TROUBLE SHOOTING ..................................................................................36
PRODUCTION SPECIFICATION ....................................................................38
STORAGE MEDIA MANAGEMENT ...............................................................39
TM
Always safe

2
OVERVIEW
The outdoor camera which is equipped with powerful LED light illuminates. The light can be
switched on manually in the app or set to switch on when motion is detected. You can also control
the camera via the app remotely from anywhere.
* Make sure the camera is operating with sufficient internet bandwidth, 1Mbps (upload/
download speed) is suggested.
* For best performance, the smart-mobile device(s) need to be on Wi-Fi or 4G mobile network
in order to receive maximum download speed.
* When the internet transmission is low, the app will automatically switch to Relay
Mode:
‧By adjusting to “Better Streaming” in the system setting section may improve the
APP performance.
* Your internet bandwidth is limited. For best performance, to avoid more than two users
connecting to the camera simultaneously.
*Make sure your smart-mobile device(s) is equipped with up-to-date technology, 1.5GHz dual
core processor or equivalent is suggested.
* If the signal strength of your Wi-Fi router is weak, there are several ways to improve
transmission:
‧Change router/camera relative position to receive better signal.
‧Use wire Ethernet cable on the camera to establish connection between the camera
and your router.
‧Use Wi-Fi repeater/extender to maximize the service range of your Wi-Fi route.
‧Switch your router to 11b/11g mode in order to improve router service range.
* Please make sure the memory card used is CLASS10 rated.
TM
Always safe

3
IMPORTANT SAFETY PRECAUTIONS
Damages caused by non-compliance with this operating manual will void the warranty! We will
not assume any liability for damages to items or persons caused by improper handling or non-
compliance with the safety notices! Any warranty claim will be null and void in such cases.
1. Do not drop, puncture or disassemble the camera; otherwise the warranty will be voided.
2. Avoid all contact with water, and dry hands before using.
3. Never tug on the power cords. Use the plug to unplug it from the wall outlet.
4. Do not expose the camera to high temperature or leave it in direct sunlight. Doing so may
damage the camera or cause camera temporary malfunction.
5. Use the devices with care. Avoid pressing hard on the camera body.
6. For your own safety, avoid using the camera or power off the camera when there is a storm or
lightning.
7. Remove the power adapter during long periods between usages.
8. Use only the accessories and power adapters supplied by the manufacturer.
9. To meet the regulations pertaining to parental responsibility, keep the devices out of the reach of
infants.
10. Check power cables, do not get crushed or damaged by sharp edges whenever the devices are
in operation.
PLEASE READ BEFORE YOU START
Always use discretion when installing CCTV equipment, especially when there is perceived policy.
Enquire relevant local regulations applicable to the lawful installation of video recording/surveillance.
Third party consent may be required.
WIRELESS DEVICES OPERATING RANGE
Ensure the signal reception viewed from the wireless camera(s) is the best possible reception
between the camera(s) and the Wi-Fi router. If necessary, reduce the distance between the
camera(s) and the Wi-Fi router to improve overall system performance. Wireless Color Camera
Recordable CCTV Kit operating on a secure digital 2.4GHz frequency which could greatly reduce
interference from product such as wireless routers, cordless phones or microwave ovens.
KG
KG
KG
TM
Always safe

4
FCC/CE WARNING
This equipment has been tested and found to comply with limits for a Class B digital device,
pursuant to Part 15 of the FCC rules and ETSI(EN) 300328. These limits are designed to provide
reasonable protection against harmful interference in residential installations. This equipment
generates, uses, and can radiate radio frequency energy, and if not installed and used in
accordance with the instructions, may cause harmful interference to radio communications.
However, there is no guarantee that interference will not occur in a particular installation. If this
equipment does interference to radio or television equipment reception, which can be determined
by turning the equipment off and on, the user is encouraged to try to correct the interference by one
or more of the following measures:
•Reorient or relocate the receiving antenna.
•Move the equipment away from the receiver.
•Plug the equipment into an outlet on a circuit different from that to which the receiver is
connected.
•Consult the dealer or an experienced radio/television technician for additional suggestions.
You are cautioned that any change or modications to the equipment not expressly approved by
the party responsible for compliance could void your authority to operate such equipment.
DISPOSAL
If the camera system no longer functions or can no longer be repaired, it must be disposed of
according to the valid statutory regulations.
Disposal of spent batteries/accumulators:
You are required by law (Battery Ordinance) to return all spent batteries and
accumulators. Disposing of spent batteries/accumulators with common household waste is
prohibited! Batteries/accumulators that contain hazardous substances are marked with the symbols
on the side. These symbols indicate that it is prohibited to dispose of these batteries/accumulators
in the household waste. The abbreviations for the respective heavy metals are: Cd=cadmium,
Hg=mercury, Pb=lead. You can return spent batteries and accumulators that can no longer be
charged to the designated collection points in your community, outlets or wherever batteries or
accumulators are sold. Following these instructions will allow you to fulll the legal requirements
and contribute to the protection of our environment!
FCC Compliance Statement: This
device complies with Part 15 of the
FCC rules. Operation is subjected to
the following two conditions: (1) this
device may not cause harmful interference, and (2) this
device must accept any interference received, including
interference that may cause undesired operation.
Products with CE Marking comply
with EMC Directive (2004/108/EC);
Low Voltag e Di rective (2 006/95/
EC); RED(2 0 1 4 / 5 3 / E U ) ; R O H S
Directive (2011/65/EU) issued by the Commission
of the European Community. Compliance with
these directives implies conformity to the following
European Norms:
EMC: EN 301 489
LVD: EN 60950
Radio: EN 300 328
TM
Always safe

5
KIT CONTENT
For best system performance:
iOS: iPhone6 / iPad2 / Mini iPad with iOS 10.0 or above.
Android: 1.5G dual core processor dual core procesor with 1G RAM or above.
Storage: Class 10 memory card.
Bandwidth: 1Mbps or above upload/download speed suggested.
Tools Required: (not included)
‧Electric drill
‧5mm masonry drill bit
‧15mm masonry drill bit
‧No. 2 Philips screwdriver
‧Level (recommended tool)
x1
HexKey
x1
QuickStart Guide
x1
Positioning CardScrewPack
x1
Bcacker
x1
UP
WAPP-LSE
x1
Antenna
x1
x1
ResetPin
TM
Always safe

6
SAFETY AND INSTALLATION TIPS
Do not attempt to open the units with the power adaptor plug connected to avoid any risk of
personal injury.
When installing CCTV camera(s), always follow manufacturer's advice when using power tools,
steps, ladders, etc. and wear suitable protective equipment (e.g. safety goggles) when drilling
holes. Before drilling holes through walls, check for hidden electricity cables and water pipes. The
use of cable/pipe detector is advisable.
To avoid exposing any cameras to extreme weather conditions (e.g., under a gutter which is prone
to any water leaks). When installing any cameras with this unit, to use cable conduit to protect any
video/power extension cables from being exposed externally and to prevent/reduce the chances of
the cables being tampered with. After drilling any hole though an external wall for a cable, ensure
the hole is sealed up around the cable using a sealant to prevent drafts.
To prevent a re or electrical shock hazard, do not attempt to open the housing while the unit is
exposed to rain, water or wet conditions. There are no user serviceable parts inside. Refer servicing
to qualied service personnel. Avoid pointing the camera(s) directly at the sun or any bushes, tree
branches or moving objects that might unnecessarily cause the camera to record.
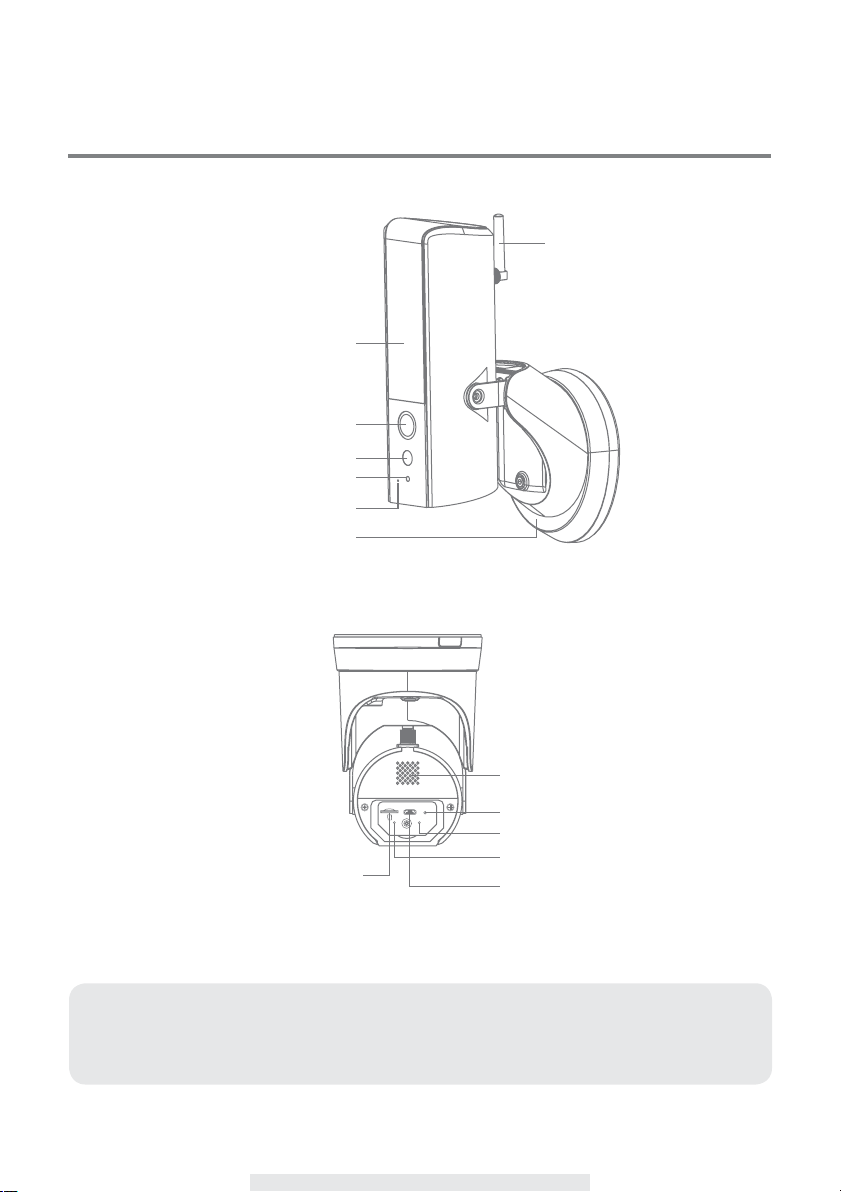
7
PRODUCT OVERVIEW
Note:
Press the reset button for 5 Seconds, until the LED starts blinking. The system will restore
to factory default and you may set up the camera again.
FHD Camera
LED Light
Antenna
Motion Sensor
Light Sensor
Wall-Mount Bracket
Microphone
Power LEDIndicator
LinkLEDIndicator
MicroUSB Port for
“only” Wi-Fisetup
ResetButton
Speaker
RESET USB
Memory Card
Slot

8
INSTALL YOUR DEIVCE
ETHERNET CONNECTION (OPTIONAL)
For optimal performance install the lighting camera at a hight between 2.5 and 4 meters.
Disconnect power at fuse or circuit breaker before proceeding to the installtion.
(1) Follow the below illustration to connect the ethernet cable if not using the Wi-Fi connection.
Motion Detection 90°
2.5mHeight
I/OPinConnector
RX+/RX-/TX+/TX-:EthernetCableI/O*
*Ethernetcablenotincludedinthepackage.
1
2
3
6
UP
1
2
3
6
UP

9
(1) Please make sure you have turn off the power from the breaker before this step.
(2) A) Make a small hole in the rubber pad to have AC power wire run into the junction box base.
B) Lead the wires to the front of the base, screw the wires rmly to the terminal blocks.
Put the terminal blocks back into the base properly to protect it against water.
CAMERA SETUP INSTRUCTION
off
A B
2
OK
UP

10
(3) Fasten the junction box to the wall. Make sure that the UP sign is at the top.
(4) Connect the power cable to the junction box.
(5) Place the device on the the junction box.
(6) Fasten the screw by using the philipps screw driver.
UP
UP
3
56
4
Connectto here
TM
Always safe

11
(7) Adjust the tilting angle of camera by adjusting the screws on both side.
(8) Lossen the screw on the back using hex key provided to adjust the pan angle. Screw it rmly
when you done.
(9) Once completed, turn on the power from the breaker and the lighting camera will power up.
Wait for 1 minute for camera to connet to internet.
(10) The LED light will be at its full brightness when initial start due to the regulation. You could
adjust the brightness to prefer level once the camera has setup completed.
(11) It is recommended to install the lighting camera at the at surface under the eave or position to
have better waterproof protection.
7
9 10
11
on
8
TM
Always safe

12
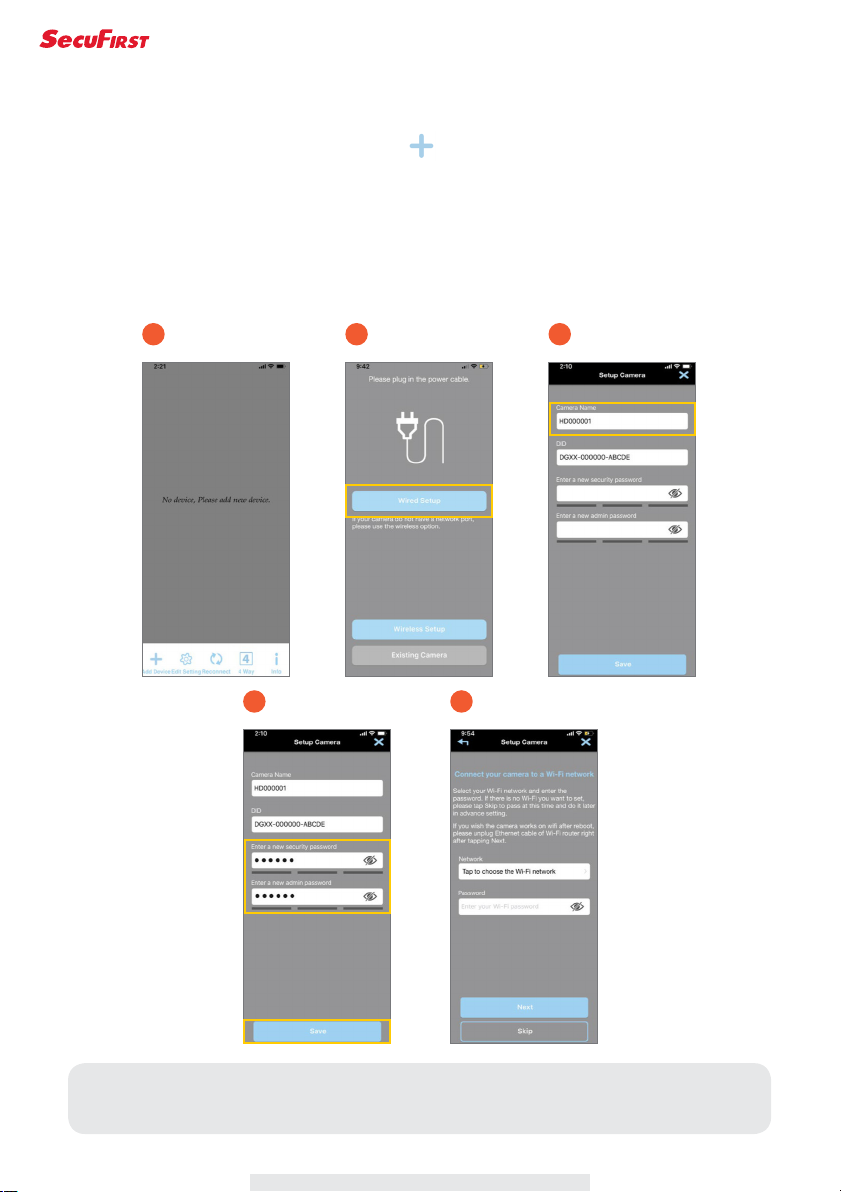
APP DOWNLOAD AND INSTALL
Please download and install the "SecuFirst HD” APP to your device.
For iOS For Android
Wired Setup
Please connect Lighting camera to your home router by included Ethernet cable.
I/OPin Connector
RX+/RX-/TX+/TX-:EthernetCable I/O*
*Ethernet cablenot includedinthepackage.
1
2
3
6
UP
1
2
3
6
UP
Wi-Fi Hotspot
APP SETUP
TM
Always safe
13
Note:
Device is only able to connect to 2.4GHz Wi-Fi router; 5GHz Wi-Fi router is NOT supported.
Setup Steps
1. Launch the “SecuFirst HD” App. Press “ ” to add your device in list.
2. Select “Wired Setup”, It will search and obtain your device ID information.
3. Name your new device.
4. Enter your own new security and admin password, then press “Save”.
5. If you would like to connect your device to home Wi-Fi router, please select your home Wi-Fi
SSID and enter the password, then press “Next”. If you would not, please press “Skip” and
keep your Ethernet cable being plugged.
1
4 5
2 3
TM
Always safe

14
Wireless Setup
The device broadcasts “HD-xxxxxxxx” as a hotspot. Please go to Wi-Fi setting page in your
mobile device, select the “HD-xxxxxxxx” and enter the default password “12345678”.
(iOS) (Android)
Wi-Fi Hotspot
TM
Always safe

15
Setup Steps
1. Launch the “SecuFirst HD” App. Press “ ” to add your device in list.
2. Select “Wireless Setup”, It will search and obtain your device ID information.
3. Name your new device.
4. Enter your own new security and admin password, then press “Save”.
5. If you would like to connect your device to home Wi-Fi router, please select your home Wi-Fi
SSID and enter the password.
1
4 5
2 3
Note:
Device is only able to connect to 2.4GHz Wi-Fi router; 5GHz Wi-Fi router is NOT supported.
TM
Always safe

16
Home Page / Device List
1. ADD Device: To add the new devices in list.
2. Edit Setting: To access “Setting”, “Delete” & “Event”.
3. Reconnect: Refresh connection of all the devices in list.
4. 4 Way: Quad-View for 4 cameras available in device list.
5. Info: Setup PIN Lock, APP version information.
12345
TM
Always safe

17
PIN Lock
1. Enable/ Disable PIN Lock: You will be required for entering PIN when you launch APP.
2. Enter your PIN Code: 4 digits number for setup your PIN.
1
2
Note:
If you forget your PIN, please remove your APP and reinstall it.
TM
Always safe

18
Live View
1. Live View
2. System Arm/Disarm
3. Light Brightness Adjust Bar
4. Light Mode On/Auto/Off
5. Snapshot: Tap to take snapshot of the live video. The captured snapshots will store in your
mobile device.
6. Mute/Unmute: Mute or unmute the live audio.
7. Record: Record a short video clip. Your video is automatically saved to the camera's internal
SD card memory.
8. Alarm: Manually trigger alarm.
9. Talk: Push and hold this icon for enabling Push-to-Talk function to speak through the
camera's speaker.
1
2
3
4
56 7 8 9
TM
Always safe

19
Edit Setting
1. Setting: Tap to access Basic and Advance setting, Please refer to “Basic & Advance
Setting” Section.
2. Delete: Tap to delete the device.
3. Event: Tap to review recording clips, please refer to “Event” section.
1 2 3
TM
Always safe
Table of contents
Other Secufirst Digital Camera manuals


